


This will be my build log for the Lady Nelson. My plan is to finish in short time as it is going to be a gift so hopefully I don't burn out and I do get it done on time. There will be some bashing done, mainly changing some of the kit wood to try and avoid some of the painting.
I started this yesterday so what you see today is what I have completed as of today. Total of seven hours worked so far including reading instructions and going over plans
I hope you enjoy and thanks for watching.


The grand box opening. As you can see there is not much so I do not anticipate this taking too long. They do include running and standing rigging, however, there are some sizes you need to blacken yourself. This will be part of the bashing . There are no markings on the billets so you need to use their plans to find the right pieces. So far they have had two of the bulkheads and the bow and stern filler pieces marked wrong in the plans. The wood strips are decent enough but I will most likely be replacing some of the outer layer of planking. They call the limewood strips 5 mm wide but they are actually 6.5 mm, more for your money I guess! The rest all looks good for a kit such as this.

The bulkheads all fit and there were no problems, they were a little loose so one has to be careful keeping them square.
For all you haters of mdf board this kit is not for you. Myself I love this stuff it is always straight and makes fairing the hull so much easier.
A word of caution, though, is to not get it wet as it will come apart. REALLY!! I am just so thankful my work area is not the bathtub or the public swimming pool

So be careful and do not get it wet, place your beer or beverage far enough away as not to cause a hazard.

Getting ready to bend the gunport strips. I give them a quick dip in water and then run them over the curling iron. In less than a minute they are done.


And here they are ready to apply

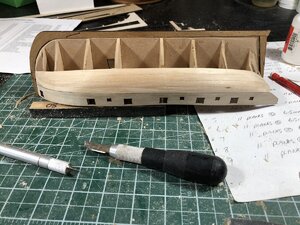
I forgot to take a picture but the false floor has been installed, it went in very easy with no alterations required.
The gunport sides have been glued in place. The upper parts of the bulkheads, above the deck, will be removed later on so minimal glue is used to ease in removal and clean up. Here I am just showing how I ran a bead of glue on the underside of the floor to help secure the gunport sides.

As I said I am doing this one fast, so I have started planking while the glue is drying on the gunport pieces. LOL
To save time on edge bending the planks I have soaked the planks. ALL planks are being tapered on both ends. To figure this out I measured the widest bulkhead(#5) and took that measurement and divided by 6.5(the width of the planks) and this came out to eleven, which is the number of planks required to cover the hull. For each other bulkhead I measured, then divided that number by eleven which gives me the width the plank needs to be at that specific bulkhead.
So at bulkhead two, first one at the bow, it measured 45 mm I then divide this by the number of planks required(11) and come out with 4 mm. This tells me the plank needs to be tapered to a width of 4 mm at this bulkhead. In doing this and checking periodically I should not require any stealers.

I got ahead of myself on that last picture. The explanation applies to this one

And here is where I am at now. Four strakes on both port and starboard sides of the hull. Off to the right you can see some of my calculations for tapering the planks.
Save final trimming at the stern until planking is completed

Here on the bow you can see on the left where I have the planks shaved right down to the bulkhead, this is required to get the second planking to fit properly. on the right hand side it may look rough but it is actually smooth, that is the layers of plywood you are seeing.
That is it for now, I need to get outside and cut about five acres of grass and get my garage cleaned up from building the battle station I just finished.
Take Care and Thanks for looking in
I started this yesterday so what you see today is what I have completed as of today. Total of seven hours worked so far including reading instructions and going over plans
I hope you enjoy and thanks for watching.
The grand box opening. As you can see there is not much so I do not anticipate this taking too long. They do include running and standing rigging, however, there are some sizes you need to blacken yourself. This will be part of the bashing
. There are no markings on the billets so you need to use their plans to find the right pieces. So far they have had two of the bulkheads and the bow and stern filler pieces marked wrong in the plans. The wood strips are decent enough but I will most likely be replacing some of the outer layer of planking. They call the limewood strips 5 mm wide but they are actually 6.5 mm, more for your money I guess! The rest all looks good for a kit such as this.The bulkheads all fit and there were no problems, they were a little loose so one has to be careful keeping them square.
For all you haters of mdf board this kit is not for you. Myself I love this stuff it is always straight and makes fairing the hull so much easier.
A word of caution, though, is to not get it wet as it will come apart. REALLY!! I am just so thankful my work area is not the bathtub or the public swimming pool
So be careful and do not get it wet, place your beer or beverage far enough away as not to cause a hazard.
Getting ready to bend the gunport strips. I give them a quick dip in water and then run them over the curling iron. In less than a minute they are done.
And here they are ready to apply
I forgot to take a picture but the false floor has been installed, it went in very easy with no alterations required.
The gunport sides have been glued in place. The upper parts of the bulkheads, above the deck, will be removed later on so minimal glue is used to ease in removal and clean up. Here I am just showing how I ran a bead of glue on the underside of the floor to help secure the gunport sides.
As I said I am doing this one fast, so I have started planking while the glue is drying on the gunport pieces. LOL
To save time on edge bending the planks I have soaked the planks. ALL planks are being tapered on both ends. To figure this out I measured the widest bulkhead(#5) and took that measurement and divided by 6.5(the width of the planks) and this came out to eleven, which is the number of planks required to cover the hull. For each other bulkhead I measured, then divided that number by eleven which gives me the width the plank needs to be at that specific bulkhead.
So at bulkhead two, first one at the bow, it measured 45 mm I then divide this by the number of planks required(11) and come out with 4 mm. This tells me the plank needs to be tapered to a width of 4 mm at this bulkhead. In doing this and checking periodically I should not require any stealers.
I got ahead of myself on that last picture. The explanation applies to this one
And here is where I am at now. Four strakes on both port and starboard sides of the hull. Off to the right you can see some of my calculations for tapering the planks.
Save final trimming at the stern until planking is completed
Here on the bow you can see on the left where I have the planks shaved right down to the bulkhead, this is required to get the second planking to fit properly. on the right hand side it may look rough but it is actually smooth, that is the layers of plywood you are seeing.
That is it for now, I need to get outside and cut about five acres of grass and get my garage cleaned up from building the battle station I just finished.
Take Care and Thanks for looking in


")


