-

Win a Free Custom Engraved Brass Coin!!!
As a way to introduce our brass coins to the community, we will raffle off a free coin during the month of August. Follow link ABOVE for instructions for entering.
-

PRE-ORDER SHIPS IN SCALE TODAY!
The beloved Ships in Scale Magazine is back and charting a new course for 2026!
Discover new skills, new techniques, and new inspirations in every issue.
NOTE THAT OUR FIRST ISSUE WILL BE JAN/FEB 2026
You are using an out of date browser. It may not display this or other websites correctly.
You should upgrade or use an alternative browser.
You should upgrade or use an alternative browser.
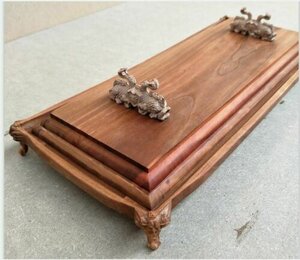
stand figurines
Whoa... I would CNC those instead of laser.... Are they hippocamp fish?
Hahaha.... not sure, perhaps they are whales.
Looks like the Detroit lean MikeI see your perspective... LOL... It is just a trick of the eye since the starboard side of the model has bulwarks and is more finished than the port side. It does look odd though in the photo!!
With the tail of a.... ah you guys know already 
BACK WHEN EVERYONE WAS YOUNGER.. IN 2015
Here are a few more details.
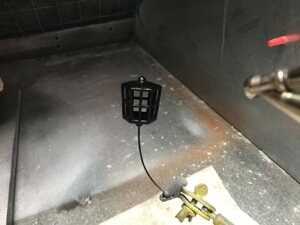
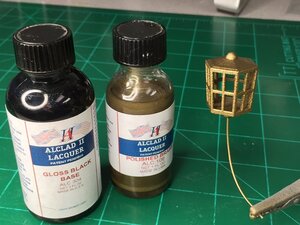
Alclad II Metalizer was airbrushed onto the 3D printed lantern. First a gloss black base, followed by the polished brass metalizer
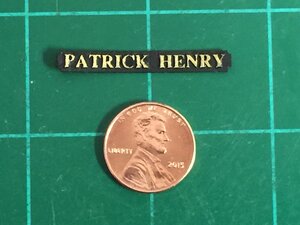
The ship's fictitious name was hand painted on the 3D printed placard
Binnacle. Simple, elegant - admiralty style
Here are a few more details.
Alclad II Metalizer was airbrushed onto the 3D printed lantern. First a gloss black base, followed by the polished brass metalizer


The ship's fictitious name was hand painted on the 3D printed placard

Binnacle. Simple, elegant - admiralty style

Last edited:
...with such a gorgeous stand, you don't really need a model. You just enjoy the stand!Mike,
what about cranking up your laser machine and making some decorative stand figurines of mythical fish like the picture below ?
IN AUGUST OF 2015 WE WERE NEARING COMPLETION OF THIS MODEL ....
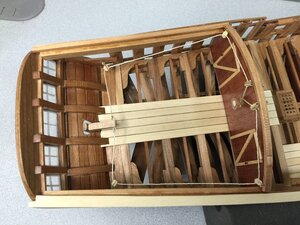
The rudder is a model in itself. About 6 hours into it so far and it's still not quite done.
Unlike all my previous ships, the rudder on this model actually operates.
The rudder comes up into the cabin where a tiller is attached to some simplified steering gear rigging.
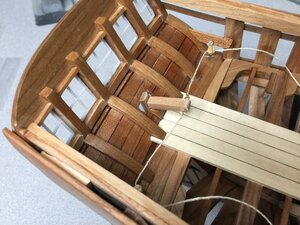
The practicum called for the tiller to be covered by a planked up box.
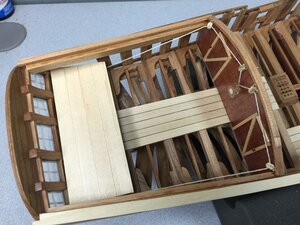
But I opted to leave the box off to better show off the tiller and steering gear rigging.
Keep in mind, this is an admiralty model and the steering gear is only intended to be a stylized representation and not historically accurate.
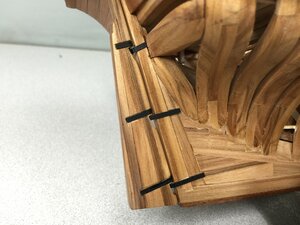
The rudder pintle are simulated with black craft paper.
The rudder is a model in itself. About 6 hours into it so far and it's still not quite done.

Unlike all my previous ships, the rudder on this model actually operates.
The rudder comes up into the cabin where a tiller is attached to some simplified steering gear rigging.

The practicum called for the tiller to be covered by a planked up box.

But I opted to leave the box off to better show off the tiller and steering gear rigging.
Keep in mind, this is an admiralty model and the steering gear is only intended to be a stylized representation and not historically accurate.

The rudder pintle are simulated with black craft paper.

That timber looks fabulous.
- Joined
- Apr 20, 2020
- Messages
- 6,256
- Points
- 738

IN AUGUST OF 2015 WE WERE NEARING COMPLETION OF THIS MODEL ....
The rudder is a model in itself. About 6 hours into it so far and it's still not quite done.
View attachment 171986
Unlike all my previous ships, the rudder on this model actually operates.
The rudder comes up into the cabin where a tiller is attached to some simplified steering gear rigging.
View attachment 171987
The practicum called for the tiller to be covered by a planked up box.
View attachment 171988
But I opted to leave the box off to better show off the tiller and steering gear rigging.
Keep in mind, this is an admiralty model and the steering gear is only intended to be a stylized representation and not historically accurate.
View attachment 171989
The rudder pintle are simulated with black craft paper.
View attachment 171990
Such a beautiful progres, I admire your professional skills
AUGUST 2015.....
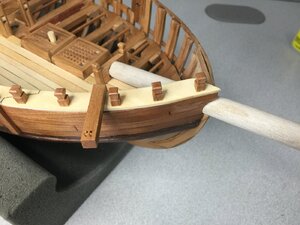
The bowsprit is basically just a dowel inserted into the bow and through the bowprit bitt.
Installed the arched beams on the rear cabin and just a few planks to represent the roof. The ships wheel is 3D printed and painted to closely match the wood. It actually turns and operates the rudder. Elmtree pumps and binnacle also installed.
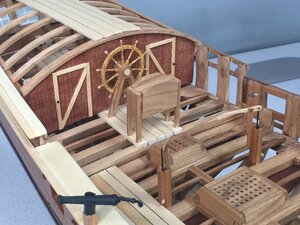
The windless is also another 3D printed part. Admiralty models are always nice with their minimal rigging.
It is looking like this model is very near completion.
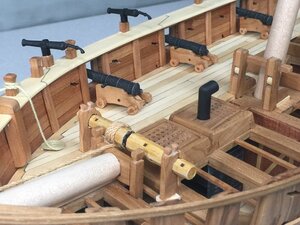
The bowsprit is basically just a dowel inserted into the bow and through the bowprit bitt.

Installed the arched beams on the rear cabin and just a few planks to represent the roof. The ships wheel is 3D printed and painted to closely match the wood. It actually turns and operates the rudder. Elmtree pumps and binnacle also installed.

The windless is also another 3D printed part. Admiralty models are always nice with their minimal rigging.
It is looking like this model is very near completion.

What type of scroll saw do you have? I bought an inexpensive one and it does not seem to have much support near the cutting part.THIS IS NOT FROM TODAY. IT IS FROM 2015
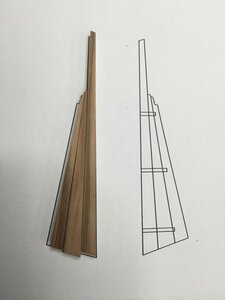
I've always found the Nibbing Strake to be challenging to make. But for this kit, it was very easy thanks to the printed templates provided. I just rubber cemented the templates to the provided strip wood and cut them out on my mini scroll saw. Over the years I have become very proficient with this particular tool and am able to use it with a lot of precision. The parts fit right in-place with very little adjustment needed.
I've been using this same saw since the early '90's. The templates make this task quick and easy.
View attachment 169536
The upper part is supposed to be one piece. Not sure why I made it two. LOL
View attachment 169537
I soaked the second piece from the left in water for a few minutes then glued it in place. This allowed for a very precise fitment through the curve of the hull.
View attachment 169538
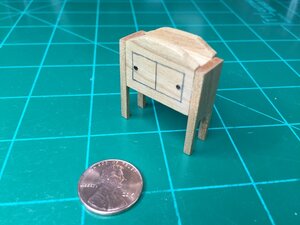
My miniature one is just the cheap old Microlux version you can buy from Micromark. There are other brands that are similar. Nothing special about it. When cutting wood this fine, it is more about practice and technique than the tool itself.What type of scroll saw do you have?
Kurt Konrath
Kurt Konrath
On scroll saws, sometimes you need to make a new blade plate, with smaller slot or hole just for the blade.
Harder to install blades, but supports work better.
Like on table saws, they have replacement blade covers you can saw thru to get zero clearance on sides.
Harder to install blades, but supports work better.
Like on table saws, they have replacement blade covers you can saw thru to get zero clearance on sides.
The only problem with running zero clearance on a miniature scroll saw is that you actually WANT the blade to flex some to give you the fine control needed. At least that is how I learned to use it. Notice in the picture of my saw it has an adjustable foot (like a sewing machine) that supports the wood in a similar fashion that a zero clearance plate would.to get zero clearance on sides.
So, either way will work. The most important thing is practice and technique...
Kurt Konrath
Kurt Konrath
Your correct about needing practice!


