ZHL Royal Caroline

Hi Bob
Firstly great to see a log from yourself.Secondly I think I know how you could achieve that look.I used a technique to create ageing on painted surfaces but with slight modification you could achieve what you are after.
Firstly a light spray coating of polyurethane
Then a mist coat of white acrylic sprayed on
Finally burnish with superfine steel wool to produce the distressed look.
The thinness of the varnish is vital.It prevents the wood absorbing the paint,but too thick and the white will not settle in the grain pattern
Subsequent sealing with poly will kill the stark white

Kind Regards

Nigel
 
Hi Nigel,

That's kind of what I had in mind myself. I'm ready to plank the lower hull on the starboard side. I've completed the upper planking from the lower wales to the top of the bulwarks, sanded it some, but haven't given it any finish. I'll give it at least 4 coats of wipe on poly before I paint the blue upper area. I went to Lowes, picked out a paint chip that looked to me to be close enough for that blue color, and then bought a sample jar of that color for $3.98. It's enough paint to paint dozens of RC's!

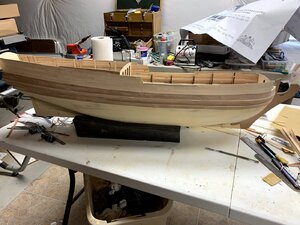
IMG_0795.jpg

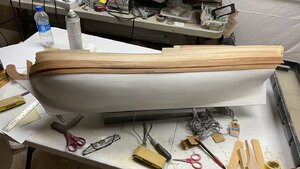
This photo shows the starboard side planked from the lower wales up. Excuse the mess but I don't clean up very often in my shop when I'm building.

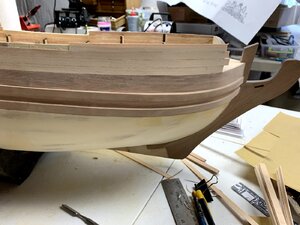
IMG_0796.jpg

Forward end of the hull. Still lots of sawdust on the model after my initial sanding.

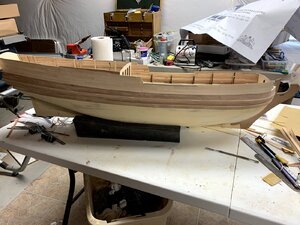
IMG_0797.jpg

Aft end of the model.

That's it for now. It will probably take me a number of days to plank the lower hull.

Take care,

Bob
 
Hi Nigel,

That's kind of what I had in mind myself. I'm ready to plank the lower hull on the starboard side. I've completed the upper planking from the lower wales to the top of the bulwarks, sanded it some, but haven't given it any finish. I'll give it at least 4 coats of wipe on poly before I paint the blue upper area. I went to Lowes, picked out a paint chip that looked to me to be close enough for that blue color, and then bought a sample jar of that color for $3.98. It's enough paint to paint dozens of RC's!

View attachment 166164

This photo shows the starboard side planked from the lower wales up. Excuse the mess but I don't clean up very often in my shop when I'm building.

View attachment 166165

Forward end of the hull. Still lots of sawdust on the model after my initial sanding.

View attachment 166166

Aft end of the model.

That's it for now. It will probably take me a number of days to plank the lower hull.

Take care,

Bob
Take heart - my workbench is worse!
So is my underbench storage, but it is a real thrill when I go exploring and find something something I thought I had lost. (occasionally even a kit!)
 
Just a quick update, no new photos yet.

I've finished planking the second layer on the starboard side. I tried the whitewash stain and did not like the results. The problem isn't in the stain though. The problem is in the wood. Some of the maple wood in the kit is soft and some is hard. The harder maple planking doesn't take the stain as well as the softer wood so the end result is sporadic strips of well stained wood mixed with strips that hardly show any color.

The result is just not very pleasing looking and once you put that stuff on, it takes a lot of sanding to get it off. That cause another problem. The planks are only .5 mm in thickness which is about .020". It doesn't take much sanding before you sand completely through some of the softer planks. End result was a lot of additional work fixing it all so now I'm stuck with a hull that basically has to be completely painted below the wales.

Another problem is that they give you just enough strips to plank both sides of the hull. I cut the pack of strips in two, 50% for each side. When I finished the starboard side, I was completely out of planks so there was no extra if you screw something up. I ordered some .020" basswood but it shows no grain so it would have stood out alike a sore thumb also. Plan, plan, plan, plan, plan. I guess I should have been better prepared and just did the entire lower hull in my own supply of basswood

My plan now is to get the port side finished, sanded and sealed and then paint the entire lower hull all at one time. I'll post photos once I get the port side finished and both sides painted.

Stay tuned,

Bob
 
Looking forward to seeing your latest update Bob.

Thanks Brian. I hate to post photos of the model in an unfinished state. I'm moving forward but it's slow going. I've painted both sides of the lower hull white with spray paint but that puts the model in a delicate state. I don't want to mess up the paint as I continue to work on the model.

I still need to do some wood filling on the upper area where the carvings go before I paint it. I'm going to do that today, but it might take 2 days -- 1 day for each side.

I've attached 3 photos for your viewing pleasure (or displeasure :rolleyes: ). The first two are self explanatory. The third one shows the aft cradle pieces.

I decided to mount the model in a cradle. I had some boxwood on hand that I used to make these two parts. I've cut out the parts for the forward cradle but haven't finished sanding them or putting them together.
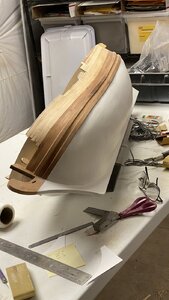
IMG_0820.jpg

As you can see, I have a lot of wires coming out of the bottom of the hull. There's only a few at the bow. Most are at the stern. The cradle will fit at these positions thus hiding the wires which will go through holes in the base.

I can't use the base that came with the kit because it's too narrow. With the cradle pieces in place, I need a base that's at lease 18" wide and 32" long. I'm going to purchase a piece of 3/4" x 2' x 4' birch plywood from Lowes sometime this week and cut it down to 18" x 32" for my base.
IMG_0821.jpg

I had to use my own .020" thick basswood for the upper hull planking on the port side because I barely had enough of the kit maple wood strips to plank the lower hull on both sides. Today I'm going to examine the upper hull basswood portion closely and fill in any cracks between the planks with white wood filler. Once sanded out, I will paint that area white.

I went to Lowes recently and examined the paint color chips. I picked one out that looked the color I wanted for the upper carving area and had them mix up a sample jar of it. I'm not sure if I will airbrush the color or apply it with a paint brush, but by spray painting the basswood planking white first, I can be sure that the various colors of planking don't show through and ruin the finished look.

I'll probably hand paint the wales black. This last photo shows the aft cradle parts I made yesterday.

IMG_0822.jpg

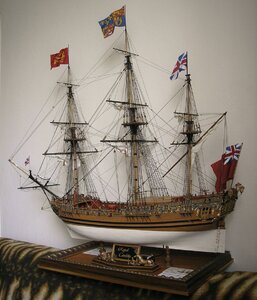
I made these out of boxwood. I've cut out the forward cradle parts but haven't glued them together yet nor applied a finish. Here is a photo of a scratch built Royal Caroline that I am using as my basic inspiration on how I want to build my model.

_ROYAL_CAROLINE_269.jpg

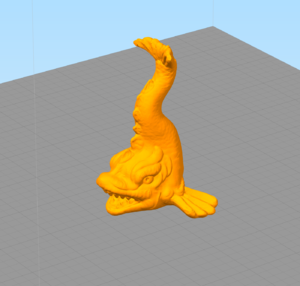
Notice the cradle mounts. Now look again at my mount parts. The extra wood at the outer end will be used to hold this 3D model after I print it them on a resin printer.
Screen Shot 2020-08-11 at 1.59.56 AM.png

This is the closest 3D model I could find to the one shown in the inspirational model. The mounts I made will have a cove molding around the outside edge thus joining the two halves together.

I was amazed when I made these cradle parts. First I used card stock to create a template of the aft port side hull curvature. It must have taken me an hour or more to get the template to fit the hull perfectly at the aft side of the area where the wires come out. I made a second template for the fore side so I could properly bevel the cradle part for the port side aft part.

After I milled some boxwood to a 1/2" thickness for the cradle part, I cut the part out on my scroll saw and used the templates to mark the bevel line on the fore side of the aft port part. I used a #22 Xacto to trim the part down and bevel it testing the fit repeatedly until I got a good fit.

I repeated this process for the starboard side. What amazed me was that the first set of templates I made for the port side worked almost perfectly for the starboard side. I used those same templates for the forward cradle parts, and again, they needed only slight tweaking. It appears to me that my hull is very symmetrical as I only had to make minor tweaks to the parts to get a good fit.

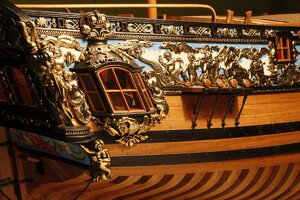
I plan to paint the cove molding around the base of the cradle mount parts gold. I bought some very shiny gold paint for this. I also plan to use the gold paint to paint my carvings after I clean them up. I will give them a black wash after the gold paint dries. Here is a photo from my inspirational model showing his gold carvings that is more of the actual color on his model. Here is a link to his build log: http://www.shipmodell.com/index_files/0ROYAL_CAROLINE1.html
_ROYAL_CAROLINE_184.jpg

This guy's ship is amazing. You should see the furniture inside that he made. I've found most of the furniture I'm going to put in my model on various 3D model websites. I plan to 3D print the models in resin because my FDM printers just can't do the details in those models that a resin printer can do.

Anyway, you all asked for some photos so that's my latest update. I want to get the upper area sanded out and painted white, then paint the wales black before I mount the model. Once it's been mounted, it will stay that way for the remainder of the build. The mounted model will allow me to work on the upper hull details and the deck details without risking damage to the painted lower hull.

One other thing that I'll mention is what I'm going to do with all those wires coming out of the bottom of my model. I will drill holes through the base and run the wires through those holes. The base will have feet on each corner so that it is raised up enough that the wires don't interfere. I plan to make a special box which will be mounted at the front of the base and will house the light control box which has four knobs on it. Each knob gives me individual control of four sets of lights so that I can turn some on and set the intensity. The lights themselves are very, very tiny LED's in the yellowish white color.

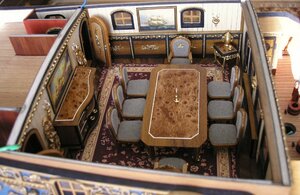
Another inspirational model I'm following is the paper model built by Doris in the paper modeler's forum. Here is a photo of her model. Keep in mind, what you're seeing is made entirely out of paper except for the carvings which are made out of sculpey. This woman is an amazing modeler. She lives in the Chez Republic.
20131231005458-229467-full.jpg

Here's an interior shot first. She uses vinyl contact paper to cover all wood parts and give them a natural wood look.
20150515174839-271739-full.jpg

Her models are simply amazing. She sculps all of the carvings out of sculpey and then paints them. As you can see, she has also painted her bottom hull white and her carvings gold. Who wouldn't be inspired by such magnificent modeling skills.

The link to her website forum postings is http://www.papermodelers.com/forum/...4-royal-caroline-1749-1-40-scratch-build.html

I guess that's about it for now. Try not to drool too much when you see the two build logs of my most inspirational models.

Take care,

Bob
 
Last edited:
Bob thank you very much for posting these pictures - especially those of your painted hull. I am in the process of painting mine as well and yours have just shown me, that I still have some way to go to achieve your smoothness. Great inspiration and back to sanding!
 
Bob thank you very much for posting these pictures - especially those of your painted hull. I am in the process of painting mine as well and yours have just shown me, that I still have some way to go to achieve your smoothness. Great inspiration and back to sanding!

Hi Heinrich,

I should tell you that there is a trick to getting thin planking to looks smooth. I had my problems with the thin maple planks staying down. I kept getting pop-ups in various places. I decided to try an idea I had. Using Elmer's thick CA, I squirted some along a seam where the edges were causing a gap due to the planks popping up. Then, before the glue dried, I used a #22 Xacto turned on its side so that I could run it across the seam at an angle thus pressing the planks down. I did this repeatedly, and as I did, the glue would get scraped off and dry but it made the planks stick to each other and lay flat. In other words, it was like a scraper but instead of scraping, I was pressing the planks down.

You have to do this at just the right speed to give the glue a chance to set up and to allow the planks to lay flat as the glue does set up. At some point the glue will begin to dry and leave a thin layer on the surface of the planks. That's when you change the angle of the Xacto so that you are scraping the glue off instead of pressing the planks down.

That technique worked great and allowed me to get the hull smooth. One other trick I used was to squirt super glue right along the edge of the plank I'm getting ready to glue a new plank next to. This helps in getting the planks tight together. Oh, and I've always soaked even these think planks in water before laying them but this time I did not. The hull is so large and has such subtle curves that I found it easy to bend the planks on these curves without soaking and they stuck better without soaking.

Anyway, hope that helps,

Bob
 
Always good advice Bob - thank you. However, my issue is not any gaps, It is reaching that sweet spot between a painted hull that one can see has been planked with wood (in other words, maintaining the individual plank profiling) but at the same time getting it smooth as possible. (Nut not so smooth that it looks like a glass reinforced hull).
 
Back
Top