I just got the reply back and it was $36 US fior the files and $39 US for shipping for a total of $75.00 US = approx $100.00 CDN. Think I will just stick with what I am using for now. At any rate Thanks @Stargazer
-

Win a Free Custom Engraved Brass Coin!!!
As a way to introduce our brass coins to the community, we will raffle off a free coin during the month of August. Follow link ABOVE for instructions for entering.
-

PRE-ORDER SHIPS IN SCALE TODAY!
The beloved Ships in Scale Magazine is back and charting a new course for 2026!
Discover new skills, new techniques, and new inspirations in every issue.
NOTE THAT OUR FIRST ISSUE WILL BE JAN/FEB 2026
- Home
- Forums
- Ships of Scale Group Builds and Projects
- Bluenose PoF Group Build
- Bluenose Group Build Logs
You are using an out of date browser. It may not display this or other websites correctly.
You should upgrade or use an alternative browser.
You should upgrade or use an alternative browser.
YUANQING BLUENOSE - Don Robinson
- Thread starter DonRobinson
- Start date
- Watchers 26
-
- Tags
- bluenose yuanqing models
Oh man they kill you guys for shipping! There are some here in Canada - https://www.gessweincanada.com/product-p/735-0301m.htm
Still Spendy though.... $$$$
Still Spendy though.... $$$$
I JUST ORDERED A SET, THE SHIPPING WAS $800 3 DAY SHIPPING, I STILL MY ORDER THE SET THAT UWE SHOWS BUT IN THE NO. 1 CUT, DON DO NOT WANT TO HIJACK YOUR LOG IF I AM PLEASE LET ME KNOW, WHAT TYPE OF GLUE ARE YOU USING ANY WELL BOND OR JUST REGULAR PVA, ALSO CHECK OU WHAT I AM DOING WITH A FRAME BOARD AS I CALL IT. GOD BLESS YOU AND YOURS DON
@donfarr not to worry. Tell me that's a typo and should be $8.00 not $800.00. lol
I use weldbond pva for the frames, ca dries too fast. From what I can see you are doing things right. When I clamp mine I just use two clamps, one clamp on each joint, but I have only done the smaller frames so far.
I use weldbond pva for the frames, ca dries too fast. From what I can see you are doing things right. When I clamp mine I just use two clamps, one clamp on each joint, but I have only done the smaller frames so far.
Last edited:
THANKS DON, OH BOY YEA THAT IS A TYPO, SOME CALL ME NUTS BUT I AM NOT THAT CRAZY IT WAS $8.00 THANKS FOR HELP. GOD BLESS YOU AND YOURS STAY SAFE DON
Hey all a very quick update:
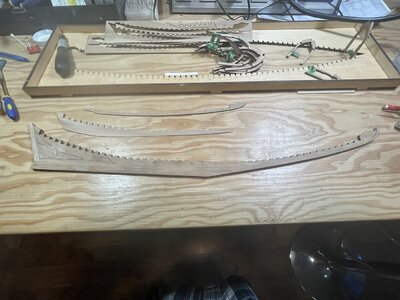
Here pieces 17 and 18 are ready to be glued on to the keel. Piece has been bevelled to a knives edge as Heinrich mentioned.
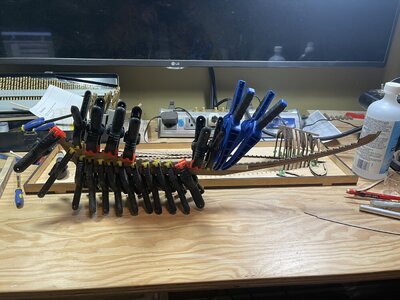
Use lots of clamps as the bevelled edge tends to want to curl up a little. The main problem I had here was the glue drying too fast, by the time I had the piece in position and started to clamp a lot of the glue had already started to dry. I'm sure the 25-30% humidity in my house has lots to do with that!
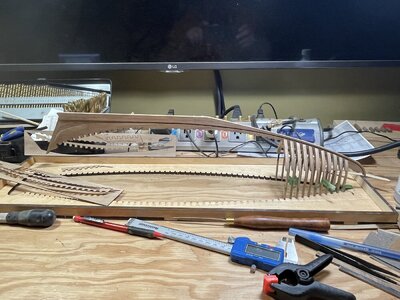
Ok, here I have done some work fairing the frames but in reality I just wanted to see how things are going to look, the little boy in me took over.
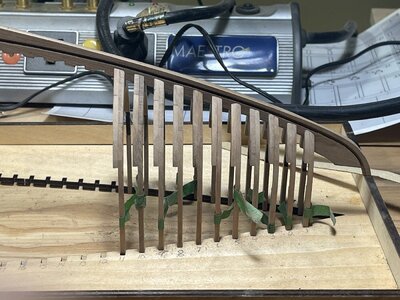
And a close up. As you can see more fine tuning is required and normally I would not show a picture such as this but I was excited and thought you guys might want to see. What I have done so far is to lightly sand and file the notches until the frames fit on the keel, not much is required so be careful. What is needed now is to work on the frames to get them all at the same level. when you are bevelling the frames be careful as you can see some(most) of mine are a little rounded and not angled properly, a little more caution during bevelling would have helped. This can all be fixed but a lot of it could have been prevented during the initial bevelling. So don't let the little boy get the best of you, try and hold your excitement level down! Good luck!
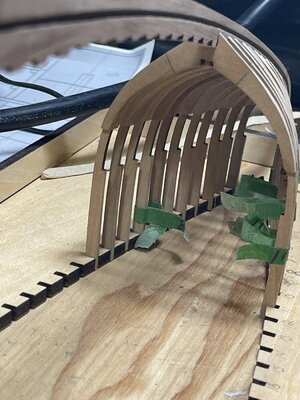
The money shot!! Isn't this cool?
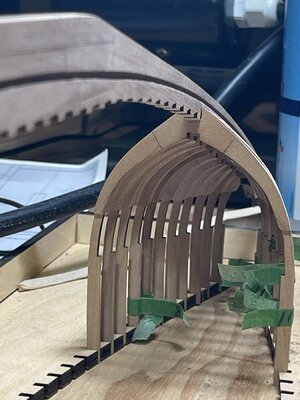
I can't get enough of this!! Nothing is glued so these frames are holding up the keel all on their own!!
One last note, when fitting the frames to the keel make the keel notches just a tiny bit on the loose side to help fitting the keel on afterwards. I really don't know yet what the easiest way of fitting the keel on to the frames is going to be when this is all finished, as fitting just these 11 frames took some doing but we'll cross that bridge later.
Have fun and Thanks for checking things out.

Here pieces 17 and 18 are ready to be glued on to the keel. Piece has been bevelled to a knives edge as Heinrich mentioned.

Use lots of clamps as the bevelled edge tends to want to curl up a little. The main problem I had here was the glue drying too fast, by the time I had the piece in position and started to clamp a lot of the glue had already started to dry. I'm sure the 25-30% humidity in my house has lots to do with that!

Ok, here I have done some work fairing the frames but in reality I just wanted to see how things are going to look, the little boy in me took over.

And a close up. As you can see more fine tuning is required and normally I would not show a picture such as this but I was excited and thought you guys might want to see. What I have done so far is to lightly sand and file the notches until the frames fit on the keel, not much is required so be careful. What is needed now is to work on the frames to get them all at the same level. when you are bevelling the frames be careful as you can see some(most) of mine are a little rounded and not angled properly, a little more caution during bevelling would have helped. This can all be fixed but a lot of it could have been prevented during the initial bevelling. So don't let the little boy get the best of you, try and hold your excitement level down! Good luck!

The money shot!! Isn't this cool?

I can't get enough of this!!
 Nothing is glued so these frames are holding up the keel all on their own!!
One last note, when fitting the frames to the keel make the keel notches just a tiny bit on the loose side to help fitting the keel on afterwards. I really don't know yet what the easiest way of fitting the keel on to the frames is going to be when this is all finished, as fitting just these 11 frames took some doing but we'll cross that bridge later.
Have fun and Thanks for checking things out.
Thanks Heinrich, this is my first pof and certainly won't be my last. I'm getting worried about my 14 other pob kits and how I'll ever get the initiative to do those now!! 


Hi Don,
Nice progress and nice pictures.
It was also my though the fine-tuning of the bevels need te be done in the jig.
Regards, Peter
Nice progress and nice pictures.
It was also my though the fine-tuning of the bevels need te be done in the jig.
Regards, Peter
Great progress Don...looking very good!
You guys are killing me! I want to start on mine so bad, but I’m trying to finish the Cazador. I fear if I start on the Bluenose, I will not finish the Cazador until after the Bluenose.
I do have a plan for the jig and keel. I’m thinking a rotisserie style setup. Make two a-frames with holes, for each end of the jig. And put dowels on the ends of the jig frame. Then insert a few frames towards the bow and stern to properly locate the keel. Glue frames to keel and jig. Then turn over and drop all the rest of the frames in from the top. I think that may work. Also have a pin for locking into position at 180 degrees out. That way you can insert frames by dropping in, and turn over to fair frames. Any thoughts on this?
I can CAD something up if needed.
- Joined
- Jul 9, 2019
- Messages
- 497
- Points
- 323

14? And my admiral gives me grief over the 4 or so in my closet. Of course, I have 3 in a state of semi-completion (2 of which are POF).I'm getting worried about my 14 other pob kits
Nice work, Don!
Last edited:
Nice idea Dean.Great progress Don...looking very good!
You guys are killing me! I want to start on mine so bad, but I’m trying to finish the Cazador. I fear if I start on the Bluenose, I will not finish the Cazador until after the Bluenose.
I do have a plan for the jig and keel. I’m thinking a rotisserie style setup. Make two a-frames with holes, for each end of the jig. And put dowels on the ends of the jig frame. Then insert a few frames towards the bow and stern to properly locate the keel. Glue frames to keel and jig. Then turn over and drop all the rest of the frames in from the top. I think that may work. Also have a pin for locking into position at 180 degrees out. That way you can insert frames by dropping in, and turn over to fair frames. Any thoughts on this?
I can CAD something up if needed.
Perhaps placing some frames in the front and back and then clamp the bottom in a screw, like this, from the intro-log. Then you can fit them from above:
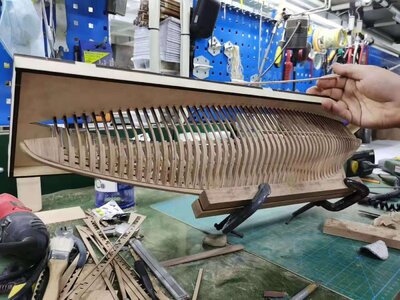
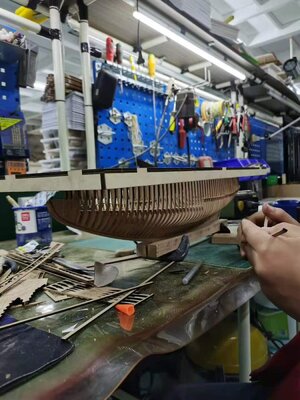
Regards, Peter
True...a simpler approach!Nice idea Dean.
Perhaps placing some frames in the front and back and then clamp the bottom in a screw, like this, from the intro-log. Then you can fit them from above:
View attachment 202529
View attachment 202530
Regards, Peter
@Peter Voogt and @Dean62 these are both great ideas. Something is needed, when I did my few I was reaching inside to push and pull the frames into position which will not work so good as more frames are added. I would like to see your idea Dean, if you have the time. Maybe with some good drawings Heinrich could convince Yuanqing to include something in the kit
Last edited:
@Brewbrarian , Hey Eric having multiple kits and working on kitchen and dining room tables are just a couple of the few perks of not having a live in Admiral. 

Hi Guys,@Dean62 , You maybe the wise one by not starting now. I promised myself I would only work on the Bluenose one day a week. It's now been 10 days since I've worked on my HMS Ontario!!!!
After the first feelings of the material and building the first part of the keel, I got the guts to put it aside again.
But when I read your logs ........ man o man ......... but The Lee looked at me helplessly.
And Heinrich has the same!And the Haarlem is laying at her mooring - angry at being neglected.
Choice stress!
The Duc is also put aside .......
Now this (other wise?) man
And after that: It's Bluenose time!
Regards, Peter
Last edited:
Please finish that beauty Peter, I am looking forward to seeing him completed. Bluenose won't be too far in the future!! 
- Joined
- May 26, 2020
- Messages
- 205
- Points
- 143

My jig did not stay flat when I took it off the board, it has a warp.
I will have to fasten it to my flat service. but that idea looks much better.
I will have to fasten it to my flat service. but that idea looks much better.


 You have a beautiful shape starting to form there! I'm sure you can't get enough of this - these POF builds are addictive!