Note that the riser for the pump is an octagonal planked assembly which allows for removal of a plank or more for repairs without removal of the entire pumping column. RichClarifying the question about bilge pumps on YQ Bluenose I have copied the diagram and explanation of those on Bluenose from Bluenose II Saga of the Great Fishing Schooners, page 56 "for educational and not commercial usage only".View attachment 203694
Cement was a large ballast material as were the growing number and load of salted cod and other fish on board making racing home more stable than with an empty hold. When racing the anchors were stowed below as ballast along with other known and not mentioned items which blew into a tempest in the last race with Theboud when there was surrepititous ballast shifting before morning waterline weight checking before the race from one item that I read.
-

Win a Free Custom Engraved Brass Coin!!!
As a way to introduce our brass coins to the community, we will raffle off a free coin during the month of August. Follow link ABOVE for instructions for entering.
-

PRE-ORDER SHIPS IN SCALE TODAY!
The beloved Ships in Scale Magazine is back and charting a new course for 2026!
Discover new skills, new techniques, and new inspirations in every issue.
NOTE THAT OUR FIRST ISSUE WILL BE JAN/FEB 2026
- Home
- Forums
- Ships of Scale Group Builds and Projects
- Bluenose PoF Group Build
- Bluenose Main Support Page
You are using an out of date browser. It may not display this or other websites correctly.
You should upgrade or use an alternative browser.
You should upgrade or use an alternative browser.
@PT-2 , Thanks for all the information. I went back looking at the pictures and in your first post in the second picture you can see the hoops. The very bottom hoop looks as though it is maybe coming apart just a little but it shows, as you have depicted, how the hoop is wrapped around itself then fastened. Near as I can count there maybe as many as eighteen hoops per mast, I'm thinking I will add this feature to my model.
These can be easily made by simply drilling out a dowel, but there is another method of using shavings from a plane which would be more realistic.
Thanks again for your time
These can be easily made by simply drilling out a dowel, but there is another method of using shavings from a plane which would be more realistic.
Thanks again for your time
Canoe21
Lawrence
Hello Don, I made hoops for my Annie M Parker build out of willow shouts and then stained them. This was not that hard at all and were quite sturdy.@PT-2 , Thanks for all the information. I went back looking at the pictures and in your first post in the second picture you can see the hoops. The very bottom hoop looks as though it is maybe coming apart just a little but it shows, as you have depicted, how the hoop is wrapped around itself then fastened. Near as I can count there maybe as many as eighteen hoops per mast, I'm thinking I will add this feature to my model.
These can be easily made by simply drilling out a dowel, but there is another method of using shavings from a plane which would be more realistic.
Thanks again for your time
Regards Lawrence
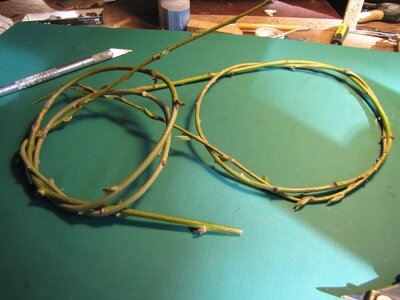
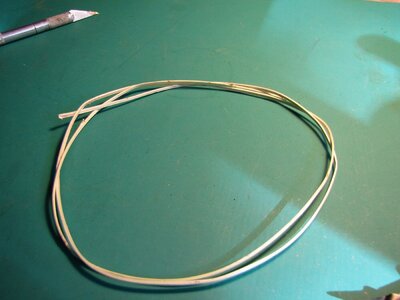
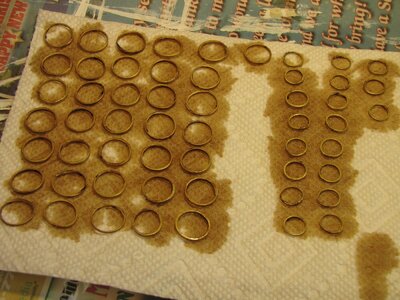
Those look great Lawrence. You must have cut them when they were green and then split them? I will have to wait until spring now to make some!! 
Hello Don, I made hoops for my Annie M Parker build out of willow shouts and then stained them. This was not that hard at all and were quite sturdy.
Regards LawrenceView attachment 203893View attachment 203894View attachment 203895
I have made hoops with well steamed and hot moist thin strips wrapped around a dowel with the free end secured tight and left to cool. When dry I brushed some adhesive to hold the concentric strip hoop in place. It was almost the same product that was provided in my 1970 Constructo Pilot Boat kit where I saw what they did and decided to do it myself to replace a few broken ones. It is hard to see if these hoops in the photo are twisted around as with the willow sprig. Nice out come though. RIchHello Don, I made hoops for my Annie M Parker build out of willow shouts and then stained them. This was not that hard at all and were quite sturdy.
Regards LawrenceView attachment 203893View attachment 203894View attachment 203895
Here is a copy and past from a related alert posing reply that I think belongs in this resourced thread:
There was another question that came in as to how many hoops were used in the original Bluenose. From the specifications for that schooner I found quantities for the two diameters: 36 24" and 24 13". I found that two were set below the tack as spares for each mast taking four out from the lower mast count of 36 leaves 32 between the fore and main masts or 16 hoops on each (if this assumption is correct). I have not found that spares were provided at the top masts but for replacement needs they were very likely there, at leas during the long fishing season runs, OK four out of 24 leaves 20 between the fore top and main top masts or 10 per top mast. I cannot guarantee this but it is from the original specs quantities for sizes and having found the placement of 2 spares below, just above the jaws of the boom and top sails. Borrowing from the sail/rigging drawings for Bluenose II I counted: Lower main 15, 14 lower fore; and 14 top main including 5 above the cross trees and 10 on the top main mast itself; 5 on the fore above the cross trees and 9 on the fore top mast itself. I may have made an error in my visual count on both in the area of the main above the cross trees to the top of that mast to the transition to the top mast itself where the hoops are very plain for both main and fore. As the book Bluenose II Saga of the Fishing Schooners with measured drawings is under copyright I don't want to make additional images. I do again highly recommend acquisition of the book which is by Nimbus Publishing, nimbus.ca, copyright 1994. It contains information and drawings for both Bluenose schooners and is a highly insightful resource. Rich
There was another question that came in as to how many hoops were used in the original Bluenose. From the specifications for that schooner I found quantities for the two diameters: 36 24" and 24 13". I found that two were set below the tack as spares for each mast taking four out from the lower mast count of 36 leaves 32 between the fore and main masts or 16 hoops on each (if this assumption is correct). I have not found that spares were provided at the top masts but for replacement needs they were very likely there, at leas during the long fishing season runs, OK four out of 24 leaves 20 between the fore top and main top masts or 10 per top mast. I cannot guarantee this but it is from the original specs quantities for sizes and having found the placement of 2 spares below, just above the jaws of the boom and top sails. Borrowing from the sail/rigging drawings for Bluenose II I counted: Lower main 15, 14 lower fore; and 14 top main including 5 above the cross trees and 10 on the top main mast itself; 5 on the fore above the cross trees and 9 on the fore top mast itself. I may have made an error in my visual count on both in the area of the main above the cross trees to the top of that mast to the transition to the top mast itself where the hoops are very plain for both main and fore. As the book Bluenose II Saga of the Fishing Schooners with measured drawings is under copyright I don't want to make additional images. I do again highly recommend acquisition of the book which is by Nimbus Publishing, nimbus.ca, copyright 1994. It contains information and drawings for both Bluenose schooners and is a highly insightful resource. Rich
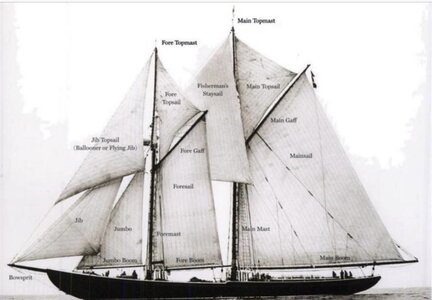
Good sail diagram to put up. Thanks. I just posted a multi-point reply about hoops, sails, and rigging but it is on a different thread to retrieve and bring in with this photo. I'll give that a try. Thanks again for the photo and sail identification. RichThis may be useful?View attachment 204055
Found the thread reply back to Don. Here it is to go with the photo:Good sail diagram to put up. Thanks. I just posted a multi-point reply about hoops, sails, and rigging but it is on a different thread to retrieve and bring in with this photo. I'll give that a try. Thanks again for the photo and sail identification. Rich
I accidentally stumbled/scanned across a microscopic note that the mast hoops are spaced 30 inches apart up luff side of the sails with the bolt rope hem on the starboard side The scale drawings and graphic scale match that the seams of the sail canvass are 20 inches apart, following the spec for 22 inch canvass, and the hoops grommet holes are 30 inches apart. The fisherman's staysail is always set on the windward side but this may not be relevant if there are no sails set in the presentation. Clew lines and associated blocks are always on starboard opposite with Europe where they are on port. Lastly, if anyone has noticed the blocks and tackle on the bottom of the main and fore boom they are used to hold the booms outboard when running before the wind in rolling seas; however, I don't see those rigging elements in the YQ model's generally simplified rigging and lack of sails. So. . . this is just to whet your curiosity and perhaps satisfy some questions as I am able to cast a fly over the water waiting for a rise from below. None of this is guaranteed but only as I understand it as of this point in time. Rich
The reply above about hoops was my initial reply but there are some added notes in the just prior note about hoops being 30 inches apart. RichFound the thread reply back to Don. Here it is to go with the photo:
I accidentally stumbled/scanned across a microscopic note that the mast hoops are spaced 30 inches apart up luff side of the sails with the bolt rope hem on the starboard side The scale drawings and graphic scale match that the seams of the sail canvass are 20 inches apart, following the spec for 22 inch canvass, and the hoops grommet holes are 30 inches apart. The fisherman's staysail is always set on the windward side but this may not be relevant if there are no sails set in the presentation. Clew lines and associated blocks are always on starboard opposite with Europe where they are on port. Lastly, if anyone has noticed the blocks and tackle on the bottom of the main and fore boom they are used to hold the booms outboard when running before the wind in rolling seas; however, I don't see those rigging elements in the YQ model's generally simplified rigging and lack of sails. So. . . this is just to whet your curiosity and perhaps satisfy some questions as I am able to cast a fly over the water waiting for a rise from below. None of this is guaranteed but only as I understand it as of this point in time. Rich
I hope that all of the details that I have posted are not distracting from the YQ model which does not include many of those. RichThe reply above about hoops was my initial reply but there are some added notes in the just prior note about hoops being 30 inches apart. Rich
Not at, all this is great information and history
I realized that for those of our group who have purchased the Bluenose II book, with all of it's detailed drawings, they will be able , if desired, to "trick up" the YQ model adding rigging and sails to make their presentation more complete. At least they can look at the anchors of Bluenose, what they were, how carried, and how the hawser/cable were stowed and flaked out for deployment. Lot of small details that can be added or not as the scale and desire of the builder carries it forward. It is too bad that the book does not identify the difference between equipage for racing (seldom) and fishing (regularly) as are annotated on the MS2130 plans which are copyrighted. I don't know about "work arounds" to that illustrating those elements. RichI hope that all of the details that I have posted are not distracting from the YQ model which does not include many of those. Rich
I think that I have figured out something in the third photo down from the top mainly showing just past the decked top of the main cabin and to the left side of the wheel a white object which is not seen in the closer photo of the wheel box. While building my own cabin and the sliding entry hatch and door . . . I think that the white object is the cabin door, swung to the left side (our view) and possibly a double hung door hinged in the middle so that the right leaf closes back over the left leaf inside face. The hatch top is slid forward and we see the sloping side piece with the track inside and out of view. One thing that I am sure is present are scuppers along the bottom edge of both slider extensions as collected water would need to drain out. The photo does faintly show the decking forming the cabin top which I had assumed and done with my model as well as another view of the wide side board for cutting bait and baiting troll lines, locate full length of both port and starboard sides. There were only two lights or vents on the side of the cabin house walls, one forward on stbd and one aft on port which is seen in the photo. The cabin roof decking is narrow and not as wide as with YQ which has also run the after decking parallel to the keel and not tapered and conforming to the curve of the hull from midships to aft.To start this thread off I am offering a series of old photos by Walter MacAskill from the Nova Scotia archives. If you Google that up you will find many more. Items to look at are what is visible and not present when Bluenose was racing. Then look at those which are obviously taken when it was fishing and there is much more seen on the decks.View attachment 199343View attachment 199344View attachment 199345View attachment 199346View attachment 199347View attachment 199348View attachment 199348
View attachment 199349View attachment 199350This one is in racing without anchor, cable or cathead visible as would be if fishing.View attachment 199351
I have not looked at how YQ deals with these small details but do note that they have the sides of the wheel box as a recessed panel which is incorrect. There were two small coved grooves cut into the side and with the space inside create the impression of a panel but those are only darker painted "decorations". I realize that YQ has cost budget to produce and sell their kits so they have made some design decisions in that direction so many of the smaller details of Bluenose are not included which for many builders is OK but some may desire more accuracy. If so that can scratch build those elements as they desire. I imagine that I will continue to come across other variances as I proceed with my own explorations and MS2130. I am inspired though by the progress that is being made in our group. Rich
Casting off my moorings from the past here is, if I am lucky, a radio controlled Bluenose YouTube, POB. It is not clear as to when it is under sail only or with the electric prop running. If nothing else the music beats a lively pace.I think that I have figured out something in the third photo down from the top mainly showing just past the decked top of the main cabin and to the left side of the wheel a white object which is not seen in the closer photo of the wheel box. While building my own cabin and the sliding entry hatch and door . . . I think that the white object is the cabin door, swung to the left side (our view) and possibly a double hung door hinged in the middle so that the right leaf closes back over the left leaf inside face. The hatch top is slid forward and we see the sloping side piece with the track inside and out of view. One thing that I am sure is present are scuppers along the bottom edge of both slider extensions as collected water would need to drain out. The photo does faintly show the decking forming the cabin top which I had assumed and done with my model as well as another view of the wide side board for cutting bait and baiting troll lines, locate full length of both port and starboard sides. There were only two lights or vents on the side of the cabin house walls, one forward on stbd and one aft on port which is seen in the photo. The cabin roof decking is narrow and not as wide as with YQ which has also run the after decking parallel to the keel and not tapered and conforming to the curve of the hull from midships to aft.
I have not looked at how YQ deals with these small details but do note that they have the sides of the wheel box as a recessed panel which is incorrect. There were two small coved grooves cut into the side and with the space inside create the impression of a panel but those are only darker painted "decorations". I realize that YQ has cost budget to produce and sell their kits so they have made some design decisions in that direction so many of the smaller details of Bluenose are not included which for many builders is OK but some may desire more accuracy. If so that can scratch build those elements as they desire. I imagine that I will continue to come across other variances as I proceed with my own explorations and MS2130. I am inspired though by the progress that is being made in our group. Rich
Casting off my moorings from the past here is, if I am lucky, a radio controlled Bluenose YouTube, POB. It is not clear as to when it is under sail only or with the electric prop running. If nothing else the music beats a lively pace.
I saw one where the building did a six foot long Bluenose with the hull fully finish and then used it as a mold to make a fiberglass one which he used for RC controls of the rudder and sails for tacking. I used to fly my RC gliders with a single stick control similar to that in small aircraft like the Piper. I don't know if I could use the two stick controls that are now dominant as it is total unlike flying an actual small plane. RichSuch a pity I can't access anything from YouTube.
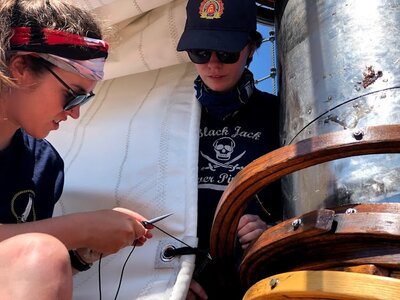
For new information on how the main sail and top gaff were tied to the hoops I have asked the Bluenose II crew for photos and information on how this is properly done. One crewmember, Emily S., sent the following description: "We start by lashing with a cow hitch on the sail, do about 8 crossing wraps and then frapping turns." She sent the following two photos which provide details about more than just the lashing:Match the sizes from the specifications that I listed above and relate those diameters to the "cartoon" showing a relative size and then a closer view of a cross section of the hoop with the rounded triangular form.View attachment 203869
Zooming in on the hoop section
View attachment 203870
I am still researching the manner of tying the sale luff to the hoop in a correct manner and not how I have done it for a horizontal hoop. Rich
i
First look at the hoops and how they are now secured to each layer.
Then look at the galvanized sheet metal mast protective band for wear from the boom jaws,
Then look at the luff plate/gromette with the protective canvas extension around the luff bolt rope canvas.
And lastly it is hard to see exactly how the lashing is started or completed. I have asked for more details and diagrams: how the cow hitch starts, the crossing path, then the vertical frapping, and lastly the final tie-off.
 Now the second photo which doesn't show much more than pulling the single line tight with the fid before tying it off:
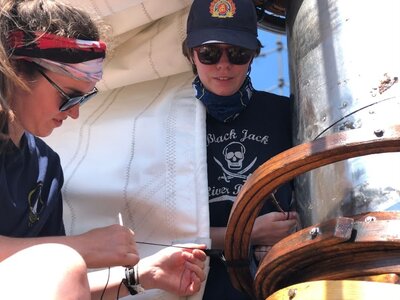
I'll pass the details along when received.
Rich
Great pictures, Thanks Rich


