Bluenose Old Photos, Books, and resources from the past

  • Thread starter Thread starter PT-2
  • Start date Start date
  • Watchers Watchers 26
For new information on how the main sail and top gaff were tied to the hoops I have asked the Bluenose II crew for photos and information on how this is properly done. One crewmember, Emily S., sent the following description: "We start by lashing with a cow hitch on the sail, do about 8 crossing wraps and then frapping turns." She sent the following two photos which provide details about more than just the lashing:
First look at the hoops and how they are now secured to each layer.
Then look at the galvanized sheet metal mast protective band for wear from the boom jaws,
Then look at the luff plate/gromette with the protective canvas extension around the luff bolt rope canvas.
And lastly it is hard to see exactly how the lashing is started or completed. I have asked for more details and diagrams: how the cow hitch starts, the crossing path, then the vertical frapping, and lastly the final tie-off.
View attachment 207699Now the second photo which doesn't show much more than pulling the single line tight with the fid before tying it off:View attachment 207700
I'll pass the details along when received.
Rich
As promised that I would provide additional details regarding lashing the sail luff to the hoops. Here is what came back from the Captain of Bluenose II through one of the crew about the 100% nylon rigging line that is linked in the reply below. Remember that frapping passes are the vertical wraps around the horziontals between the grommet and hoop.

"Here is some more information from the Captain. I hope this helps!

We use a braided gangion from Brownell.
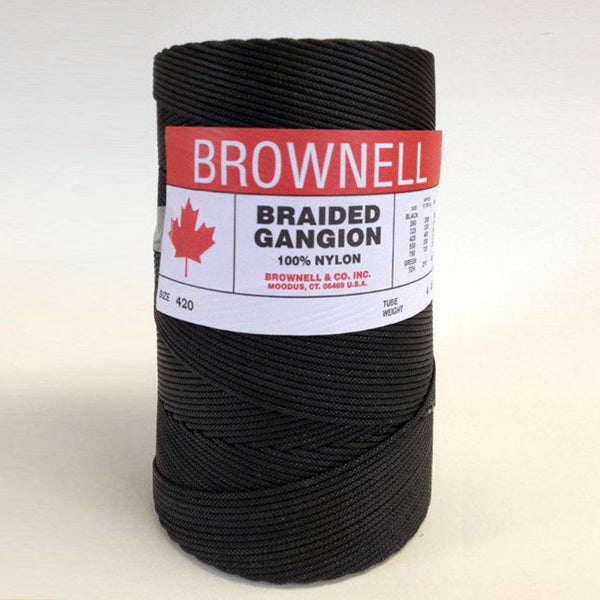

We middle about two fathoms of line on the thickest part of the hoop. We then pass the ends in opposite directions through the grommet on the sail. Eight passes is the normal amount. Then we add frapping passes starting at the sail and working towards the hoop. We finish with two reef knots. After the last reef knot we add an overhand knot for extra security. The ends are then trimmed.

We use the thickest part of the hoop because the gangion bears the most strain over the smallest area. The thinner part of the hoop bears on the forward side of the mast. It’s a small thing but we try to put everything in our favour. "


My own thought is that this is more than we could do on our models but does provide a manner that may be truncated with the small line that we may use depending upon scale. It does provide better insight to the schooner.
Rich
While this video is not BN or a schooner the early part of the construction and planking is somewhat related to POF.
 
While this video is not BN or a schooner the early part of the construction and planking is somewhat related to POF.
Here is a YouTube video of the BNII rebuild starting with the deadwood construction
Then I will put up a later video of the decking
There are a lot of other views in-between that you can find with some searching of the sidebars.
Rich
 
Here is a YouTube video of the BNII rebuild starting with the deadwood construction
Then I will put up a later video of the decking
There are a lot of other views in-between that you can find with some searching of the sidebars.
Rich
I will try to post an historical item from Tourcanada.com which summarizes her racing career
Rich
 
Note the link to Bluenose II at the bottom of the page which will take you to the home page and various pulldown menues of information.
Rich
Here is a YouTube video that I may have put up previously but contains many details about the racing of Bluenose and her actual match race results for history buffs.
Rich
 
Such a pity that YouTube is a no-go for me :(
 
It is too bad that such censorship is felt necessary but then YouTube has some questionable postings there also depending upon a person's own preferences. Rich
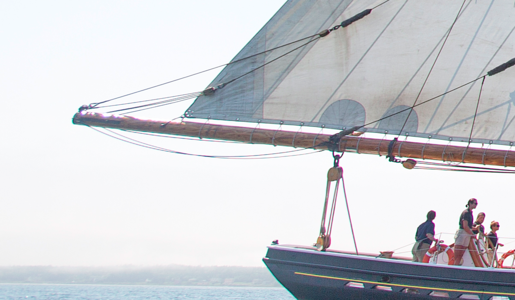
We have seen how the sail luff was tied to the hoops above so now in response to another question of connections the crew sent me two photos of the mainsail clew and boom topping lift rigging for your use:
BN II Main Sail boom end riggng.jpg
Boom end clew fitting and rigging closer view
BN II Main sails boom end rigging closeup.png
 
We have seen how the sail luff was tied to the hoops above so now in response to another question of connections the crew sent me two photos of the mainsail clew and boom topping lift rigging for your use:
View attachment 219849
Boom end clew fitting and rigging closer view
View attachment 219850
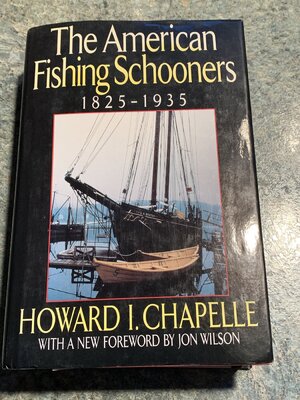
Our porch had a welcome home box for me from the shipboard crew of BN II's recommended acquisition which I found an excellent used copy for $35.00 USD.
The American Fishing Schooners 1825 - 1935.jpgThe American Fishing Schooners 1825 - 1935.jpg
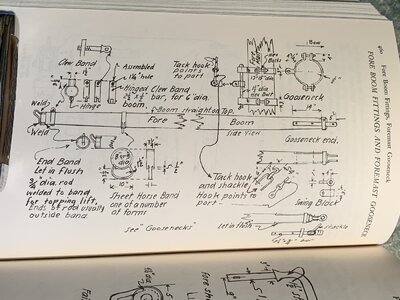
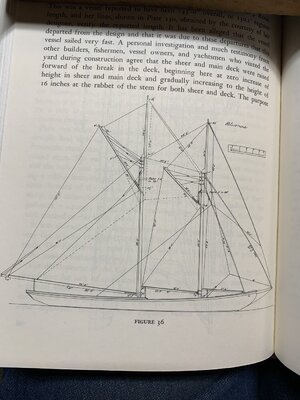
From the detailed questions that I was asking and what they could provide their strong recommendation was to obtain this book. It is 313 pages of historical information, lofting draughts, and old photos; before beginning with very detailed drawings and explanation of everything that goes into a schooner up until the last page 683, with concluding acknowledgments and index. I cannot begin to present all that is available to a serious and detailed student and model builder of schooners and Bluenose. An example of a random page is
AFS Details Example.jpg
My point of hesitation at this initial scan of the book is how to coordinate all of the details for my own BN work. I would have liked to have had this resource sooner, before I started working on the kit as it has information and drawings related to the very start of construction. Highly recommended for your consideration. It will keep my mind working every night and all night long in preparation for the following day's work. Rich (PT-2)
 
Our porch had a welcome home box for me from the shipboard crew of BN II's recommended acquisition which I found an excellent used copy for $35.00 USD.
View attachment 219864View attachment 219864
From the detailed questions that I was asking and what they could provide their strong recommendation was to obtain this book. It is 313 pages of historical information, lofting draughts, and old photos; before beginning with very detailed drawings and explanation of everything that goes into a schooner up until the last page 683, with concluding acknowledgments and index. I cannot begin to present all that is available to a serious and detailed student and model builder of schooners and Bluenose. An example of a random page is
View attachment 219867
My point of hesitation at this initial scan of the book is how to coordinate all of the details for my own BN work. I would have liked to have had this resource sooner, before I started working on the kit as it has information and drawings related to the very start of construction. Highly recommended for your consideration. It will keep my mind working every night and all night long in preparation for the following day's work. Rich (PT-2)
Hello Rich, Yes this is a very good and informative book , I have had it for years now. I used it in the building of one of the Fishing Schooners that my Great Grand Father Commanded in the early 1900ths. the Annie M. Parker. I also bought it used and now it is even more used and will be of a great help in my up and coming Bluenose build.
Regards LawrenceANNIE M..jpg
 
Hello Rich, Yes this is a very good and informative book , I have had it for years now. I used it in the building of one of the Fishing Schooners that my Great Grand Father Commanded in the early 1900ths. the Annie M. Parker. I also bought it used and now it is even more used and will be of a great help in my up and coming Bluenose build.
Regards LawrenceView attachment 219918
As I did not find an index for all of the detail drawings I am going to type one up in Excel so that I can sort it alphabetically to find it when needed. Nice photo that you have here. Rich
 
As I did not find an index for all of the detail drawings I am going to type one up in Excel so that I can sort it alphabetically to find it when needed. Nice photo that you have here. Rich
Overly hasty indexing reaction on my part as the titles of the details and notes are alphabetically arranged so a search would be for key word/item either way. Saved myself some time after seeing the pattern when I had typed in about 15 - 20. Most detail drawings show much more than a single item and most times that one in relationship to numerous others. Rich
 
Overly hasty indexing reaction on my part as the titles of the details and notes are alphabetically arranged so a search would be for key word/item either way. Saved myself some time after seeing the pattern when I had typed in about 15 - 20. Most detail drawings show much more than a single item and most times that one in relationship to numerous others. Rich
Looks like a great book I might have to purchase!
 
Looks like a great book I might have to purchase!
The value for schooner builders is that Chapelle wrote that within his time periods there was reuse of most of the same items. Primary changes were small ones in hull lines and not rigging components. Thus at the very end of the era of large schooners the Bluenose was only significantly different in her forward sheer and knuckle being higher than other schooners but using the same rigging components. In this way we are offered what will lead to faithful schooners no matter which one may be selected. He has scantlings for each the schooners in each "era" which for the most part were taken from surviving half hulls. Very few drawings were preserved it seems and he notes that only every third to fifth frame is dimensioned leaving the shipwrights to their own experience and eye on how to interpolate the frames between. The amazing thing for me is the detail given to all of the different fittings with his dimensions on his own sketches of those that he had in hand and drew from with his own measurements.
 
All very cool images
The value for schooner builders is that Chapelle wrote that within his time periods there was reuse of most of the same items. Primary changes were small ones in hull lines and not rigging components. Thus at the very end of the era of large schooners the Bluenose was only significantly different in her forward sheer and knuckle being higher than other schooners but using the same rigging components. In this way we are offered what will lead to faithful schooners no matter which one may be selected. He has scantlings for each the schooners in each "era" which for the most part were taken from surviving half hulls. Very few drawings were preserved it seems and he notes that only every third to fifth frame is dimensioned leaving the shipwrights to their own experience and eye on how to interpolate the frames between. The amazing thing for me is the detail given to all of the different fittings with his dimensions on his own sketches of those that he had in hand and drew from with his own measurements.
One item from the Schooners book relating to mast rake in full sized schooners but not with our models:
p. 294, elevation drawing of Bluenose has notes of rake for each mast: Main 2'-4'at 70 ft. and Fore 5" at 64 ft.. I though those wer raked aft until I found under notes p. 431 "Curvature of the Masts - Rake" "Masts of fishing schooners were usually stayed with the mastheads pulled forward . . (See dimensions above) from the masts' centerlines, wit all sail lowered. the purpose was to produce taut forestay and jib stay, and also springstay, with sails hoisted. Topmasts were sprung forward in proportion, to tauten jib-topsail stay. The bowsprit, if one existed, would be hogged down for the same purpose. With sails hoilted, the masts became nearly straight and slightly raked. Mainmasts were raked more than foremasts, but rakes were moderate after 1860."
So we now know something about nothing that will affect our models but does add a possible reason for the deck crewman photo measuring downwards to the deck . . . perhaps. . . .
I had the rakes backwards in my mind until I found the note
On the drawing you can find the rake notes by the masts right of the gaffs Bluenose in Schooners.jpgBluenose in Schooners.jpgas well as the length of the sides of the sails. For those of yesteryear radio. . . "Now you know the rest of the story." Rich
 
It's interesting to see that the ship has such a small rudder. I wasn't expecting that.
Tacking and steering are a combination of both rudder and forward sails becoming backed which pushes the bow over. Timing in sailing is everything combined. I learned that long ago when racing in both very low and very high winds as the skipper with my hand on the tiller and mainsheet, instructing the crew when to bring the jib and other forward sheets across keeping in balance. Also mast rake and centerboard have to be combined: downwind the main stay released bringing the mast as vertical as possible for maximum sail exposure and then when rounding the downwind mark bringing the mast aft and balancing that center of effort of the sails with the centerboard position. On a beam reach when planning the hull the centerboard is brought up from a quarter to two thirds reducing friction and tripping over an extended centerboard, so that the center of resistance going aft had to match the center of effort of the sails above. It is a very tactile feedback activity with the wind and water changing all the time and the need to use sail tensioning moving the camber of the sail for greatest drive. Eyes and hands always working. I loved it. Longer hulls require that forward backing to bring the bow across as the rudder cannot be moved over too fast or it is just drag defeating a tack. If you have raced larger boats I would like to hear about that. Rich (PT-2)
 
I am not a seaman in any sense of the word I am just very curious about the operation of these sailing vessels. Silly question, but does this mean you can turn a boat without using the rudder at all? That is really what I am wondering.
Thanks
 
I am not a seaman in any sense of the word I am just very curious about the operation of these sailing vessels. Silly question, but does this mean you can turn a boat without using the rudder at all? That is really what I am wondering.
Thanks
From my experience in racing "dinghies" (small mono-hull boats under about 20 ft. like the one design classes of Lightning, BLue Jay, Thistle, and 5-0-5 all with personal racing experience) you still need a tiller and rudder to initiate the process from sailing on one tack and while maintaining upwind direction cross over the bowline to the other. In square riggers I have only book knowledge of a method of changing tacks by "wearing" or allowing the vessel to proceed back downwind and in shifting the yards to then come around once again to an upwind tack but far downwind from where it was initiated. (Say starting on port tack at 1:00 proceeding toward starboard around to 3:00 then at 6:00 beginning to come back upwind on starboard tack toward 9:00) I don't know if that could be done without the use of the rudder but allowing wind resistance in the sails or high winds bare yards it may be possible. There is a good explanation and diagrams of this in the book Seamanship in the Ages of Sail by John Harland. Sailing downwind, usually with the mainsail boom out on one side and the jib out over the other side, the greater driving force of the main would try to pivot the hull around the centerboard to the other side. You could control this by how far out the main boom was set and by adding a strong swift pull on the main sheet it would give a paddle-like thrust in a pivoting manner around the centerboard without using the rudder but letting it "swing" freely. If held firm the rudder would provide an opposing resistance to the tack change. Sailing is a very comprehensively involved activity which makes it so engrossing in smaller craft where you can feel so many things going on. I don't have large craft experience other than limited crewing so I comment on that except speculation.
 
Back
Top