Hi Jeff I am no expert but found the planking was difficult on this kit especially around the bow, the first six bulkheads change shape dramatically. The laser cut planks make it look worse, once it's sanded and filled you'll be as amazed as I was with mine.
-

Win a Free Custom Engraved Brass Coin!!!
As a way to introduce our brass coins to the community, we will raffle off a free coin during the month of August. Follow link ABOVE for instructions for entering.
-

PRE-ORDER SHIPS IN SCALE TODAY!
The beloved Ships in Scale Magazine is back and charting a new course for 2026!
Discover new skills, new techniques, and new inspirations in every issue.
NOTE THAT OUR FIRST ISSUE WILL BE JAN/FEB 2026
You are using an out of date browser. It may not display this or other websites correctly.
You should upgrade or use an alternative browser.
You should upgrade or use an alternative browser.
ZHL Black Pearl Golden 2021 - 1:64 - JeffT [COMPLETED BUILD]
There's only 2 seasons in south Texas. Summer time and July/AugustI hope the comment on sanding in Texas was somewhat "tongue in cheek"!Does San Antonio have Winter?
Thanks for the comment. I actualy doubled the thickness of some of the planks and sanded them down partially to get enough wood in some places. I haven't had to do that before. I number of planks near the bow needed to be twisted as well as bent. Generous use of putty should fix the issues however, but I am likely to get "sander's elbow" getting it right.Hi Jeff I am no expert but found the planking was difficult on this kit especially around the bow, the first six bulkheads change shape dramatically. The laser cut planks make it look worse, once it's sanded and filled you'll be as amazed as I was with mine.
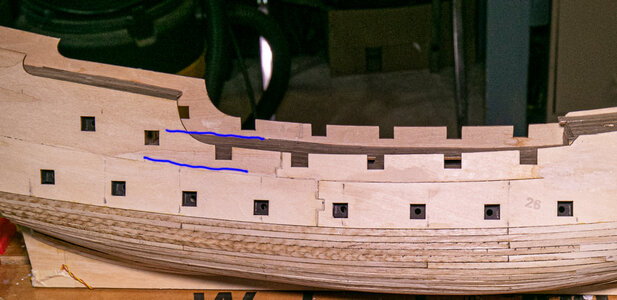
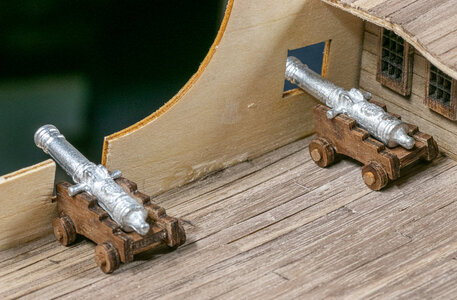
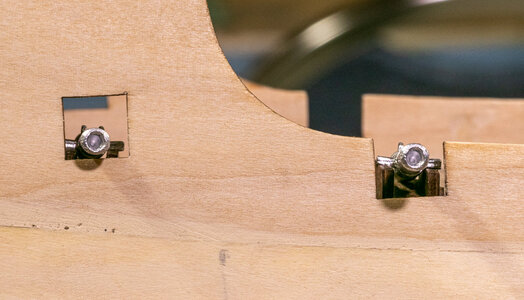
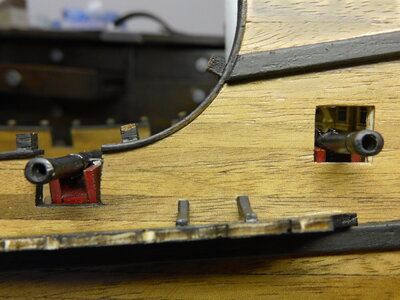
I have an interesting question especially for those that have built this model. I have been looking at the placement of the last full gun on the main deck. It seems to me that the gun port is cut too high in the bulwark for this gun. Note the blue lines that show the approximate deck height relative to the pre-cut gun ports. In the other pictures it can be seen that a gun can be centered in the second last port, but that the gun cannot be vertically centered in the last gun port. As can be seen in the pictures the gun carriage is nearly 1 cm away from the bulwark in order to get the gun out of the port.
I am thinking of re-cutting this gun port to open it lower and then adding a spacer to the top of the existing opening. This should lower the bottom of the port to be at the correct height relative to the deck.
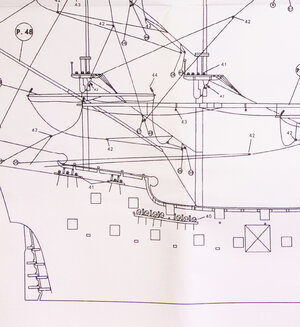
I am curious if others have seen a similar problem or if I somehow misaligned the bulwarks during assembly. I think I was misaligned a little at the stern, but not enough to cause this much problem. To my eye the plans show this gun port as not being in alignment with the curve of the deck.

- Joined
- Apr 20, 2020
- Messages
- 313
- Points
- 278

I have an interesting question especially for those that have built this model. I have been looking at the placement of the last full gun on the main deck. It seems to me that the gun port is cut too high in the bulwark for this gun. Note the blue lines that show the approximate deck height relative to the pre-cut gun ports. In the other pictures it can be seen that a gun can be centered in the second last port, but that the gun cannot be vertically centered in the last gun port. As can be seen in the pictures the gun carriage is nearly 1 cm away from the bulwark in order to get the gun out of the port.
View attachment 211618View attachment 211619View attachment 211620
I am thinking of re-cutting this gun port to open it lower and then adding a spacer to the top of the existing opening. This should lower the bottom of the port to be at the correct height relative to the deck.
I am curious if others have seen a similar problem or if I somehow misaligned the bulwarks during assembly. I think I was misaligned a little at the stern, but not enough to cause this much problem. To my eye the plans show this gun port as not being in alignment with the curve of the deck.
View attachment 211622
@Jeff T....I think that is the cannon that will be hidden under the stairs... my newbie approach was just to angle the mounting of the cannon on the carriage upwards just very slightly. Not perfect but I thought it will not be too noticeable.
Hi Jeff I checked my BP today and it's similar to yours. I have found that the drawings are no help and may even be of the bigger ship look at the deadeyes for the main mast and door by the gun ports.I have an interesting question especially for those that have built this model. I have been looking at the placement of the last full gun on the main deck. It seems to me that the gun port is cut too high in the bulwark for this gun. Note the blue lines that show the approximate deck height relative to the pre-cut gun ports. In the other pictures it can be seen that a gun can be centered in the second last port, but that the gun cannot be vertically centered in the last gun port. As can be seen in the pictures the gun carriage is nearly 1 cm away from the bulwark in order to get the gun out of the port.
View attachment 211618View attachment 211619View attachment 211620
I am thinking of re-cutting this gun port to open it lower and then adding a spacer to the top of the existing opening. This should lower the bottom of the port to be at the correct height relative to the deck.
I am curious if others have seen a similar problem or if I somehow misaligned the bulwarks during assembly. I think I was misaligned a little at the stern, but not enough to cause this much problem. To my eye the plans show this gun port as not being in alignment with the curve of the deck.
View attachment 211622
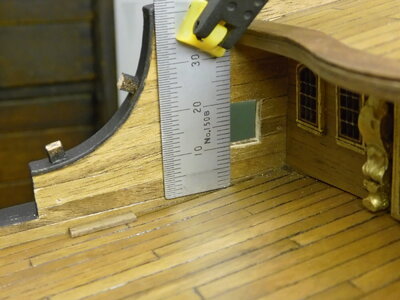
Thanks for the heads up I hadn't noticed this issue before I can get away with the low one but I am not happy with the other one that sits on an angle. The height of gun port is 9.5mm.
Jeff, my fix was quite easy. My guns are aiming every which way, so you won't notice if they're not even. One's aiming at seagulls, one's at sharks, and another's at lanyards.Hi Jeff I checked my BP today and it's similar to yours. I have found that the drawings are no help and may even be of the bigger ship look at the deadeyes for the main mast and door by the gun ports.
View attachment 211789View attachment 211790
Thanks for the heads up I hadn't noticed this issue before I can get away with the low one but I am not happy with the other one that sits on an angle. The height of gun port is 9.5mm.
Thanks for the replies to my question. I can see that if I lower the gun port a bit. I will have to keep an eye on the location of the opening relative to the deadeyes and shrouds. It looks like the last shroud on the main mast channel could be close to the gun port.Hi Jeff I checked my BP today and it's similar to yours. I have found that the drawings are no help and may even be of the bigger ship look at the deadeyes for the main mast and door by the gun ports.
View attachment 211789View attachment 211790
Thanks for the heads up I hadn't noticed this issue before I can get away with the low one but I am not happy with the other one that sits on an angle. The height of gun port is 9.5mm.
It's always better to learn from someone else's mistakes. I wish I could do that!Thanks for the replies to my question. I can see that if I lower the gun port a bit. I will have to keep an eye on the location of the opening relative to the deadeyes and shrouds. It looks like the last shroud on the main mast channel could be close to the gun port.
Thanks for the replies to my question. I can see that if I lower the gun port a bit. I will have to keep an eye on the location of the opening relative to the deadeyes and shrouds. It looks like the last shroud on the main mast channel could be close to the gun port.
Rather than lowering the gun port you could try placing a spacer under the front wheels of the gun a few mm's should be enough it won't show behind the stairs. I had to move a deadeye as it was in front of the gun.
Careful placement of the channels is important here. There are several places where it could be a tight fit.Rather than lowering the gun port you could try placing a spacer under the front wheels of the gun a few mm's should be enough it won't show behind the stairs. I had to move a deadeye as it was in front of the gun.
Probably not a bad idea. Small spacers under the wheels would hardly be noticeable. Moving the port down 2mm or so could be more problematic.Rather than lowering the gun port you could try placing a spacer under the front wheels of the gun a few mm's should be enough it won't show behind the stairs. I had to move a deadeye as it was in front of the gun.
While I wait for Spring and warmer weather to sand the hull outside, I have been working on various parts of the build that can be done in a cool basement. I say that because glue has not been setting up as well as usual and I suspect it is due to the temperature being around 56F there.
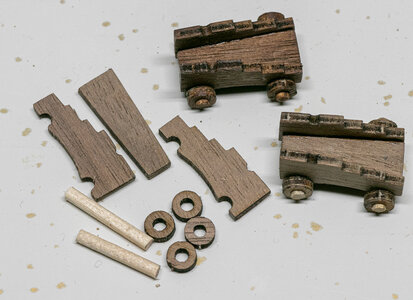
I worked on and completed the gun carriages. Most everyone paints them red as typical on warships, but as this is the Black Pearl, I am going for a dark walnut color which should work well with the overall dark theme of the ship. The photo shows the parts, the completed carriage unstained and stained. I build a simple jig/platform to build the carriages on. It worked fairly well as long as the carriage was removed before the glue could fully set just in case some got on the platform.
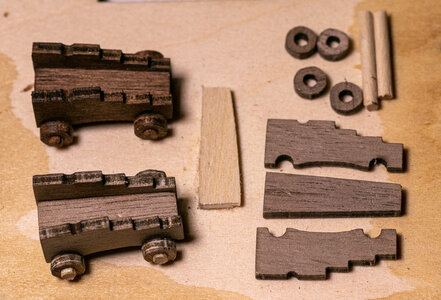
I worked on and completed the gun carriages. Most everyone paints them red as typical on warships, but as this is the Black Pearl, I am going for a dark walnut color which should work well with the overall dark theme of the ship. The photo shows the parts, the completed carriage unstained and stained. I build a simple jig/platform to build the carriages on. It worked fairly well as long as the carriage was removed before the glue could fully set just in case some got on the platform.

Last edited:
Hello, Jeff. I also like to leave natural timber instead of painting it red, and dark walnut looks great. The question I have, however, for cheeks positioning. I think the narrower side should be the front. But as you mentioned, it is BP and everything is possible.  Check this image below as refference
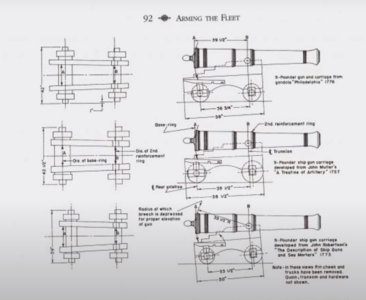

Yeah, Jeff, I did the same thing. Somebody informed me and it was too late. I had already made them all.Hello, Jeff. I also like to leave natural timber instead of painting it red, and dark walnut looks great. The question I have, however, for cheeks positioning. I think the narrower side should be the front. But as you mentioned, it is BP and everything is possible.Check this image below as refference
View attachment 214790
Jim,Hello, Jeff. I also like to leave natural timber instead of painting it red, and dark walnut looks great. The question I have, however, for cheeks positioning. I think the narrower side should be the front. But as you mentioned, it is BP and everything is possible.Check this image below as refference
View attachment 214790
Thanks the information. I published the wrong picture. I did in fact build the first 2 carriages backwards and then realized my mistake. I was able to de-bond the glue and build these 2 and the other 8 carriages in the correct orientation.
Kurt Konrath
Kurt Konrath
The one hard lesson you haven't learned is from the one mistake you haven't made yet.
I tend to learn a lot, as I make mistakes often, mostly from not reading ahead to verify things, or just not reading instructions at all, but then I am a guy!
I tend to learn a lot, as I make mistakes often, mostly from not reading ahead to verify things, or just not reading instructions at all, but then I am a guy!
Hi Jeff by coincidence I've been finishing the cannons on my BP this week. I went the other way with the colour and used a red stain on the carriage mainly because everything on the ship is walnut and black. I wanted the cannons to stand out. I thought the instructions showed the taper round the wrong way and the cannon seemed to fit in the carriage better like this but I went with the correct orientation. I will update my log soon.While I wait for Spring and warmer weather to sand the hull outside, I have been working on various parts of the build that can be done in a cool basement. I say that because glue has not been setting up as well as usual and I suspect it is due to the temperature being around 56F there.
I worked on and completed the gun carriages. Most everyone paints them red as typical on warships, but as this is the Black Pearl, I am going for a dark walnut color which should work well with the overall dark theme of the ship. The photo shows the parts, the completed carriage unstained and stained. I build a simple jig/platform to build the carriages on. It worked fairly well as long as the carriage was removed before the glue could fully set just in case some got on the platform.
View attachment 214787
Tony
Thanks for the comment Tony. The instructions are not always a lot of help and I this case it was difficult to see which way they went. I was looking at the 2 that I had built and realized that something was off. I went to a th other models I have and verified my mistake.Hi Jeff by coincidence I've been finishing the cannons on my BP this week. I went the other way with the colour and used a red stain on the carriage mainly because everything on the ship is walnut and black. I wanted the cannons to stand out. I thought the instructions showed the taper round the wrong way and the cannon seemed to fit in the carriage better like this but I went with the correct orientation. I will update my log soon.
Tony
I have been following your BP build as well. I think some of the gold decorations will add the contrast or interest you refer to by using red for the carriages.
I spent the last 2 weeks working on the ships boat/gig. Not the easiest project. The ribs are very delicate and break easily (3 broken during assembly). Even so, I was able to get it completed. I put in the floor boards early to add some strength and support to the ribs during planking. I stained the boat a dark walnut to the match gun carriages. I still have the oars to work on and I am considering whether to add a version of oarlocks. We'll see about that.
I had a number of small gaps between planks which is understandable with the quality of the wood strips provided. The wood strips were very thin and very difficult to sand the edges. To fill the gaps, I mixed white glue and wlanut sanding dust at about 1.5 to 1 parts and filled gaps with that. I thought it worked surprizingly well.
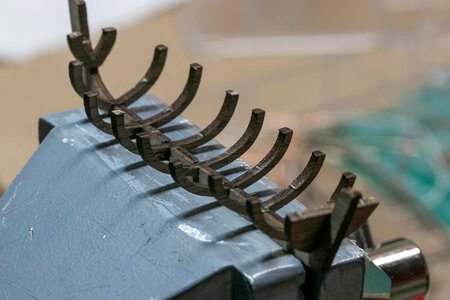
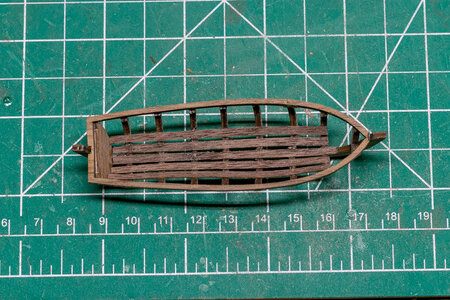
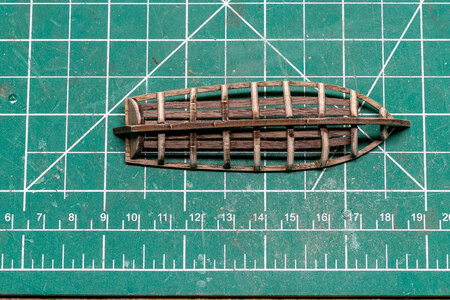
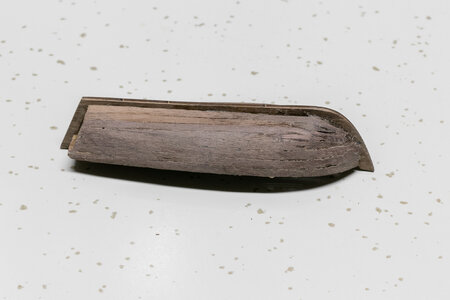
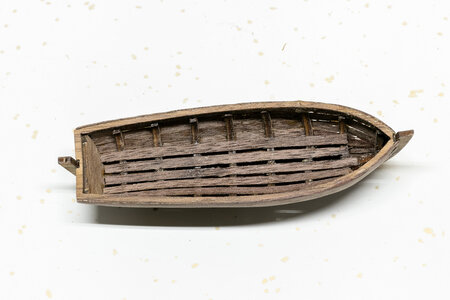
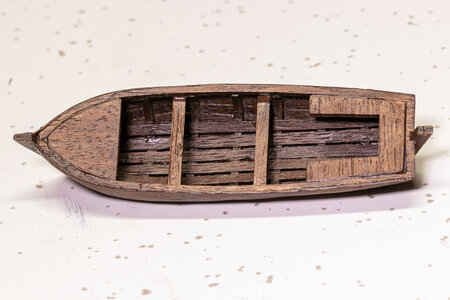
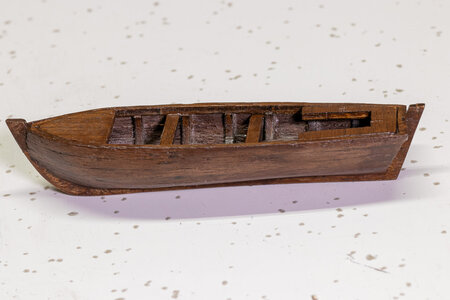
What would I do differently if I could start over? First, I think I would try to assemble the frames and keel to the gunwale while it was still attached to the full laser cut piece. This would have added some additional stabilization the the ribs during the assembly process which would have helped considerably. I also would have considered a filler piece at the bow between the first and second rib. Since the bow deck would cover the filler, I think it would have been a good addition to get better planking at the bow.
I have not worked on the tiller and rudder yet. I am considering putting them in the bottom of the boat instead of attaching them to the stern. I have enough experience in small boat handling and storage to know that rudders and tillers are typically removed during transport and storage. Any thoughts on this?
I had a number of small gaps between planks which is understandable with the quality of the wood strips provided. The wood strips were very thin and very difficult to sand the edges. To fill the gaps, I mixed white glue and wlanut sanding dust at about 1.5 to 1 parts and filled gaps with that. I thought it worked surprizingly well.


What would I do differently if I could start over? First, I think I would try to assemble the frames and keel to the gunwale while it was still attached to the full laser cut piece. This would have added some additional stabilization the the ribs during the assembly process which would have helped considerably. I also would have considered a filler piece at the bow between the first and second rib. Since the bow deck would cover the filler, I think it would have been a good addition to get better planking at the bow.
I have not worked on the tiller and rudder yet. I am considering putting them in the bottom of the boat instead of attaching them to the stern. I have enough experience in small boat handling and storage to know that rudders and tillers are typically removed during transport and storage. Any thoughts on this?


