Soleil Royal ZHL kit 1:90 Scale [COMPLETED BUILD]

Hello Mike
She's looking absolutely amazing. Outstanding job I'll try to come close to.
Are you going to install the sails?
Congratulations again
Hi Gilbert,
Thank you for the compliment, no sails for me I like look without. Your build is progressing nicely, your work is excellen.
 
Did you run a "rabbet" along the keel for a garboard plan, and remove dead wood near the stern? thanks Ken
 
Hi Ken
No I did not. I just shaped the plank to fit to keel. I felt that the stern would have gotten to thin if I cut a rabbet and removed the dead wood.
 
IN frame ..363, how did you get that to bend. I'm working on same. I don't want to break it, and hesitant to put in water due to de lamination, Thanks, Ken
 
not 363...... 63
Hi Ken, Im not sure what part 63 is, i can't find my CD. If it is the part for the fore end of the ship that has 2 gun ports and the hole for the mast i did not bend it.
I believe that was a mistake on my part, i think should be bent.
To bend i would use a plank bender, soldering iron or such. Take your time it should bend dry, put something behind the part so you can get a nice curve.
If 63 is one of the gun port frames bend same way, mine bent easily with heat from the bender.
Do not do your life Difficult. Take a Pot with water, heating it op the boiling, and then use the steam from that or the DRY bending. Yale a Tin (from Beans or something like That. Set it FAST strongly, as it gets extremely hot after you have inserted 4-5 candlelight -the ones from the Chinese restaurant

AA-03-BENDING WOODS-111 (3).jpg

AA-03-BENDING WOODS-111 (12).jpg

AA-03-BENDING WOODS-111 (13).jpg
 
Do not do your life Difficult. Take a Pot with water, heating it op the boiling, and then use the steam from that or the DRY bending. Yale a Tin (from Beans or something like That. Set it FAST strongly, as it gets extremely hot after you have inserted 4-5 candlelight -the ones from the Chinese restaurant
I have not seen your build until today. It was my last build -77 now - Mine was from Altaya/DeAgostini. I have has a look at you Images, and to me, it looks correct
 

Attachments

  • stevn3.jpg
    stevn3.jpg
    55.2 KB · Views: 23
  • stevn 5.jpg
    stevn 5.jpg
    652 KB · Views: 23
Thanks Capi, I was not sure. Any plans for another project?
Hi Ken, Im not sure what part 63 is, i can't find my CD. If it is the part for the fore end of the ship that has 2 gun ports and the hole for the mast i did not bend it.
I believe that was a mistake on my part, i think should be bent.
To bend i would use a plank bender, soldering iron or such. Take your time it should bend dry, put something behind the part so you can get a nice curve.
If 63 is one of the gun port frames bend same way, mine bent easily with heat from the bender.
Hi mike... 63 is the gun port frame support that goes around the bow. I've been experimenting with some of the scrap. Soak for an hour, put it in a jig, let set for an hour then score lightly behind with a cutting disc. This method gave me plenty of flexibility, plus it will be supported with wood blocks under neat. thank you Ken
 
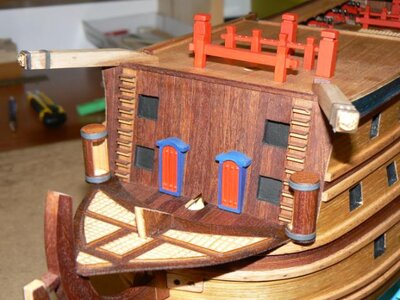
Well getting in last update of 2018, were did it go? I had some issues when I was cutting in the round gun ports. I found out the poop deck was 5mm to long and the dimensions in the instructions were different than the plan, so I had to make adjustments. View attachment 69852 View attachment 69853
You can see where I had to add to the bulwarks, at least its getting covered up by paint.
Planking is mostly done and gun port frames are in. Balcony's are built and ready for paint.

View attachment 69855

View attachment 69856

I'm with @Jimsky on painting but it has to have the blue. Going to use ultramarine blue, looks to be a nice shade. I wasn't sure about painting bulwarks but I think I'm going to do it. Hope it turns out ok.
This last pic is where she stands now.

View attachment 69854

Hope you all have a Happy New Year, and lets pray we have less health issues this coming year and enjoy modeling.
Beautiful model. I'm working on same. Getting ready to start the stern galleries and wondered what type of filler did you use on the port and starboard sides to smooth things out. I used a "DaP" filler before the second planking. That is basically just a spackle. Since these areas will be more visible, would a more durable product be more appropriate. Thank you.
 
Thank you for the compliment. I used HobbyLite filler. I picked this up at a local Hobby shop.
This filler sands very easy to a smooth finish. I really liked working with this product.
I enjoyed working on this build and hope you do as well. There are a lot of great logs here on SOS of this ship. Happy modeling.

2F893636-B8F0-4304-8CBB-70251B345DFD.jpeg
 
Thank you for the compliment. I used HobbyLite filler. I picked this up at a local Hobby shop.
This filler sands very easy to a smooth finish. I really liked working with this product.
I enjoyed working on this build and hope you do as well. There are a lot of great logs here on SOS of this ship. Happy modeling.

View attachment 253184
thank you
 
how did you get the vaneer to curve sideways in such a way? do you steam them or soak them? interested to understand! mine just want to form a straight line and lift on the edges to form peaks. rather frustrating.
 
Back
Top