Build Log: Port Jackson Schooner

Joined
Sep 5, 2021
Messages
131
Points
78

Location
Honolulu Hi.
I had hoped to start this build log after I got the first layer of planking in, but I ran into some trouble fitting the planking at the bow, nothing that can't be fixed, but I was hoping I might get some technique tips or other suggestions so as to avoid this on future builds.

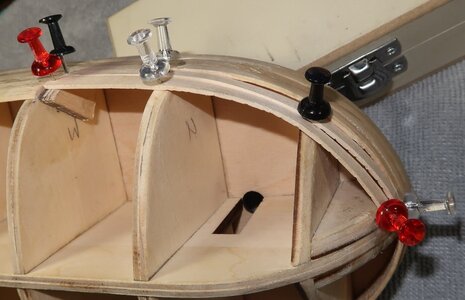
As I started planking down the hull, it got to where I couldn't get the planks to make contact with bulkhead 1, they just bowed out too far. I think part of the problem is I removed too much material from the edge of bulkhead 1, as well as technique issues mentioned earlier.

I cut off the bottom three planks at bulkhead 3 and am in the process of fitting replacement planks. I'm getting better contact with bulkhead 1 but I'm getting this step affect on the planks between bulkhead 1 and the bow.

Easy enough filling all that in, but any tips or suggestions on getting a smoother line down the outside of those planks would be appreciated.

Thanks.
 

Attachments

  • IMG_2999.JPG
    IMG_2999.JPG
    166.8 KB · Views: 41
Thanks Allan;

The taper on the planks is 1.6 mm from bulkhead 3 to the bow and .7 mm from bulkhead 6 to the transom. Considering that my milling station right now is a sheet of 180 grit taped to the top of a 2 drawer filing cabinet, I've got that taper pretty close. There's nothing in the instructions about the joggle planks you mentioned.

The planking across the rest of the hull is going well, I just kind of messed up a bit on the bow, but the fix seems to be taking care of that.

Thanks.
 
Whats the old saying "practice makes perfect" and we all seem to get lots of practice.

Adding filler blocks in bow to help float the gaps helped me on my first build.

Its a little extra work but worth the effort, and they don't have to look great, as you plank over them.

They give you more solid room to glue and press against when bending the bow planks.
 
what i see as a possible problem is the lack of filler pieces between the bulkheads. Builders of bulkhead hull sometimes do not realize real ship hulls are practically as solid wall of timber sometimes with only inches between frames. It is the solid wall behind the planking that give the planks something to form to. As you can see the the plank behind the black pin bows outward then the next planks have no support so it will lay flat between the bulkheads. As the bevel on the first bulkhead changes the planks will contine to lay flat.
To reslove this you need to fill in between the bulkheads and shape the hull before you start planking.


IMG_2999.JPG
 
Last edited:
Hi Toleolu!

PA010569.JPG

In the photo marked with
1: Conventional straight planking strips. You have to be made narrower and bent in some places.
2: Parts from a modern kit: "Ready bent" curved planking stripes for a deck of a French ship.
3: This is what "ready-bent" and partly adjusted planking stripes for a hull planking look like.

Modern kit production eliminates the difficult shaping of the planks for the model builder. The steps between the planks at the bow are thus eliminated.

Neverless, I still love the old shaping of the planks by myself. When I first started building models, there were only straight planks.

Best regards
Thomas
 
Last edited:
Kkonrath and Dave;

I agree with your points about the filler pieces. I was considering doing that at first when things with the shape started going wonky. But being a first project, I kinda went into this as a burner project to begin with anyway.

I'm saving all the dust from tapering the planks, I'll mix that with some glue and fill the big gaps, sand that all down then finish it off with some Timbermate. That should give me a good enough surface for the second layer of planking. If the bow ends up a little dinged up, I'll just say I was trying to "relic it" to duplicate all the dings in the bow from the Aussie crew bumping into things after a few to many Fosters. :)
 
Hi Toleolu!

View attachment 259093

In the photo marked with
1: Conventional straight planking strips. You have to be made narrower and bent in some places.
2: Parts from a modern kit: "Ready bent" curved planking stripes for a deck of a French ship.
3: This is what "ready-bent" and partly adjusted planking stripes for a hull planking look like.

Modern kit production eliminates the difficult shaping of the planks for the model builder. The steps between the planks at the bow are thus eliminated.

Neverless, I still love the old shaping of the planks by myself. When I first started building models, there were only straight planks.

Best regards
Thomas
I can see where kits like that would make things a lot easier. But like you, I like shaping all this stuff myself.

As I mentioned, this being a first build, my only expectation is getting familiar with some new techniques and converting my old home recording studio into a wood shop.
 
that would work using filler to even out the hull before you apply the second planking.
Oh yeah. Give me enough filler and sandpaper and I can fix anything.

I'm going to start cutting out parts for a new build here in a few days. I'm going to use the parts from this kit as template, tweak the hull shape a bit, add more bulkheads, I was even thinking about scanning the pieces into the computer and blowing them up a bit to build it to a little larger scale.

I'll be using this to play around with a single plank hull while working on the kit.

You've got some really nice wood at your place, any suggestions on something for the planking? Thinking I might hit it with some stain and finish it with some shellac.

Thanks.
 
Filling in between the bulkheads won't help your current problem.
You need to taper the planks more.
Up to half their original width. If you need more then you have to fit "joggle planks" on the bow or stealers on the stern.
Maybe at this stage do the second option as it is the first layer and will be covered up.

Don't bother scanning the parts as I can send you the plans.

Regards
Allan

planking.jpg

Fig_9B.jpg
 
Thanks Allan, I sent you a private message regarding the plans. Appreciate the offer.

You may be right on the tapering, but I used the same calculations provided in the instructions and came up with the same results, but no worries.

I replaced the three planks I cut out the other day and added a full length plank below them. The shape is a little better and I'll be able to fill and sand smooth for the next layer. I've got 8 planks on the hull, two more then I have to stop and cut away some planking at the bow and stern, then recalculate the taper for the final 6 planks along the bottom of the hull.

I know I'm going to have a question or two when it comes to getting the planking laid on the deadwood area at the stern, but I'll post those when I get to that point.

Many thanks to all for the help.

Charles
 
that looks like a good fix
think of hull planking like a veneer over a finished shape rather than the planking itself creating the hull shape.
 
Thanks Dave;

A few posts up I asked you about some wood from your place for a single planked hull. I'm going to cut out new pieces using this kit as template, lengthen the keel, probably do the bulkheads more like frames and add more frames as needed. This is just for practice, no plans to do a complete model.

I've got some 1/8 in. birch ply I was going to use for the keel and frames, what would you suggest for the planking. I'm thinking I might want to hit it with some stain, then finish it with either shellac or Tru Oil.

Thanks
 
When you taper the plank edge only do the upper side, facing the last plank not both sides, it will curve properly then.
That's interesting because in my instructions, and other tutorials I've seen online, they say to only taper the bottom of the plank, which I did. Never thought about tapering on the upper side.

I've really had to put the instructions aside for finishing up the first layer of planking, things got really wonky and I'm having to do some real butchery to get things lined up. No problem coming up with a smooth clean surface for the second layer of planking though. Just bothers me that I jacked it up so bad.

Oh well, live and learn.
 
A few posts up I asked you about some wood from your place for a single planked hull. I'm going to cut out new pieces using this kit as template, lengthen the keel, probably do the bulkheads more like frames and add more frames as needed. This is just for practice, no plans to do a complete model.

You've got some really nice wood at your place, any suggestions on something for the planking? Thinking I might hit it with some stain and finish it with some shellac.


ok i see it now i somehow missed the first post

if you are going to stain the hull then you do not want to spend money on expensive wood like steamed pear or boxwood. Nor would you want something like Cherry which is a dark color, something natural in color and easy to work with. What comes to mind is Red Maple which is not red at all but a light cream color i am building the Tecumseth out of it, but i selected figured boards and not the clear stuff. Another is Poplar a white wood that will take an even stain. I use Poplar a lot because it is easy to work with.
Cedar is nice like Aaskan Cedar or yellow Cedar the only draw back is they are soft and will dent easy you can push your thumb nail into Alaskan Cedar, so clamping it will leave a mark. Alder is workable so is Basswood both work well and stain well.

perhaps others will post their openions on different woods to use.
 
What comes to mind is Red Maple which is not red at all but a light cream color i am building the Tecumseth out of it, but i selected figured boards and not the clear stuff. Another is Poplar a white wood that will take an even stain. I use Poplar a lot because it is easy to work with.
Thanks Dave;

Think I'll try both the Red Maple and Poplar. On your site, it shows the Red Maple as 3 in. wide and the Poplar as 2 in. wide, just wanted to confirm that is correct.

Thinking 1/8 in. thick for the planking, I've got some 1/4 in. birch ply that I was going to use for the keel and frames. This is just a test project for single planking a hull and then playing around with stains and finishes. Not intending to build a complete ship with this.
 
Before and after pics of the fix. Hopefully next time, I can get things to fit better.

View attachment 259378View attachment 259381View attachment 259379View attachment 259380
Perhaps the next time around you should consider heat bending each plank for a better matching and joined edge condition before trying to glue it in place. The more test fairing that you do with flexible strakes the better and easier will be the outcome. Don't rush it to get planks/strakes in place but go slow, text, reshape, retest, reshape . . . . . . short radius curves are difficult to heat bending will make it easier. The most complex in my mind are those with a compound curve which not only have the bendng of the plank but also a twist as may often be found approaching the stern and transom. In addition to the comment about spakeling and sanding to achieve a visual form is the insight "A good painter can make a finish carpenter out of anyone!" Keep at it and things will improve over time. I have sailed this course and had my own problems to overcome but progress is attainable with persistence and patience. Just some suggestions. Rich (PT-2)
 
Back
Top