• LUCZORAMA SHIPWRECK SCAVENGER HUNT GIVEAWAY. 4 Weeks of Fun • 1 Legendary Prize ((OcCre’s Fram Ship)) • Global Crew Welcome!
    **VIEW THREAD HERE**

HIGH HOPES, WILD MEN AND THE DEVIL’S JAW - Willem Barentsz Kolderstok 1:50

No front wall?….I voted for two “doors” ROTF . I think the one you made from Pear looks good, however it may look too obvious against the oak hull etc. Does it not work for you? Cheers Grant
Grant that is a difficult call. The drawings of Van de Veer shows either no front wall or a front wall but with only a single arch door opening and no door. I am trying to construct the wall so that I can see what it looks like, but so far, the little ship has refuted all my attempts - as if to tell me the front wall shouldn't be there.
 
Grant that is a difficult call. The drawings of Van de Veer shows either no front wall or a front wall but with only a single arch door opening and no door. I am trying to construct the wall so that I can see what it looks like, but so far, the little ship has refuted all my attempts - as if to tell me the front wall shouldn't be there.
As long as nothing is glued in place, you have the time to consider what you prefer. You can lay it beside your WB till you got the ‘ping’. And perhaps some paper molds: with 2 openings with of without doors. Then you can compare all the options. Visualization will sometimes helps.
Regards, Peter
 
As long as nothing is glued in place, you have the time to consider what you prefer. You can lay it beside your WB till you got the ‘ping’. And perhaps some paper molds: with 2 openings with of without doors. Then you can compare all the options. Visualization will sometimes helps.
Regards, Peter
Thank you for the input, Peter. I have used paper templates to determine the basic structure of the front wall and arch. Those have shown me that it is definitely worthwhile to pursue, but whether I actually prefer that to the "open" look, is a difficult call for me.
 
Dear Friends

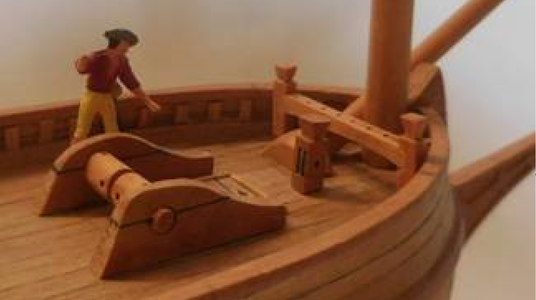
While I am still fighting with the front wall - something that at the rate I'm going now, will continue for the foreseeable future - I assembled, stained and dry-fitted the winch.

微信图片_20221021154113.jpg
Finally, something that went together without a hitch, but that is probably because @Kolderstok Hans custom-made it for me. ROTF Once again I am in awe of the workmanlike effect that the CLOU stain gives the oak.
 
Heinrich, i agree with Peter Voogt about your frontwall, so that is not a point of discussion, but have you already decided how to place the winch??
I believe Ab Hoving had it inbetween the canopy and the frontmast was it not??
Bye the way, can you still go to school? or is it back to the online lessons???
Hello my friend. Yes, as far as the front wall goes, I will finish it, dry fit it into position and then make a final call. Luckily, both options are shown on De Veer's drawings, so I can make a choice based on personal preference and still be correct. The winch is still a difficult one. Ab and I are actually in discussion about that as we speak. I have no doubt now that Ab's placement of the winch directly behind the fokkemast (foremast) is very feasible. The problem is that even though I have considerably more space now, it might still not be enough as the front mast placement on the Kolderstok kit is further back than on Hoving's model. I also have to fit a belegbank (belaying rack) and knecht (knighthead) in the bow, so I might be forced to go the De Weerdt/replica route of placing it further back underneath the front canopy.

One thing that Ab has cleared up 100% for me, is that the WB had no ankerbeting (mooring bitt) - another mistake on the replica!
 
Heinrich, i agree with Peter Voogt about your frontwall, so that is not a point of discussion, but have you already decided how to place the winch??
I believe Ab Hoving had it inbetween the canopy and the frontmast was it not??
Bye the way, can you still go to school? or is it back to the online lessons???
Peter. I will post pictures later, but my windlass will be in the same position as Ab's! :)
 
Dear Friends

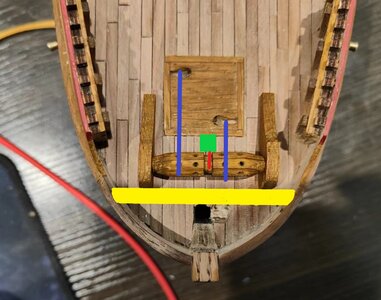
Tonight, I am very happy to be able to say that the correct position of the windlass and ancillaries have been determined after a final consultation with @Ab Hoving. Let me share with you, the layout.

微信图片_20221021222022.jpg
The position of the windlass in front of the front canopy is self-explanatory. My much wider, rounder - and more importantly, correct - bow has finally created the space as it was on the real ship. The ancillaries are as follow:

1. Belaying rack (Belegbank) - Yellow
2. Knighthead (Knecht) - Green
3. Windlass stop (Pal) - Red
4. Anchor cables - Blue

The big news here is of course the absence of the mooring bitt (ankerbeting) which has been confusing part of this build since day one. In Ab's words: "Mooring bitts were used for ships with capstans, while on smaller vessels the windlass doubled as mooring bitt as well." The layout as it is shown above is the CORRECT one - compare it to the layout on the replica.

Mees Ippel 29.jpg
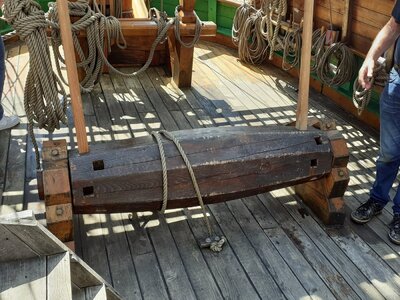
Here the winch is placed underneath the front canopy (where I have it on WB #1 with the mooring bitt in front of it. I am not going to comment about this other than to say that, that is the final nail in replica's coffin as far as I am concerned.

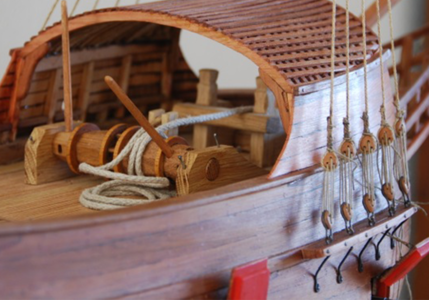
This also negates the models of Koos Weestra (below)

MK-kaapstander (1).png

Constant Willems (below)

CW4.png

and my own WB#1.

My motto - "Persequi Veritatem" - Pursue the Truth is intact.
 
Good morning, Dear Friends

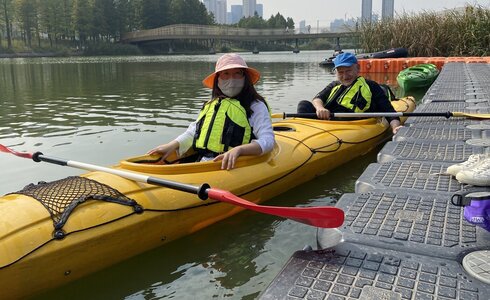
Firstly, and most importantly, I managed to convince the Admiral to join me on the water yesterday. This was her first time and I'm not quite sure whether she enjoyed it or not! ROTF (She certainly made sure that she did not get sunburnt!)

微信图片_20221022164057.jpg

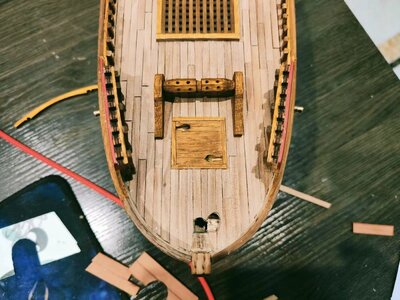
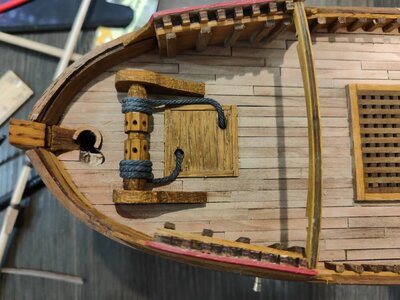
Secondly, I have reached a personal milestone. After a huge amount of research and consultation with Ab, the windlass (braadspil) has finally been placed and the anchor cables installed.

微信图片_20221023085527.jpg

I am very happy with how this has turned out so far (I say so far, because the belaying rack still has to go between the foremast and the winch and the knighthead, the winch-stop needs to be installed between the winch and the hatch and finally, the hand spokes for the winch need to done). It will be a tight fit, but it is exactly how it would have been on a small ship like the WB whilst the whole installation is 100% realistic in its functionality. The rope that Kolderstok has supplied as "cabling" works for me and I am very happy with the color. I am even happier about the fact that it is correct! Now I have oodles of space for the lifeboats!

微信图片_20221023092008.jpg

Now that the windlass is in position, I have also started placing the roof beams of the front canopy.

微信图片_20221023092342.jpg
lastly, the final version of the center canopy's front wall is under construction.
 
Good morning, Dear Friends

Firstly, and most importantly, I managed to convince the Admiral to join me on the water yesterday. This was her first time and I'm not quite sure whether she enjoyed it or not! ROTF (She certainly made sure that she did not get sunburnt!)

View attachment 336008

Secondly, I have reached a personal milestone. After a huge amount of research and consultation with Ab, the windlass (braadspil) has finally been placed and the anchor cables installed.

View attachment 336010

I am very happy with how this has turned out so far (I say so far, because the belaying rack still has to go between the foremast and the winch and the knighthead, the winch-stop needs to be installed between the winch and the hatch and finally, the hand spokes for the winch need to done). It will be a tight fit, but it is exactly how it would have been on a small ship like the WB whilst the whole installation is 100% realistic in its functionality. The rope that Kolderstok has supplied as "cabling" works for me and I am very happy with the color. I am even happier about the fact that it is correct! Now I have oodles of space for the lifeboats!

View attachment 336012

Now that the windlass is in position, I have also started placing the roof beams of the front canopy.

View attachment 336014
lastly, the final version of the center canopy's front wall is under construction.
Fantastic Heinrich, congratulations on getting the Admiral on the water, hopefully there will be more outings after this one.

Great resalt on the windlass and center canopy's front.

Cheers,
Stephen.
 
Fantastic Heinrich, congratulations on getting the Admiral on the water, hopefully there will be more outings after this one.

Great resalt on the windlass and center canopy's front.

Cheers,
Stephen.
Thank you, Stephen! The convincing part as far as the Admiral goes, was actually courtesy of the Club Coach. He gave her two options - either she takes out a single kayak on her own or she joins me in the double! ROTF

I am very happy to have the windlass sorted out - now I can finally lay that bugbear to rest!
 
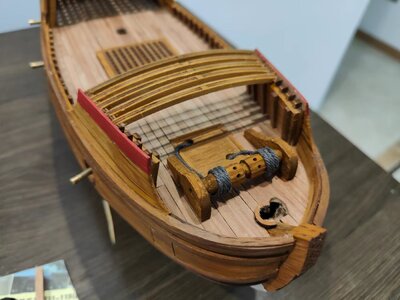
Further Progress.

微信图片_20221023140427.jpg
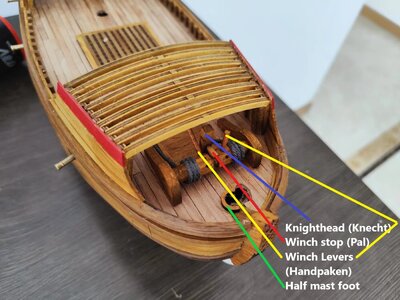
Except for the belaying rack and pins which will be placed between the foremast and the winch, everything is now complete in the bow.

1. Winch with anchor cables installed.
2. Knighthead (Knecht) with Winch Stop (Pal) installed.
3. Levers for operating the winch (handpaken) installed.
4. The fabricated mast foot for the foremast is only semi-circular as the bowsprit has to go in on the other side.

The center canopy front wall is still proving to be a headache.
 
Good morning, Dear Friends

Firstly, and most importantly, I managed to convince the Admiral to join me on the water yesterday. This was her first time and I'm not quite sure whether she enjoyed it or not! ROTF (She certainly made sure that she did not get sunburnt!)

View attachment 336008

Secondly, I have reached a personal milestone. After a huge amount of research and consultation with Ab, the windlass (braadspil) has finally been placed and the anchor cables installed.

View attachment 336010

I am very happy with how this has turned out so far (I say so far, because the belaying rack still has to go between the foremast and the winch and the knighthead, the winch-stop needs to be installed between the winch and the hatch and finally, the hand spokes for the winch need to done). It will be a tight fit, but it is exactly how it would have been on a small ship like the WB whilst the whole installation is 100% realistic in its functionality. The rope that Kolderstok has supplied as "cabling" works for me and I am very happy with the color. I am even happier about the fact that it is correct! Now I have oodles of space for the lifeboats!

View attachment 336012

Now that the windlass is in position, I have also started placing the roof beams of the front canopy.

View attachment 336014
lastly, the final version of the center canopy's front wall is under construction.
A Admiral has to be on the water in a ship! You have succeeded, Heinrich.
And the windlass with the details looks very nice!
Regards, Peter
 
A Admiral has to be on the water in a ship! You have succeeded, Heinrich.
And the windlass with the details looks very nice!
Regards, Peter
Thank you, Peter. I am very glad that you like the windlass - coming from someone with your infinite talent and skill, it is sincerely appreciated. To be very honest, I still think the windlass probably looks "nicer" underneath the canopy (less cluttered bow with everything spaced out more evenly), but then that is not the point.
 
Great work Heinrich, not only on your WB#2, but also about getting your admiral on the water in a kayak.
Your windlass is looking great as it is, one chapter closed on your research :) :)
Thank you very much my friend. It is indeed a chapter closed. Now all that is left is the belaying rack and then all ancillaries win the bow will be finished. Much later will be the turn of the foremast and bowsprit but there is still a lot of water to flow under the bridge before that can happen.
 
Back
Top