Paul, Hi. I'll borrow one of the 1,000 chairs that Jim was so kind to deliver. Your build is always a pleasure to watch, lots of new and interesting stuff. Good luck with the build of this wonderful model 

 |
As a way to introduce our brass coins to the community, we will raffle off a free coin during the month of August. Follow link ABOVE for instructions for entering. |
 |
 |
The beloved Ships in Scale Magazine is back and charting a new course for 2026! Discover new skills, new techniques, and new inspirations in every issue. NOTE THAT OUR FIRST ISSUE WILL BE JAN/FEB 2026 |
 |


Thank you, Sasha. It's fun to begin something new.Paul, Hi. I'll borrow one of the 1,000 chairs that Jim was so kind to deliver. Your build is always a pleasure to watch, lots of new and interesting stuff. Good luck with the build of this wonderful model
Indeed. The dark side beckons... Let's see if I can lighten it up a bitNow I know, why I missed the start of your new build log. You changed to the very dark side of model building. You have choosen a very intersting ship to build and I will follow your log.
Thanks, Dirk. Honestly, I can't say much about French ships either - thus my interest.Wow, great Paul. I am very pleased that something new is coming from your corner and the first works already look super great. I can't say too much about French ships, but I will sit down comfortably on one of the 1000 chairs.
I didn't realise that a small group was annoying, so don't let that put you off.
Cheers Dirk


 :
:

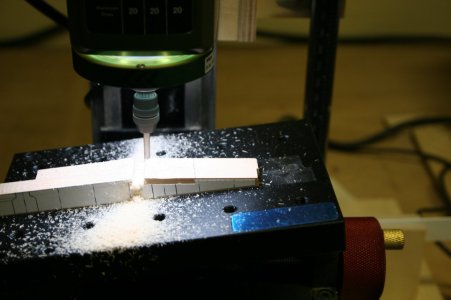
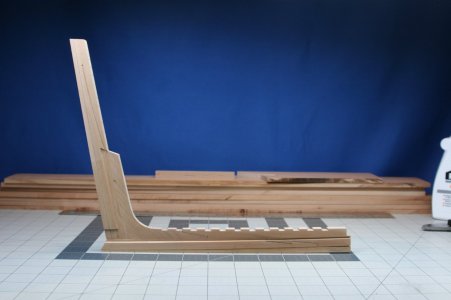
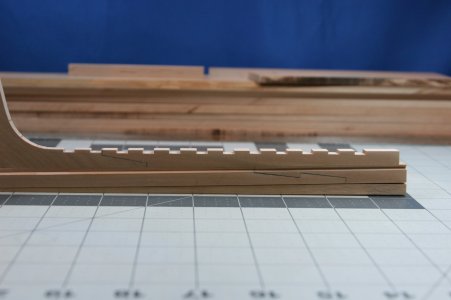
Hello Doc!Finally (on the SP), the frames seat into notches along the deadwood (I hope I am using that term correctly). These were cut in with a mill
Thanks for the terminology tune-up!Hello Doc!
That would likely be referred to as 'rising wood'... where the square frames seat into notches atop the keel. Your work is very impressive so far!
I also see that you are using a Proxxon MF70 mill. I just purchased one of those with the ER11 collet upgrade but have not used it yet. What do you think of it? I'd be tempted to say, by the beautiful and crisp looking parts that you've made that you and that mill are getting along just fine!
The beginning of another masterpiece. I'll be learning a lot as I watch from the back.Hello Friends!
After a bit of an internal struggle as to whether or not I wanted to create another build report, here I am back in a familiar spot (but on an unfamiliar side of the forum).
One of my particular flaws is I don’t like to do the same thing twice. My first ship model was a plank-on-bulkhead adaptation of the DeAgostini Vasa. Next, I was privileged to get my hands on the discontinued Lauck Street Shipyard plank-on-frame Kingfisher. If you are familiar with those build reports, you know I am very comfortable modifying/replacing/adding to the kit parts to make the model my very own – scratch building felt like a natural extension.
So that’s one fully rigged 17th century galleon, and one unrigged 18th century swan class admiralty model. Each of these are prominently displayed in my house and are summarily ignored by most everyone who enters. Good thing I build for the enjoyment of the process rather than the response I get to the final product
.
This current project will be a stern section model of the French warship Saint Philippe – primarily in European pearwood. It will be fully finished on the exterior – and left in frames on the interior (that is, there will not be any planking or build-out on the open interior of the hull).
FAQ
Why a stern section model rather than the whole ship?
Several thoughts come to mind here. First, the entire ship is beyond my current level of experience and knowledge. Mr. Lemineur’s monograph is famously difficult to interpret. Michele Padoan is currently building this ship, and we all know that I am no Michele Padoan. Nigel Brook has started this model in 1:36 but has set it aside in favor of other projects (and we all know that I am no NMBrook). Concurrent with the development of the monograph two builders also completed this ship and a few photographs of those models accompany the monograph but there are no construction diaries. I am unaware of anyone else successfully completing the Saint Philippe in POF (though I am not on many international forums).
Second, I am not really wanting to take on an 8 to10 year project right now. There are other ships I want to build if God allows me to linger…
Why a stern section of the Saint Philippe?
This is a beautiful ship. As a flag-carrying vessel of King Louis XIV she sits alongside the Royal Louis and the Soleil Royal as representative of a special time in French ship-building history. The ornate stern will require my best work and the challenge appeals to me.
Why not simply build plank-on-bulkhead and finish out the interior?
I believe there is much to be gained by forcing myself to learn how to read plans and fabricate parts from scratch. Surely the experience will make future projects more approachable.
Why build to 1:48 scale?
In one sense, a 1:36 presentation would allow me to get the most out of the stern décor. At 1:48 there will be some compromises. But even at 1:48 this is still a fairly large model, and the space necessary to display it is a factor to be considered. Plus, the Kingfisher was built to 1:48 and I think this will be an effective comparison of relative ship size.
To be continued...

I just purchased three 'cheap' WEN digital calipers for all three axes on mine. I'll be working on installation starting this weekend, maybe. Not yet sure as to how I'll actually mount the things after I 'butcher' them down to the basic components needed for a 'redneck-readout', but I'll figure it out! You 'could' purchase a dial indicator, with a magnetic base for the X and Y axes. The base of the mill is made of cast 'ferrous' material. The magnet sticks and would probably work, however. That would be just as limiting as 'eyeballing' things one feature at a time. Too easy for small oopsies to accumulate over distance, going from one feature to another, one measurement at a time, re-setting the indicator each time (with error, of course). I prefer 'ordinate' dimensions starting with one 'zero' point and each feature for machining have its own unique linear dimension. That's why I bought the cheap 6" WEN calipers. I want the DRO for X, Y and also Z but was unable to find any readymade DRO's small enough for the Proxxon mill. Oh well. "Invention meets necessity once again!"I added a digital caliper on the vertical axis but I wish I had a mill with a digital readout. Right now I'm pretty much just eyeballing things but that has its limits.

WitajDzisiejszy wpis podniesie raport z kompilacji do stanu obecnego...
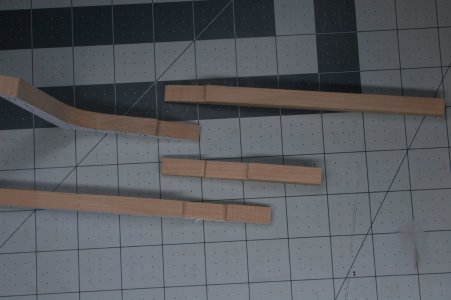
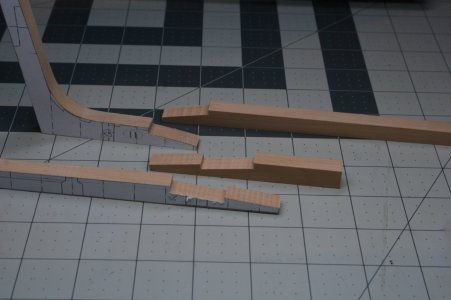
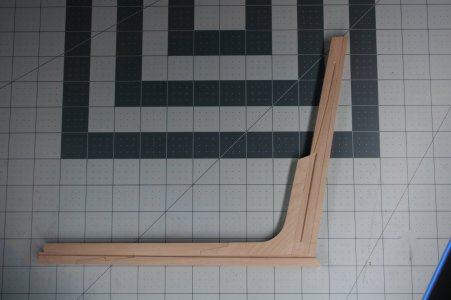
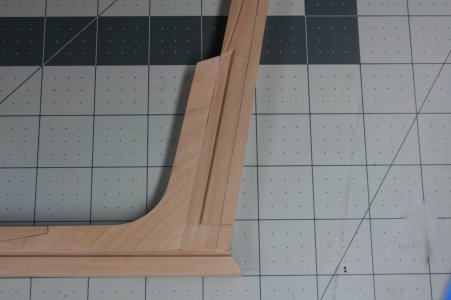
Kil SP składał się z czterech segmentów połączonych szeregowo za pomocą haczykowych połączeń szalikowych. Mimo że buduję tylko sekcję rufową, zdarzyło się, że jedno z tych haczykowych połączeń szalikowych znalazło się w zakresie mojej pracy (buduję nieco dłuższą sekcję rufową niż w bardziej typowych przykładach).
W przeszłości robiłam ręcznie szaliki szydełkowe - ale widziałam, że inni robią je przy użyciu frezarki i stołu uchylnego. Spróbowałam...
Przy okazji wbiłem sobie w kolano rufowe zwykły szalik...
View attachment 526429
View attachment 526430
View attachment 526431
Niespodziewany sukces za pierwszym razem!
View attachment 526432
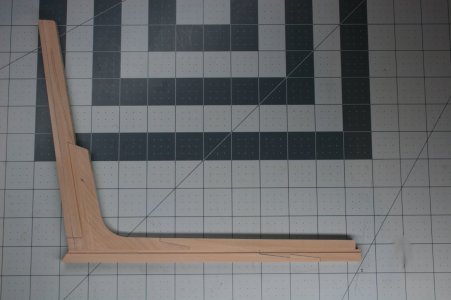
Jeśli przyjrzysz się uważnie, zobaczysz, że ukończyłem również wstępne kształtowanie/zwężanie rufowego martwego drewna (a także stworzyłem wpust przy stępce i rufie). Saint Philippe ma (głównie) kwadratowe zagięcie.
Interesujące jest dla mnie to, że w monografii martwe drewno jest określane jako fałszywy kil. Nie jestem pewien, czy to kwestia tłumaczenia (moja wersja monografii została przetłumaczona z francuskiego), czy też w tamtym czasie w historii stosowano inną nomenklaturę. Dowiedziałem się również, że znaną praktyką (pod koniec XVII wieku) było dodawanie pełnego kila (nie fałszywego kila) do spodniej części istniejącego kila w celu złagodzenia wyginania.
Tak czy inaczej, oto druga strona zespołu, na której widać niektóre szczegóły:
View attachment 526433
View attachment 526434
View attachment 526435
View attachment 526436
Tam, gdzie wpust jest prosty, użyłem mojego małego frezu. Tam, gdzie wpust jest zakrzywiony, użyłem dłuta V (bardzo ostrożnie, aby nie zniszczyć elementu, w który już zainwestowano dużo).
Na koniec (w SP) ramy osadzane są w wycięciach wzdłuż martwego drewna (mam nadzieję, że używam tego terminu poprawnie). Zostały one wycięte za pomocą frezarki - choć są dwie, które trzeba będzie wykonać ręcznie, ponieważ nie mogę umieścić frezarki tam, gdzie trzeba, ponieważ przeszkadza mi rufa).
Poniższe obrazy pokazują również moje rozwiązanie faktu, że ramy nie są prostopadłe do stępki (przechylają się do przodu o 1,2 stopnia). Pod kilem zauważysz pochylnię o nachyleniu 1,2 stopnia... Teraz mogę ustawić ramy prostopadle do płyty konstrukcyjnej, a gdy usunę pochylnię, będę miał przednią końcówkę ram.
View attachment 526437
View attachment 526438
Dziękujemy za odwiedziny!
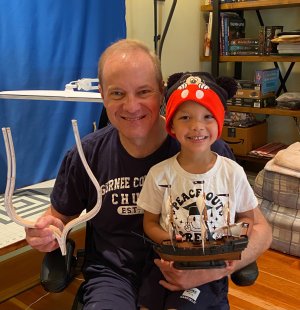
PS Mój wnuk i ja właśnie skończyliśmy jego pierwszy model statku. Oto, jak pokazujemy naszą pracęA:
View attachment 526428

 Such a beautiful little ship and of course, it's a pirate ship.
Thanks, Chris. We'll see how well I did when I get to fitting frames.Nice work Paul on some tricky assemblies !
I not so sure about the masterpiece part - but I have been enjoying myself up to this point.The beginning of another masterpiece. I'll be learning a lot as I watch from the back.
Alex R
Hi Jeff. Yup, these big ships must have been quite impressive in real life. At 1:48 the measurement from keel to top timber is about 16 inches.Wow ! Thank you for deciding to again share your wonderful adventure !
Even though it is "only" the stern section, this is a beast ! I'm sure you will do a wonderful job with it. I will definitely follow if you will allow me to.
By the way, that stack of frames doesn't look "rough".
Indeed. Grandchildren are a wonderful blessing!Witaj
Masz super pomocnika Pawle, wnuki to największy nasza skarb.Masz wemnie wiernego kibica. Pozdrawiam Mirek
Thanks for this nice post, Gunther. Your work is excellent - I'm confident you could build any ship you want.Hey Paul,
really, how do you do that? It all looks so incredibly clean. Great realisation. I will definitely follow and study your construction report and will definitely learn from your construction method. I'm a little envious of how beautifully you've done it. You have a really great workshop and enough space. Maybe one day I will build such a beautiful ship in this scale.
Your grandson seems to have inherited your talent.Such a beautiful little ship and of course, it's a pirate ship.
A beautiful picture with both of you!
I look forward to further progress and remain faithful to your building report.
Best regards
Günther

Thanks, Chris. We'll see how well I did when I get to fitting frames.
I not so sure about the masterpiece part - but I have been enjoying myself up to this point.
Hi Jeff. Yup, these big ships must have been quite impressive in real life. At 1:48 the measurement from keel to top timber is about 16 inches.
Indeed. Grandchildren are a wonderful blessing!
Thanks for this nice post, Gunther. Your work is excellent - I'm confident you could build any ship you want.


Thanks, Tobias. Pull your chair up close - I'll need your guidance...Hi Paul,
I'm delighted to see you back at the workbench. Since our first exchange, I've been eagerly awaiting the final push. I'm going to join the guys and take a seat on one of the remaining chairs. Absolutely fantastic start, with very clean and sharp lines as usual. Your decision to simplify the ribs is, in my opinion, absolutely correct, as long as they're not visible. I'll definitely keep at it.

Thanks, Roy. He was pretty proud of his pirate ship!I was excited to see this thread. I look forward to following your build Paul. Your Kingfisher was the first build log I ever followed daily. That is a very fine looking pirate ship your grandson built!
If I built a rowboat one might only guess it is a rowboat by observing my rendition of oars.
