• LUCZORAMA SHIPWRECK SCAVENGER HUNT GIVEAWAY. 4 Weeks of Fun • 1 Legendary Prize ((OcCre’s Fram Ship)) • Global Crew Welcome!
    **VIEW THREAD HERE**

L'Orenoque Mamoli 1:100 scale

That is beautiful !!!! Bravo Chuck !
Although you are ‘bad at math’ you made a nice 4-steps pattern on the planking connections, Chuck.
And the hull planking looks very nice.
Regards, Peter
Hi Chuck,

Super clean work! Beautiful.

Bill
Eh beh , nickel mon pote !ROTF
Good morning Chuck. I concur with my fellows- wonderful modelling. Cheers Grant
Chuck, the attention to detail, sanding, repairing the bulwarks and planking on the poop deck look awesome! Very nice! Magic Mike

What ho, shipmates! Jeff! Peter! Bill! Martin! Grant! Mike! That's a lot of approbation! Thank you! But really, Martin, "perfect?" - at least that's what the computer translation says you saidROTF.

Seriously, thank you! I appreciate you taking the time to look and to send your thoughts.

Blessings. Peace. Gratitude.
Chuck
 
What ho, shipmates!

Wabi sabi. That's one of the secrets of my mastery of this fine art formROTF No, really!

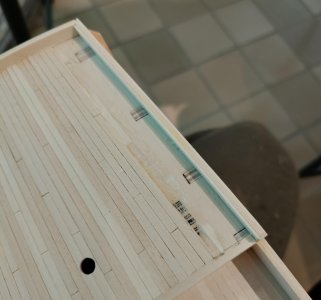
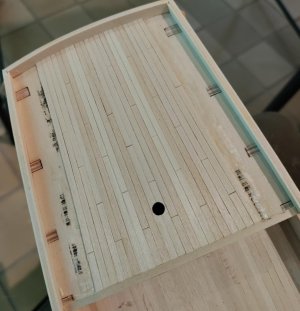
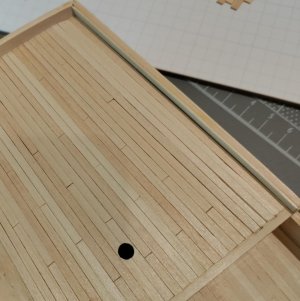
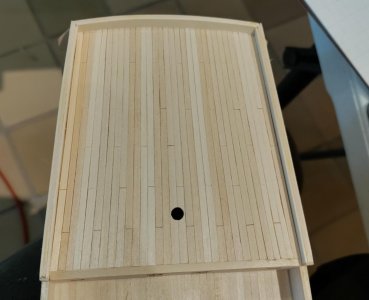
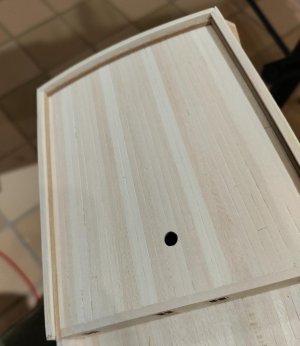
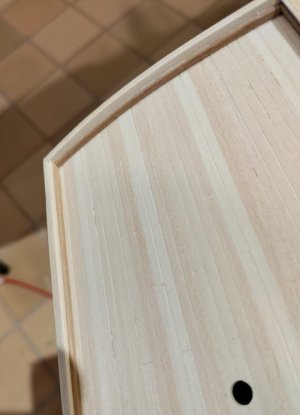
Here's how the poop deck shaped up, plenty of wabi sabi and you don't even have to look that close. So, I did what I said I would do. When I got home yesterday afternoon, I removed the offending planks port and starboard. Happily, I did not purposefully edge glue the planks. There was, however, a certain amount of squeeze out in a couple of places that had the same effect. In any event, the montage shows the removal and replacement process and the addition of waterways. Also, this time, I made and fitted all of the remaining planks before I glued them down - which is what I should have done in the first place. Perhaps my work in Shangri-la Shipyard today will allow me to finish with the waterways and get the wood oiled:D. We'll see. . .

LO Poop deck plank 1.jpgLO Poop deck plank 2.jpgLO Poop deck plank 3.jpgLO Poop deck planking 4.jpg
LO Poop deck plank 5.jpgLO Poop deck 6.jpg

Blessings.
Chuck
 
What ho, shipmates! Jeff! Peter! Bill! Martin! Grant! Mike! That's a lot of approbation! Thank you! But really, Martin, "perfect?" - at least that's what the computer translation says you saidROTF.

Seriously, thank you! I appreciate you taking the time to look and to send your thoughts.

Blessings. Peace. Gratitude.
Chuck
Haha! Nickel is the shiny metal plating that goes on the outside, the french use it to mean "finished, clean and tidy" You know you should trust google AI about as much as Mamoli plans, right ?
 
Makes a great looking stand for a finished model. I make stands like that and screw them right to the baseboard of my cases. The stands i customize to each model, so no need to send yours along. Thanks none the less. And yes, it looks like Olive Ash burl, a very nice decorative burl veneer.
 
Makes a great looking stand for a finished model. I make stands like that and screw them right to the baseboard of my cases. The stands i customize to each model, so no need to send yours along. Thanks none the less. And yes, it looks like Olive Ash burl, a very nice decorative burl veneer.
Pete! I agree with you! I decided to go full plex with my cases including the bases - the admiral likes it better and so do I - gives the impression that the ship is floating in the air and the case kind of fades away - all a matter of taste - particularly the admiral:D

As to sending the base to you - meant in part as a joke but mainly as a tribute - you know I know what you did for a living, right!?!:cool:

Blessings.
Chuck
 
What ho, shipmates!

Wabi sabi. That's one of the secrets of my mastery of this fine art formROTF No, really!

Here's how the poop deck shaped up, plenty of wabi sabi and you don't even have to look that close. So, I did what I said I would do. When I got home yesterday afternoon, I removed the offending planks port and starboard. Happily, I did not purposefully edge glue the planks. There was, however, a certain amount of squeeze out in a couple of places that had the same effect. In any event, the montage shows the removal and replacement process and the addition of waterways. Also, this time, I made and fitted all of the remaining planks before I glued them down - which is what I should have done in the first place. Perhaps my work in Shangri-la Shipyard today will allow me to finish with the waterways and get the wood oiled:D. We'll see. . .

View attachment 532091View attachment 532090View attachment 532089View attachment 532088
View attachment 532093View attachment 532092

Blessings.
Chuck
Awesome.
 
Beautiful case...best to keep them under glass!!!

But also very cool cabinet that she sits on. Those front panels look like a complex joinery project :) !
Thank you, Brad! Yup. I had to learn that lesson the hard way. As to the cabinet - someone did a great job on it and the admiral had to have it ;)

Blessings.
Chuck
 
What ho, shipmates!

All of the waterways are aboard - pics of that later. More pressing is the external colour scheme.

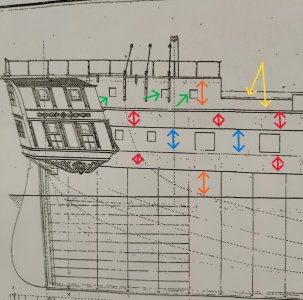
This is the real L'Orenoque btw. Yellow arrows are rub rails and I have marked their locations on the hull:D:D:D:D:D in preparation for attaching them

Green arrows - I'm going with the same size windows as I used in the poop deck façade - Hey! I gave them 3/16" extra headroom so why not bigger windows!

Orange - that is where the black paint goes - including the rub rail
Blue - that is going to be "wood" colored - can't wait to see it!
Now the tricky part - Red - I'm thinking about painting those two bands red

So from top down - black, red, wood, red, black, and some nice shiny copper below the waterline!!!!

Thoughts?

LO Color Scheme.jpg
 
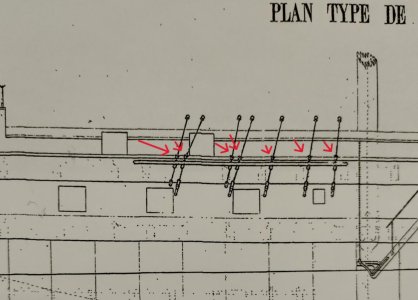
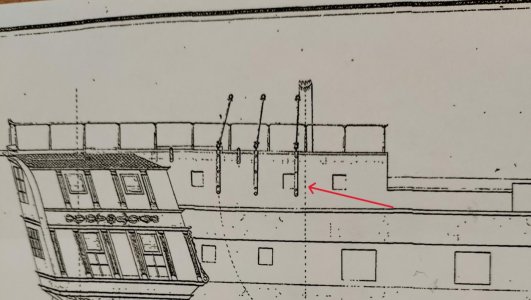
I have been looking at my L'Orenoque plans and comparing them to the kit plans, in this instance - was the real ship rigged with rigging screws of some kind? rather than the deadeyes the kit shows? And some one please look at the attachments for the mizzen lower shrouds - looks like chain plates attached to the hull with no channel to me. You?

LO plan main chains.jpgLO plan mizzen chains.jpg
 
Though they look like rods with eyes and shackles in the drawing, I'll wager they're rigging screws. The way the line is drawn offset to the right slightly makes me thing the line is the side in shadow to imply roundness.
The mizzen shrouds do appear to go to strops mounted right to the hull without a channel, which oddly, aren't angled to match the angle of the shrouds.. Best to pop a stick in and measure to see if that works, and if they need to pass under that railing.
 
What ho, shipmates!

One of our shipmates shared that he fell in love with a ship because he loves dancing and the ship had a dance floor - effectively a ball room on a raised platform aft.

It dawned on me why we do the things we do and help and celebrate each other: We were the really cool kids that people didn't get when we were kids/teenagers! We were cool then and we're even cooler now! And that love of dancing and falling in love with a ship because of it is absolutely the coolest thing!!!!

Bless you all!

Chuck
 
What ho, shipmates!

Well, I've gone back through my references and revisited the images of French ships of this era and I think it's black from the cap rail to the waterline broken by a white band (wood color in my case) for the main battery - that's probably the historically correct answer. Don't know what to tell you - lost my head with all of the excitement! Nevertheless, I am still using the bigger windows and I'll pick out the rub rails in gold or red - probably one or the other - we'll see ;)

Blessings.
Chuck
 
Though they look like rods with eyes and shackles in the drawing, I'll wager they're rigging screws. The way the line is drawn offset to the right slightly makes me thing the line is the side in shadow to imply roundness.
The mizzen shrouds do appear to go to strops mounted right to the hull without a channel, which oddly, aren't angled to match the angle of the shrouds.. Best to pop a stick in and measure to see if that works, and if they need to pass under that railing.
Jerry! I thought they were rigging screws! Glad I didn't order all of those deadeyes yet!ROTF I'll make sure to check the lay of the mizzen shrouds - thank you! It would bad terrible:eek::eek::eek: if I had installed that railing and then found that the shrouds had to be fed through it to avoid the sharpish bend by going over top of it. As to the angle of the stops for the mizzen shrouds, I'll probably take the liberty of having them match the angle of the shrouds. Perhaps the draughtsman decided not to run them over the windowsROTF and that's why they're set at those peculiar angles. For me that means making sure I determine the location of the strops before I put in the windows.

See - this is exactly what I was talking about! Lovely to be able to think these things out with you, Cool KId:cool:!

Blessings.
Chuck
 
Back
Top