• LUCZORAMA SHIPWRECK SCAVENGER HUNT GIVEAWAY. 4 Weeks of Fun • 1 Legendary Prize ((OcCre’s Fram Ship)) • Global Crew Welcome!
    **VIEW THREAD HERE**

Le Saint Philippe 1693 after Jean-Claude Lemineur (Ancre) in scale 1:48

Inasmuch as your work looks perfect to me, Paul, what I think I learned here is this: The difference between a scratch builder and a kit builder is the scratch builder gets to fix his own mistakes; a kit builder gets to fix somebody else’s mistakes.
I'm convinced Paul will achieve this. Because he's a pervert... ROTF ("pervert" in a Japanese way of course)
 
Inasmuch as your work looks perfect to me, Paul, what I think I learned here is this: The difference between a scratch builder and a kit builder is the scratch builder gets to fix his own mistakes; a kit builder gets to fix somebody else’s mistakes.
This is very true! Manufacturers make choices (design, instructions, materials) and we often disagree with those choices (and we call them mistakes). But then when we get the opportunity to be the manufacturer the mistakes don't go away - they simply become personal.
 
Last edited:
Looking good Paul

The biggest piece of advice I could practically give you is to make the outermost timbers well oversize in breath and protrusion aft. Then I would fair the timber faces to follow the hull contours and curve of the stern face. I would not trust Lemineur to get the development of these timbers correct on the drawings.

I said practically because the very nature of the forum means we are thousands of miles apart, otherwise I would gladly pop round and give you some guidance. Trying to do that via the net is not easy, it is sooo much easier to explain things in person. I don't profess to know everything but two minds are always greater than one
 
Hello Friends,

I had hoped this would be a major update, but alas...

I continue to struggle with the challenges inherent to scratch building. Namely, the more complex the part the more difficult it is for me to visualize what the drawings represent. Plus, determining a proper build sequence is elusive. It seems that if I could install certain parts... that would provide some helpful constraint to the shaping of subsequent parts. But if I install those certain parts, it precludes correcting them (or further shaping them / sanding them). Basically, my lack of experience has profoundly slowed progress.

In my last progress report I celebrated the installation of all frames that originate at the centerline. Aft of that there are to be two more frames. One of these is the top timber that goes on top of the fashion pieces. This forms the corner between the side of the ship and the stern of the ship (that is - it needs to be perfect). There is an additional filler timber between that top timber and the last frame previously installed.

Across the lower portion of the stern there are eight stern counter timbers - and then above that are a series of upper counter timbers. These items relate one to the other.

Here are the lower and upper counter timbers during fabrication:

View attachment 536861

View attachment 536862

View attachment 536863

In order to control the position of the counter timbers I made a jig:

View attachment 536867

View attachment 536868

View attachment 536869

I mentioned the top timber that sits above the fashion pieces (forming the corner of the ship in the back). That piece is a 3D marvel that shares the profile of the counter timbers I just showed - but it also follows the curves of the ship hull (effectively making this piece S-shaped when viewed from the stern).

In the center of the image shown below you can see this vexing part. My first attempt was long ago abandoned. This was the second attempt. It has also been binned after an investment of nearly a full day. I made the mistake of trusting the drawing of the filler frame (labeled #18 in the picture below) when creating the curved portion of the fashion piece top-timber.

Anyway, I have given up for the day and will make another attempt over the weekend.

View attachment 536864

I'm sure you are familiar with the "I don't think I can build this thing" feeling...
I know this feeling better than anyone. I used to do only according to drawings and when I tried the Alert kit I did everything with relief. Of course, I changed a lot of things, but in fact, everything is simple, everything as I go and from ready-made blanks. And as soon as I started building the second Alert, I again encountered the fact that I had to think about how to do what, the correct order and much more. And this sometimes takes much more time than the assembly itself. Calculations and analysis of drawings are sometimes just torture ... but in the end, when everything works out, you get much more pleasure than from assembling the kit .. Do not be discouraged, you will succeed, I am sure of it.
 
I know this feeling better than anyone. I used to do only according to drawings and when I tried the Alert kit I did everything with relief. Of course, I changed a lot of things, but in fact, everything is simple, everything as I go and from ready-made blanks. And as soon as I started building the second Alert, I again encountered the fact that I had to think about how to do what, the correct order and much more. And this sometimes takes much more time than the assembly itself. Calculations and analysis of drawings are sometimes just torture ... but in the end, when everything works out, you get much more pleasure than from assembling the kit .. Do not be discouraged, you will succeed, I am sure of it.
Thank you for this encouraging post, Sergey! Indeed, I spend a silly amount of time looking at drawings and wondering how best to solve the puzzle - and which order to place the pieces...
 
Looking good Paul

The biggest piece of advice I could practically give you is to make the outermost timbers well oversize in breath and protrusion aft. Then I would fair the timber faces to follow the hull contours and curve of the stern face. I would not trust Lemineur to get the development of these timbers correct on the drawings.

I said practically because the very nature of the forum means we are thousands of miles apart, otherwise I would gladly pop round and give you some guidance. Trying to do that via the net is not easy, it is sooo much easier to explain things in person. I don't profess to know everything but two minds are always greater than one
Thanks, Nigel. "Not trusting Lemineur" has (unfortunately) become my mantra. Your oversize suggestion served me well with the most aft full frame. Fortunately, my first two attempts at the top timber of the fashion pieces have provided some helpful constraints.

I would enthusiastically welcome your personal tutelage - but am happy the forum facilitates in its own way.
 
Hello Friends,

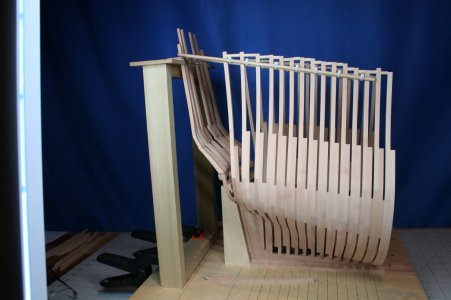
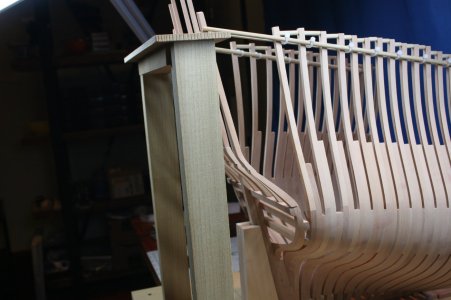
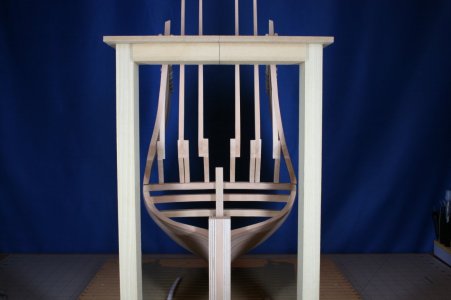
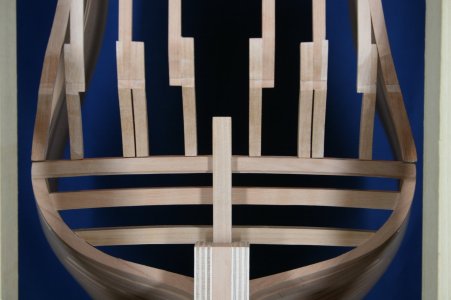
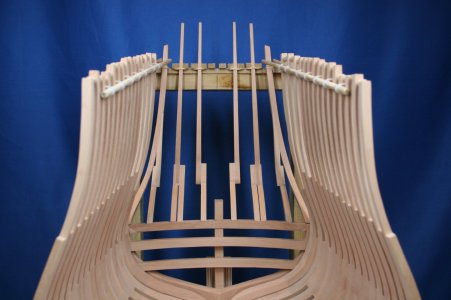
Over the past two days I have managed to make actual progress on the stern of the ship. With several failures in my wake, I was starting to have a pretty good idea of how to fabricate the top timbers of the fashion pieces.

As it turns out there was less 'curvature' than I had envisioned. I would love to blame Mr. Lemineur for the previous failures, but at the end of the day I think it would be better to own my own mess rather than blame someone who has forgotten more about ship construction than I will ever know.

Unexpectedly, Nigel has now offered to move to the US to guide me during the balance of this build, so that is comforting...

Everything is loose fit and prior to fairing...

IMG_1386.JPG

IMG_1389.JPG

IMG_1390.JPG

IMG_1391.JPG

IMG_1388.JPG

I wish I had more excess for the fairing process, but at this point I think it will be acceptable. Keep in mind that the exterior of this stern section model will be planked - everything you see will only be visible from the inside, and the particular shortcomings will almost certainly be lost in the overall experience of taking in the build out of the interior.

The learning curve has been steep...but I hope it will pay dividends in the future...
 
Agree with Christian, your last picture really is the “money shot” Paul Thumbsup

Things will really take shape now as you add the fan of upper futtocks to close the gap.

If you do find you have an odd low spot when final fairing these upper timbers, don’t be afraid to add a sliver of Pear. As you say, this area will all be planked. This is much better than oversanding to try and chase a dip

Move to USA ……….ROTFROTFROTF
 
Hey Paul,

that's really breathtaking. When I grow up, I hope to be allowed to build like this one day. I'm already a little envious ...

Best regards

Günther Ship-1
 
I love the last picture. She has beautyful curves.
Indeed. And this interior view will remain open albeit with the addition of beams, knees, etc. - but no interior planking or decking.

Agree with Christian, your last picture really is the “money shot” Paul Thumbsup

Things will really take shape now as you add the fan of upper futtocks to close the gap.

If you do find you have an odd low spot when final fairing these upper timbers, don’t be afraid to add a sliver of Pear. As you say, this area will all be planked. This is much better than oversanding to try and chase a dip

Move to USA ……….ROTFROTFROTF
Good tip on the fairing.

And are you suggesting that there might be issues here in the USA?

Paul,
Your jigs look cleaner than my models. :eek:
ROTF ROTF ROTF

Paul, your loose-fit, pre-fared frames look to me as already expertly finished sanded, pristine and ready for planking!
Is there another way to do this? :)

Hey Paul,

that's really breathtaking. When I grow up, I hope to be allowed to build like this one day. I'm already a little envious ...

Best regards

Günther Ship-1
You CAN do this, Gunther! You only have to sacrifice your ego and self-esteem and be willing to be confused, angry, and satisfied all at the same time...
 
Back
Top