• Win a Free Custom Engraved Brass Coin!!!
    As a way to introduce our brass coins to the community, we will raffle off a free coin during the month of August. Follow link ABOVE for instructions for entering.

1/24th scale POF 36' French Longboat, Cherry wood version from Unicorn

I placed my order the day you started the build log. I guess have to wait and see if I get slapped with a tariff. It was not charged out checkout, so does it come as a bill after delivery?
I still haven't seen anything.
 
I placed my order the day you started the build log. I guess have to wait and see if I get slapped with a tariff. It was not charged out checkout, so does it come as a bill after delivery?
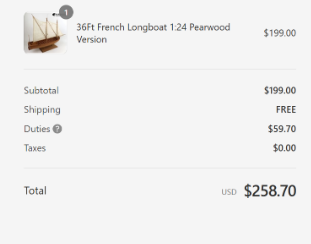
Mine was taken out by Drydock before paypal got the order. On paypal, the $59.70 is listed as shipping and handling. On my drydock receipt, the $59.70 is listed as Duties. 1756554678613.png
 
Mine was taken out by Drydock before paypal got the order. On paypal, the $59.70 is listed as shipping and handling. On my drydock receipt, the $59.70 is listed as Duties. View attachment 540719
Some of the purchases caught up in the middle of System changes on Aug 27-28 and some of the purchases addrd the tariffs the others not.I have to tweek each product mannually and can choose between DDP(Delivery Duty Payd) or DAP (Delivered at Place)At Dap the buyer pay the import fees upon customs clearance.
 
Some of the purchases caught up in the middle of System changes on Aug 27-28 and some of the purchases addrd the tariffs the others not.I have to tweek each product mannually and can choose between DDP(Delivery Duty Payd) or DAP (Delivered at Place)At Dap the buyer pay the import fees upon customs clearance.
Interesting. Glad I got the DDP version. I wonder if customs even takes paypal? These tariffs are raising my tax burden this year. A whole lot.
 
Last edited:
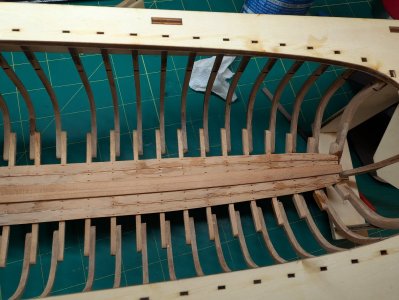
Well, finally got to spend some time making sawdust and supergluing my fingers together last night. I was able to get a couple strakes of floor planks in place on each side of the keel. Something I didn't anticipate was that the CA is flowing through the nail holes that have been laser cut. I have a feeling I am going to have to redrill them in order to get the nails in. I might switch to a thicker CA glue for the next strake.

PXL_20250830_045443583.jpg
PXL_20250830_045452214.MP.jpg
Now, if you'll excuse me, I still have a couple fingers stuck together I need to see to.
 
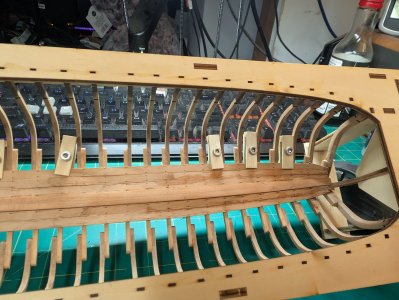
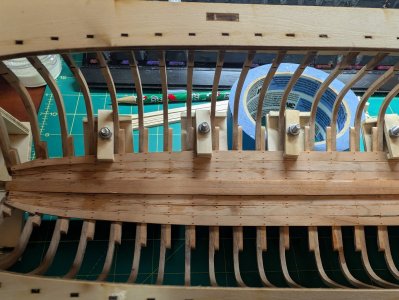
I am starting to need more advanced techniques to build now and two of the popped up here with the third strake. The front couple of inches need to be bent/twisted, I used the soldering iron type method and didn't run into any problems. I am also finding I need clamps now. I stole Doc's clamp style but used stuff I had on hand, which means some 3mm plywood and some 20mm M4 screws. I made mine about 30mm long and 9mm wide but had some difficulty with them being fiddly and hard to get good purchase on both the rib and the plank.
PXL_20250831_014453339.jpg
I glued that strake on with PVA glue and that also came through the nail holes. But it seems to have dried cleaner and stronger.

I also came up with a wider 30x30 base for the clamp. I am reusing one of the 9mm strips with each 30mm base. The 9mm slips between ribs, while the 30mm spans two ribs on the outside. This is actually how Doc's clamps work, too. but his gaps were much narrower, thus his clamps didn't need to be as wide.
PXL_20250831_192150744.jpg
PXL_20250831_194755659.jpg
PXL_20250831_194801500.jpg
PXL_20250831_194858693.jpg
Downsides are that these are allen head drive cap screws. They are really hard to tighten and kind of short. I have ordered some longer screws from 30-45mm, some washers, and some of these knurled thumb knobs.

PXL_20250831_194803320.jpg
 
I am starting to need more advanced techniques to build now and two of the popped up here with the third strake. The front couple of inches need to be bent/twisted, I used the soldering iron type method and didn't run into any problems. I am also finding I need clamps now. I stole Doc's clamp style but used stuff I had on hand, which means some 3mm plywood and some 20mm M4 screws. I made mine about 30mm long and 9mm wide but had some difficulty with them being fiddly and hard to get good purchase on both the rib and the plank.
View attachment 541059
I glued that strake on with PVA glue and that also came through the nail holes. But it seems to have dried cleaner and stronger.

I also came up with a wider 30x30 base for the clamp. I am reusing one of the 9mm strips with each 30mm base. The 9mm slips between ribs, while the 30mm spans two ribs on the outside. This is actually how Doc's clamps work, too. but his gaps were much narrower, thus his clamps didn't need to be as wide.
View attachment 541060
View attachment 541061
View attachment 541062
View attachment 541064
Downsides are that these are allen head drive cap screws. They are really hard to tighten and kind of short. I have ordered some longer screws from 30-45mm, some washers, and some of these knurled thumb knobs.

View attachment 541063
 
Last edited:
I use paperclips modified as a clamp. Once I made these I never went back to any of the expensive clamp I used previously. I hope this helps


Last edited:
Hey Rob,
very nice work....This looks tob be a very nice kit. I`ll pull up a chair... :D Anchor
Cheers Günther Ship-1
 
I use paperclips modified as a clamp. Once I made these I never went back to any of the expensive clamp I used previously. I hope this helps


Ted, I've got plenty of those, I'll give that trick a try, too, if I can find where I put them.
 
Well, finally got to spend some time making sawdust and supergluing my fingers together last night. I was able to get a couple strakes of floor planks in place on each side of the keel. Something I didn't anticipate was that the CA is flowing through the nail holes that have been laser cut. I have a feeling I am going to have to redrill them in order to get the nails in. I might switch to a thicker CA glue for the next strake.

View attachment 540821
View attachment 540822
Now, if you'll excuse me, I still have a couple fingers stuck together I need to see to.
Personally, I like nail hole stains on my planks.
 
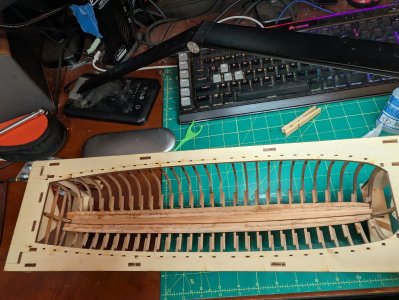
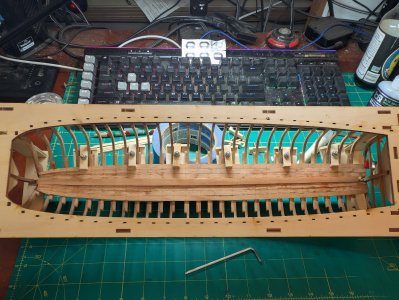
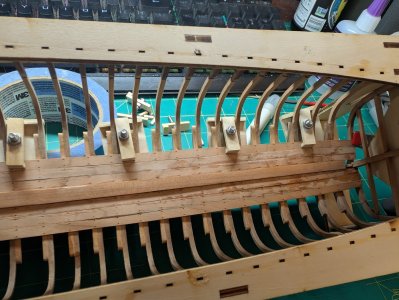
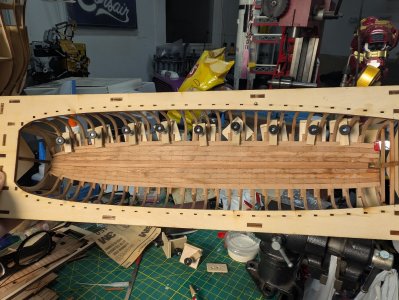
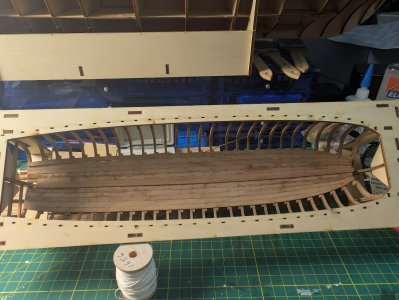
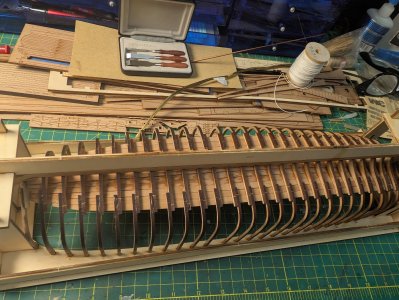
Floor planking is in.
PXL_20250902_042554829.jpg
PXL_20250903_041514371.jpg
PXL_20250903_041526347.jpg
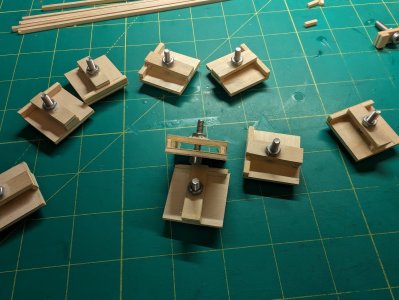
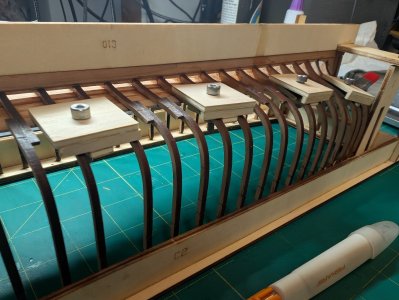
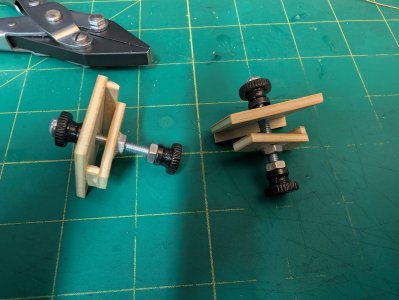
I have modified my clamps so I can screw and unscrew them from inside or outside the frame. Sometimes the double nutted one comes loose so I might locktite them. This is using an M4 x 40mm screw, I also have some 35 and 45mm screws just in case.
PXL_20250901_200555171.jpg
 
Floor planking is in.
View attachment 541864
View attachment 541865
View attachment 541866
I have modified my clamps so I can screw and unscrew them from inside or outside the frame. Sometimes the double nutted one comes loose so I might locktite them. This is using an M4 x 40mm screw, I also have some 35 and 45mm screws just in case.
View attachment 541863
Good morning Rob. I played a little catch up here. You are making great progress on what looked like a very fragile frame construction. Way to go. Cheers Grant
 
I like to look in the background of the photos bto learn what others are using for tools to make their models. It's an unbiased endorsement
 
Back
Top