-

Win a Free Custom Engraved Brass Coin!!!
As a way to introduce our brass coins to the community, we will raffle off a free coin during the month of August. Follow link ABOVE for instructions for entering.
-

PRE-ORDER SHIPS IN SCALE TODAY!
The beloved Ships in Scale Magazine is back and charting a new course for 2026!
Discover new skills, new techniques, and new inspirations in every issue.
NOTE THAT OUR FIRST ISSUE WILL BE JAN/FEB 2026
You are using an out of date browser. It may not display this or other websites correctly.
You should upgrade or use an alternative browser.
You should upgrade or use an alternative browser.
Thank you, Allan. I’m keeping my fingers crossed it all comes together. Adding an interior is new territory for me, further complicated by the addition of lighting.I love how you and others wire the models to shed some light in/on them, clever solution! I also like the reference to Baldrick. I've never seen Blackadder, but would love to give it a try.
Allan
What a brilliant solution! If I am interpreting this setup correctly, the whole ship is a switch, just slide it back a little and break the contacts turning off the lights.View attachment 546702
In order to wire the lighting for the ship before planking the hull, but still leaving the whole thing freely accessible as the rest of the build progresses, I am going to insert electrical contacts into the keel at the points where it rests in the pedestals. The pedestals themselves have leads soldered to the bases
View attachment 546703
One will connect to the positive side of the power supply, the other the negative side. The resistor and LEDs will be in series so wiring will be simple. I drilled holes for the leads next to the holes for the mounting screws.
View attachment 546704
With everything set in place, this is how it looks. No sign of wiring and the ship doesn’t need to stay permanently attached to the base.
View attachment 546705
With the contacts installed and the ship resting in the pedestals, resistance across the whole setup is effectively nil. I’ll call it a win.
Just waiting for some resistors to show up in the mail so I can test the lighting properly.
My Bluenose just sets loosely in its pedestals which so far has not been a problem.
Hi, Daniel! That’s a very interesting idea, but I don’t dare leave Fair American loose with as much rigging as she’ll carry. I’ll install a switch in the base, but the ship will be screwed down securely once the hull is complete..What a brilliant solution! If I am interpreting this setup correctly, the whole ship is a switch, just slide it back a little and break the contacts turning off the lights.
My Bluenose just sets loosely in its pedestals which so far has not been a problem.
- Joined
- Apr 15, 2025
- Messages
- 151
- Points
- 103

Super cool!!! And the commentary and memes are entertaining as always. Thank you!
Thank you, DD! I’m glad you’re enjoying them.Super cool!!! And the commentary and memes are entertaining as always. Thank you!
Thank you, my friend!Hey Namabiiru,
really very well thought out. I'm really happy for you and I think, just like Mellpapa: great work!
I'm already looking forward to the next pictures.

Due to the government shutdown, it appears I will have a couple of extra days to work on the old girl (Fair American). With luck, I may have some appreciable progress to show by next week
You flatter me, Günther. Neither my modeling nor my photography are particularly noteworthy, but I am appreciative beyond words for your encouragement.Hey Namabiiru,
I'm already looking forward to it ... and above all to your great photos ...
Got to enjoy a nice long weekend thanks to the US Congress, so I put it to good use getting the base wired to power the LEDs that will someday go in a ship.
A test of the LEDs showed they were too bright for my purposes so yesterday was a trip to Electric Town in the otaku capital of the world, Akihabara.
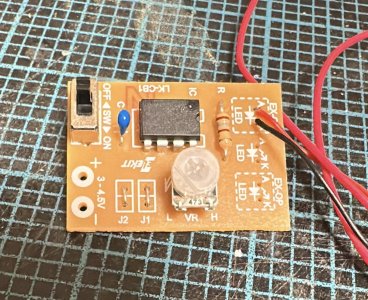
Grabbed an LED controller kit. This is what it looks like assembled. As you can see, the voltage range is 3-4.5VDC, and the smallest power supply I had was a 5V USB charger. So I cobbled together a voltage divider from the resistors that came with the LEDs.
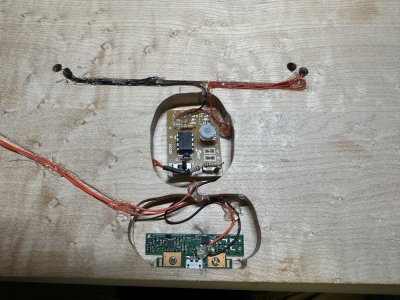
Here’s the underside of the base with all the guts installed. The red wires running off to the left go to the on-off switch. The PC board at the bottom only serves as the host to a USB-C connector I cannibalized from a battery charger. I wanted to be able to disconnect the cord whenever I need to move the ship.
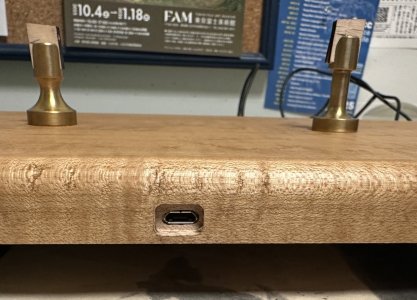
Here’s the connector from the back.
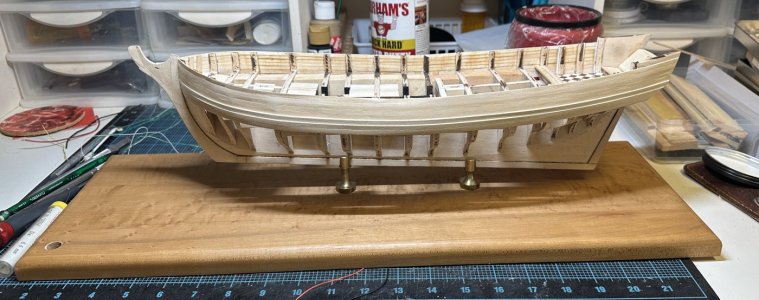
The ship temporarily installed to test circuit continuity. I did have a bit of a scare when I connected all four LEDs for the final test and nothing happened. After end-to-end troubleshooting, I discovered the controller will only work with the LEDs in parallel, but not in series. A minor mod to the wiring inside the hull.
With all that done, I could finally add the feet to the base. Photos of that tomorrow after the glue is dry and tape comes off.
Next, It’s time to continue scratch-building gun carriages. I need at least one so I can verify whether another run of bulwark planking is needed.
TTFN.
A test of the LEDs showed they were too bright for my purposes so yesterday was a trip to Electric Town in the otaku capital of the world, Akihabara.

Grabbed an LED controller kit. This is what it looks like assembled. As you can see, the voltage range is 3-4.5VDC, and the smallest power supply I had was a 5V USB charger. So I cobbled together a voltage divider from the resistors that came with the LEDs.

Here’s the underside of the base with all the guts installed. The red wires running off to the left go to the on-off switch. The PC board at the bottom only serves as the host to a USB-C connector I cannibalized from a battery charger. I wanted to be able to disconnect the cord whenever I need to move the ship.

Here’s the connector from the back.

The ship temporarily installed to test circuit continuity. I did have a bit of a scare when I connected all four LEDs for the final test and nothing happened. After end-to-end troubleshooting, I discovered the controller will only work with the LEDs in parallel, but not in series. A minor mod to the wiring inside the hull.
With all that done, I could finally add the feet to the base. Photos of that tomorrow after the glue is dry and tape comes off.
Next, It’s time to continue scratch-building gun carriages. I need at least one so I can verify whether another run of bulwark planking is needed.
TTFN.
Last edited:
The electronics are fascinating to look at; I can only marvel at how they actually work.
Me too! My Dad is an expert with this stuff, but I just watch YouTube videos and cross my fingers!The electronics are fascinating to look at; I can only marvel at how they actually work.
If I tried those wiring mods there would be a Viking funeral...
- Joined
- Apr 15, 2025
- Messages
- 151
- Points
- 103

Seriously impressed by the electronics! Nicely done. One day I won't be too intimidated to learn.
It’s all low voltage past the wall wart so no risk of that. I certainly hope it all looks good when everything is finished.If I tried those wiring mods there would be a Viking funeral...
Thank you. I think you’ve sufficiently shown that you’re adventurous enough to try whatever you set your mind to and clever enough to pull it off. I’m thinking glowing red piñata eyes (next year)…Seriously impressed by the electronics! Nicely done. One day I won't be too intimidated to learn.

The completed base. I’m trusting to the notion that the ship will distract from my mediocre (i.e. non-Dockattner) joinery.
Last edited:
Ah, you underestimate my level of electrical incompetenceIt’s all low voltage past the wall wart so no risk of that.
 .
.While the glue sets on my carriage assembly jig, I’m keeping the momentum going by making eye bolts with brass wire
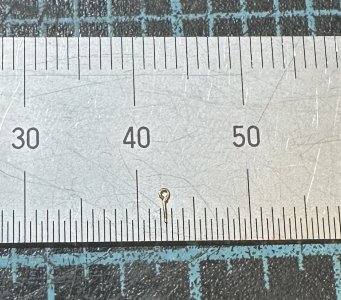
The wire is from one of those bottles of Spanish wine that comes wrapped in wire weave. I made a jig from plexi-glass and guitar string (I think drill bits are too brittle for this) to make the loop. Then it’s a couple more steps to flatten, center and trim. Only need 56, so should go quickly

The wire is from one of those bottles of Spanish wine that comes wrapped in wire weave. I made a jig from plexi-glass and guitar string (I think drill bits are too brittle for this) to make the loop. Then it’s a couple more steps to flatten, center and trim. Only need 56, so should go quickly


