• Ships of Scale has incorportated an extra level of security when you log In. Please follow on-screen prompts to acknowledge that you are not a robot via a "Check Box" or a "Pictorial Check Box Puzzle". This is needed due to higher level of AI Activity Security.
  • SUBSCRIBE TO SHIPS IN SCALE TODAY!

    The beloved Ships in Scale Magazine is back and charting a new course for 2026!
    Discover new skills, new techniques, and new inspirations in every issue.

    NOTE THAT OUR NEXT ISSUE WILL BE July/August 2026
  • Win a Free Custom Engraved Brass Coin!!!
    As a way to introduce our brass coins to the community, we will raffle off a free coin during the month of August. Follow link ABOVE for instructions for entering.

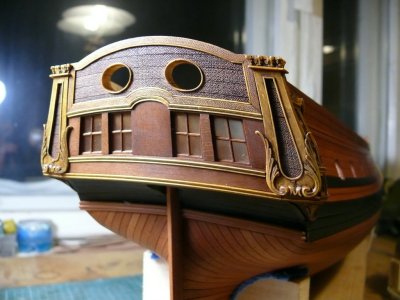
Le Saint Philippe 1693 after Jean-Claude Lemineur (Ancre) in scale 1:48

Hello Friends!

It's been a few weeks since I posted anything that pertained to model building. In mid-July I shared this image of rough-cut decoration blanks:

View attachment 624984

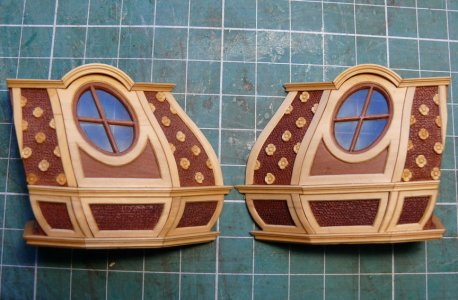
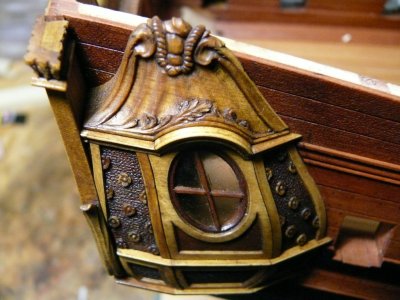
Here are those same pieces provisionally prepared (these still need to be fitted to the model):

View attachment 624985

View attachment 624987

A "single" picture that represents hours of work.

My Kingfisher had a few carvings, but I had to discover all over again how to do these detailed decorative pieces.

On the Kingfisher I mostly used chisels and micro-files for everything - and that is how I created the leafy ball things on the far right (middle and bottom). Basically, these were chip carved and then cleaned up.

But on all the remaining pieces I forced myself to embrace rotary carving. This took some practice and I hope I will continue to improve with more experience - but I was encouraged. Rotary carving feels very natural in my hands, and it can do some things that chisels can't do (and vice-versa) so it was good to practice this skill.

Experts in 17th century French ships will know I have failed to accurately (or even remotely) create acanthus leaves on several of these pieces. This is what happens when you try to carve from memory (the place we stayed in Northern Wisconsin didn't have internet and it never occured to me to print out the drawings). Imagine a place where you have to go to the public library to find WiFi ROTF.

*** Now a decision needs to be made. Many people who carve in boxwood leave the carvings natural. A few others will use a solvent-cut bitumen or other 'aging' effect. My model is not going to be aged - but do I want to leave the boxwood natural - or try to tint it in the direction of my tung-oil treated pearwood? There is no way to get a perfect match - but do I want to reduce the contrast between these woods or embrace it? Hmm.

View attachment 625011
Beautiful work Paul !
I wonder why the rotary carving tool would feel "very natural" in your hands..... ROTF
Great work !
 
Wow, mon ami! Your carvings are absolutely stunning. The level of craftsmanship is truly impressive. You've really conquered the carving learning curve! ;)

One thought, if I may. Diluting bitumen with white spirit and applying it to the carvings will darken the recesses and make the details stand out even more. This technique is often used to accentuate the grain and edges of the wood, giving it a more contemporary, aged appearance. Here is some of the work of Dmitry Shevelev.

1786236301054.jpeg

However, if your goal is to maintain a more authentic or period-correct look for the ship, I would simply leave the wood treated with oil. The natural finish of Pear and Castello (box) already looks beautiful and lets the quality of your carving speak for itself. Here is the untreated versus bitumen-treated by Dima Shevelev.

1786236447080.jpeg
1786236467701.jpeg
 
Hello Friends!

It's been a few weeks since I posted anything that pertained to model building. In mid-July I shared this image of rough-cut decoration blanks:

View attachment 624984

Here are those same pieces provisionally prepared (these still need to be fitted to the model):

View attachment 624985

View attachment 624987

A "single" picture that represents hours of work.

My Kingfisher had a few carvings, but I had to discover all over again how to do these detailed decorative pieces.

On the Kingfisher I mostly used chisels and micro-files for everything - and that is how I created the leafy ball things on the far right (middle and bottom). Basically, these were chip carved and then cleaned up.

But on all the remaining pieces I forced myself to embrace rotary carving. This took some practice and I hope I will continue to improve with more experience - but I was encouraged. Rotary carving feels very natural in my hands, and it can do some things that chisels can't do (and vice-versa) so it was good to practice this skill.

Experts in 17th century French ships will know I have failed to accurately (or even remotely) create acanthus leaves on several of these pieces. This is what happens when you try to carve from memory (the place we stayed in Northern Wisconsin didn't have internet and it never occured to me to print out the drawings). Imagine a place where you have to go to the public library to find WiFi ROTF.

*** Now a decision needs to be made. Many people who carve in boxwood leave the carvings natural. A few others will use a solvent-cut bitumen or other 'aging' effect. My model is not going to be aged - but do I want to leave the boxwood natural - or try to tint it in the direction of my tung-oil treated pearwood? There is no way to get a perfect match - but do I want to reduce the contrast between these woods or embrace it? Hmm.

View attachment 625011
They say everyone has hidden talents. Here is yours: 'Rotary Carving'!
And as for the contrast? If you take the lighting into account when placing the model later, that light will already create a natural contrast. In photography we can that ‘Painting with Light’.
Regards, Peter
 
Hej Paul, carvings looks super! About your contrast issue. In my opinion there is no "issue" you should "celebrate" the contrast between the pear and the boxwood as it let the carvings pop out in a natural way. I would not try to treat the boxwood in any way. Just my 2 cent.

best Dirk
Nice work Paul on the carvings Paul - don't get hung up on the finish -they will naturally patina over time with the pear. If anything I would use the same finish that you are using on the hull if you want to bring the contrast down.
Great work, especially "from memory" and while on vacation!!

I'm with Dirk, the contrasting colors of the wood is a great way to "paint" our model, making the carvings pop, without actual paint. Tack them in place plain and see if you like the contrasting effect.

Thanks for sharing!
I spent a bit of time last night looking through the finished model showcase here on SOS - there are only a few examples of ships with significant numbers of hand-carved decorations (the work of Janos and Kalliboot was especially mind-blowing) - and they pretty much all leave the carvings in their natural state (that is, with a finish coat, but no staining).
 
Wow, mon ami! Your carvings are absolutely stunning. The level of craftsmanship is truly impressive. You've really conquered the carving learning curve! ;)

One thought, if I may. Diluting bitumen with white spirit and applying it to the carvings will darken the recesses and make the details stand out even more. This technique is often used to accentuate the grain and edges of the wood, giving it a more contemporary, aged appearance. Here is some of the work of Dmitry Shevelev.

View attachment 625260

However, if your goal is to maintain a more authentic or period-correct look for the ship, I would simply leave the wood treated with oil. The natural finish of Pear and Castello (box) already looks beautiful and lets the quality of your carving speak for itself. Here is the untreated versus bitumen-treated by Dima Shevelev.

View attachment 625261
View attachment 625262
Thanks, Jim. This is very helpful. Mr. Shevelev has inspired many ship modelers with his work - and for good reason! Michele Padoan also uses this style and his work is stunning.

But I might even like the pre-finished version better! The craftmanship (which I will never match) really stands out!
 
They say everyone has hidden talents. Here is yours: 'Rotary Carving'!
And as for the contrast? If you take the lighting into account when placing the model later, that light will already create a natural contrast. In photography we can that ‘Painting with Light’.
Regards, Peter
This is good advice, Peter. And I thank you for the compliment as well.
 
Amazing work. Your decorations have soul and are worthy of a grandmaster. I also prefer to keep the decorations in the original color of the wood.
Witaj
Pięknie rzeźbisz Pawle masz talent. Pozdrawiam Mirek
Thank you, gentlemen. Your words motivate me to continue practicing this new technique.
 
great looking carvings.
I have always wondered how one does that at such a small scale without jamming a gouge into one's hand.
 
Once again I’m going back multiple pages and seeing and reading a lot of very useful and instructive information. I sometimes think I’m reading advanced modelling techniques from a master as I follow your excellent work Paul. That carving work is so freaking impressive.
 
Once again I’m going back multiple pages and seeing and reading a lot of very useful and instructive information. I sometimes think I’m reading advanced modelling techniques from a master as I follow your excellent work Paul. That carving work is so freaking impressive.
These are nice words, Roger. Of course, I'm still a relative newcomer so I'm learning right alongside everyone else.
 
Good move. I have some renaissance wax coming next week. Will flatten the wood to 300 or so before application, then give it a final polish after a couple of days and see how it turns out.

You probably know about shellac, but I found it could still be marked by heavy handling but was a nice finish it treated with care. It took two coats and was very slow to soak in to Buxus, and was totally colourless. Easy to tool it away for gluing as well and didn't compromise the joint strength.

Next week i plan to see the French polisher who works for a historic instrument restorer I tune for, hoping to get some tips on other finishing possibilities.
 
Back
Top