• Ships of Scale has incorportated an extra level of security when you log In. Please follow on-screen prompts to acknowledge that you are not a robot via a "Check Box" or a "Pictorial Check Box Puzzle". This is needed due to higher level of AI Activity Security.
  • SUBSCRIBE TO SHIPS IN SCALE TODAY!

    The beloved Ships in Scale Magazine is back and charting a new course for 2026!
    Discover new skills, new techniques, and new inspirations in every issue.

    NOTE THAT OUR NEXT ISSUE WILL BE July/August 2026
  • Win a Free Custom Engraved Brass Coin!!!
    As a way to introduce our brass coins to the community, we will raffle off a free coin during the month of August. Follow link ABOVE for instructions for entering.

Bending

KRB

Joined
Jul 4, 2026
Messages
2
Points
3
Hello everyone

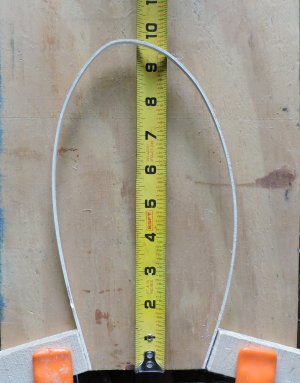
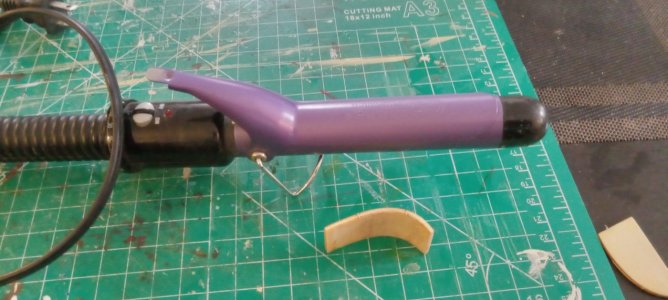
I thought I should share this with you. I needed to curve a small peice of wood for my model. Water alone wasn't working and I don't own a plank bender. The wife suggested I use her curling iron. Worked perfectly, you just have to be patient.f0a59394-9278-46aa-a532-8e62d39cab75.jpg
 
Yes, curling irons and electric hair dryers are often pressed into service to bend wood. Remember, it isn't the wet that makes the bend, but rather the heat. Heat is more easily transmitted through the wood when the wood is wet, but it really doesn't make all that much difference whether the wood is wet or not as long as the wood is heated "through and through." Successful bending requires heating through and through, though. Just getting the wood hot on the outside isn't going to work as well. You want the heat all the way through the wood.
 
now to just get a hot iron, or somesuch.

Try zapping the wooden piece to be bent in your kitchen microwave. It will probably take some practice to determine the amount of time required to heat it to the required temperature. One of the advantages of a microwave is that it will heat the wood evenly throughout, rather than just from the outside in. Wear gloves when handling so you don't burn your fingers.
 
There seem to be many ways to broad bend successfully. I wish someone would invent a practical adjustable tool for edge bending which is as critical and much more difficult to do. Spiling is the best way to go, but most kits only supply straight sticks so it is not so easy to taper in breadth then edge bend so they do not lift.
Allan
 
There seem to be many ways to broad bend successfully. I wish someone would invent a practical adjustable tool for edge bending which is as critical and much more difficult to do. Spiling is the best way to go, but most kits only supply straight sticks so it is not so easy to taper in breadth then edge bend so they do not lift.
Allan

The difficulty encountered with edge-bending that you've described is God's way of telling us that he never intended wood to be bent on edge.
 
when this subject comes up no one mentions the type of wood. Some woods are just stubborn and will split before they bend while others will bend easy like the sample below no heat, no water the wood bends naturally. This piece is .080 x .150 (2 x 4 mm)
You would think the thinner the wood the easier it is to bend but that is not always the case. The thinner the wood the weaker it becomes unless you have a very fine-grained wood. I realize if you are building from a kit, you have no choice in the wood the kit makers do not select wood with properties suited for the job they select wood they have available, cost less, and looks good.

SCN0442.jpg
 
he difficulty encountered with edge-bending that you've described is God's way of telling us that he never intended wood to be bent on edge.

You are of course correct, but with the vast majority of planking wood supplied being straight sticks instead of spiled planks something needs ot be done. Happily the method shown in the videos by Chuck Passaro works extremely well to get the proper shape and avoid lifting and gaps.
Allan
 
You are of course correct, but with the vast majority of planking wood supplied being straight sticks instead of spiled planks something needs to be done. Happily, the method shown in the videos by Chuck Passaro works extremely well to get the proper shape and avoid lifting and gaps.
Allan

A few more observations on the subject:

Spiled scale planks can easily be gotten out of wider flat stock. There's no need to use the unsuitable 1/4" wide stuff that the kit manufacturers provide in their kits. There is, of course, a bit of waste involved in cutting the curves instead of bending them, but if one planks "to scale," which is to say they use planks of the proper scale length, the amount of waste is greatly reduced, as is the required width of stock to accommodate the curve in any given length of plank. We often see modelers planking with narrow strip stock that is 12, 18, or even 24" long. Even a foot long planking strip on a 1:48 scale model is 48 scale feet long, at 1:96 scale, a foot long planking strip is 96 scale feet long, and so on. Due to the practical limitations of the available timber and handling convenience, even on the largest vessels, the maximum plank length in real life is about 24 feet. At the risk of being dismissed as a "rivet counter," all those clear-finished hulls with 150 or 200 scale foot planks hung with no regard to the proper planking lining or schedules and fastened with contrasting-colored treenails "to show the planking detail" are glaringly out of scale and incorrectly planked.

Passaro's edge bending method does adequately prevent the "buckling" that occurs when bending across the flat of a strip but note that in his demonstration videos he is bending Alaskan Yellow Cedar which is much more amenable to heat-bending than the low-quality "walnut," "mahogany," and other questionably identified exotic species frequently found in kit boxes. Much of the "kit wood" planking stock is so coarsely grained and figured that it's really unsuitable for any modeling purpose other than paint-stirring sticks! Buying better stock does occasion an additional expense, but in proportion to the overall cost of many kits and the time invested in building any ship model, using higher quality materials is a relatively small price to pay for a much better end result.

The far more efficient way to "get the proper shape and avoid lifting and gaps" is to exercise the required care in laying out the planking runs properly and spiling and cutting the planks to fit as they should. Edge-setting plank is an illusory solution that often causes more subsequent problems with plank seam gaps, clamping, and adhesive failures, than it solves in shaping the planks to fit properly before they are hung.

However, I do realize that there are many modelers who for whatever reason do not wish to invest the time and effort required to learn how to lay out planking runs and schedules and spile and fit planks, particularly if they intend to merely create a rough "strip planked" hull shape which will be puttied, sanded fair, and painted, and that for them none of these observations will be of much relevance at all.
 
but note that in his demonstration videos he is bending Alaskan Yellow Cedar which is much more amenable to heat-bending than the low-quality "walnut," "mahogany," and other questionably identified exotic species frequently found in kit boxes.
Yes, spiling is a great way to go, and some kits provide spiled planks, but most do not, so alternatives are needed. I have only used the Chuck Passaro method with Castello and Swiss pear so cannot speak for the sapeles and other woods we often see. It would be great to see someone use this method and post how it turns out. His method has made it possible to plank a hull realistically with the straight pieces usually provided in kits which I think is terrific.
Allan
 
As I was cleaning up my hobby shop in the garage, I found a small metal toolbox that one of my nephews made for me while he lived with me and went to the local high school, those ten or so years ago, AND I FOUND a hot iron to bend planks, I knew I had purchased one back then but had not seen it for more than a decade. There is metal stand to set it in when it is hot, and a template that has curves to use as a guide. I am going to refresh my knowledge of how to use the hot plank bender iron for the next complete hull planking project.

Oh, this box also contained about $100.00 of micro twist drill bits from #60 - #80, plus a metal and plastic mitar board, some micro drillbits for the Dremel plus a dozen or more micor-chucks to hold them. I must have spent a thousand dollars on tools besides all of the expensive kits I bought back then.
 
Last edited:
I have only used the Chuck Passaro method with Castello and Swiss pear so cannot speak for the sapeles and other woods we often see.

I believe that the less of a differential in the strengths of the "rings" and "softwood" between the rings, which is often apparent from the marked difference in the color of the two, and the tighter the ring structure itself in the species, which indicates the growth rate of the wood, are two factors which indicate a good bending wood choice. Castello and Swiss pear are classic examples of such species and why they are for many good reasons excellent ship modeling woods.

Additionally, the greater the moisture content of the wood, the more readily it will bend. Partially seasoned "green wood" is generally best for bending regardless of the species, but, of course, "green wood" is likely impossible to source unless one harvests and mills their own growing wood because the small dimensions used in modeling lose their moisture content very quickly. The best wood moisture content for heat-bending is between twenty and thirty percent (measured with a wood moisture meter.) Well-seasoned or kiln dried wood is usually around six to eight percent.

For those modelers who are interested in such things:

Although there is a lot of anecdotal evidence that soaking dry wood in water will to some extent promote better bending, at least in smaller dimensioned wood pieces, soaking is actually of rather limited value because soaking in water cannot replace the bound water already held in wood cell walls, because bound water is chemically bound to cellulose and hemicellulose and is not displaced by external water.

Without going any farther down the scientific rabbit hole than necessary, the fact is that there are two kinds of water in wood, or more accurately, there are two ways wood holds moisture. These are called "free water" and "bound water." Free water is located in cell cavities (lumens) and between fibers and is not chemically bound to the wood. This leaves the cell walls unchanged in size when the free water is removed. Bound water is held between microfibrils in the cell wall by hydrogen bonds to cellulose and hemicellulose. This water is part of the cell wall structure and is what causes the cell wall to swell when present. When green (freshly cut) wood is submerged in water, the free water in the lumens is replaced by the soaking water, and the cell walls remain saturated with bound water. This is why wood does not shrink until all free water is gone and the bound water starts to evaporate.

Importantly, however, bound water is not a free liquid that can be swapped out — it is chemically bound to the cell wall polymers. Even if you soak wood for a long time, the water in the cell walls remains the same bound water; the soaking water only fills the lumens and exchanges with free water. Bound water begins to evaporate once the moisture content of the wood falls below the "fiber saturation point," typically around twenty-eight to thirty percent by weight in most species. This happens during drying, and once bound water evaporates, it cannot be replaced by soaking because the soaking water cannot bind to the cell wall polymers of wood which is not growing. In other words, once bound water evaporates, it can't be replaced and this is why well-seasoned or kiln-dried wood doesn't warp or crack from the loss of size caused by the evaporation of bound water after it's been milled. Soaking replaces free water in the lumens, but it cannot replace or “refresh” the bound water in the cell walls — that bound water is intrinsic to the wood’s structure.

Heat makes wood more pliable because it softens the natural “glue” (lignin) in the wood’s cell walls, allowing the cellulose fibers inside to slide and reposition without breaking. Heat softens lignin – Lignin begins to plasticize at around 190–212 °F (88–100 °C). In this state, it loses its rigidity and can no longer lock the fibers in place. Moisture more efficiently distributes externally applied heat throughout the wood to be bent, but it is the bound water in the cell walls that transmits the heat to the lignin, not the free water.

Probably more than most are interested in knowing, but if you are having difficulty bending modeling wood, a grasp of the variables may help in solving some of the many problems that can arise trying to bend wood.
 
When I soak a piece of castello planking 0,06" thick and 0,25 inches broad overnight I can edge bend it easily and clamp it down to keep it flat, then dry it over time or with a hot air gun. When I tried to do it dry before trying to heat it, it cracks. I have no interest in a chemistry class at this point in my life, but I know what has worked in the past.
Allan
 
Last edited:
When I soak a piece of castello planking 0,06" thick and 0,25 inches broad overnight I can edge bend it easily and clamp it down to keep it flat, then dry it over time or with a hot air gun. When I tried to do it dry before trying to heat it, it cracks. I had no clue about the chemistry, but I know what has worked in the past.
Allan

If it works, it ain't broke! If it ain't broke, don't fix it.

Just for grins, try bending it dry when well heated and see if it still cracks.
 
As I was cleaning up my hobby shop in the garage, I found a small metal toolbox that one of my nephews made for me while he lived with me and went to the local high school, those ten or so years ago, AND I FOUND a hot iron to bend planks, I knew I had purchased one back then but had not seen it for more than a decade. There is metal stand to set it in when it is hot, and a template that has curves to use as a guide. I am going to refresh my knowledge of how to use the hot plank bender iron for the next complete hull planking project.

Oh, this box also contained about $100.00 of micro twist drill bits from #60 - #80, plus a metal and plastic mitar board, some micro drillbits for the Dremel plus a dozen or more micor-chucks to hold them. I must have spent a thousand dollars on tools besides all of the expensive kits I bought back then.
"Everything old is new again!"
 
There seem to be many ways to broad bend successfully. I wish someone would invent a practical adjustable tool for edge bending which is as critical and much more difficult to do. Spiling is the best way to go, but most kits only supply straight sticks so it is not so easy to taper in breadth then edge bend so they do not lift.
Allan
Allan, one of our members KeDennis has kindly provided free files of some of the wonderful 3D printed machines he has designed. One of them is a plank bender, which may help with your request. I have not had it built yet but I have built his waterline marker and rope walk. They are wonderful gadgets.


Rob
 
Interesting thread.

Consider making a form based on the curvature at the bow.

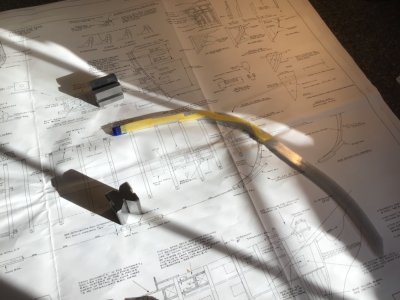
Here is the flexible ruler on the plan.

1791636430681.jpeg

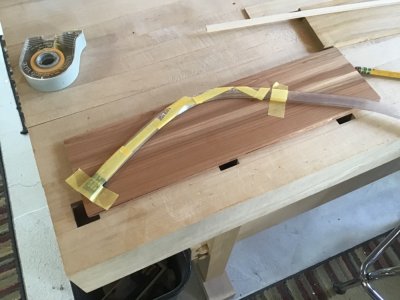
Layout the line on sheet stock.

1791636344715.jpeg

Remove the waste. Check the fit.

1791636391842.jpeg

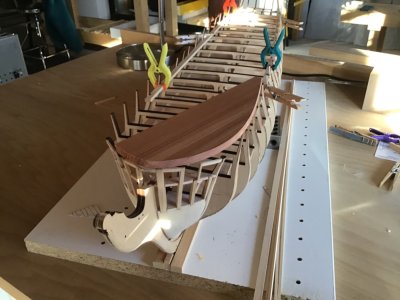
Soak 6-8 planks until flexible. Use rubber bands to hold planks against template. Let dry. Wash, rinse, repeat.

1791636265143.jpeg

Good luck!

-Rich
 
Back
Top