• Win a Free Custom Engraved Brass Coin!!!
    As a way to introduce our brass coins to the community, we will raffle off a free coin during the month of August. Follow link ABOVE for instructions for entering.

HMS Enterprise 1:160 scale Boxwood - Unicorn Models

ll the models/images I've seen of Enterprize 1774 only have gunport covers on on the last three aft gunports,
Hi Russ,
My first reaction to this was surprise. Regarding 6th Rates in general, not just the sectional model, and not just Enterprize and her class, port lids were not used in the area of the waist as they serve no purpose, but what about under the forecastle where spray would be a constant issue. The foremost ports on the upper most deck sometimes did have half lids, and this is mentioned by David Antscherl in the TFFM series, volume 2. Then I looked at plans which of course rarely, if ever, show port lids so no help. The two well known paintings of Enterprise forward and aft views confirm only three aft ports with lids as you point out. Contemporary models of 6th rates seem to confirm this was commonplace as well. This is not addressed by Goodwin or Steel that I could find, so hard to make any other conclusion than what you posted. Thanks for this information, much appreciated!
Allan
 
All the models/images I've seen of Enterprize 1774 only have gunport covers on on the last three aft gunports, so I don't think they would apply to this section. That said, now you've got me thinking about putting them on my stern section when I get to it.
Good point. Those and the stern chaser gun ports are possible it seems. The two ports below the quarterdeck are obstructed.
 
That's really coming along well.
I received mine yesterday, but don't think I'll be as fast as you. After you mentioned the broken frames I got to 22 and thought I was doing well, then broke 2.
Did you glue the remaining frame onto the bulkheads?

Thanks
Neil
I broke five, so well done. How do mean about the bulkheads? If you mean repairing the broken frames, i did them individually and battoned them to keep them straight, as shown on an earlier picture. They have a tendency to twist due to pressure and drying/shrinking glue, so it is crucial to keep an eye on them as they glue.
 
Last edited:
Hi Russ,
My first reaction to this was surprise. Regarding 6th Rates in general, not just the sectional model, and not just Enterprize and her class, port lids were not used in the area of the waist as they serve no purpose, but what about under the forecastle where spray would be a constant issue. The foremost ports on the upper most deck sometimes did have half lids, and this is mentioned by David Antscherl in the TFFM series, volume 2. Then I looked at plans which of course rarely, if ever, show port lids so no help. The two well known paintings of Enterprise forward and aft views confirm only three aft ports with lids as you point out. Contemporary models of 6th rates seem to confirm this was commonplace as well. This is not addressed by Goodwin or Steel that I could find, so hard to make any other conclusion than what you posted. Thanks for this information, much appreciated!
Allan
It appears that some guns were 'protected' with canvas covers. I like that idea, but wonder what they look like.
 
I broke five, so well done. How do mean about the bulkheads? If you mean repairing the broken frames, i did them individually and battoned them to keep them straight, as shown on an earlier picture. They have a tendency to twist due to pressure and drying/shrinking glue, so it is crucial to keep an eye on them as they glue.
Sorry I meant the building platform is still attached to the top of your frames. Is that glued on?
 
Thanks Gunther,
The port side will be planked as per normal. I'm not sure about gunport covers because the guns are on the top deck, but I agree that they would look really cool. I agree about the mysterious look of windows that 'reveal' parts of the frame. Nice.

Sanding is a real challenge. Boxwood is very hard and using constant finger pressure isn't really healthy. I have a tendency to get tennis elbow (from playing piano, not from tennis), and I can already feel the beginnings of it when I'm sanding the hull interior which is proving extremely slow and challenging..................

I imagine the technique for pearwood will be very light pressure due to the breakage risk. It's the same for the very thin boxwood.


View attachment 551968
Hello Richard,

may I ask what thickness your sandpaper is? Is it 220 grit or even 400 grit?
 
For fairing the hull I started with a medium coarse half-round file. Then 80 grit sandpaper, then 180 carborundum, 180 polishing paper and finally 320 polishing paper.

Final finishing I use a range of polishing paper up to 3000. Depends on the material. There are different types of boxwood in the kit and they all respond differently. It depends on how much sheen I want. I check regularly with an 8X loupe for scratches.
 
Not a lot done today.

Added some beams in the hold and the mast step along with a platform. Made a hatch.

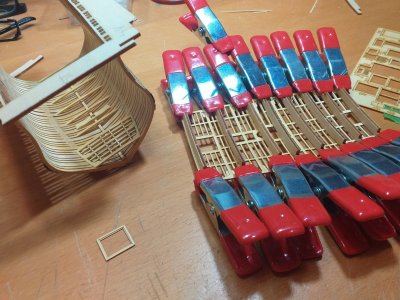
Hardest part was assembling the orlop. It is made from five very thin pieces sandwiched and lamped to templates for the curve. Plenty of areas broke. Will disguise the breaks later before cleaning it up. I will breath a sigh of relief when it is installed, but still have the gundeck to do in the same manner and I'ms truggling to think of a way of doing it that would preserve it better?

It's very fragile.................


20251023_213320.jpg
 
Hey Richard,

that looks really nice. Great work. I haven't got there yet. That's why I'm taking a close look at all this with you. Forgive me. Because I can only learn from you...

I agree with you that everything is fragile. It's no different for me. I really have to be careful. I'll keep my fingers crossed for you and look forward to any progress you make ...... :)
 
Thanks Günther,
As you can see the deck layering alignment is off in places. The pieces are perfectly made, but they must have slipped during glueing. I really have to try something different especially for ther gundeck which will be more visible. Even with the greatest of care pieces were breaking. This is a very tricky section. The small platform in the hold was easy and a good practice piece, but the other decks are challenging.

Maybe for you extreme care is required due to the lower strength of the pearwood.
 
Last edited:
Thanks Günther,
As you can see the deck layering alignment is off in places. The pieces are perfectly made, but they must have slipped during glueing. I really have to try something different especially for ther gundeck which will be more visible. Even with the greatest of care pieces were breaking. This is a very tricky section. The smal platform in the hold was easy and a good practise piece, but the other decks are challenging.

Maybe for you extreme care is required due to the lower strength of the pearwood.
Hey Richard,

I'm glad you said that. This is all really very fragile and I'll do my best not to be so rude....... I wish you continued success..... Thumbsup
 
Not a lot done today.

Added some beams in the hold and the mast step along with a platform. Made a hatch.

Hardest part was assembling the orlop. It is made from five very thin pieces sandwiched and lamped to templates for the curve. Plenty of areas broke. Will disguise the breaks later before cleaning it up. I will breath a sigh of relief when it is installed, but still have the gundeck to do in the same manner and I'ms truggling to think of a way of doing it that would preserve it better?

It's very fragile.................


View attachment 552248
I have this post of yours in my mind when I will start my build, Richard. Every peace has to be handled with great care. Fragility everywhere! The hull structure looks very nice and clean.
Regards, Peter
 
I have this post of yours in my mind when I will start my build, Richard. Every peace has to be handled with great care. Fragility everywhere! The hull structure looks very nice and clean.
Regards, Peter
Thank you,
Yes, definitely a mindset that needs to be maintained. I often find myself using tools and sandpaper by using their weight rather than pressure, and using finger contortions to support pieces for processing.
 
Thanks Günther,
As you can see the deck layering alignment is off in places. The pieces are perfectly made, but they must have slipped during glueing. I really have to try something different especially for ther gundeck which will be more visible. Even with the greatest of care pieces were breaking. This is a very tricky section. The small platform in the hold was easy and a good practice piece, but the other decks are challenging.

Maybe for you extreme care is required due to the lower strength of the pearwood.

Do you think that wetting the wood on the side that will be the top (convex) side of the deck would help? The moisture would tend to swell and soften the wood just on that side, perhaps making it easier to bend. Keep it clamped to the form until it dries.
 
Do you think that wetting the wood on the side that will be the top (convex) side of the deck would help? The moisture would tend to swell and soften the wood just on that side, perhaps making it easier to bend. Keep it clamped to the form until it dries.
Actually, I tried to lightly steam it, but it wrinkles immediately so I had to clamp it quickly into the jigs.
 
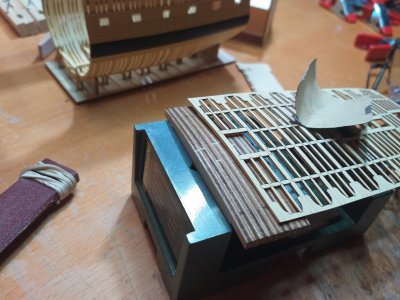
This might help for the next two decks Richard. I used scrap wood from the berth fret and glued the templates to make a jig. It was a lot easier to remove the clamps without damage to the thin wood:
View attachment 552434

Don't look too closely at my efforts, I gave up trying to remove the scorching after damaging so many parts :(.

Cheers
Tom
Great idea Tom. Thanks. That will really help with the gundeck.

I just completed cleaning up the top of the orlop with sandpaper by doing something similar. I have not cleaned between most beams, carling and ledges as it seems to show up the seam between the two layers..................

20251024_172347.jpg
 
Back
Top