1:100 Halcon 1840 Schooner

Joined
Mar 20, 2021
Messages
18
Points
58

Hello,

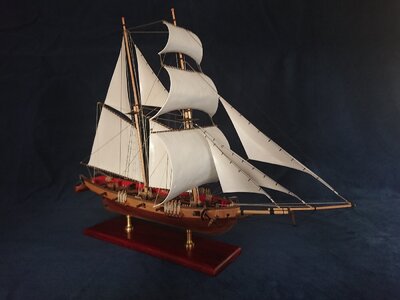
This will be a build log of the $15 1:100 Halcon 1840 kit from aliexpress.

This will be my first wooden static sailing ship. I have built some RC boats before, but they were built for speed, and now it is time to build something for the looks.

So, after waiting for about 2 weeks for the kit to arrive, it fell trough the mailbox. After opening the enveloppe the kit appeared:

20210312_172203.jpg

20210312_172214.jpg

20210312_172607.jpg

20210312_172742.jpg

20210312_172747.jpg

20210312_172732.jpg

So far so good, the laser cut parts look great!
The sheets of wood are a little warped, but that should not be a problem, they will straighten out once the build progresses and parts will be glued in place.

The build plans are short, maybe even too short.
The small parts are clear, but when it comes to finishing a lot is not listed here.

20210312_173216.jpg

20210312_173241.jpg

20210312_173251.jpg

As you can see, its not much and i guess im gonna have a lot of questions about the masts and rigging.

So far the "unboxing" part. Can you call it a unboxing when it did not come in a box?

Time to start the build.
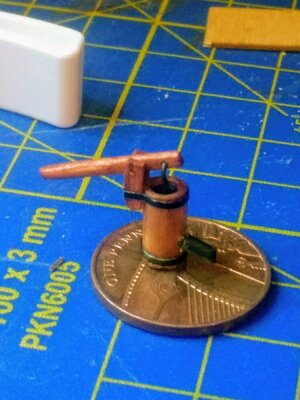
The first thing i just had to do is build some cannons:

20210312_183321.jpg

20210312_185528.jpg

These are nice little things. The brass looks great, too bad it needs some paint later on.

Time to start building the hull. The laser cut parts fit really tight together, maybe even a little too tight, so some sanding is needed:

20210313_182743.jpg

Couldnt help myself and built some more cannons

20210313_182754.jpg

After some creative ways of applying pressure while the glue was drying, there was a deck and railings:

20210314_123707.jpg

20210314_155030.jpg

I also started on some of the smaller parts, like the hatches and other stuff

20210316_184350.jpg

20210316_184407.jpg

20210316_184357.jpg

Then it was time for the difficult part, the boardings. I used hot water and some pressure to bend the wood so it would take the shape of the hull before i glued them in place.

20210316_190723.jpg

20210317_173558.jpg

20210317_200621.jpg

20210318_171935.jpg

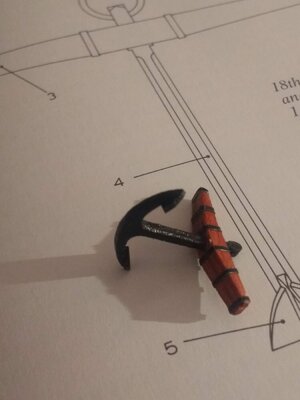
While the glue was drying, i started painting some of the smaller parts. I used 2 shades of brown to get some contrast between the parts.
Can you spot the different colored parts? No? Me neither... I guess the two colors look too much alike and i need to buy a different brown to get the effect i was looking for. Or maybe i will leave it this way, because it looks nice anyway.

20210318_213340.jpg

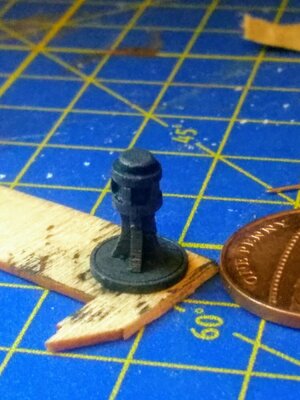
And some black paint to get a feeling for the final color scheme

20210318_215909.jpg

20210319_204848.jpg
 
Last edited:
With some of the parts in place, it starts to look like a ship

20210320_123204.jpg

20210320_123210.jpg

At this point, the accesory pack fell in the mailbox. This pack consists of 6 nicely detailed "small" cannons, one "big" cannon, 5 barrels, 2 metal anchors, anchor chain with some link rings, and a bag of small ball bearing balls wich should go for cannonballs. Unfortunately these balls are to big even for the big cannon, so i put them on the side for now. So lets build and paint the new parts

20210320_173033.jpg

20210320_190753.jpg

At this point i discovered my revell enamel paint dried out so the metal straps on the barrels have to wait on their color until the shops open again.

The big cannon appeared to be nozzle heavy and kept falling forward...

20210320_173347.jpg

I had to use a small 3mm drill to drill out the nozzle to lose some weight at the front.

At this point the questions are starting.
I want to paint the anchorchain in a nice scale color, but how do i do this without making a mess of it and what color(s) should i use?

Next was to apply some paint to the deck and inside of the boardings:

20210320_144152.jpg

Next step will be to add the planks on the bottom of the hull. To keep the strips of wood in place while drying, i tried needles and wasknijpers(whats the correct english word for this?) But both didnt work the way i was hoping them to work, so i did what every hobbyist would do; i made my own tools to fit the job!

I made some simple clamps who would fit on the ribs, with a little extension to keep the strips of wood in place.

20210321_163657.jpg

20210321_170320.jpg

Now this problem is solved, i can continue glueing the strips of wood in place.
This is a slow process, max 2 strips a day because i want to let the wood dry for at least one day.

20210324_203230.jpg

I also glued little blocks of balsa wood on the spots the masts will be glued as reinforcements.

20210326_185715.jpg

20210326_185724.jpg

Painted the anchors and the hoops of the barrels

20210328_163750.jpg

I made an attempt to make my own 4mm deadeyes. They dont look too bad, but im curious how they look to the seasoned scale builders here.

I am also making some 3x4mm single blocks. Not sure how many i gonna need so i start with about 20 or so.

20210328_170720.jpg

I also made some room for the bowsprit by filing the rail down to stem level.
I know it is not like it should be, but looks good:

20210328_184323.jpg

20210328_184330.jpg

After some inspiration from @Dr Havotnicus i built a new pump:

20210410_214347.jpg

20210411_124815.jpg

My only concern is the size. I think it might be too big for 1:100 scale. I will try to find some sizes and if it really is too big, i will make another. I know i can make something nice now, so that shouldnt be a big problem :)

Next thing i made was a tool to help me thread my deadeyes. I found something on aliexpress that looked like this and made my own:

20210411_183008.jpg

Time for a little update.
Unfortunately it is a really small update, did not have much time to work on this ship.

I have made a new smaller version of the pump:

20210419_205642.jpg

I hope i can make a bigger update soon.
 
Last edited:
So far the progress on this nice little ship. I will keep adding photos as the build comes along.

Any comments about the build, my bad english or the using wrong of names for parts are welcome!
 
Hi Freakert

I bought a kit like this last summer. It's my first ship model too. There are various versions out there, some better than others. If yours is anything like mine, you'll run into these difficulties:
  • The stem comes up too high. You are expected to drill a hole where the bulwarks meet at the bow to pass the bowsprit through to the bitts. This is impossible as the top of the stem is in the way. I trimmed the protruding part of the stem off and reattached it lower down to solve this
  • The rails and bulwarks aren't the same length. You'll have to trim the rail to meet the aft end of the bulwarks
  • Missing parts: mast caps and channels. I'm having to make these from the scrap plywood
  • Dowels provided aren't the right size. The the lower masts are too thick to fit through the holes in the deck or the slots in the false keel!
  • No blocks, deadeyes, hearts, only one spool of rigging thread
  • No dimensions provided for masts or sails
If you enjoy doing research and solving problems, you have plenty to get your teeth into. If you want an easy introduction to model ship building, you might find it discouraging.
There's a guy on a Russian forum that did a really great job with this. He also has a series of videos on YouTube
https://www.shipmodeling.ru/phpbb/viewtopic.php?f=41&t=72685&sid=07e2d1255a7ae19867a669a0425d0874

Good luck!
Alan

Thank you for your reply!

I too have the problem with the stem/bowsprit. I was planning om just filing away the top of the rail/bulwark so the bowsprit will fit between and at the height of the raised stem. Im not going for full scale, so it does not bother me that much, it wil be a nice ship anyway :)

In my case the bulwark is slightly longer then the rails. Its a 1mm difference and i might glue a little strip of the 1mm wood on to it to make up the difference.

My kit is missing the mast caps and channels too. Do you have some sizes and maybe a picture of how you made them?

I noticed the mast were too thick too, i think im gonna solve it by just drilling out the holes in the deck/slots.

Blocks, deadeyes and hearts are missing from my kit as well. How did you make them (sizes) / where did you buy them?

Tho there are no dimentions mentioned for the masts, the sizes of the sails are mentioned. I was planning to use those as a guideline and make it so it looks nice. But if anyone has dimentions and sizes i will be happy to apply them :)

Im not totally new to model building, so i already know some tips and tricks, but static wooden ships i have not made before.
I will look into the russian guy, always nice to see how other people make their stuff.

Halcon 1:100 combo brass version

Looking good! I will surely use your picture to figure stuff out on how to do things!
 
Hi Freakert

How are you getting on with your Halcon?
I haven't finished my ship yet, so I haven't got round to making mast caps yet. I've made the bowsprit cap and the channels though. There are proper plans here that you can use to make the missing bits: http://www.shipmodell.com/index_files/0PLAN1A.html
I got deadeyes from Cornwall Model Boats. I haven't decided whether to buy blocks or make them. I don't have a lot of tools, so buying them would be less painful!

I tried to enlarge the holes for the masts. It's very tricky though, as the plywood will splinter. Sanding the dowel down, or even buying a better sized one would make a sloppy fit less likely.

Kind regards
Alan
 
I made a little progress last week. The planks on the hull are slowly growing in number and i painted a number of small parts.
Added some photos of it to the log

I will look into your link to find the right plans!

Do you have pictures of your halcon?
 
Looking good Thumbsup
When i see your pump i might have f*cked up that part an i think im gonna make a better one.

Posted some new pictures about my progress on deadeyes, blocks and bowsprit.
 
Last edited:
I have tool envy! Last night I made some cleats. It took me a long time, with saw, knife, files and sandpaper.
The pump in my kit was a bewildering selection of random discs. I couldn't make sense of it so I made one from scratch. The "iron" straps around it and the anchors are made of foil from a wine bottle!
 
The "iron" straps around it and the anchors are made of foil from a wine bottle!

Thats a good idea! I think im gonna have to try that too. Does red or white wine make a difference? I have to go to the shop anyway, i might just try bothROTF
 
Thats a good idea! I think im gonna have to try that too. Does red or white wine make a difference? I have to go to the shop anyway, i might just try bothROTF
Red wine is best - you can taste the oak!
I had to colour the inside of the foil and the cut edges with permanent marker. It's nearly impossible to cover all edges, so you get some silver showing through. I excuse myself by thinking this is more realistic: the edges of the iron would be shiny from wear Redface
 
It took me a while to finish the bottles of wine, only to figure this would be a pirate version of this ship, so i would need a bottle of rum instead :D
The only problem with it was i already had an empty bottle of rum...

Anyway, i used the metal from the bottle of rum to make straps and handle for my new pump. (Pictures in the build log)
Next will be straps for the anchor and maybe some other decorative parts.
 
Just found this thread!
Looking. Good so far.
Heres my building log if you want to take a look.


A picture for refefence
IMG_20210518_000819.jpg
 
Nicely done Thumbsup
I just read your topic and i think i might also use your photos to complete my rigging.
Where did you find info on the anchor chain?
I was under assumption it would be routed something like this:

20210519_175613.jpg

(Yes i know, i have to make some holes for the anchorchain in the bulwark, but that will be done by the next update :) )

I also added a small update to my build log.
 
Hi Freakert

I bought a kit like this last summer. It's my first ship model too. There are various versions out there, some better than others. If yours is anything like mine, you'll run into these difficulties:
  • The stem comes up too high. You are expected to drill a hole where the bulwarks meet at the bow to pass the bowsprit through to the bitts. This is impossible as the top of the stem is in the way. I trimmed the protruding part of the stem off and reattached it lower down to solve this
  • The rails and bulwarks aren't the same length. You'll have to trim the rail to meet the aft end of the bulwarks
  • Missing parts: mast caps and channels. I'm having to make these from the scrap plywood
  • Dowels provided aren't the right size. The the lower masts are too thick to fit through the holes in the deck or the slots in the false keel!
  • No blocks, deadeyes, hearts, only one spool of rigging thread
  • No dimensions provided for masts or sails
If you enjoy doing research and solving problems, you have plenty to get your teeth into. If you want an easy introduction to model ship building, you might find it discouraging.
There's a guy on a Russian forum that did a really great job with this. He also has a series of videos on YouTube
https://www.shipmodeling.ru/phpbb/viewtopic.php?f=41&t=72685&sid=07e2d1255a7ae19867a669a0425d0874

Good luck!
Alan
Great link. What a build that guys done. I have to keep telling myself it's not the same cheap Chinese kit that I bought lol. Some good reference photos though.
I'm also going to have to sand some of the bow away to get the bowsprit through.
 
Nicely done Thumbsup
I just read your topic and i think i might also use your photos to complete my rigging.
Where did you find info on the anchor chain?
I was under assumption it would be routed something like this:

View attachment 234110

(Yes i know, i have to make some holes for the anchorchain in the bulwark, but that will be done by the next update :) )

I also added a small update to my build log.

I just got reference on other models.
Some SOS member explained to me that by this time, theres no chain for anchors, but big rope instead, but, i found the image below.
My chain is too thick i think to go arround.

1621566654493.png
1621567160069.png
 
Last edited:
Back
Top