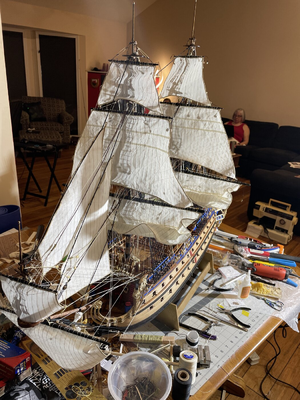
Happy Birthday, Gilbert! 

 |
As a way to introduce our brass coins to the community, we will raffle off a free coin during the month of August. Follow link ABOVE for instructions for entering. |
 |
 |
The beloved Ships in Scale Magazine is back and charting a new course for 2026! Discover new skills, new techniques, and new inspirations in every issue. NOTE THAT OUR FIRST ISSUE WILL BE JAN/FEB 2026 |
 |

THanks El Capifrom me toocapi
Thanks PaulBrilliant Gilbert. Slowly but surely...
well done Gilbert. looks great except the fourling of the main lover sails on the fore and main mast.i have the way how to do it but will have to find them, as I am not very active anymore. will come back ASAP. If You would change it , it is not that dificult. el capiGood job, Gilbert! What standing rigging have you not accomplished as of yet?
Thanks El Capiwell done Gilbert. looks great except the fourling of the main lover sails on the fore and main mast.i have the way how to do it but will have to find them, as I am not very active anymore. will come back ASAP. If You would change it , it is not that difficult. el capi
THanks VicGood job, Gilbert! What standing rigging have you not accomplished as of yet?
Are you talking about the line that starts at the mizzenmast and breaks into three or four lines that attach to the main shrouds?THanks Vic
It's those rigging that go from mast to the ratlines
Not sure how to attach those to the ratline? How did you do that? Just a drop of glue or did you make seizing?
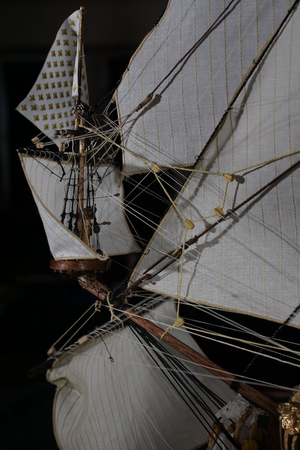


Good morning Gilbert. Beautiful work. I see what El Capi is referring to re the furled sails, however should you choose to leave it exactly like it is, it is simply stunning. Cheers GrantHello all
I have now completed the yards, sails and rigging of the mizzen mast
Some pictures below
View attachment 328890
View attachment 328891
View attachment 328892
View attachment 328893
View attachment 328894
View attachment 328895
Next will be some additional standing rigging for which I need to do some research and may ask a few questions to the community.
Cheers
here you have some. when you look at the main sail front side, you will have 3 lines coming from the bottom ege- outer BUNT LINE, INNER BUNT LINE, and Cleve line-side Fig 1. all these go up on the sails to blocks on the yard and later the mast. finally down to a pin rail aft the mast. on the backside, you have one coming from the outher edge of the sai Clewline. the oner a block half the yard then another block beside the mast then down to a pin. in Spanish we called this apago (take ) Viento (wind) .Hope this will help.P.S. You are one of the few, whom I will make a commentsThanks El Capi
That would indeed be great if you could find that
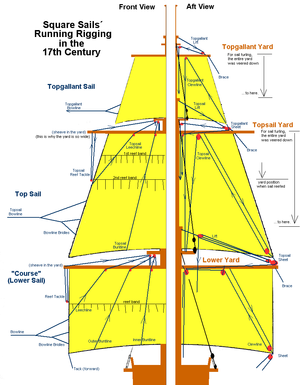
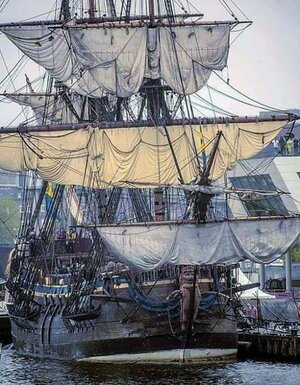
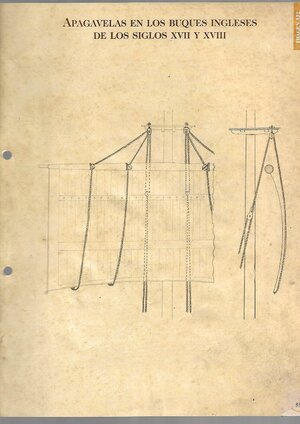
Thanks El Capihere you have some. when you look at the main sail front side, you will have 3 lines coming from the bottom ege- outer BUNT LINE, INNER BUNT LINE, and Cleve line-side Fig 1. all these go up on the sails to blocks on the yard and later the mast. finally down to a pin rail aft the mast. on the backside, you have one coming from the outher edge of the sai Clewline. the oner a block half the yard then another block beside the mast then down to a pin. in Spanish we called this apago (take ) Viento (wind) .Hope this will help.P.S. You are one of the few, whom I will make a comments
View attachment 329048
View attachment 329049
View attachment 329050
View attachment 329051
Thanks GrantGood morning Gilbert. Beautiful work. I see what El Capi is referring to re the furled sails, however should you choose to leave it exactly like it is, it is simply stunning. Cheers Grant
Thanks KurtBeautiful ship Gilbert!
ARRRRrrrrrr!
Thanks VicBetween the fore mast and the sprit mast, I had a stay separate into four lines which attached to the sprit mast shrouds. I twisted the four smaller lines together on one end and seized them to the thicker stay. I didn't use any glue. I tied them the ends to the shrouds under the ratlines. Most of the time I didn't make a hard attachment until the tension was adjusted a bit. I don't know if that's what you're talking about. Here's a picture of the sprit example:
View attachment 328969
Also, on the fore and main course sails, instead of just rolling them up, I used the clew and buntline and reef lines to pull up the sails. I think I pulled the reef lines first until they were all the way up, then the clue lines, and, finally, the buntlines. I think that's the way they're done on the real ship. I just didn't go all the way to tie the gaskets up around them. I just wanted the deck to be seen more easily.
