1930 Bentley Blower by Aifix 1/12 build log

When I started this project, one of my goals was to have working brakes. To achieve this, I needed working brake segments. So I drew them up and printed them with the only printer I had at the time (a filament printer). So I had my brake segments which eventually gave me working brakes. The thing is, I now have a resin printer. Sooo, me being me, I had to redo them. Here are a few pictures.

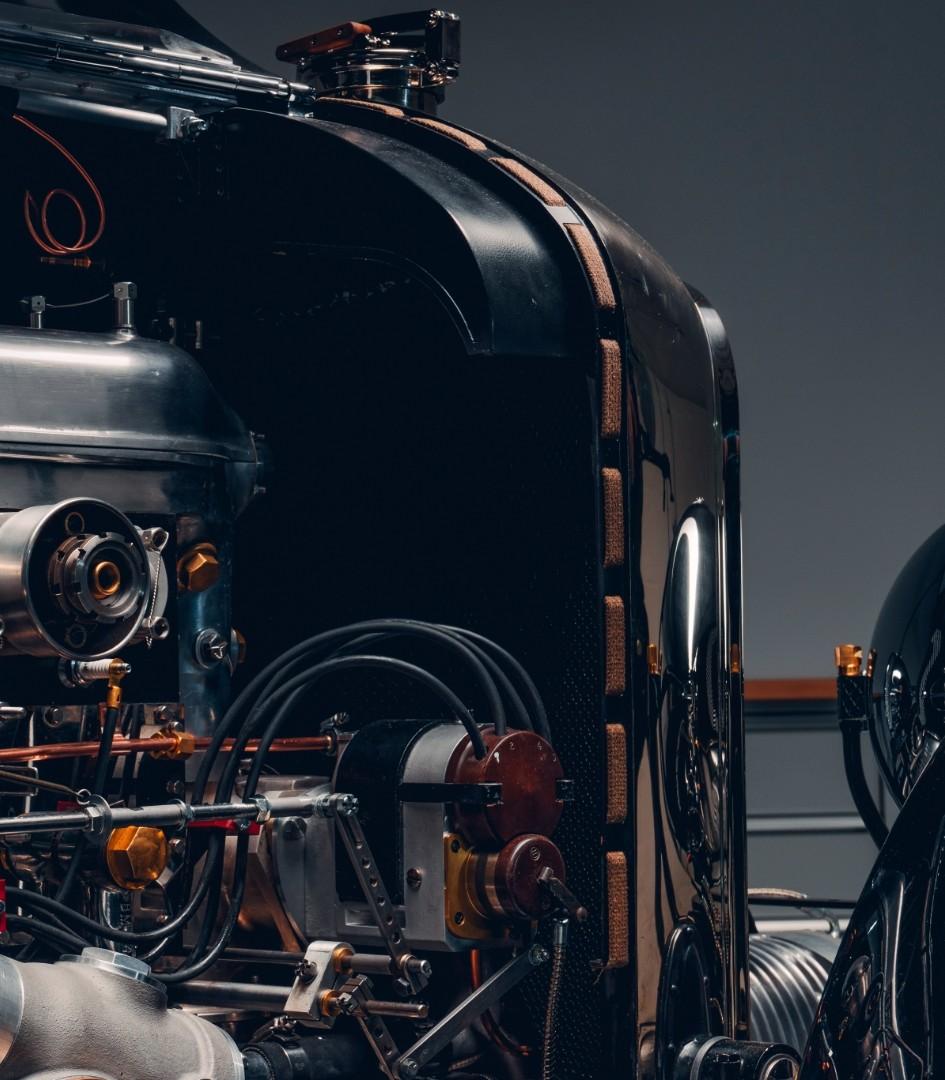
First, here's what the kit proposes
20240102_203735.jpg

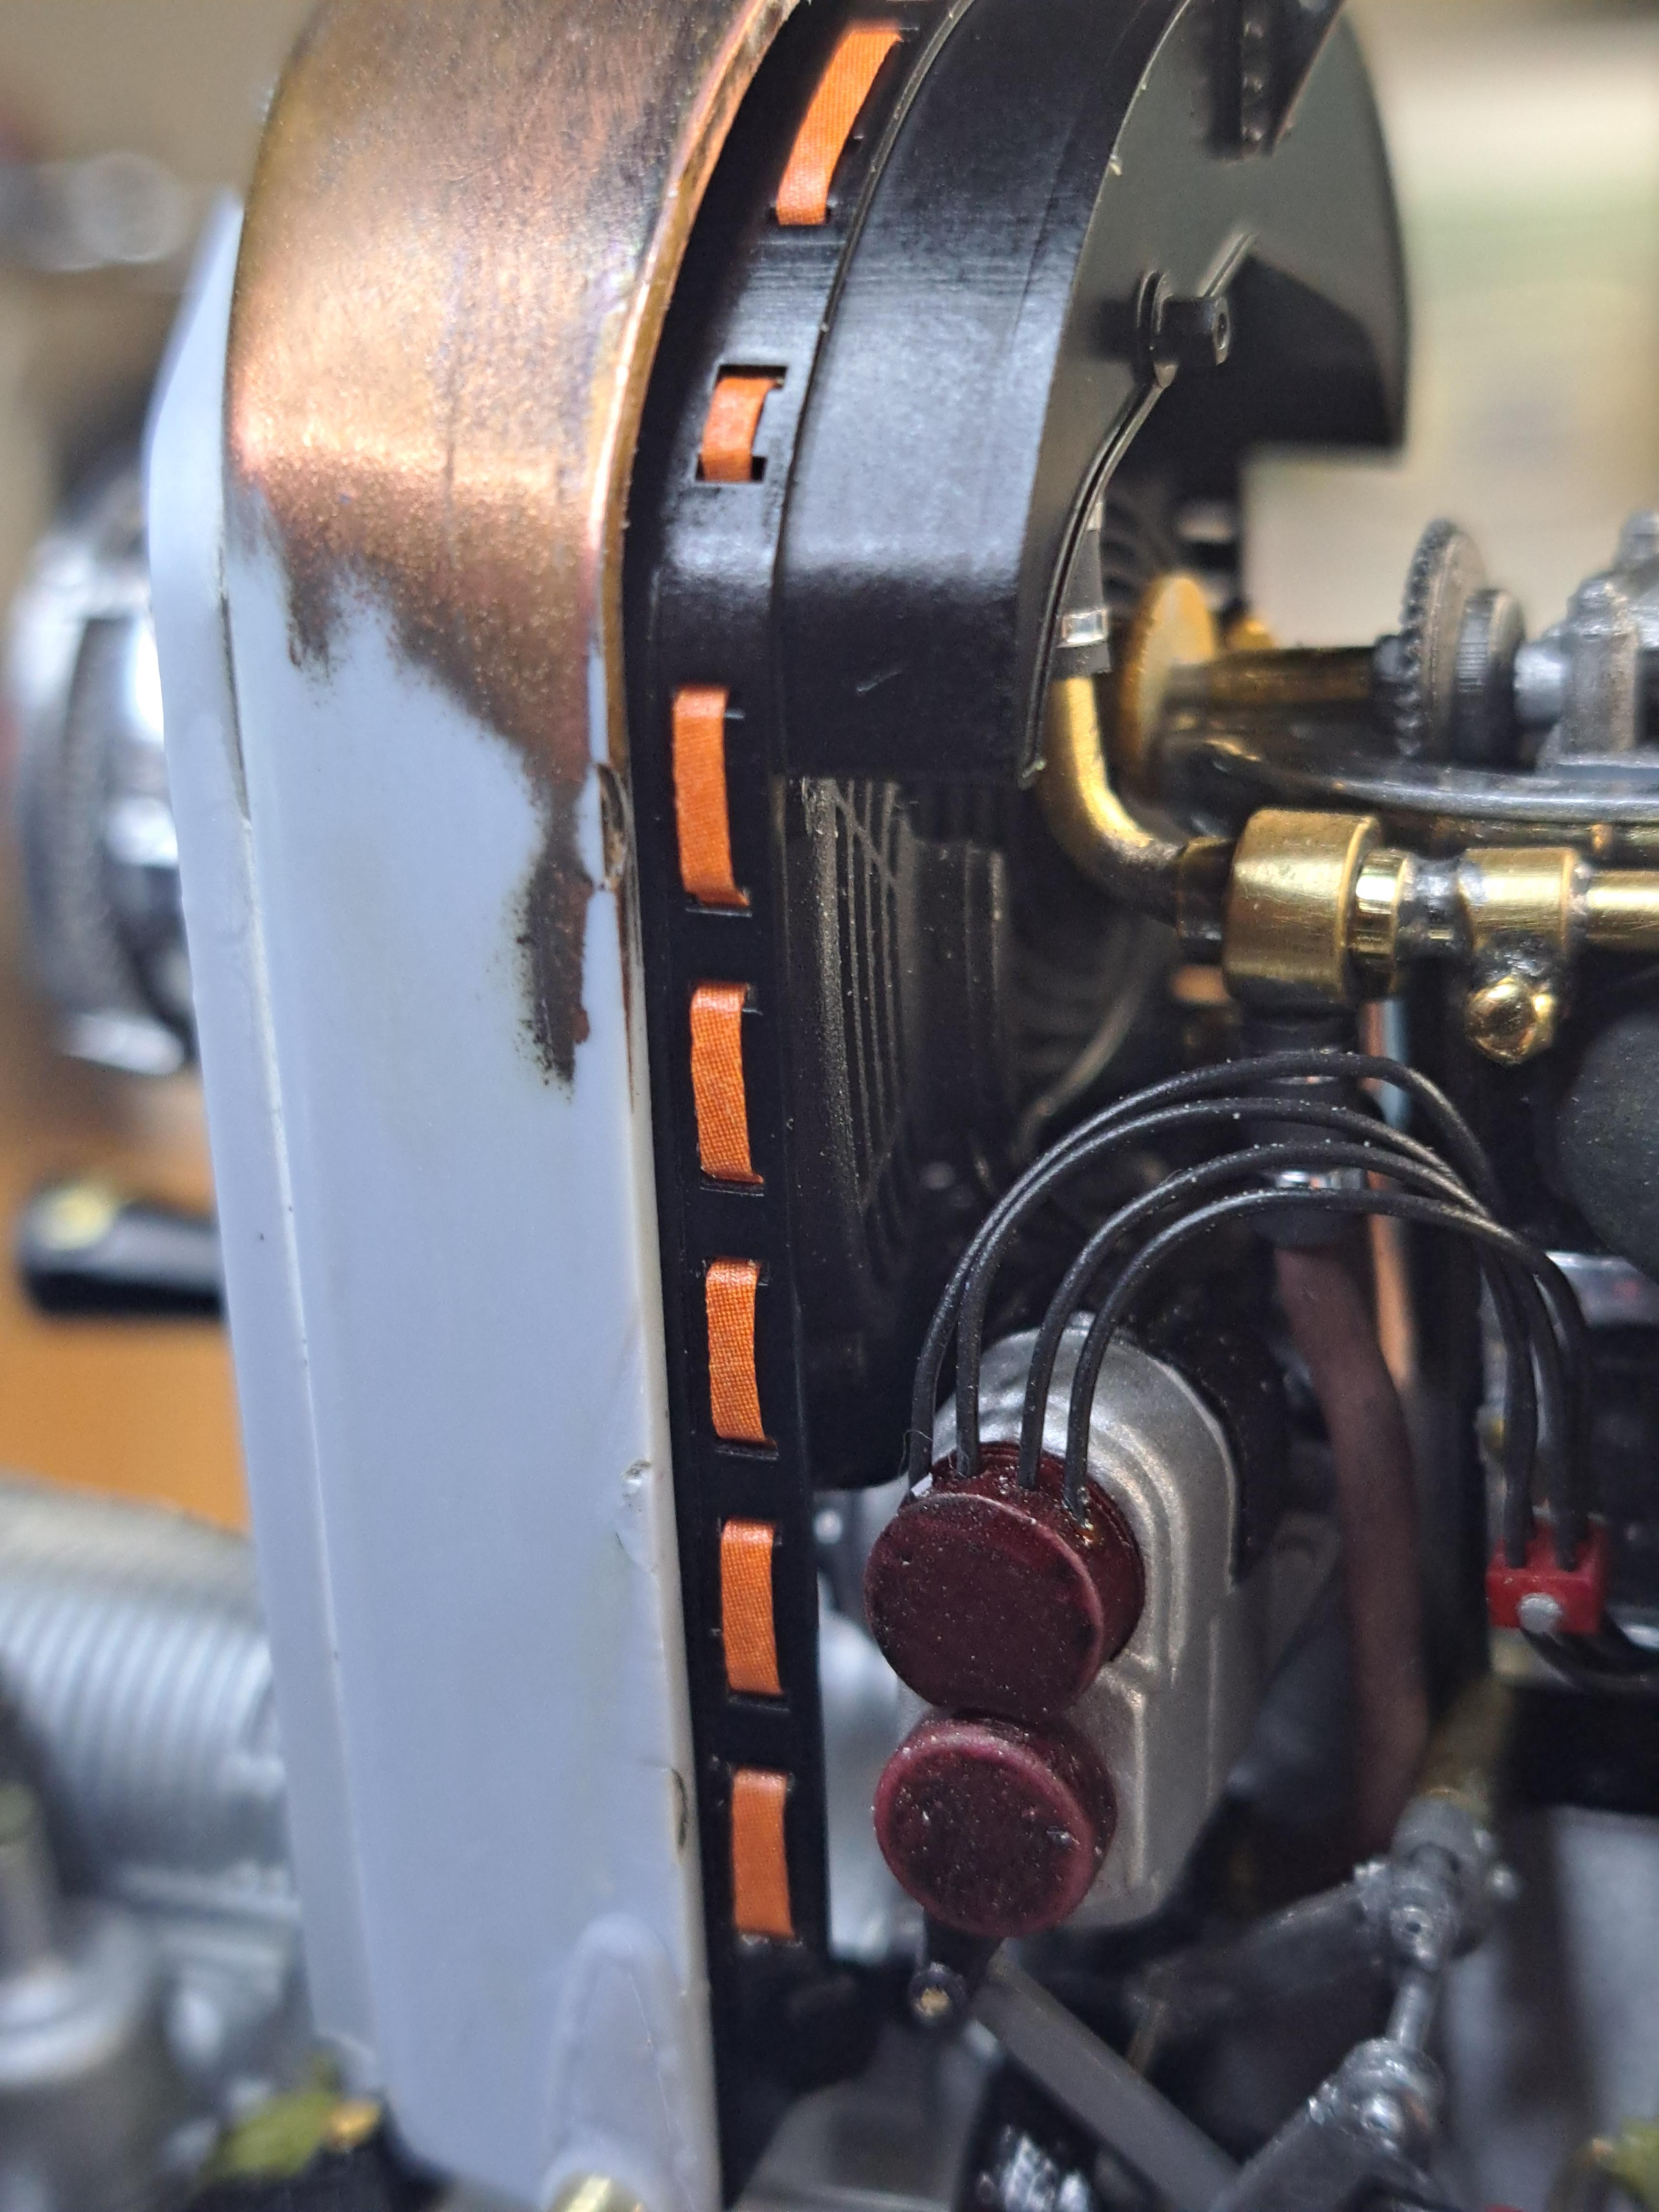
These are the segments I printed first
20240102_203744.jpg20240102_132551.jpg

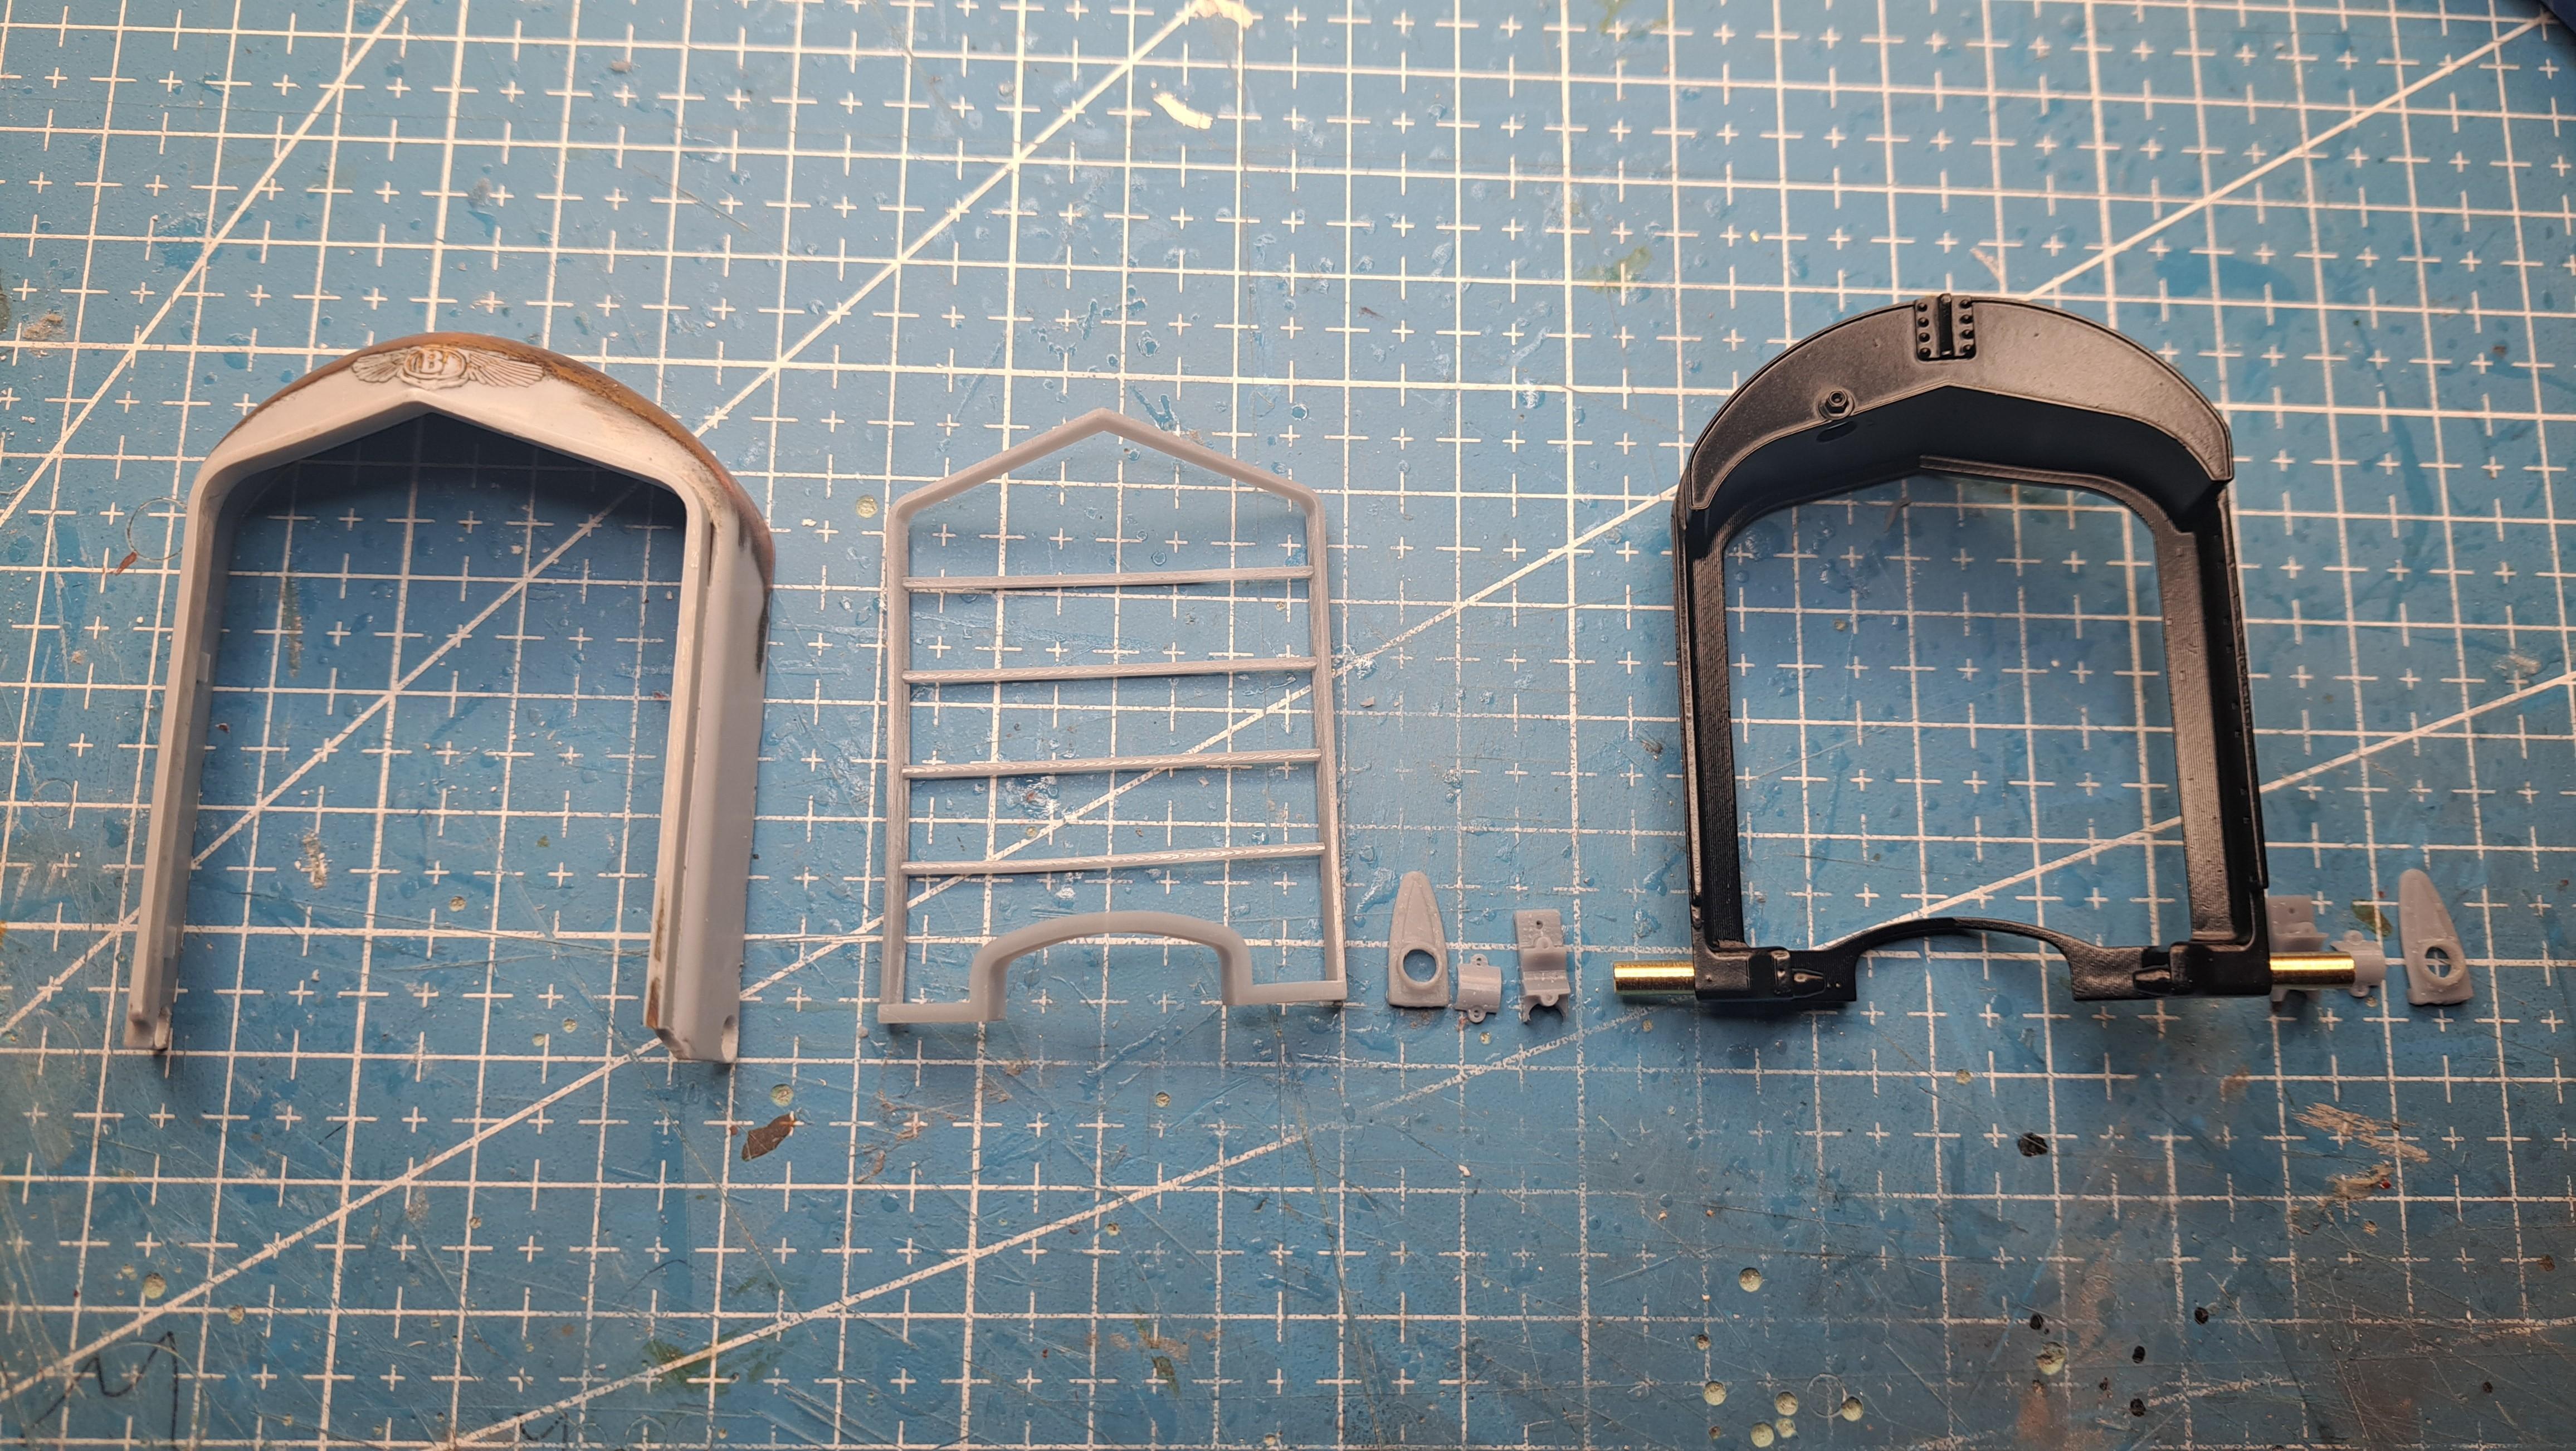
This is what I really wanted
Screenshot_20240102_214012_Chrome.jpg

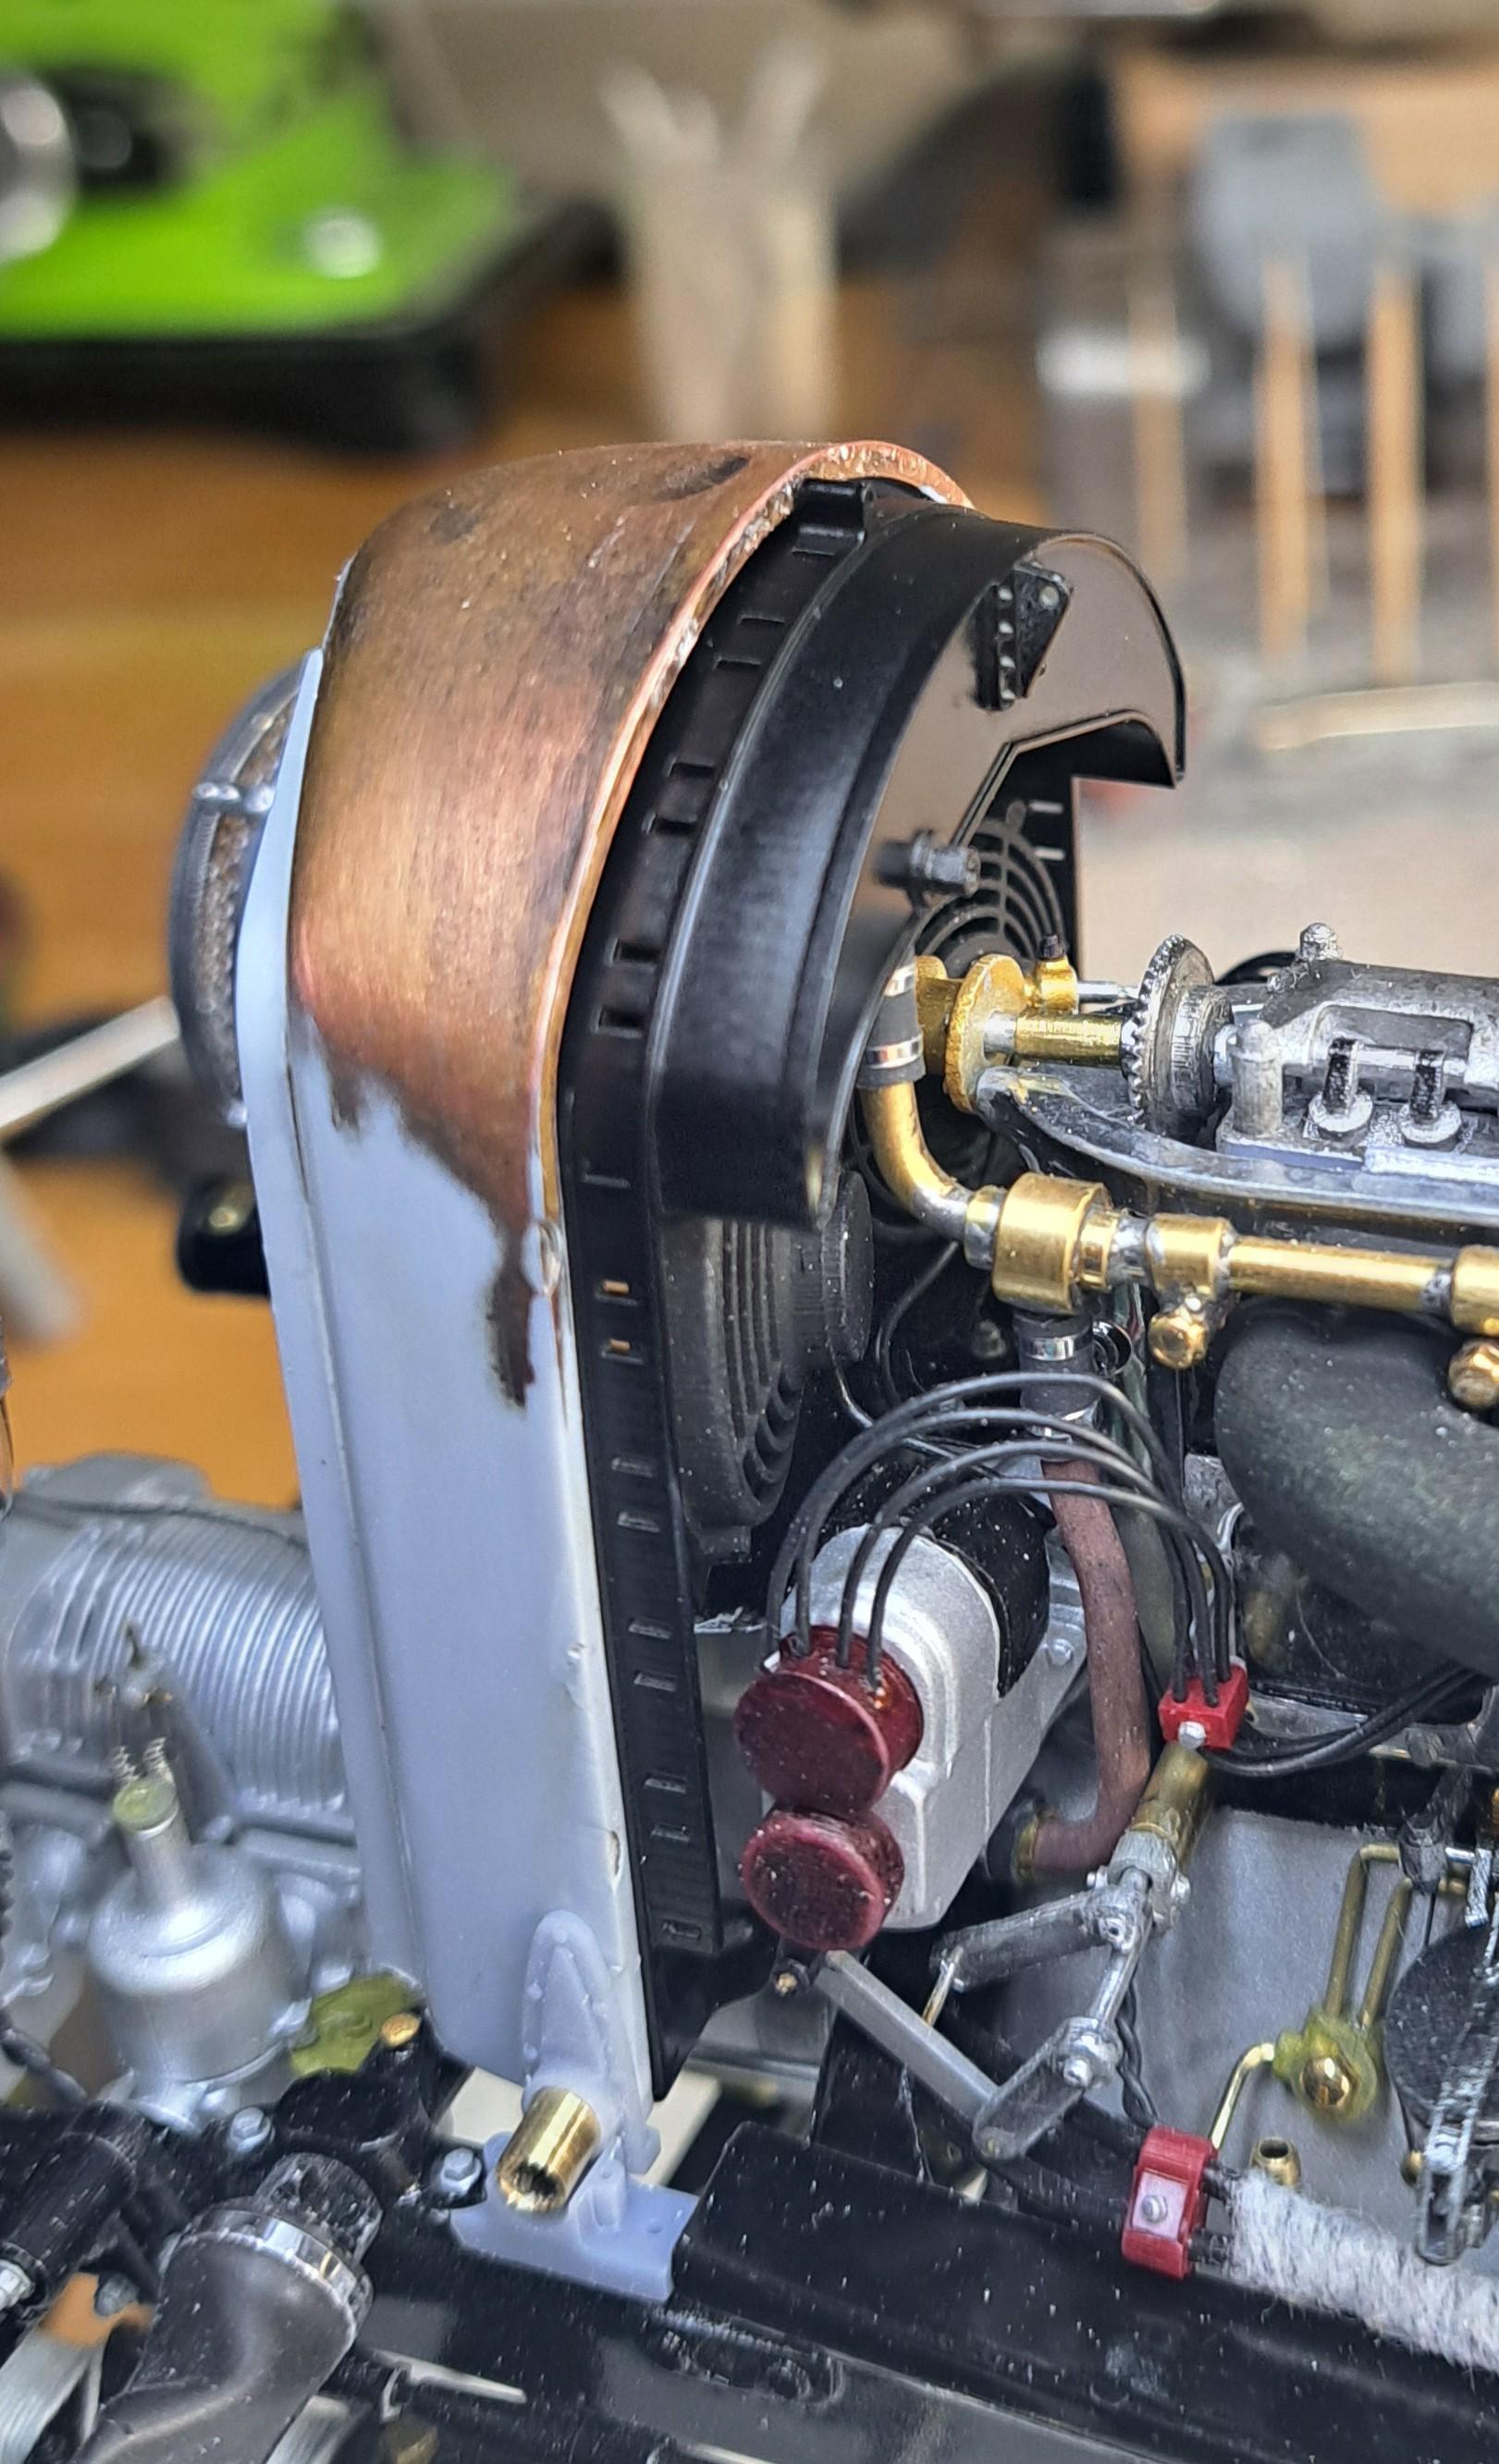
And this is what I now have. Still need to make the return spring.
20240102_203805.jpg20240102_203612.jpg

it's really nice to be able to do praticaly any parts at will!!
 
I made the micro springs for the brake segments using a. 003in dia rod.
View attachment 20240103_095231.mp4
20240103_095201.jpg
I reprinted the brake drums
20240103_214711.jpg
20240103_214719.jpg
20240103_215348.jpg
20240103_215314.jpg
And finished wiring the head lights and the gearmotor. All the wires run inside the frame and all come out on the left side of the gas tank to form a neet wire harness that will eventualy go to a control panel mounted on the display case. I also wired and installed the battery.
20240103_071535.jpg
20240103_074557.jpg
20240103_085425.jpg
20240103_085342.jpg
 
Hi Francois, since you started the build, every new post tells me that you are the real craftsman, however, every new post continues to wonder me how far you can go with showing details on your model, and trust me, I wouldn't surprise if one day, you turn the ignition key and the engine will start!
 
I did the exhaust system. I wrapped the down pipe, added tube clamps with expension springs before and after the silencer and added the correct tail pipe mounting bracket.
20240108_221605.jpg
The real thing
Screenshot_20240108_221259_Chrome.jpg

Tube clamps and springs
20240108_134952.jpg
20240108_135106.jpg

20240108_134944.jpgTail pipe bracket
20240108_135146.jpg

The real thing
Screenshot_20240107_213012_Photos.jpg

I also decided to try my hand at printed the wheel rims instead of drilling a zillion holes in the kit rims. First try is promissing.
20240108_221951.jpg
20240108_221940.jpg

And lastly, here are some general shots of the car with the body on
20240108_153730.jpg
20240108_153722.jpg
20240108_153655.jpg
20240108_153641.jpg
 
Thumbs-UpThumbs-UpThumbs-UpThumbs-UpThumbs-UpThumbs-Up:):):) Excelente trabajo,no te as dejado ni un solo detalle,una verdadera maravilla,enhorabuena
 
I did the exhaust system. I wrapped the down pipe, added tube clamps with expension springs before and after the silencer and added the correct tail pipe mounting bracket.
View attachment 419900
The real thing
View attachment 419896

Tube clamps and springs
View attachment 419886
View attachment 419889

View attachment 419885Tail pipe bracket
View attachment 419893

The real thing
View attachment 419899

I also decided to try my hand at printed the wheel rims instead of drilling a zillion holes in the kit rims. First try is promissing.
View attachment 419895
View attachment 419897

And lastly, here are some general shots of the car with the body on
View attachment 419884
View attachment 419891
View attachment 419888
View attachment 419894
I am continually amazed !
 
Like mentionned on my previous post, I tried printing the wheel rims instead of drilling the ones from the kit. Well after a few printing interrations, I'm very happy to say that I was able to print a very nice rim. The prototype rim (all the pictures that fallow are of that wheel) was printed at an angle, the finished rims are printed flat and the result is even better. So here are some pictures from start to finish with, as always, a few pictures of the real thing.

The rim fresh off the printer, printed at a slight angle
20240108_221940.jpg

I made an assembly jig to aid the alignment of the first row of spokes
20240110_210519.jpg
20240110_210453.jpg
20240109_215715.jpg
First row done
20240110_091444.jpg

Second row
20240110_114237.jpg

Wheel completed next to the kit's wheel
20240110_122825.jpg

Primed
20240110_141513.jpg

And painted. The prototype was painted after lasing but the proper wheels will be painted in sections, the hubs and rims will get a coat before lasing and a final coat over the finished wheel. I believe that the result should be better this way.
20240110_180106.jpg

i also printed a valve
20240110_180055.jpg

And a bunch of wheel weights
20240110_175929.jpg
20240110_140714.jpg

The finished prototype wheel
20240110_212127.jpg

20240110_212253.jpg

The real thing
Screenshot_20240110_215638_Chrome.jpg

20240110_212223.jpg

again the real thing
Screenshot_20240110_215646_Chrome.jpg

And for fun,
the model
20240110_211859.jpg
Vs the cad model
20240110_211837.jpg

and a little video
View attachment 20240110_212556.mp4
 
Like mentionned on my previous post, I tried printing the wheel rims instead of drilling the ones from the kit. Well after a few printing interrations, I'm very happy to say that I was able to print a very nice rim. The prototype rim (all the pictures that fallow are of that wheel) was printed at an angle, the finished rims are printed flat and the result is even better. So here are some pictures from start to finish with, as always, a few pictures of the real thing.

The rim fresh off the printer, printed at a slight angle
View attachment 420405

I made an assembly jig to aid the alignment of the first row of spokes
View attachment 420408
View attachment 420403
View attachment 420410
First row done
View attachment 420402

Second row
View attachment 420414

Wheel completed next to the kit's wheel
View attachment 420415

Primed
View attachment 420411

And painted. The prototype was painted after lasing but the proper wheels will be painted in sections, the hubs and rims will get a coat before lasing and a final coat over the finished wheel. I believe that the result should be better this way.
View attachment 420412

i also printed a valve
View attachment 420407

And a bunch of wheel weights
View attachment 420416
View attachment 420417

The finished prototype wheel
View attachment 420399

View attachment 420406

The real thing
View attachment 420413

View attachment 420404

again the real thing
View attachment 420401

And for fun,
the model
View attachment 420398
Vs the cad model
View attachment 420409

and a little video
View attachment 420400
That’s a great work, François. The spoked wheels with all the details looks beautiful.
Regards, Peter
 
Happy new year Rick!
Thank you, I'm very pleased with it so far. I decided to go all out on this one, working engine, working brakes, working head lights, and many more features still to come.
 
Had a bit of bad luck with the head lights assembly. The 'U' shaped bracket that holds the head lights is so fragile that it keeps braking. So I did what I should have done in the first place, I made it out of a brass rod. I had to slightly modify the horn bracket to have a more sturdy assembly.

The new 'U' shaped bracket that is now more a 'Y' is made of soldered brass rod, round and square brass tubing. The lower rod will go thru the modified horn bracket and also thru the frame.
20240115_140547.jpg
20240115_140626.jpg

I also made the spare wheel mount with a screwed on center spigot for easy spare removal
20240113_122918.jpg
20240113_123056~2.jpg
And the real thing
Screenshot_20240113_231940_Photos.jpg

And lastly, l made the step. I might need to rework the shape a bit but it pretty close.
This is the kit's step
20240115_171505.jpg
Mine
20240115_171208.jpg
And the real thing
Screenshot_20240115_212019_Photos.jpg

I'm also slowly advancing the lacing of the wheels. I've pre-painted all the hubs and rims
20240113_121433.jpg
First layer
20240113_130237.jpg
Second layer
20240113_164358.jpg
Third layer
20240114_115310.jpg
 
Your work is really fascinating. As you probably know, I have been selling Pocher models for almost twenty-five years now, and I always considered them a sort-of guide to creating the model. Of course, when the brand was started in the 1960's there was no thought of 3D printers but I wonder if your work here is a preview of what modellers will be doing in the future.

Do you think there will be companies that will sell some rough CAD files to a model, and include a zillion pictures? That way, the modeller would have the fun of finishing off the CAD, and then printing on their own machine.

Being a model designer, and retailer, I am always anticipating where the industry will go next.

Best Regards,

Rick
 
Thanks Rick, coming from someone with as much experience as you means a lot.
There has to be a market for this, especially with the increasing quantity of affordable 3d printers out there. The problem is that not everyone who owns a printer has the ability to model complex parts on a cad system. That's where I come in, I've started offering my 3d cad modeling services to anyone wishing to further customize with a level of detail that scratch building is often not capable of giving.
Naturally, I can also fo the printing.
 
Last edited:
Thanks Rick, coming from someone with as much experience as you means a lot.
There has to be a market for this, especially with the increasing quantity of affordable 3d printers out there. The problem is that not everyone who owns a printer has the ability to model complex parts on a cad system. That's where I come in, I've started offering my 3d cad modeling services to anyone wishing to further customize with a level of detail that scratch building is often not capable of giving.
Naturally, I can also fo the printing.
Hi Francois,

If you are interested, we should take this off-line here and discuss over a coffee. I have the website where we could market what you design. I think the folks on this forum might benefit from such a collaboration.

Cheers,

Rick
 
Finished reenforcing the head lights assy, shouldn't brake anymore. 20240118_080044.jpg
20240118_105557.jpg

Now that that's done, I decided to tackle the radiator.
The kit's radiator is composed of 3 parts:
20240118_233451.jpg
1-the inner part that represents the core (right), I'll completly replace this part because it not very detailed and it doesn't fit with the twin fans and water pump.

The kit's core with the grill removed
20240118_210543.jpg

A real core
Screenshot_20240118_232154_Photos.jpg
My core so far
20240118_233227.jpg


2-The outter shell (center). I'll keep the kit's part but will replace the poor excuse for mounting brackets that are there by more accurate looking brackets.

The kit's bracket
20240118_210350.jpg
Real thing
Screenshot_20240118_231739_Photos.jpg
First test print
20240118_210445.jpg

I know that many say that the bentley badge location is incorrect but personnaly, I don't find it too bad. I think that playing with it would only make it worst since this part will be chromed.
20240118_233254.jpg

3- the grill, I will also redo this completly
20240118_233451.jpg

As a side note, I was recently asked to 3d model and print a model T tire in 1/25 scale complete with the firestone logo and a specific thread.
This is what it looks like
20240117_080350.jpg

And a vintage light. Again in 1/25 scale. The post holding it is a toothpick!! This was a mis printed part that I painted real quick just to see the color scheme
20240117_191727.jpg

20240118_215349.jpg
 
Last edited:
First test print of radiator core, not half bad. I'm still missing some details but at least I know it prints ok. I'll be using a very fine flexible wire mesh that as an aperture of .02 which should simulate the core's mesh pretty good. For the front grill, I'll use the same metal mesh used for the head lights.
20240119_213143.jpg
20240119_213008.jpg
 
I had pretty much finished printed the different components for the radiator assembly when I noticed I made a mistake. Here's what I did wrong. There is a type of webbing inserted in small slots that goes all around the core's outter flange.

Here's what I'm talking about.

Screenshot_20240122_224244_Photos.jpg.802afa4fa1728a56d0426a2e7ce78d4f.jpg


When designing the core, I missed one of the slots for the webbing, the result is a broken pattern.


I'll reprint it. The rest of the parts are ok.


Back
Top