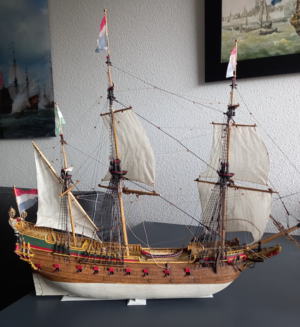
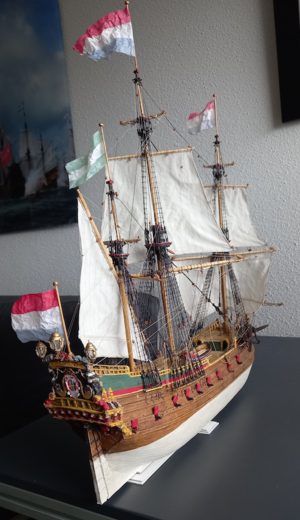
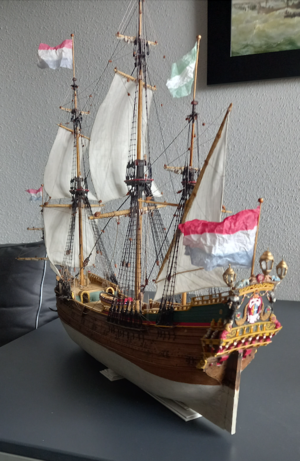
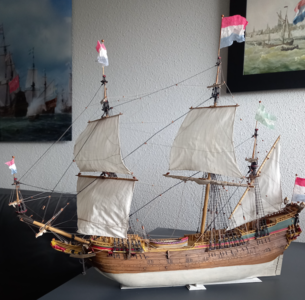
BTW: Ab, your rigging and sails are really looking very authentic - very good to compare the "before and after"
-

Win a Free Custom Engraved Brass Coin!!!
As a way to introduce our brass coins to the community, we will raffle off a free coin during the month of August. Follow link ABOVE for instructions for entering.
-

PRE-ORDER SHIPS IN SCALE TODAY!
The beloved Ships in Scale Magazine is back and charting a new course for 2026!
Discover new skills, new techniques, and new inspirations in every issue.
NOTE THAT OUR FIRST ISSUE WILL BE JAN/FEB 2026
You are using an out of date browser. It may not display this or other websites correctly.
You should upgrade or use an alternative browser.
You should upgrade or use an alternative browser.
A 17th century Dutch armed trader – scratch built from card [COMPLETED BUILD]
- Thread starter Ab Hoving
- Start date
- Watchers 25
-
- Tags
- completed build
- Joined
- Aug 8, 2019
- Messages
- 5,566
- Points
- 738

In our country the voile cotton is not expensive

 www.textielstad.nl

Cotton voile gebroken wit
100% fijne katoenen voile. Deze stof is een van onze nieuwe basis kwaliteiten. Geschikt voor kleding en interieur. TIP: Deze stof kan ook al lekker zomerse en natuurlijke voering worden gebruikt.
Voile is something different than Navarra. Then latter is better, but also more expensive.
I use Navarra. See the link.
Congratulations for finishing this beautifull model (in this short period of only two months)
Very good work
Very good work

Very inspiring, thank you for showing us how much can be done with very little.
Uwe,
Actually the time needed to build a model is of no significance. I don't keep records, but I estimate the time to be around 400 hours. I am retired, so I don't have any obligations. But what is really important is simply the intention and the amount of fun caused by building. This one replaced the one I gave to the museum. I missed the sight of the model at home and chose to make another one. I was surprised by the speed of building myself. Experience helps a lot.
Actually the time needed to build a model is of no significance. I don't keep records, but I estimate the time to be around 400 hours. I am retired, so I don't have any obligations. But what is really important is simply the intention and the amount of fun caused by building. This one replaced the one I gave to the museum. I missed the sight of the model at home and chose to make another one. I was surprised by the speed of building myself. Experience helps a lot.
Thank you Jolley Roger for your kind words. For your information here is what I use to make my models:
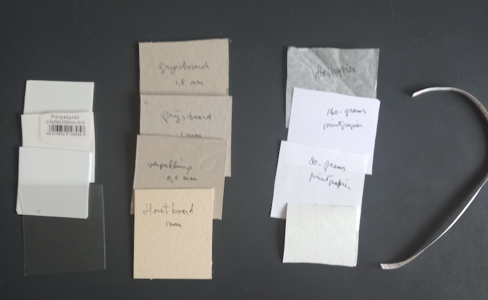
To the left three sizes of polystyrene (0.5, 0.8 and 1.0 mm) for wales and railings and some transparent plastic for windows and lanterns, saved from the dustbin.
In the middle various types of cardboard: grey board (I'm not sure of the English type name) 1 and 1.8 mm thick (any stiff card box will do), another sort of board from the dustbin in which frozen pizzas are sold (0.5 mm) and wood board 1mm, which has the advantage that is is not laminated, so sanding will not cause all kinds of tiny fleeces hanging from the broken surface.
And to the right very thin blotting paper for flags, two kinds of print paper (160 and 80 grams) for decks and various small items like pumps, capstans, bulkheads and so on and self-adhesive printed plastic (D-C-Fix) for planking. A cut strip is added as an example.
Furthermore plastic glue, white glue, CA glue and finally spray glue to stick the frame drawings to the card as I showed in the first posting of this thread. Masts are made from some soft wood (I think it is abachi) I give the right size on my table saw and some bamboo sticks from the Indonesian kitchen were used for the smaller yards. I paint my models both with Humbrol and Revell paint, which are sold in tiny cans and tubes of Rembrandt paint by Talens. And for the carvings I use Miliput or Magic Sculpt.
I mentioned Navarra white Lawn for sails and Irish linen for the rigging.
What does it all cost? Maybe all together I spent 20 or 25 euros on this model. Most of the costs are in the paint, glue and sails.
Last edited:
Very nice work again Ab.
How do you make the flags, these look very realistic.
How do you make the flags, these look very realistic.
Hello Maarten,
As stated earlier I make my flags from very thin transparant paper. My liquor supplyer wraps my whisky bottle in it (the Dutch variation of the brown paper bag), so there is always a good excuse to buy a new one . ‘I’m out of flags honey’
I draw the flags on a sheet of sufficient size and paste that to an improvised wooden frame. That’s how both sides of the flag can be painted at once. The trick is the amount of paint to use. I take a little bit of paint at the tip of my brush and dip it in turpentine. Then I mix the combination on a piece of paper until a very diluted mixture of paint and turpentine remains on the brush. That’s what I use to color the flag.
Long ago I used to paint with undiluted paint, but the result was far too bright. And it did not match with the intensity of the colors of the ship.
Once thoroughly dry I cut the flags to their size and crumple them to small balls, carefully open them again and repeat the proces. When the result is as I wanted it ,I only partly stretch the flag and glue it to the flagpole. It can be easily handled to a naturally flapping flag.
It’s so easy!
As stated earlier I make my flags from very thin transparant paper. My liquor supplyer wraps my whisky bottle in it (the Dutch variation of the brown paper bag), so there is always a good excuse to buy a new one
I draw the flags on a sheet of sufficient size and paste that to an improvised wooden frame. That’s how both sides of the flag can be painted at once. The trick is the amount of paint to use. I take a little bit of paint at the tip of my brush and dip it in turpentine. Then I mix the combination on a piece of paper until a very diluted mixture of paint and turpentine remains on the brush. That’s what I use to color the flag.
Long ago I used to paint with undiluted paint, but the result was far too bright. And it did not match with the intensity of the colors of the ship.
Once thoroughly dry I cut the flags to their size and crumple them to small balls, carefully open them again and repeat the proces. When the result is as I wanted it ,I only partly stretch the flag and glue it to the flagpole. It can be easily handled to a naturally flapping flag.
It’s so easy!
Last edited:
‘I’m out of flags honey’
GREAT - I have to keep this in mind ....
GREAT - I have to keep this in mind ....
Hi Ab,Hello Maarten,
As stated earlier I make my flags from very thin transparant paper. My liquor supplyer wraps my whisky bottle in it (the Dutch variation of the brown paper bag), so there is always a good excuse to buy a new one. ‘I’m out of flags honey’
I draw the flags on a sheet of sufficient size and paste that to an improvised wooden frame. That’s how both sides of the flag can be painted at once. The trick is the amount of paint to use. I take a little bit of paint at the tip of my brush and dip it in turpentine. Then I mix the combination on a piece of paper until a very diluted mixture of paint and turpentine remains on the brush. That’s what I use to color the flag.
Long ago I used to paint with undiluted paint, but the result was far too bright. And it did not match with the intensity of the colors of the ship.
Once thoroughly dry I cut the flags to their size and crumple them to small balls, carefully open them again and repeat the proces. When the result is as I wanted it ,I only partly stretch the flag and glue it to the flagpole. It can be easily handled to a naturally flapping flag.
It’s so easy!
Everything in life is easy as long as you know how to do it
This is drfinately one I will use, your flags look so real, these will also suit wooden models.
Hello Ab, I am now also a member of this forum. I said this many times before, your builds look so easy on the screen, but with your knowledge of historical ships, they look amazing. I started a while ago also an historical model, but failed in a big way. I think it is still very different to make a modern hull as a historical one.
But I will not give up, but I probably cannot catch up on your knowledge you got from working so many years as a conservator in the Scheepvaart Museum in Amsterdam. I admire your skills !!
But I will not give up, but I probably cannot catch up on your knowledge you got from working so many years as a conservator in the Scheepvaart Museum in Amsterdam. I admire your skills !!
Hello Jan, good to see you here.
I'm sorry that you failed in your attempt to do a historical ship. I know that is not your main interest. Japanese modern warships is a whole other league. Don't admire my skills. They are extremely limited. I would never be able to make cruisers like you do. Each his own territory. But did you start with a simple model or did you at once go for a three decked ship? Always start simple...
If you want I can send you some simple stuff to practice.
Oh, by the way, I did spend some years in the Scheepvaartmuseum as their guest during the rebuild of the Rijksmuseum, but the latter was my employer for 23 years and it was the best time of my life.
Good luck!
That's a good question pugwash. To be absolutely honest, I don't know, but it seems reasonable to suppose that if they stand in a bathroom or in a sauna the life expectance will be much lower than in normal house hold circumstances. I never tested that, because they stand in a guest room or in a small showcase, so i don't really know. My oldest paper model is from 2016 and I can swear that there is no sign of any deformation or other catastrophic decay. I think that as long as the atmospherical conditions are more or less constant paper models can last as long as wooden ones. But much depends on how they were constructed. I am 74 now and I don't expect any kind of decay before I pass away and what happens after that: 'actually my dear, I don't give a damn'. wasn't that a frase by Humphry Bogard in a classical movie?
- Joined
- Aug 8, 2019
- Messages
- 5,566
- Points
- 738

Gone with the wind, Clark Gable. I was forced to see that movie a few times.actually my dear, I don't give a damn


