That is discussed in the video. He places it on one side for the first parts to be glued, then flips it over to glue the other parts. This is due to the stagger of the pieces.Jeff,
Thanks, great suggestion. I'll watch the video today for sure.
My understanding is that frame "B" aligns with the solid line on the frame plan, and Frame "A" aligns with the dotted line. The two frames are glued together with the laser-printed (bevel indicator line ) facing outwards. In the center-most full frames, half frames A" and "B" are almost exactly on top of each other; but as the frames approach the stern and the bow, the position of the two half frames relative to each other begins to diverge..like astigmatism...
A question I have: for a stern frame (like # 37) when making half-frame "A" on the dotted line, do I lay the futtocks printed-side down, or printed-side up ?
In a frame with straight sides, no stagger, it wouldn't make any difference, (one just flips the frame over to glue it back to back to half-frame "B") but if the thickness of the futtocks differs, then spacing would be different depending on which side down the frames were constructed.. kinda complicated to explain....I'll go watch the video. I'll watch video, think, think, think, print some plan sheets, and clean up char today. Once I get the frame-making sequence, subsequent frames will go a little faster. I hope to get it right, but if not, I know you guys will set me straight. I'll send pics before any critical phase.
Thanks a lot !
Alex R
-

Win a Free Custom Engraved Brass Coin!!!
As a way to introduce our brass coins to the community, we will raffle off a free coin during the month of August. Follow link ABOVE for instructions for entering.
- Home
- Forums
- Ships of Scale Group Builds and Projects
- Modelship Dockyard PoF HMS Enterprize 1774 - 1/48
You are using an out of date browser. It may not display this or other websites correctly.
You should upgrade or use an alternative browser.
You should upgrade or use an alternative browser.
Perfectly fine plan.Hello everyone.
Starting the frames today. They are complicated to say the least. I'm starting with the rearmost midship frame, # 37
What complicates the frame build is the different thicknesses of the futtocks, and the way the spaces are staggered. Each frame is made up of two half-frames. There are some inconsistencies in the instructions, which I can figure out, and only one frame plan sheet for each frame.
My technique is to attach the futtocks to the paper plan using paper glue. For me, the best way is to have three copies of each frame plan. Use one copy to make frame "A" one copy to make frame "B" and the third copy to mate both half frames. I'll have to put some thought into how to best deal with the stagger and spacing. Each frame will need lots of sanding and preparation before assembly and after assembly. At least for me, I think it will take at least 2-3 days per frame...Here are the parts for both of # 37 Half frames. The futtocks are spread over many sheets because of the differing thicknesses. They are clearly laser-labeled. Be real careful with the chocks, as they are futtock and frame specific.l
View attachment 513892
Frames "A" and "B" laid out. Futtocks not cleaned or prepared yet.
Alex R
What I have been doing after cleaning up futtocks and chocks, using frame plans, ( be aware each plan is for both plans per pair….be careful) I will glue chocks on, without a lot of glue slop the plan stays pristine, when dry, sections get glued up, laying on plan for alignment until dry. Very slight glue migrates to plan, nice alignment, few, tears of any kind.
Going this route, able to do 1-11/2 frames per day.
When frame halves are done, I will leave them glued together over night and then shape taper inside/outside with spindle sander ending just shy of lines fo final sanding.
finished 11 up front, now onto 37-36, etc and the Y’s. Which require lots of angle, taper, sanding. Everything dry fit so far..
When I’m done with final keel sanding, etc. I believe I will begin gluing transom, fillers, first few frames while everything is light and easily movable.
As you’ve indicated,a few inconsistancies between instruction and plan but nothing big.
P.S. you need to to be super carefully transferring frames and futtocks to plan to insure everything yields bevel lines end up correct.
I had to unglue 1-2 with alcohol to correct. Nothing huge but you need to constantly review with all the futtock offests.
A actually made up a few sets of stock with thickness sander to support frames with a few of the tricky offsets around gun ports so everything stays perfectly straight.
When proper thickness of spacers glued to top of frames, everything seems to click in nicely to top of jig.
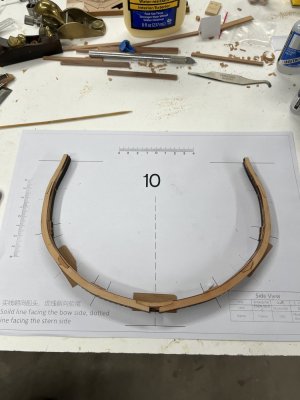
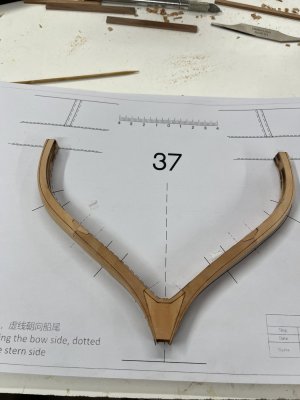
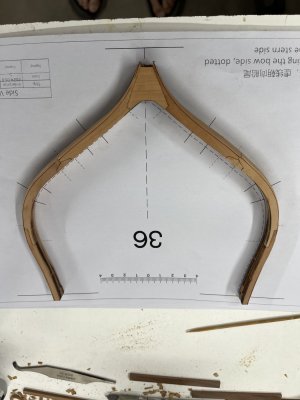
Last edited:
Jeff,
Yep, I'll watch it now.
I spent a long time this AM laying in bed visualizing the makin' and flippin' of frames..I guess the exercise keeps the mind working..At least better than worrying about current (Aghhh) politics.
Thanks again.
AR
Yep, I'll watch it now.
I spent a long time this AM laying in bed visualizing the makin' and flippin' of frames..I guess the exercise keeps the mind working..At least better than worrying about current (Aghhh) politics.
Thanks again.
AR
The frames look great ! If you put clear plastic wrap (like Glad Plastic wrap) down over the plans, the glue will peel right off of it without sticking to the wrap.Perfectly fine plan.
What I have been doing after cleaning up futtocks and chocks, using frame plans, ( be aware each plan is for both plans per pair….be careful) I will glue chocks on, without a lot of glue slop the plan stays pristine, when dry, sections get glued up, laying on plan for alignment until dry. Very slight glue migrates to plan, nice alignment, few, tears of any kind.
Going this route, able to do 1-11/2 frames per day.
When frame halves are done, I will leave them glued together over night and then shape taper inside/outside with spindle sander ending just shy of lines fo final sanding.
finished 11 up front, now onto 37-36, etc and the Y’s. Which require lots of angle, taper, sanding. Everything dry fit so far..
When I’m done with final keel sanding, etc. I believe I will begin gluing transom, fillers, first few frames while everything is light and easily movable.
As you’ve indicated,a few inconsistancies between instruction and plan but nothing big.
P.S. you need to to be super carefully transferring frames and futtocks to plan to insure everything yields bevel lines end up correct.
I had to unglue 1-2 with alcohol to correct. Nothing huge but you need to constantly review with all the futtock offests.
A actually made up a few sets of stock with thickness sander to support frames with a few of the tricky offsets around gun ports so everything stays perfectly straight.
When proper thickness of spacers glued to top of frames, everything seems to click in nicely to top of jig.View attachment 513969View attachment 513970View attachment 513971
Perfectly fine plan.
What I have been doing after cleaning up futtocks and chocks, using frame plans, ( be aware each plan is for both plans per pair….be careful) I will glue chocks on, without a lot of glue slop the plan stays pristine, when dry, sections get glued up, laying on plan for alignment until dry. Very slight glue migrates to plan, nice alignment, few, tears of any kind.
Going this route, able to do 1-11/2 frames per day.
When frame halves are done, I will leave them glued together over night and then shape taper inside/outside with spindle sander ending just shy of lines fo final sanding.
finished 11 up front, now onto 37-36, etc and the Y’s. Which require lots of angle, taper, sanding. Everything dry fit so far..
When I’m done with final keel sanding, etc. I believe I will begin gluing transom, fillers, first few frames while everything is light and easily movable.
As you’ve indicated,a few inconsistancies between instruction and plan but nothing big.
P.S. you need to to be super carefully transferring frames and futtocks to plan to insure everything yields bevel lines end up correct.
I had to unglue 1-2 with alcohol to correct. Nothing huge but you need to constantly review with all the futtock offests.
A actually made up a few sets of stock with thickness sander to support frames with a few of the tricky offsets around gun ports so everything stays perfectly straight.
When proper thickness of spacers glued to top of frames, everything seems to click in nicely to top of jig.View attachment 513969View attachment 513970View attachment 513971
Your frames look great ! tight joints. I see you have sanded down the chocks on frame 36. Looks like you have started beveling. I also use a spindle occsillating sander for beveling. Are both halves of frame # 37 glued together yet ? I can't tell for sure. Again, fast work..Congratulations.Perfectly fine plan.
What I have been doing after cleaning up futtocks and chocks, using frame plans, ( be aware each plan is for both plans per pair….be careful) I will glue chocks on, without a lot of glue slop the plan stays pristine, when dry, sections get glued up, laying on plan for alignment until dry. Very slight glue migrates to plan, nice alignment, few, tears of any kind.
Going this route, able to do 1-11/2 frames per day.
When frame halves are done, I will leave them glued together over night and then shape taper inside/outside with spindle sander ending just shy of lines fo final sanding.
finished 11 up front, now onto 37-36, etc and the Y’s. Which require lots of angle, taper, sanding. Everything dry fit so far..
When I’m done with final keel sanding, etc. I believe I will begin gluing transom, fillers, first few frames while everything is light and easily movable.
As you’ve indicated,a few inconsistancies between instruction and plan but nothing big.
P.S. you need to to be super carefully transferring frames and futtocks to plan to insure everything yields bevel lines end up correct.
I had to unglue 1-2 with alcohol to correct. Nothing huge but you need to constantly review with all the futtock offests.
A actually made up a few sets of stock with thickness sander to support frames with a few of the tricky offsets around gun ports so everything stays perfectly straight.
When proper thickness of spacers glued to top of frames, everything seems to click in nicely to top of jig.View attachment 513969View attachment 513970View attachment 513971
Alex R
All glued. The photo is deceptive, the frames are almost fully beveled, but the straight on photo looks like a lot of wood outside the line. It is actually the bottom of the 2nd frame which is not beveled.Your frames look great ! tight joints. I see you have sanded down the chocks on frame 36. Looks like you have started beveling. I also use a spindle occsillating sander for beveling. Are both halves of frame # 37 glued together yet ? I can't tell for sure. Again, fast work..Congratulations.
Alex R
I do not sand chocks. Where stepped I place a small cut with dozuki saw ( very useful tool )at the step and then come with a very sharp 1/2” chisel from lower surface. Quick and finishes well.
Here’s a better angle.
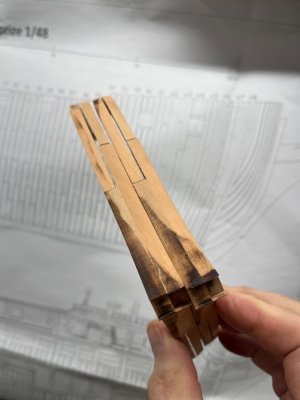
Last edited:
You have to look at various futtock offsets with frames, some print up….some down, even within single frame, and some, to finish with a proper spacer under frame.Jeff,
Thanks, great suggestion. I'll watch the video today for sure.
My understanding is that frame "B" aligns with the solid line on the frame plan, and Frame "A" aligns with the dotted line. The two frames are glued together with the laser-printed (bevel indicator line ) facing outwards. In the center-most full frames, half frames A" and "B" are almost exactly on top of each other; but as the frames approach the stern and the bow, the position of the two half frames relative to each other begins to diverge..like astigmatism...
A question I have: for a stern frame (like # 37) when making half-frame "A" on the dotted line, do I lay the futtocks printed-side down, or printed-side up ?
In a frame with straight sides, no stagger, it wouldn't make any difference, (one just flips the frame over to glue it back to back to half-frame "B") but if the thickness of the futtocks differs, then spacing would be different depending on which side down the frames were constructed.. kinda complicated to explain....I'll go watch the video. I'll watch video, think, think, think, print some plan sheets, and clean up char today. Once I get the frame-making sequence, subsequent frames will go a little faster. I hope to get it right, but if not, I know you guys will set me straight. I'll send pics before any critical phase.
Thanks a lot !
Alex R
I have hung the frame plan next to my table and constantly check with all of the offsets……easy to go off the rails hete.
True storyJeff,
Yep, I'll watch it now.
I spent a long time this AM laying in bed visualizing the makin' and flippin' of frames..I guess the exercise keeps the mind working..At least better than worrying about current (Aghhh) politics.
Thanks again.
AR
The more I see of this kit the more I am impressed. I have never seen frames with the reduced sidings except in fully framed scratch builds. It appears they have matched the siding for the floors and lower futtocks all the way to the top timbers to the scantlings very nicely.
Allan
Allan
- Joined
- Oct 14, 2020
- Messages
- 279
- Points
- 323

Hi Alex, this is a fesiable plan, and the works you done looks great so far!Ok, what's next ?
The building jig is complete and the completed keel structure is positioned inside the jig. Everything is tight and fits well.
My plan is to make the first and last midship frames, Frame # 1 and Frame # 37 and install them on the keel, then work alternating making frames from the bow and stern. This will take a long time!!!
Victor, any problems with my plan ?
Thanks
Alex R
View attachment 513512
- Joined
- Oct 17, 2020
- Messages
- 1,687
- Points
- 488

Sorry TRS7139, is this area by design?Thanks.FrankPerfectly fine plan.
What I have been doing after cleaning up futtocks and chocks, using frame plans, ( be aware each plan is for both plans per pair….be careful) I will glue chocks on, without a lot of glue slop the plan stays pristine, when dry, sections get glued up, laying on plan for alignment until dry. Very slight glue migrates to plan, nice alignment, few, tears of any kind.
Going this route, able to do 1-11/2 frames per day.
When frame halves are done, I will leave them glued together over night and then shape taper inside/outside with spindle sander ending just shy of lines fo final sanding.
finished 11 up front, now onto 37-36, etc and the Y’s. Which require lots of angle, taper, sanding. Everything dry fit so far..
When I’m done with final keel sanding, etc. I believe I will begin gluing transom, fillers, first few frames while everything is light and easily movable.
As you’ve indicated,a few inconsistancies between instruction and plan but nothing big.
P.S. you need to to be super carefully transferring frames and futtocks to plan to insure everything yields bevel lines end up correct.
I had to unglue 1-2 with alcohol to correct. Nothing huge but you need to constantly review with all the futtock offests.
A actually made up a few sets of stock with thickness sander to support frames with a few of the tricky offsets around gun ports so everything stays perfectly straight.
When proper thickness of spacers glued to top of frames, everything seems to click in nicely to top of jig.View attachment 513969View attachment 513970View attachment 513971
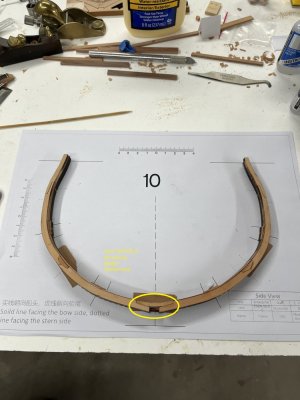
No problem. Absolutely, all main frames have this, one lower, one higher which allow frames to positively locate onto the keel.
Review any image of keel....notch/lug. When frames are paired/glued, they snap right in.
You need careful sanding of keel width, and all those surfaces with test fitting to insure proper fit......everything is quite tight.
- Joined
- Oct 17, 2020
- Messages
- 1,687
- Points
- 488

Thank you for your reply.FrankNo problem. Absolutely, all main frames have this, one lower, one higher which allow frames to positively locate onto the keel.
Review any image of keel....notch/lug. When frames are paired/glued, they snap right in.
You need careful sanding of keel width, and all those surfaces with test fitting to insure proper fit......everything is quite tight.
Allan,The more I see of this kit the more I am impressed. I have never seen frames with the reduced sidings except in fully framed scratch builds. It appears they have matched the siding for the floors and lower futtocks all the way to the top timbers to the scantlings very nicely.
Allan
You are spot on, about as close as I have ever seen. About the only difference I see so far is you don't have to cut plans, glue to stock to custom cut all parts.
Yet to be tried, rather ingenious methodology with jig set to lay into finish framed hull to positively locate everything for deck beams.
For all you guys sitting on the fence about this kit.....dive in. I suspect this will be the benchmark for what quality shipbuilding kits can be, certainly not inexpensive but IMHO worth every penny.Wood consistency with the pear is very nice as well. I have worked with box and cherry, first time with pear and I really like it.
Last edited:
For a dumb guy I get it right every once in a while.Thank you for your reply.Frank
That looks great Frank ! If you're building this, why aren't you doing a build log in the build group?
- Joined
- Jan 10, 2022
- Messages
- 856
- Points
- 403

That's what I plan to do when I get to that stage. I did it when l made the Alert kit and it worked perfectly. (We call it Clingfilm)The frames look great ! If you put clear plastic wrap (like Glad Plastic wrap) down over the plans, the glue will peel right off of it without sticking to the wrap.I keep a roll in my shop. LOL
- Joined
- Oct 17, 2020
- Messages
- 1,687
- Points
- 488

I thank you Corsair, I am not building Enterprize but I am fascinated by axial carpentry and all that basting.The Kit chapter is a whole other story building from scratch .FrankThat looks great Frank ! If you're building this, why aren't you doing a build log in the build group?
Is that also a invitation for Tim @TRS7139 ?That looks great Frank ! If you're building this, why aren't you doing a build log in the build group?
Regards, Peter
I already invited him a bit farther back in the thread.Is that also a invitation for Tim @TRS7139 ?I saw already a few pictures of him in this build-log.
Regards, Peter


