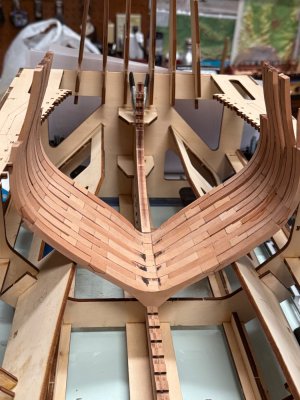
And I thank you. Probably not going to Do a formal log but jump in and try and contribute here and there as issues arise or techniques might be shared, hopefully that’s OK.I already invited him a bit farther back in the thread.
-

Win a Free Custom Engraved Brass Coin!!!
As a way to introduce our brass coins to the community, we will raffle off a free coin during the month of August. Follow link ABOVE for instructions for entering.
- Home
- Forums
- Ships of Scale Group Builds and Projects
- Modelship Dockyard PoF HMS Enterprize 1774 - 1/48
You are using an out of date browser. It may not display this or other websites correctly.
You should upgrade or use an alternative browser.
You should upgrade or use an alternative browser.
What size sleeve do you use on your oscillating sander.? I've been using the smallest, I think it's 1/4 inch.Perfectly fine plan.
What I have been doing after cleaning up futtocks and chocks, using frame plans, ( be aware each plan is for both plans per pair….be careful) I will glue chocks on, without a lot of glue slop the plan stays pristine, when dry, sections get glued up, laying on plan for alignment until dry. Very slight glue migrates to plan, nice alignment, few, tears of any kind.
Going this route, able to do 1-11/2 frames per day.
When frame halves are done, I will leave them glued together over night and then shape taper inside/outside with spindle sander ending just shy of lines fo final sanding.
finished 11 up front, now onto 37-36, etc and the Y’s. Which require lots of angle, taper, sanding. Everything dry fit so far..
When I’m done with final keel sanding, etc. I believe I will begin gluing transom, fillers, first few frames while everything is light and easily movable.
As you’ve indicated,a few inconsistancies between instruction and plan but nothing big.
P.S. you need to to be super carefully transferring frames and futtocks to plan to insure everything yields bevel lines end up correct.
I had to unglue 1-2 with alcohol to correct. Nothing huge but you need to constantly review with all the futtock offests.
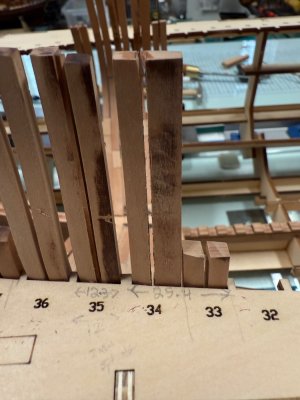
A actually made up a few sets of stock with thickness sander to support frames with a few of the tricky offsets around gun ports so everything stays perfectly straight.
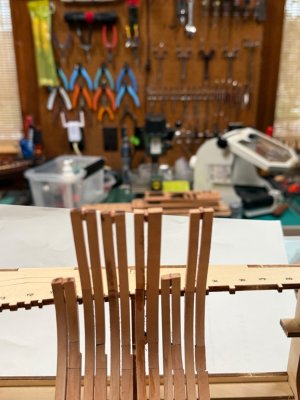
When proper thickness of spacers glued to top of frames, everything seems to click in nicely to top of jig.View attachment 513969View attachment 513970View attachment 513971
AR
IMHO too small, very easy to go too far, given the inside radius of frames I find the 1 1/2” 180 grit works well without excess.What size sleeve do you use on your oscillating sander.? I've been using the smallest, I think it's 1/4 inch.
AR
I have the belt style on my oscillating sander. I can use the flat side or one of the rounded sides (I think one is about 1.5" and the other is about 3/4"
Thanks to TRS 7139 n ( what is your name ? ) and Jeff, I am now using the 1 1/2" drum with 80 grit for my first sanding of interior and exterior char and most of the beveling. Then I switch to 180 grit to finish the bevel. I may use the 3/4" drum on some areas. This works FAST and it is smooth - great !IMHO too small, very easy to go too far, given the inside radius of frames I find the 1 1/2” 180 grit works well without excess.
I also started using a Japanese Dozuki saw to make cuts and slots: It is fantastic!!!
Learning a lot
Thank you guys
Alex R
Great. Those little saws cut like butter don’t they? Had to go 3/4” for the Y’s with their sharp inside radius.Thanks to TRS 7139 n ( what is your name ? ) and Jeff, I am now using the 1 1/2" drum with 80 grit for my first sanding of interior and exterior char and most of the beveling. Then I switch to 180 grit to finish the bevel. I may use the 3/4" drum on some areas. This works FAST and it is smooth - great !
I also started using a Japanese Dozuki saw to make cuts and slots: It is fantastic!!!
Learning a lot
Thank you guys
Alex R
Tim
Tim,
I have to be so careful with it- I could easily saw off a body part-with a really clean cut. That would make it easier for the hand surgeon to re-attach, but I'd rather skip the whole theater !


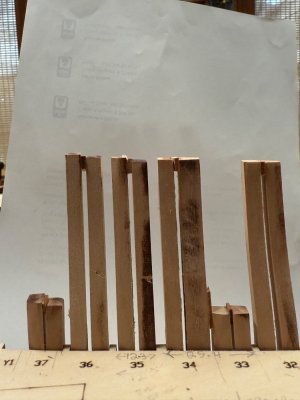
Just dry-fitted frame # 33 on to the keel. It is a gunport frame. The spacing between its upper futtocks is 1 mm, and it fits the jig spacing just right.
FYI:
Full frame jig spacing is 12.4 mm
Gunport jig spacing is 25.3 mm
Gunport side to side opening is 14.1 mm
Room and space is 27.75 mm
Starting frame 32 later this evening. Looks like I can finish one frame/day and start the next. Unfortunately, I won't be able to keep up that pace due to other stuff I have to do.
Thanks
Alex R
I have to be so careful with it- I could easily saw off a body part-with a really clean cut. That would make it easier for the hand surgeon to re-attach, but I'd rather skip the whole theater !


Just dry-fitted frame # 33 on to the keel. It is a gunport frame. The spacing between its upper futtocks is 1 mm, and it fits the jig spacing just right.
FYI:
Full frame jig spacing is 12.4 mm
Gunport jig spacing is 25.3 mm
Gunport side to side opening is 14.1 mm
Room and space is 27.75 mm
Starting frame 32 later this evening. Looks like I can finish one frame/day and start the next. Unfortunately, I won't be able to keep up that pace due to other stuff I have to do.
Thanks
Alex R
Yeah, don’t do that. When I was 13 I ran my left hand through dad’s radial arm saw. Never lost fingers but got four fingers, about 115 stitches. When my old man got home he seriously considered a beating, sling and all, still get creeped out when I hear one some 50 odd years later.Tim,
I have to be so careful with it- I could easily saw off a body part-with a really clean cut. That would make it easier for the hand surgeon to re-attach, but I'd rather skip the whole theater !
View attachment 515164View attachment 515165
Just dry-fitted frame # 33 on to the keel. It is a gunport frame. The spacing between its upper futtocks is 1 mm, and it fits the jig spacing just right.
FYI:
Full frame jig spacing is 12.4 mm
Gunport jig spacing is 25.3 mm
Gunport side to side opening is 14.1 mm
Room and space is 27.75 mm
Starting frame 32 later this evening. Looks like I can finish one frame/day and start the next. Unfortunately, I won't be able to keep up that pace due to other stuff I have to do.
Thanks
Alex R
On the Dozuki, did you get the small 11” one ?
On a darker note, just when you’re feeling competent, I just realized I majorly screwed up sternpost, deadwood and had to pull everything off of the keel.
Last two days spent fabing lots of new pieces, largely using the holes in sheets they came in for patterns with moderate trimming.
About 90% done….cannot tell anything happened but Jeez, about the worst place for screwup. Two days gone sideways!
Tim

ROFL Love the picture!Yeah, don’t do that. When I was 13 I ran my left hand through dad’s radial arm saw. Never lost fingers but got four fingers, about 115 stitches. When my old man got home he seriously considered a beating, sling and all, still get creeped out when I hear one some 50 odd years later.
On the Dozuki, did you get the small 11” one ?
On a darker note, just when you’re feeling competent, I just realized I majorly screwed up sternpost, deadwood and had to pull everything off of the keel.
Last two days spent fabing lots of new pieces, largely using the holes in sheets they came in for patterns with moderate trimming.
About 90% done….cannot tell anything happened but Jeez, about the worst place for screwup. Two days gone sideways!
Tim
View attachment 515182
Sorry you had a challenge with yours Tim. Glad you got it worked out but sorry it was so much work.
Alex, yours is coming along nicely ! It's really looking good.
I have 2 frames fully built and the 3rd one is about half way. I had to take today and tomorrow off due to some other life matters, but I'll be back at it soon.
Tim,Yeah, don’t do that. When I was 13 I ran my left hand through dad’s radial arm saw. Never lost fingers but got four fingers, about 115 stitches. When my old man got home he seriously considered a beating, sling and all, still get creeped out when I hear one some 50 odd years later.
On the Dozuki, did you get the small 11” one ?
On a darker note, just when you’re feeling competent, I just realized I majorly screwed up sternpost, deadwood and had to pull everything off of the keel.
Last two days spent fabing lots of new pieces, largely using the holes in sheets they came in for patterns with moderate trimming.
About 90% done….cannot tell anything happened but Jeez, about the worst place for screwup. Two days gone sideways!
Tim
View attachment 515182
Sorry you had to redo the sternpost. I don't think there is anybody here who hasn't had a similar problem at some point. Good reason to keep the sheets for a while-in case one needs to trace new parts. You say, "just when you are feeling competent" it reminds me; I used to road cycle a lot..if you ever said you were "feeling great, no effort, going fast" it usually meant buyout going downhill, with a strong wind at your back. Beware of feeling too good-it is deceptive..- Yes, I got the 11" DoZuki. Later I found that there is a much smaller one 3 or 4" -used by luthiers-I'll find out about it.
Cheers
Alex R
Last edited:
AsROFL Love the picture!
Sorry you had a challenge with yours Tim. Glad you got it worked out but sorry it was so much work.
Alex, yours is coming along nicely ! It's really looking good.
I have 2 frames fully built and the 3rd one is about half way. I had to take today and tomorrow off due to some other life matters, but I'll be back at it soon.
2 1/4” or so, Stewmac.com, was actually just looking at it, ultra thin pull saw.Tim,
Sorry you had to redo the sternpost. I don't think there is anybody here who hasn't had a similar problem at some point. Good reason to keep the sheets for a while-in case one needs to trace new parts. You say, "just when you are feeling competent" it reminds me; I used to road cycle a lot..if you ever said you were "feeling great, no effort, going fast" it usually meant buyout going downhill, with a strong wind at your back. Beware of feeling too good-it is deceptive..- Yes, I got the 11" DoZuki. Later I found that there is a much smaller one 3 or 4" -used by luthiers-I'll find out about it.
Cheers
Alex R
Wish I had sheets for those parts, had to use holes left from OEM parts as templates and trim accordingly. Almost finished .
You talk about “ downhill” one of my good ski buddies about a year ago was going downhill very fast on his big money carbon bike…….front forks failed, shattered his collar bone.
Sorry for the thread drift….night all.
Tim
Last edited:
Guys
Finished frame # 32. Fitting well. I placed (lightly glued with a glue stick) 1mm and 2mm spacers at the ends of the top-timbers (and between upper futtocks in some frames) to keep the timbers aligned and spaced to dimension. So far, the frames fit right against the jig's slots without having to use a rubber band system to pull them laterally. May need to do so later.


Port (L) and Starboard (R) frames with 1 and 2 mm spacers.
On to frames 31 and 30 today.
Alex R
Finished frame # 32. Fitting well. I placed (lightly glued with a glue stick) 1mm and 2mm spacers at the ends of the top-timbers (and between upper futtocks in some frames) to keep the timbers aligned and spaced to dimension. So far, the frames fit right against the jig's slots without having to use a rubber band system to pull them laterally. May need to do so later.


Port (L) and Starboard (R) frames with 1 and 2 mm spacers.
On to frames 31 and 30 today.
Alex R
Tim,As
2 1/4” or so, Stewmac.com, was actually just looking at it, ultra thin pull saw.
Wish I had sheets for those parts, had to use holes left from OEM parts as templates and trim accordingly. Almost finished .
You talk about “ downhill” one of my good ski buddies about a year ago was going downhill very fast on his big money carbon bike…….front forks failed, shattered his collar bone.
Sorry for the thread drift….night all.
Tim
Ordered the 2 1/4" Dozuki saw a couple of days ago !...
I'm a skier also !! (Forbidden by the Admiral from doing cliffs and hiking off terrain-she's. right. The headline would read: "71 years old skier found dead, smiling, at bottom of inaccessible Couloir".
I have a second home in Park City, Utah, where I ski in winter, bike ride in summer...Heaven, Best place.
Thanks
Alex R
I love my Japanese flush cutting saw !
I'm sure you will really like it.
I'm sure you will really like it.
You’re killing me. Almost bought a place out there a couple times, best snow in the US, love Snowbird, Solitude, like to get out a couple more times before I”m done….Do a fair amount in VT, where, i went to college, Mt every summer flyfishing.Tim,
Ordered the 2 1/4" Dozuki saw a couple of days ago !...
I'm a skier also !! (Forbidden by the Admiral from doing cliffs and hiking off terrain-she's. right. The headline would read: "71 years old skier found dead, smiling, at bottom of inaccessible Couloir".
I have a second home in Park City, Utah, where I ski in winter, bike ride in summer...Heaven, Best place.
Thanks
Alex R
Again, sorry for the thread drift…..frames are looking nice.
Excellent model. Everything is working out great. I will follow your build.Tim,
I have to be so careful with it- I could easily saw off a body part-with a really clean cut. That would make it easier for the hand surgeon to re-attach, but I'd rather skip the whole theater !
View attachment 515164View attachment 515165
Just dry-fitted frame # 33 on to the keel. It is a gunport frame. The spacing between its upper futtocks is 1 mm, and it fits the jig spacing just right.
FYI:
Full frame jig spacing is 12.4 mm
Gunport jig spacing is 25.3 mm
Gunport side to side opening is 14.1 mm
Room and space is 27.75 mm
Starting frame 32 later this evening. Looks like I can finish one frame/day and start the next. Unfortunately, I won't be able to keep up that pace due to other stuff I have to do.
Thanks
Alex R
Posting here but something for all, Something I have noticed with my solution. Several chocks fit perfectly some , somewhat less so, especially on one side or other.
Some of this is the nature of laser cutting, side to side, some of it is do to the many angles of chocks some frames require.
When I have a gap, one great little trick sourced from NRG info......apply a small application of medium cyanoacrylate[ instant glue]. Before it dries, quickly sand it across the gap with corse paper. I use 80 grit. The theory here is that process creates sawdust which instantly fills even the smallest void and creates a stronger bond as well. Keep sanding until all glue remnants are gone, leaving only joint.
Only downside is that iy fills paper fast and you need fresh paper for best result.
This process has been effective by one of the MSW admin guys for planking in particular and I primarily use it for that, most recently on my scratch Confederacy. That is cherry but, harder the wood the better th result.
Thanks Tim, I have used that tip for a very long time. It works welll with soft woods too since the sanding creates more saw dust faster. 
Also, it doesn't have to be CA that you use. You can do it with PVA glues as well. It just takes longer to set. I would imagine you can do it with any glue product.
I have just done it and didn't even think to mention it here. Thanks for the tip !!!
Also, it doesn't have to be CA that you use. You can do it with PVA glues as well. It just takes longer to set. I would imagine you can do it with any glue product.
I have just done it and didn't even think to mention it here. Thanks for the tip !!!
Great. FWIW I like the cyano because the nature of it is that, even the medium, it migrates into anything unseen below the surface and for planking in particular you're done, it's set in 15-20 seconds.Thanks Tim, I have used that tip for a very long time. It works welll with soft woods too since the sanding creates more saw dust faster.
Also, it doesn't have to be CA that you use. You can do it with PVA glues as well. It just takes longer to set. I would imagine you can do it with any glue product.
I have just done it and didn't even think to mention it here. Thanks for the tip !!!
- Joined
- Sep 10, 2024
- Messages
- 905
- Points
- 353

Posting here but something for all, Something I have noticed with my solution. Several chocks fit perfectly some , somewhat less so, especially on one side or other.
Some of this is the nature of laser cutting, side to side, some of it is do to the many angles of chocks some frames require.
When I have a gap, one great little trick sourced from NRG info......apply a small application of medium cyanoacrylate[ instant glue]. Before it dries, quickly sand it across the gap with corse paper. I use 80 grit. The theory here is that process creates sawdust which instantly fills even the smallest void and creates a stronger bond as well. Keep sanding until all glue remnants are gone, leaving only joint.
Only downside is that iy fills paper fast and you need fresh paper for best result.
This process has been effective by one of the MSW admin guys for planking in particular and I primarily use it for that, most recently on my scratch Confederacy. That is cherry but, harder the wood the better th result.
I've used that technique for years, not only in model building, but furniture building as well. One thing I would mention, however, is that the pieces we work with are already pretty small, and probably already close to, if not at, final size. P80 grit creates some pretty deep scratches that must subsequently be removed with finer grits. If you're doing this at all, it's because the area will show, and the last thing you want is a visible dip in your part from over sanding. I usually use P320 for this, or use, preferably, the technique below.
One thing I do when I'm doing general sanding of parts over my workbench, is to NOT sweep the wood dust into the bin, but to collect it in small lidded containers (different ones for different species) that you can get a couple of fingers into to grab a "pinch" of "filler" when you need it. You can either put some medium viscosity CA into the gap and then fill it with dust, or pack it with dust first and touch it with just a drop of thin CA. Then, use your finer grits to smooth it over. You'll lose less part thickness that way.
Last edited:


