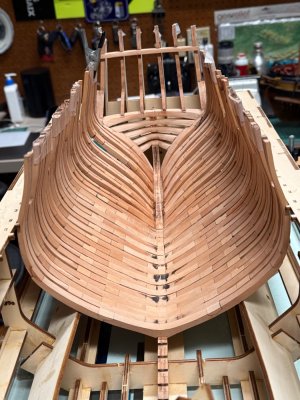
Alex R H.M.S. Enterprize Build Log

Wow Alex,

that's awesome! Great work and you are so incredibly fast.
May I ask what glue you use?

Best regards
Günther
Gunther,
Thank you.
I do have a really nice workshop. I put a lot of thought into it. It is my "man cave" and spend a lot of time here-often just reading and, of course, falling asleep in my chair.
I use Tight-Bond PVA wood glue, to which I have added a small amount of graphite powder to turn it black-gray. I use an applier with a 20 gauge needle to apply it. I often add a tiny drop of StarBond thin Superglue (also applied with a micro-tip) to a joint as the PVA is curing...This mixture solidifies well and turns rock hard very quickly, so don't use it if you need time to move the piece. StarBond glues come in a variety of thicknesses and colors, so I use them often-different ones for different applications as they have various curing times.
Danke
Alex R
 
Good morning Alex. I agree with Jefff- nicely done. Oh boy I would snap those off in a minute ROTF. Cheers Grant
Jeff and Grant,
Thank you. I'm glad the stern is mostly done. Hopefully I can finish the rest of the aft cant frames Y-2 to Y-6 before next Monday. I am going on a trip to Scotland and the Outer Hebrides Islands until the end of the month, and the first week of June to Park Citry, Utah for the summer until September. I do have a shop in Park City, so I will take the sheets containing the pieces to make the rest of the midship and forward cant frames. I'll be far behind everybody by September, but will benefit from your build logs !
Cheers
Alex R
 
Alex
Nice job with a tough task. Agree with you, this was a real bear to finish up.....glad it's done.
Pretty much same approach although I have not installed top timbers......afraid to have them up there while doing finish sanding when fully framed, etc. I did mill out the locating slots on the wing after gluing up.
About the only thing I did different, about 1/2 of the beveling as I found frames fit the jig better and to insure that, rather than the rubber band deal I use spreader bars which I build using threaded rod with a nut that slides into brass tubing, both with wooden plugs on the end. You adjust length by simply adjusting the nut and press the frames tight to the jig.
Now , to change up, finishing up the "X's", soon to glue Hawse pieces after final sanding. Another tricky part seems to be getting those positioned to locate on frame in proper jig position....well see.
One final tip, guys. Be aware, especially on the X's.....you not only have to get a good lateral angle to fit the keel, usually 7-10 deg, but also vertical angle requires taper for tight fit.
I went too far on a couple and had to glue small pieces to frame bottoms to start again., although easy fix and virtually invisible when fastened, but easier not to screw up in the first place.;)

Tim
Thanks for the heads up !
 
Jeff and Grant,
Thank you. I'm glad the stern is mostly done. Hopefully I can finish the rest of the aft cant frames Y-2 to Y-6 before next Monday. I am going on a trip to Scotland and the Outer Hebrides Islands until the end of the month, and the first week of June to Park Citry, Utah for the summer until September. I do have a shop in Park City, so I will take the sheets containing the pieces to make the rest of the midship and forward cant frames. I'll be far behind everybody by September, but will benefit from your build logs !
Cheers
Alex R
Sounds like a wonderful trip ! I hope you post some pictures. Maybe by the time you get back I'll be caught up to you. ROTF :p
 
Alex
Nice job with a tough task. Agree with you, this was a real bear to finish up.....glad it's done.
Pretty much same approach although I have not installed top timbers......afraid to have them up there while doing finish sanding when fully framed, etc. I did mill out the locating slots on the wing after gluing up.
About the only thing I did different, about 1/2 of the beveling as I found frames fit the jig better and to insure that, rather than the rubber band deal I use spreader bars which I build using threaded rod with a nut that slides into brass tubing, both with wooden plugs on the end. You adjust length by simply adjusting the nut and press the frames tight to the jig.
Now , to change up, finishing up the "X's", soon to glue Hawse pieces after final sanding. Another tricky part seems to be getting those positioned to locate on frame in proper jig position....well see.
One final tip, guys. Be aware, especially on the X's.....you not only have to get a good lateral angle to fit the keel, usually 7-10 deg, but also vertical angle requires taper for tight fit.
I went too far on a couple and had to glue small pieces to frame bottoms to start again., although easy fix and virtually invisible when fastened, but easier not to screw up in the first place.;)

Tim
Tim,

Thank you.

Yes, those top stern timbers and counter timbers are indeed fragile, and I thought a lot about not installing them later. However, I wanted to make sure that the stern structure would be symmetrical, and that's why In put the counter timbers in. I've built other sterns slightly askew before, so this was important. I'll just have to be careful when I'm working around them. Hopefully, the longitudinal deck clamps and spirketing internal timbers will help stiffen the counter and upper frame timbers. I plan to fix these in place while the ship is still in its cradle.
BTW, The book "The Construction and fitting of the English man of war 1650-1850" by Goodwin is such a good reference I'll start sleeping with it under my pillow. I constantly have to look up the name of structures so I can write somewhat intelligently to you guys. Better to say b"counter timbers" than long fragile curvy pieces at the upper stern"

Cheers
Alex R
 
Jeff and Grant,
Thank you. I'm glad the stern is mostly done. Hopefully I can finish the rest of the aft cant frames Y-2 to Y-6 before next Monday. I am going on a trip to Scotland and the Outer Hebrides Islands until the end of the month, and the first week of June to Park Citry, Utah for the summer until September. I do have a shop in Park City, so I will take the sheets containing the pieces to make the rest of the midship and forward cant frames. I'll be far behind everybody by September, but will benefit from your build logs !
Cheers
Alex R
Enjoy your trip Alex.
 
Very nice progress Alex, looks nice and clean.
In back, i’m up to #29, up front done through #13 to break it up.
Hopefully like the transcontinental rr I’ll meet in the middle.
With those frames done I routinely check on the ports. I must say the width, checking with dividers from the plan, comes out pretty much exact, every one.
So far this jig system works quite well, I must say.
Have an Oban when you get there.;)

Tim
 
Guys,

Here are my post-construction FYI's and "if I had to do it over again" remarks on my build and stern construction so far. Had I done my build this way, It would be almost perfect and I would have spent a lot less time fixing screw-ups!
1) Install Y-8 fully completed. (top timber installed). Maybe reinforce the top timber with a treenail since it is very frail ( I broke it twice. ). Install Y-7 immediately after- it will serve as a guide for the proper positioning of Y-8's top timber. Make sure that the bottom of cant frames sits on top of the steps on the stern deadwood. Make sure all cant frames sit on their "step". When they are correct, the middle of frames Y-5 to Y-1 sit right on the build-jig's lower wing.
2) Place the lower futtocks of Y-8 against the side of transoms # 2,3, and 4.- transom # 1 fits on top of the 2nd futtock right next to the top timber of Y-8. Take some time (a lot of time) dry-fitting these parts together-the construction is complex...
3) Do not over-trim the wing transom before installing it. The lateral end meshes with Y-8's top-timber. Needs a lot delicate hand filing. Maybe do final filing after the ship is out of the jig.
4) Do not cut the grooves for the counter timbers on the wing transom until you have placed them on the jig supports and noted where they fit on the wing transom..The printed laser marks may not be accurate.
5) Carefull with over-beveling, especially on the first futtocks of the cant frames that fit flat against the rising deadwood. One bevel is long and shallow (the one that goes against the deadwood) the other is steep and shallow (abuts the next frame's futtock) . I used my Byrnes sander to sand these surfaces perfectly flat ( I did the initial cant frames with the spindle sander- and they didn't turn out well- mistake ! the Byrnes works much better and is more accurate than the spindle sander for this part.
6) Pay particular attention to the spacings and their orientation ! They can be tricky. They vary from 1 mm to 4 mm....Some frames are easier to construct upside down, but not others. I got confused with the lines in the cant frames' drawing in the instructions, and ended up having to de-construct two frames since the spacing was all wrong !
7) It is extremely easy to break top timbers, and they are difficult to repair, because the break usually occurs right where the top timber crosses the groove on the build jig-hard to re-glue in that situation. Be ultra careful.
8) The curved half counter timbers sit on top of the wing transom and fit next to and outside counter timbers "C". I didn't see any indication on the manual locating this piece, but it makes sense that it goes there.

Again, sorry if I'm being too obvious and a pain in the ass, but hopefully my mistakes will help so you don't repeat them
At least, my stern is symmetrical, and the frame lines flow. All's well that ends well so far.

Cheers

Alex R
 
Plan is to insert copper wires as treenails in various places later on.
Treenails were pretty subtle on both the hull and deck. Copper will look like.... well, copper. If blackened they will look like iron spikes. Maybe consider making them from bamboo with a draw plate? They actually will add strength and have a subtle appearance. Costs a few pennies and a few hours time. Just a thought.... :)

Allan
Haven't done it yet, mostly because not sure what was used where exactly, but I may very well use Ed Totti's methodology using black monofilament for iron spikes.
While testing, it looks good, easy to sand flush, and when installed with CA really adds strength to the pieces.
I have made a decent supply of treenails from cherry with my mill using the trimmed tattoo needle system which works pretty well and you can turn out quite a few from a piece of wood.
Undecided as to whether I want to spend the rest of my life drilling small holes.

Alex,
Very nice over all. I still do most beveling with spindle, most often when paired frames get glued, seems easier to follow a nice line.
Absolutely right on top timber fragility, I haven't broken any yet and one thing that helps is I usually glue spacers up top as soon as frames get installed...adds a lot of rigidity.
 
Last edited:
Treenails were pretty subtle on both the hull and deck. Copper will look like.... well, copper. If blackened they will look like iron spikes. Maybe consider making them from bamboo with a draw plate? They actually will add strength and have a subtle appearance. Costs a few pennies and a few hours time. Just a thought.... :)

Allan
True story Allan. Maybe on a scale model this is the best approach. On the real deal did they not use metal/copper to nail on the futtock and frames ? Cheers Grant
 
Hi Grant,
I was just going to look up when the change from wood to metal occurred on the hull and the decks. :) Thanks for the little push:)

For the hull, David Steel gives diameters of treenails for bottom planking of a 28 gun ship at 1 3/4" diameter PLUS one bolt in the timber next to each butt and clenched inside - 7/8" diameter He does not name what type of bolt material was used. So, it sounds like there is a combination, at least in the late 18th century. There is no information on the size of the trennals in the Establishments that I could find so I have no idea when metal came into use along with the wooden treenails.

From the contract for Enterprize's sister Aurora 16 July 1776,
All the treenails to be dry seasoned, clear of sap, & converted from timber of the growth of Sussex, or equal in goodness thereto, to be well mooted, not overhauled with an ax in driving, & all to be caulk’d or wedg’d at both ends ~~~~~~~~~~~~~~~~~~~~~~~~~~

There is information on iron work in general, but no mention of copper or iron for securing planking anywhere in the contract. I do not want to assume anything from this, just that there is no mention of it.

Any more information on this would be great to see.

Allan
 
Back
Top