Amati Riva Aquarama for use on water.

Joined
May 25, 2021
Messages
76
Points
88

Location
UK Lancashire
I have followed Ken (Complete Build) blog which is excellent and been a big help to me. Ken's build was for a static display model and I'm building the same kit but for use on water. The instruction manual is bias towards a display model so having followed the instructions implicitly and Kens Build log I am now going to deviate from the instruction manual. This is because after a suggested dry run of fitting the motors, prop shafts, rudders and associated linkages I found access extremely difficult even before any planking was fitted.
I've therefore decided to blog my deviation from the instructions since they indicate fitting these components on completion. I think otherwise this would be near impossible so I'm going to blog my method and hope it works! Hopefully it might be useful for anyone else building this Amati kit.
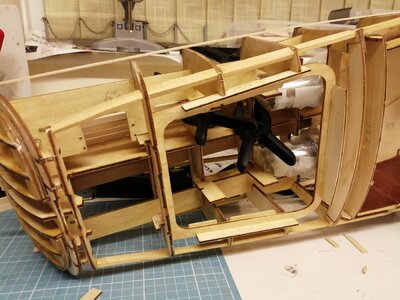
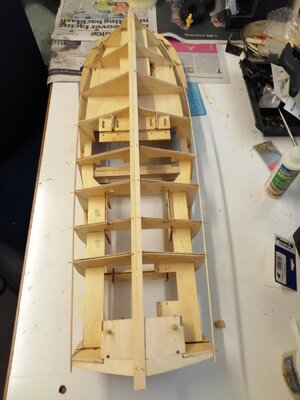
I've just installed the motors and prop shafts as I needed to use the space where the planking would be fitted in order to get them into place! I've wrapped the motors and gear boxes in a plastic bags to protect them until the boat is finished. I will complete the bottom planking and then fit the rudders as again access once planking is complete will make the job almost impossible. The clamps are holding strengthening pieces in place in order to hold the props in correct alignment. This again is a modification plus I've filed out the wood close to where the outer motor terminals are located. Otherwise attaching the wires to the motors would again be difficult. I plan to cover the bottom of the hull with the mahogany planks so I can attach the rudders and linkages before planking the sides.

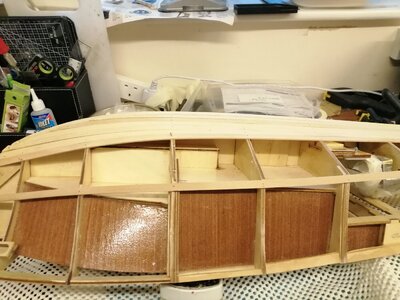
Picture of me applying another plank with an Amati pin pusher. I usually get the nail started with the pin pusher and the complete with the hammer. I'm thinking of applying some epoxy resin to the underside of the planks (under the cabin area) as soon this will be unreachable - just in case in future any water gets ingresses into those areas.
Has anyone got any thoughts on this please ? This is my first build of a planked hull so any experience greatly received.
IMG_20211215_100732.jpgIMG_20211215_100914.jpgIMG_20211215_101006.jpgIMG_20211215_101109.jpgIMG_20211230_184017.jpgIMG_20211230_184106.jpgIMG_20211230_205912.jpgIMG_20211230_205959.jpgIMG-20220101-WA0002.jpg
 
Hello DP Trainer - welcome to SOS and thank you for sharing this great build with us! As to planking a hull with the eye on an RC model, I have no experience, so I cannot help you in that regard. However, there are some very experienced and accomplished builders here who may be able to do so.

Gentlemen (John, Stephen, Ted, Moxis, Daniel), with your very kind co-operation can you please assist?

@neptune
@Stevedownunder
@tedboat
@Moxis
@badras-khan
 
Hi DP. Thanks for the compliment on my build and for starting your log. I don’t envy you trying to build a RC version, not the easiest option but a brave one. I’ll be dropping in from time to time to see how your getting on, good luck with it.
 
I have followed Ken (Complete Build) blog which is excellent and been a big help to me. Ken's build was for a static display model and I'm building the same kit but for use on water. The instruction manual is bias towards a display model so having followed the instructions implicitly and Kens Build log I am now going to deviate from the instruction manual. This is because after a suggested dry run of fitting the motors, prop shafts, rudders and associated linkages I found access extremely difficult even before any planking was fitted.
I've therefore decided to blog my deviation from the instructions since they indicate fitting these components on completion. I think otherwise this would be near impossible so I'm going to blog my method and hope it works! Hopefully it might be useful for anyone else building this Amati kit.
I've just installed the motors and prop shafts as I needed to use the space where the planking would be fitted in order to get them into place! I've wrapped the motors and gear boxes in a plastic bags to protect them until the boat is finished. I will complete the bottom planking and then fit the rudders as again access once planking is complete will make the job almost impossible. The clamps are holding strengthening pieces in place in order to hold the props in correct alignment. This again is a modification plus I've filed out the wood close to where the outer motor terminals are located. Otherwise attaching the wires to the motors would again be difficult. I plan to cover the bottom of the hull with the mahogany planks so I can attach the rudders and linkages before planking the sides.

Picture of me applying another plank with an Amati pin pusher. I usually get the nail started with the pin pusher and the complete with the hammer. I'm thinking of applying some epoxy resin to the underside of the planks (under the cabin area) as soon this will be unreachable - just in case in future any water gets ingresses into those areas.
Has anyone got any thoughts on this please ? This is my first build of a planked hull so any experience greatly received.

View attachment 279763View attachment 279764View attachment 279765View attachment 279766View attachment 279767View attachment 279768View attachment 279769View attachment 279770View attachment 279771
Hi DP Trainer,

Thanks for sharing your build.

One question is what sort of finish are you looking for, painted or varnished?

Cheers,
Stephen.
 
Hi Stephen, Thank you for your reply. I'm wanting to have a beautiful mahogany finish with the bottom of the hull below the waterline painted white with a blue line close to the waterline ( as per photo on the box - attached)Riva Final Finish.jpg. I've bought some Z-epoxy and I have painted the frames with this that will be difficult or impossible to reach once the planking is complete. I also have some yacht varnish. A guy has said that he knew someone who had built a similar model and didn't waterproof it completely and it basically fell apart after being on the water! Therefore I'm a bit concerned how much damage a bit of water can do. That is why I'm now thinking of applying some epoxy resin to the underside of planks that are covering the area under the cabin before they become inaccessible. I'm thinking that I will need to apply the epoxy carefully so it doesn't seep through which might affect gluing the second layer of mahogany planks. Is this a correct assumption? I'm currently using Aliphatic glue for the planking. Can you also recommend a good filler for the planking that will sand easily but do a good job? I had seen some white Mantua filler on the internet that sounded OK. I have also bought some Brummers Medium mahogany filler but it seems fairly hard to sand. Thank you in advance for your help.

Happy New Year everyone!
Cheers
Duncan
 
Hello
Help a bit to put masking tape on the ouside before Z poxy .
I recomand the book Mahogany in scale -lot of info with your model
see

Kind regards,Daniel
 
Daniel thanks for the suggestion on the masking tape - a good idea! Here is also another photo showing the area in question for Z epoxy.
Ken - did you use a white Brummers filler on the spruce before covering with mahogany planks? How do you fill in the nail holes on the mahogany so as not to spoil the finish. I had seen some clamps that wouldn't damage the final planking but they only seem to be available from USA Does anyone know any different?
Please see the photo from Micro Mark.10 piece clamp set.jpg

IMG_20220102_111039.jpg
 
Hi DP. Yes I used nails and filler on my first planking but no nails on the second planking so that I get an unblemished finish. I explain how I do it on page three of my log, I use this method on all of my models and after many years I’ve never had any problems yet, but do stick them down bit at a time
 
Hello DPT,
I've built a few R/C sailing models in my time, so my experience may be of use.
I have a 30" 1940/50's style runabout that was actually built around that time - not by me! She's probably about 70 years old!
It is fully planked, and for some years I sailed her through the summers and put her in store through the winter in a warm workshop. The inevitable result was that she would dry out in winter and the seams would open up slightly. So the first couple of times she sailed in the summer, I would bring her in every 15 minutes to empty out the water she took in. Eventually all the seams would close up and she would be dry for the rest of the summer.
Then a friend who was in to model yachting said why didn't I try woven fibreglass and resin on the outside of the hull? - So I did, and it works perfectly.
The manner of doing it is described in my write-up of 'Natterer' , as found below in my completed builds. She is a 72" fully working steam launch, fully carvel planked, and dry as a bone.
The finish with the fibreglass and resin is excellent, but practice first on some timber sheet until you have the hang of applying it.

Regards

Ted
 
Hi DP. Yes I used nails and filler on my first planking but no nails on the second planking so that I get an unblemished finish. I explain how I do it on page three of my log, I use this method on all of my models and after many years I’ve never had any problems yet, but do stick them down bit at a time
Hi Ken, Thanks for your input. I've just looked for white Brummer filler and wondered if your chose the interior or the exterior version. I've ordered some white exterior but then after placing the order I noticed they also do an interior version.
I must have missed your method of planking on page 3. I will go back and have another look! Thanks for your time and expertise.
 
Hello DP Trainer - welcome to SOS and thank you for sharing this great build with us! As to planking a hull with the eye on an RC model, I have no experience, so I cannot help you in that regard. However, there are some very experienced and accomplished builders here who may be able to do so.

Gentlemen (John, Stephen, Ted, Moxis, Daniel), with your very kind co-operation can you please assist?

@neptune
@Stevedownunder
@tedboat
@Moxis
@badras-khan
Hi Heinrich,

Thanks for pointing the above group of us in Duncan's direction, this is why this site is so good people willing to help out where possible.

Cheers,
Stephen.
 
Hi Stephen, Thank you for your reply. I'm wanting to have a beautiful mahogany finish with the bottom of the hull below the waterline painted white with a blue line close to the waterline ( as per photo on the box - attached)View attachment 279910. I've bought some Z-epoxy and I have painted the frames with this that will be difficult or impossible to reach once the planking is complete. I also have some yacht varnish. A guy has said that he knew someone who had built a similar model and didn't waterproof it completely and it basically fell apart after being on the water! Therefore I'm a bit concerned how much damage a bit of water can do. That is why I'm now thinking of applying some epoxy resin to the underside of planks that are covering the area under the cabin before they become inaccessible. I'm thinking that I will need to apply the epoxy carefully so it doesn't seep through which might affect gluing the second layer of mahogany planks. Is this a correct assumption? I'm currently using Aliphatic glue for the planking. Can you also recommend a good filler for the planking that will sand easily but do a good job? I had seen some white Mantua filler on the internet that sounded OK. I have also bought some Brummers Medium mahogany filler but it seems fairly hard to sand. Thank you in advance for your help.

Happy New Year everyone!
Cheers
Duncan
Hi Duncan,

This is a bit outside of my experience, however one thing I would do is drill holes into areas that are sealed up to enable some thinned varnish to be poured in and swished around wait a few minutes then pour out the rest and leave the boat siting upright you will find out if there are any leaks this may need to be repeated several times to seal any gaps in planks, this is not one of my ideas it comes from one of Harold Underhills books.

One thing I would be concerned about is how much your boat is going to weigh, this type of boat ideally wants to fairly light to give it good performance. From hard won experience I would recommend that you make your motor mounts able to be changed.

As far as Adhesive I don't really know what Aliphatic glue is, Personally I use Titebond 3 which is near enough waterproof it is easy to use and can be cleaned up with water while wet.

Cheers,
Stephen.
 
Hi Stephen, Thank you for your suggestions. This is the glue I have been using for the planking so far. I chose this because I wasn't sure how cyno glue would react in potentially a damp/wet environment. Does anyone know if cyno is water resistant?
1641158863304.png
112g bottle

Famous “yellow” wood glue used in aeromodelling and professional applications where hard woods are used; dries crisper than PVA giving better sanding specially with balsawood.
Will not pull joints as it sets, resulting in better dimensional stability important for airframe construction.
Also sets at low temperatures and is water resistant making it ideal for model boats.
Use in miniature furniture making where its useful properties include:
• Taking a stain.
• Faster grab time.

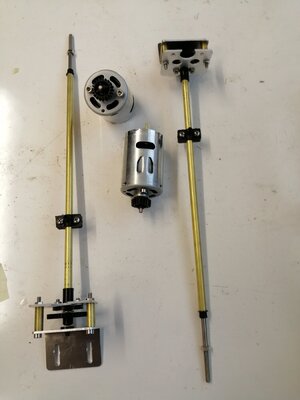
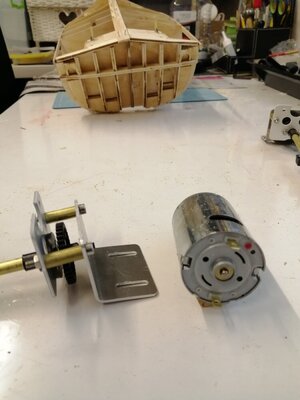
By the way, I forgot to mention to anyone who might be following this build, is that I cut 5.5mm off the threaded length of the prop shafts (supplied in the motorisation kit) otherwise there would have been far too much of the screw thread showing. Also I cut some of the ply away from the horizontal frame in the engine bay area otherwise I believe fitting the wire connectors at a later date onto the motors who have been difficult. There are two lots of props supplied. One with the main kit and one set with the motorisation kit. The ones in the motorisation kit are larger so I've used these as I believe they will give better performance. There was an option to use direct drive with totally different plywood housing. Since the motorisation kit supplied a gear box to assemble I thought I may as well use this as it may give a more realistic speed.

Thank you to everyone following this build log and your comments/help. Not sure if I've put this blog it in the correct place on the website but I do like receiving your help and advice.
 
I have followed Ken (Complete Build) blog which is excellent and been a big help to me. Ken's build was for a static display model and I'm building the same kit but for use on water. The instruction manual is bias towards a display model so having followed the instructions implicitly and Kens Build log I am now going to deviate from the instruction manual. This is because after a suggested dry run of fitting the motors, prop shafts, rudders and associated linkages I found access extremely difficult even before any planking was fitted.
I've therefore decided to blog my deviation from the instructions since they indicate fitting these components on completion. I think otherwise this would be near impossible so I'm going to blog my method and hope it works! Hopefully it might be useful for anyone else building this Amati kit.
I've just installed the motors and prop shafts as I needed to use the space where the planking would be fitted in order to get them into place! I've wrapped the motors and gear boxes in a plastic bags to protect them until the boat is finished. I will complete the bottom planking and then fit the rudders as again access once planking is complete will make the job almost impossible. The clamps are holding strengthening pieces in place in order to hold the props in correct alignment. This again is a modification plus I've filed out the wood close to where the outer motor terminals are located. Otherwise attaching the wires to the motors would again be difficult. I plan to cover the bottom of the hull with the mahogany planks so I can attach the rudders and linkages before planking the sides.

Picture of me applying another plank with an Amati pin pusher. I usually get the nail started with the pin pusher and the complete with the hammer. I'm thinking of applying some epoxy resin to the underside of the planks (under the cabin area) as soon this will be unreachable - just in case in future any water gets ingresses into those areas.
Has anyone got any thoughts on this please ? This is my first build of a planked hull so any experience greatly received.
View attachment 279763View attachment 279764View attachment 279765View attachment 279766View attachment 279767View attachment 279768View attachment 279769View attachment 279770View attachment 279771
As with some others, I have no RC experience with model boats, but as you position and load the required components aboard, I would recommend that as soon as adequately planked, and the hull waterproofed (even with plastic bags) you give it a careful flotation test to check and recheck the trim and ballasting that is needed. Later this will change when more of the superstructure and masting are added which will change your center of flotation and increase the possibility of overturning (dead calm and then with increasing wind forces in the sails). You have a great challenge coming from many related fronts. I think that taking your time and checking/rechecking will help you to your completion and first trial run. Best wishes for your voyage. Rich (PT-2)
 
Hi Duncan,

Your Aliphatic glue might be similar to the Titebond 2 glue, and is probably a good choice in my opinion.
Water resistance is not a problem if the boat is well sealed, people use ordinary PVA without any problem as long as water doesn't pernitrate and soften the glue.

I tend to steer away from Cyno due to the nasty fumes and sticking of fingers together.

In my opinion it is best to be able to remove/replace your motors, also where do you intend to but the battery and what type of battery are you intending to use, in short make things as easy to get to as possible IMHO.

Cheers,
Stephen.
 
I'll second @tedboat 's suggestion for fiberglass. I've used it on a RC aircraft over balsa and the fiberglass cloth virtually disappears when the resin is applied. A single layer of very lightweight woven fiberglass will seal it and show off the beauty of the wood underneath.

Glenn
 
Thanks Glenn. The thought of getting creases in it scares me a bit! It is a very curvy hull in multiple directions! How do you deal with applying it at the corners? Do you ask for a particle ounce for the fibreglass matting?
Cheers Duncan
 
Back
Top