Amati Riva Aquarama for use on water.

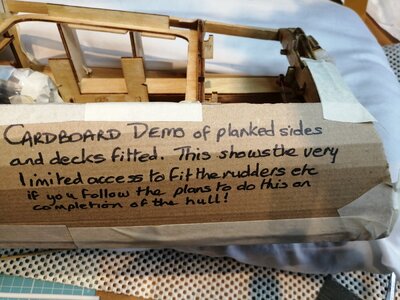
I have followed Ken (Complete Build) blog which is excellent and been a big help to me. Ken's build was for a static display model and I'm building the same kit but for use on water. The instruction manual is bias towards a display model so having followed the instructions implicitly and Kens Build log I am now going to deviate from the instruction manual. This is because after a suggested dry run of fitting the motors, prop shafts, rudders and associated linkages I found access extremely difficult even before any planking was fitted.
I've therefore decided to blog my deviation from the instructions since they indicate fitting these components on completion. I think otherwise this would be near impossible so I'm going to blog my method and hope it works! Hopefully it might be useful for anyone else building this Amati kit.
I've just installed the motors and prop shafts as I needed to use the space where the planking would be fitted in order to get them into place! I've wrapped the motors and gear boxes in a plastic bags to protect them until the boat is finished. I will complete the bottom planking and then fit the rudders as again access once planking is complete will make the job almost impossible. The clamps are holding strengthening pieces in place in order to hold the props in correct alignment. This again is a modification plus I've filed out the wood close to where the outer motor terminals are located. Otherwise attaching the wires to the motors would again be difficult. I plan to cover the bottom of the hull with the mahogany planks so I can attach the rudders and linkages before planking the sides.

Picture of me applying another plank with an Amati pin pusher. I usually get the nail started with the pin pusher and the complete with the hammer. I'm thinking of applying some epoxy resin to the underside of the planks (under the cabin area) as soon this will be unreachable - just in case in future any water gets ingresses into those areas.
Has anyone got any thoughts on this please ? This is my first build of a planked hull so any experience greatly received.
Hallo @DPTrainer
we wish you all the BEST and a HAPPY BIRTHDAY
Enjoy your special day
Birthday-Cake
 
Hi Duncan,

Your Aliphatic glue might be similar to the Titebond 2 glue, and is probably a good choice in my opinion.
Water resistance is not a problem if the boat is well sealed, people use ordinary PVA without any problem as long as water doesn't pernitrate and soften the glue.

I tend to steer away from Cyno due to the nasty fumes and sticking of fingers together.

In my opinion it is best to be able to remove/replace your motors, also where do you intend to but the battery and what type of battery are you intending to use, in short make things as easy to get to as possible IMHO.

Cheers,
Stephen.
Just like to point out - Titebond III is the waterproof version vs Titebond II....I am not at all sure what adhesives are alike in the UK. One more mention - when it comes to waterproof varnishes, Spar Urethane is very durable in this regard.
 
Here is a good article on fiberglassing a full size kayak: Fiberglassing a Wood Strip Boat

Reading through it might help you decide if it's worth the effort. Process would be the same but obviously on a much smaller scale.

Definitely heed the advice of not using creased or wrinkled material, it's impossible to get it to lay flat when you wet it out.
And look at the West System for fiberglass crafting....
 
Thank you. I think I'm going to avoid using fibreglass as I don't feel confident to do that process. I'm going to use 2 or 3 coats of clear cellulose sanding sealer and several coats of varnish. Then on the bottom of the hull up to the waterline I'm then going to apply on top of this several coats of white paint. I will also apply several coats of epoxy resin to the inside of the hull. I've already applied either varnish or epoxy to other inside parts of the hull which are now inaccessible. Fingers crossed this will make it waterproof! I'm now just working on the second layer of mahogany planks on top of the lime planking. I'll send some more photos when I've finished the mahogany planking up to the waterline. I'll then install the rudders and linkages so that I can get my fingers in through the boat sides before applying the planking to the sides. Otherwise I believe access to fitting these rudder horns, nuts and linkages will be extremely difficult. Has anyone else built an R/C version of this kit and if so how did you deal with this problem? The glue that I'm using is a waterproof version of Aliphatic resin glue. Thanks anyway for your input Philski - it is appreciated. Cheers Duncan
 
Grazie. Penso che eviterò di usare la fibra di vetro perché non mi sento sicuro di fare quel processo. Userò 2 o 3 mani di sigillante abrasivo di cellulosa trasparente e diverse mani di vernice. Quindi sul fondo dello scafo fino alla linea di galleggiamento applicherò sopra diverse mani di vernice bianca. Applicherò anche diversi strati di resina epossidica all'interno dello scafo. Ho già applicato vernice o resina epossidica ad altre parti interne dello scafo che ora sono inaccessibili. Incrociamo le dita questo lo renderà impermeabile! Ora sto solo lavorando sul secondo strato di assi di mogano sopra il tavolato di lime. Manderò altre foto quando avrò finito il fasciame in mogano fino alla linea di galleggiamento. IO' Installerò quindi i timoni e le biellette in modo che io possa infilare le dita attraverso le fiancate della barca prima di applicare il fasciame alle fiancate. In caso contrario, credo che l'accesso per il montaggio di queste corna, dadi e collegamenti del timone sarà estremamente difficile. Qualcun altro ha costruito una versione R/C di questo kit e se sì come hai affrontato questo problema? La colla che sto usando è una versione impermeabile della colla in resina alifatica. Grazie comunque per il tuo contributo Philski - è apprezzato. Saluti Duncan Grazie comunque per il tuo contributo Philski - è apprezzato. Saluti Duncan Grazie comunque per il tuo contributo Philski - è apprezzato. Saluti Duncan
Ciao DPT, la mia esperienza sulla tenuta all'acqua sui modelli da vela ho utilizzato solo resina bicomponente applicata a pennello

DSC00106.JPG

Senza-titolo-1.gif
 
Last edited:
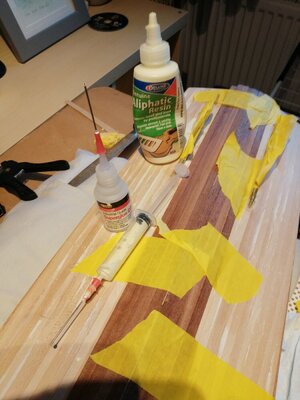
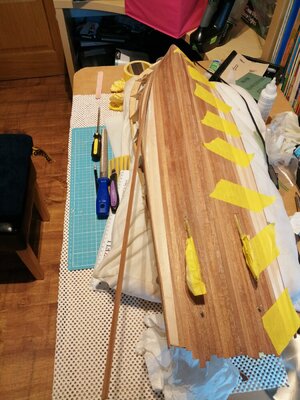
I have started the second layer of planking on my Amati Riva Aquarama. It is the first time that I have built a planked model but having looked at some previous methods I have adopted the following method which is a combination of other ways and seems to be working well. Following Ken's advice from building a similar model I have purchased off Ebay some BLUNT needles and syringes which are quite cheap. The needles allow you to carefully control the amount of glue applied and enable you to get into the tight gaps. First of all, I glued the bow end with CA glue for a length of about 2" making sure I have a tight fit and let the CA go off. Using the syringe filled with Aliphatic glue I then apply a thin bead of this glue for the rest of the length of the plank onto the hull.( I find using CA glue I end up sticking my fingers!) The needle lets you get glue very close to where the plank is already fixed with the CA glue. Because of the curvature of the hull I have found that the plank will bend and make a tight fit to the preceding plank. I then press it down wiping excess glue away and apply wide masking tape to keep the plank firmly in place - and give it time to set. I didn't want to use nails as shown in the instructions because I didn't want holes showing when the planks are finally finished with varnish. As Ken suggested if the CA glue needle gets blocked just burn off the blockage with a lighter. I haven't found the Aliphatic glue blocks the needle but in both cases I always replace the plastic covers on the needles.

IMG_20220303_162737.jpg

IMG_20220309_120532.jpg

IMG_20220310_140616.jpg
 
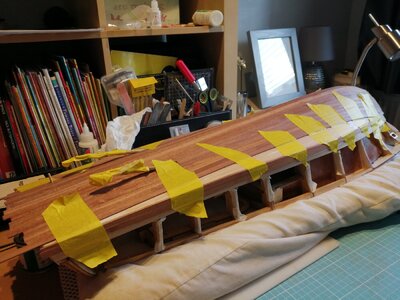
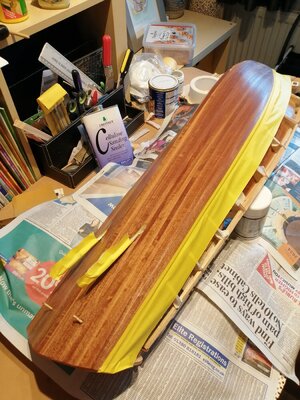
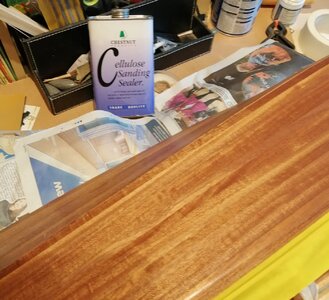
I've completed the second layer of mahogany planking on the bottom of the hull and have now applied the first coat of Chestnut Sanding sealer which will require sanding before another coat is applied. Before applying the sealer I applied Vaseline to the BBQ bamboo skewers to ensure they didn't get stuck in the rudder tubes (they are a perfect fit!) and also applied the yellow masking tape around the last planks fitted in order to ensure a raw wood edge when I'm gluing the side planking on after fitting the rudders and linkages. My plan is to do another coat of sanding sealer and then two coats of yacht varnish. Not sure whether I should also apply a finishing epoxy resin coat before doing the varnishing. Any thoughts? The bottom of the hull will then be painted with white enamel - Humbrol. That is my thoughts so far. Any comments?


IMG_20220330_105550.jpgIMG_20220330_105709.jpg
 
I've completed the second layer of mahogany planking on the bottom of the hull and have now applied the first coat of Chestnut Sanding sealer which will require sanding before another coat is applied. Before applying the sealer I applied Vaseline to the BBQ bamboo skewers to ensure they didn't get stuck in the rudder tubes (they are a perfect fit!) and also applied the yellow masking tape around the last planks fitted in order to ensure a raw wood edge when I'm gluing the side planking on after fitting the rudders and linkages. My plan is to do another coat of sanding sealer and then two coats of yacht varnish. Not sure whether I should also apply a finishing epoxy resin coat before doing the varnishing. Any thoughts? The bottom of the hull will then be painted with white enamel - Humbrol. That is my thoughts so far. Any comments?


View attachment 299628View attachment 299629
Hi DPTrainer,

A lot of people would probably go for epoxy with a light glass matt, but that would be before any sealer. I don't know how well the epoxy will bond to the sealer, in my opinion this could present problems down the track. I am guessing the Cellulose sealer is a Nitro Cellulose, fast drying and quite smelly, if that is the case it will have filled the grain with a waterproof medium and I would probably just put a few coats of white straight over it.
I know this will bring critique but that should be waterproof enough, if you are worried then put the varnish on then the Humbrol. The question you need to ask yourself is how long do you intend leaving her in the water for? Most RC boats don't spend much more than half an hour in the water at any one time.

Cheers,
Stephen.
 
Thank you Stephen for your comments. I think from what you have said I will just use the epoxy resin on the bare wood inside the hull. Like you say the boat wont be in the water for more than 20->30 minutes. The sanding sealer is a Cellulose quick drying smelly type but I've noticed it says for internal use. That is why I thought a coat of yacht varnish will be a good idea but perhaps just a few coats of white Humbrol enamel will be sufficient. I thought the yacht varnish might be more waterproof - any thoughts?
 
Thank you Stephen for your comments. I think from what you have said I will just use the epoxy resin on the bare wood inside the hull. Like you say the boat wont be in the water for more than 20->30 minutes. The sanding sealer is a Cellulose quick drying smelly type but I've noticed it says for internal use. That is why I thought a coat of yacht varnish will be a good idea but perhaps just a few coats of white Humbrol enamel will be sufficient. I thought the yacht varnish might be more waterproof - any thoughts?
No worries,
The internal use thing I think is more to do with UV resistance.
I would not worry too much about the marine varnish but if you feel it is better then do it, it won't hurt.
As for the epoxy inside personally I would just use thinned varnish and swish it around up end the boat and let it get into anywhere it can drain out the excess then repeat the process several times.

Cheers,
Stephen.
Thanks again Stephen. Useful to know that the 'Internal use' is more to do UV protection. I was thinking is was to do with water resistance. Because of the type of construction of the hull I think draining out excess varnish from inside the hull will not be easy. I had thought of perhaps using some spray lacquer perhaps with a plastic nozzle similar to what you get with WD40 cans to get into the more inaccessible places. The frames have already been coated with epoxy or varnish. It is just the initial layer of planking that will require some protection. Where the planks were going to be under the cabin I applied a thin layer of waterproof Aliphatic glue along the length of the planks just in case some water got in. Hopefully not! I'm perhaps being a bit over cautious but someone at the boat club said someone had in the past built one of these beautiful models but having had it in the water it later started to fall apart because of the wood warping. I don't want this to happen with the number of hours I'm putting in to build it. It is my first model of this type so I'm learning all the time. Thanks again. Cheers Duncan
 
Hi Duncan,
That's just what I think, I am not an expert. You could do a practical experiment with a couple of blocks of balsa put a couple of coats of the Cellulose on one then put both in water and see what happens, although I am pretty sure it will be fine especially with a few coats of Humbrol Enamel. With a base of the Nitro Cellulose you could easily use an automotive finish or one of the hobby Lacquers and have the ability to polish it if you wanted. I am making the assumption that you have an airbrush.

By the sounds of it the inside should be alright. Spraying into confined spaces is problematic due to "bounce back" the paint won't go right into corners especially at higher pressures, like rattle cans.

You would need to know more about the boat that came apart before making assessments on it in my opinion, for a start you have used waterproof glue and made efforts to seal the wood, so even if water gets in your boat is not going to fall apart.
Your planking looks very nice without gaps that I can see.

We are always learning with this hobby, time spent doing experiments off model is time well spent in my opinion you can learn a lot.

The main reason I don't encourage epoxy is because if you are not careful you can add quite a bit of weight to what I think is probably a fairly heavy boat with all it's internal structure and double planking, that's not a critique of your work more what you are working with.

Cheers,
Stephen.
 
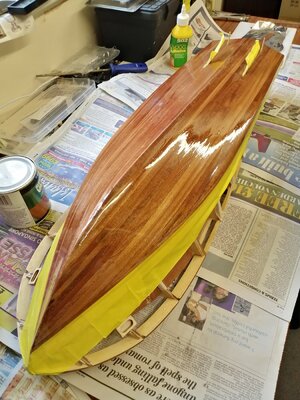
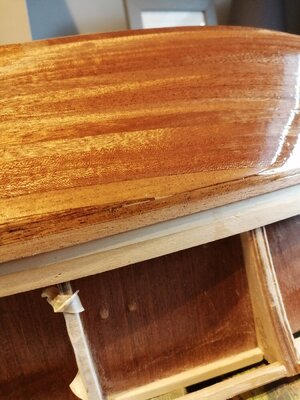
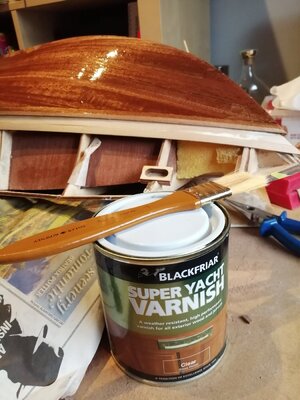
Hi Everyone, Just a small update on progress. Having applied several coats of Cellulose Sanding sealer I have now applied one coat of yacht varnish which I already had in my workroom. Hopefully you can see from the photos the reason I decided to apply the masking tape. This was to protect a raw wood edge in order to get a good bond to glue to when I start the side planking. I'm pleased with the overall finish so far. I forgot to do a test of the varnish on the sealer so there were a few anxious hours of waiting hoping that they wouldn't react with each other! I knew that on Ken's build of the same boat he didn't have a problem but he used a different type and make of varnish.


IMG_20220405_154729.jpgIMG_20220406_103836.jpgIMG_20220406_104007.jpg
 
Hi Everyone, Just a small update on progress. Having applied several coats of Cellulose Sanding sealer I have now applied one coat of yacht varnish which I already had in my workroom. Hopefully you can see from the photos the reason I decided to apply the masking tape. This was to protect a raw wood edge in order to get a good bond to glue to when I start the side planking. I'm pleased with the overall finish so far. I forgot to do a test of the varnish on the sealer so there were a few anxious hours of waiting hoping that they wouldn't react with each other! I knew that on Ken's build of the same boat he didn't have a problem but he used a different type and make of varnish.


View attachment 301018View attachment 301019View attachment 301021
Hi Duncan,

Nice looking finish.

Cheers,
Stephen.
 
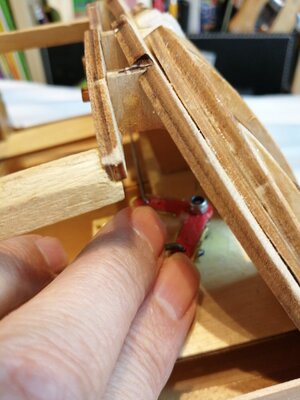
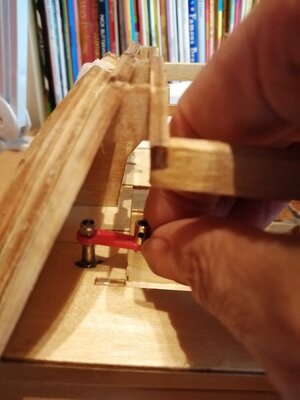
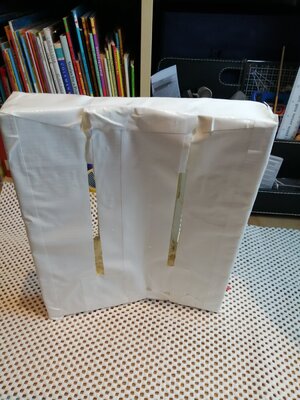
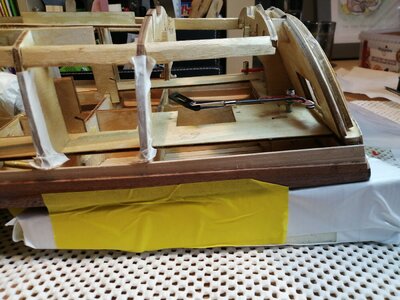
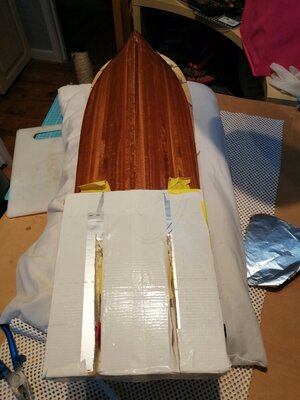
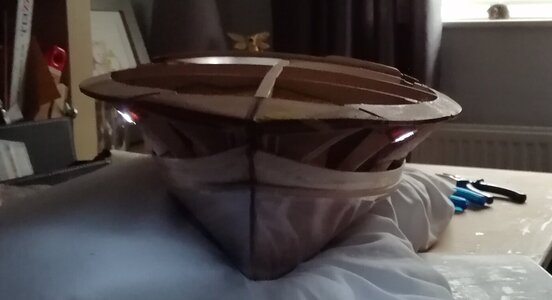
Hopefully the photos that I'm attaching will explain why I'm not following the instructions for a radio control version! The Amati instructions indicate that the rudders and control linkages are fitted at the end of the hull construction. I decided that this will be virtually impossible to get your hands in to accomplish this task so I have planked almost up to the waterline with both 1st and second planking in order to still have some reasonable access to carry out this task. In order to protect the rudders whilst the rest of the hull is completed I've cut out a polystyrene block (or could be balsa blocks) and covered it in gaffer tape to go over the prop shafts and rudders to provide the protection.
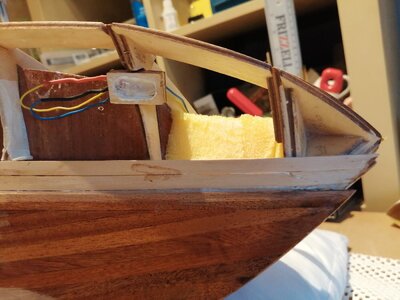
It still took all afternoon to get the supplied R/C rudders in place. I've C/A glued a nut onto the bottom of each rudder horn. I found that with the shape of the hull, the rudders when turned fully were catching the bottom of the hull so I've added two small 2mm white plastic spacers which I made from some tubing. Hope this will help anyone else who attempts to build the R/C version of the kit! Next stage is to epoxy the inside below the waterline before continuing with the rest of the planking. I've also installed a 3mm light in the cabin and also added 3mm bulbs for the headlights rather than using the dummy headlights.

IMG_20220501_154926.jpgIMG_20220501_152335.jpgsimulated planking & decking.jpgIMG_20220501_161038.jpgIMG_20220501_161821.jpg
.

IMG_20220502_090506.jpg

IMG_20220502_090324.jpg

IMG_20220502_091102.jpg
 
Last edited:
Good work Duncan,
Are you going to fit the servo as well before proceeding?

Cheers,
Stephen.
Hi Stephen,

Thank you. I've dry tested the servo installation. I am going to leave it as long as possible to install the servo in order to protect it during the next phase of the build. The mounting of the servo is a lot easier to access than attaching the rudder horns and linkages - so I'm not as worried about that part of the assembly. I've pre drilled the mounting holes for the servo. Thank you for your interest. Cheers Duncan
 
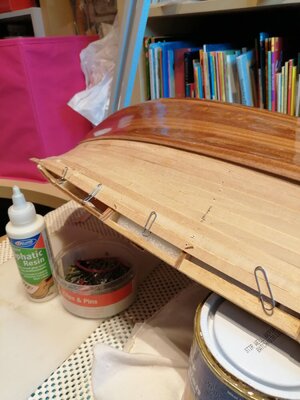
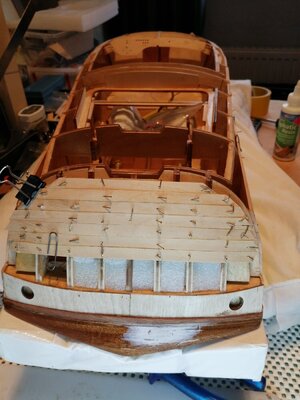
Just a small update. Nearly finished the first layer of planking. I thought this tip maybe of help others when planking. I found that as I nearly completed the the 1st layer of planking I could no longer use bulldog clips to assist in butting the edges of the planks together. Instead I have found using paper clips does this job well in tight confines. I still nail the planks to the bulkheads but between the bulkheads it helps to keep the plank edges tight together. Keeping the plank edges as smooth as possible will no doubt help in cutting down the tedious job of sanding it smooth! There is quite a curvature required at the ends of the planks on the transom - so I have used a Modelcraft heated plank bending tool. Works well. As this is only the base layer planking which will be sanded down before applying the second mahogany planks the fortunately finish doesn't need to be perfect!

IMG_20220516_113317.jpg

IMG_20220516_172240.jpg
 
Last edited:
Back
Top