Amerigo Vespucci, Panart 1:84 scale

Hi, thank you for the information.
Something that I'll have to deal with at a much later date. I would love to include this ship in my dock, but it is full right now.
 
Ken I am sure that the next level of rigging will be no match for your abilities! Just continue doing what you are doing. It is great.
 
Hello everyone. The rigging is almost done, thank goodness! It was a lesson in absolute frustration. I’m sure that you’ve all been there at some time, difficult to understand rigging plans, crossed or snagged lines time and time again, too many lines going to the belaying points to get your fingers near. What made it more difficult was having fifteen spars instead of the usual nine so many more lines to negotiate, and all those deck fittings ready to snag the lines at every opportunity.

I’ve started to make up and fit the rope coils. I use a rough jig that I hand hold whilst doing them, the picture shows it, the larger nail is loose and is taken out to release the coil, I have put a groove at the rear of the coil so that the cord can be easily passed under whilst tying off, the small nail at the bottom I use for a quick wrap of the cord which holds it nicely without using clamps which I found got in the way. A simple rough jig that is quick to use.

Because I couldn’t understand where to put them or what type of blocks were needed I had to fit them as I went along, quite difficult with limited access especially as there were some that had several fitted close together. To make life easier I just used .5mm copper wire instead of cord and for an eye I used an eyelet cut down and glued into the block, I put them in a blackening solution before fitting, I just drilled a hole and glued them in, some cord wrapped around the area gave the appearance that they were tied on. They turned out fine, unless you knew you wouldn’t know that they weren’t rigged correctly, good enough for me anyway.

Ken


281.jpg

282.jpg

283.jpg

284.jpg

285.jpg

286.jpg

287.jpg

280.jpg

278.jpg

279.jpg
 
Last edited:
Hello. Again thanks for those likes.

I have now completed all of the rigging including the rope coils, I’m very happy with the way it came out. I have made up and fitted the life rafts and have made and fitted the davits, they were more difficult than I had expected, I just ran out of room around the hull and I had to adapt them to fit without fouling any of the other fittings. Again the plans weren’t very helpful, no measurement were given and only a sketch as to where they would go. I noticed that on the box art and poster the model that was used for the photo had parts missing as if the builder couldn’t fit everything as well, so it was left up to you to juggle things as best that could to make things fit.

My next task will be to make the four gangways, another mystery to be solved.

Ken

288.jpg


289.jpg


290.jpg


291.jpg


292.jpg
 
What a fine looking ship. Your rigging is outstanding. I'm just starting to get into line work myself and it is really a challenge for me. Right now I could not come close to your level but I will get there. It seems being able to properly seize the ropes at the end points and make it look good is a big part of the secret to nice looking line work.
 
Witaj
Model wygląda pięknie .Odwaliłeś kawał dobrej roboty.
Wiem jaki takielunek był niewdzięczny bo go niedawno skończyłem.
Pozdrawiam Mirek Motyka
 
  • Like
Reactions: Ken
Hello all. Thanks Heinrich, Mirek, Don and Daniel for your very kind words and thanks to all who gave me their likes, its worth the effort to know members appreciate it.

Now a moan, again about the plans just to get it off my chest. I have just started to make up the four sets of gangways needed. You can see that although a tricky part to make up, the plans show virtually no measurements, they are nowhere near to scale and each part of the unit is shown at a completely different scaled size. They look good on paper but are not practical to make, the only fixed point is the top of the ladder to the to the upper platform, the lower part is supported by a davit type block and tackle and at this scale the hinge in the middle is not practical, the slightest touch will have it break off. I have shown a picture of my started parts at the size that I think is correct against the plans. I'll work out my own design that will hopefully be more robust and look okay.

Now that I've had my moan I feel better so I've added a couple more shots of the Mersey, one of the Mersey ferry and the other of ships leaving after a regatta.

Ken

293.jpg

020 Tall Ships.jpg

021 Tall Ships.jpg
 
Hello again. I managed to build the gangways without any real problems, just a bit fiddly and time consuming. Once I’d worked out how I was going to do them and make them sturdy enough their construction went well and instead of them being fixed just from the top I pined them to the hull as well, you can’t see the pins and now they will survive minor knocks. As with most things with this build it involved lots of bits going together, as well as the home made davits and tackle there were 40 ladder rungs, 16 side pieces, 16 hand rails 32 rail supports and 12 gratings. The numbers in this build are just huge and seem never ending, but I’m getting there. The first picture shows my kit of parts that I prepared for the building of them.

I’m dreading the eleven ships boats which will be coming soon, that will be another major project in itself.

Ken

295.jpg

296.jpg

297.jpg

298.jpg299.jpg
 
Hi, Again thanks for your likes and comments. Some more progress,. I have just finished hoisting the flags, I think that this gives a nice finishing touch to the model. To get them to hang naturally I use starch, after attaching I give them a good spray of ordinary domestic starch I weigh them down so that they hang naturally. When they are dry and the weights removed they stay in their set position, much better than stuck straight out.

Ken

301.jpg


302.jpg


303.jpg


304.jpg


305.jpg

306.jpg
 
Hi, Again thanks for your likes and comments. Some more progress,. I have just finished hoisting the flags, I think that this gives a nice finishing touch to the model. To get them to hang naturally I use starch, after attaching I give them a good spray of ordinary domestic starch I weigh them down so that they hang naturally. When they are dry and the weights removed they stay in their set position, much better than stuck straight out.

Ken

View attachment 197271


View attachment 197272


View attachment 197273


View attachment 197274


View attachment 197275

View attachment 197276
What a great idea.
 
  • Like
Reactions: Ken
Hello Everyone. I had some spare time yesterday so I read through my log from the beginning. I found it interesting to see just how much interest and encouragement I’d received throughout my build, so to everyone I thank you very much as it became something to look forward to as the build progressed.


I am now starting the final stage of the build, I’m even letting my mind wander on to my next project which I will again do a build log of. I now need to make the ships boats, as these are a main feature of the A.V. I’ll give them my best shot and try to do them justice. I need to make two different pinnace, four motor launches in two different sizes, four rowing boats and a cutter to hang at the stern. I feel like this is a completely different part of my build and that each of the boats will be a project in itself. Each boat is double plank on frame and for once the plans are very good and there should be no issues. I’ve started the frames but haven’t done any photos yet they’ll come soon.


As there’s not much to look at I’ll show some more pictures of my home area. The peninsular where I live is only a very short ferry trip from Liverpool but it could be hundreds of miles from any big city or town, mostly it’s a rural coast but with a history of ship building. The Confederate warship Alabama was built here, it nearly caused a war, it was sold as a civilian ship but was built with armour and secret gun mountings, the heavy guns were first shipped to Australia and imported from there to be fitted to the Alabama later, a serious breach of neutrality.

002.jpg


The first picture shows my home town West Kirby, nestling on the coast. There is a large sailing lake built onto the seafront and the small island is a pleasant walk away and is a bird sanctuary.

west kirby 2.jpg

This is the island on a nice day, at its tip is the remains of an old lifeboat station

hilbre 02.jpg

old  lifeboat st.jpg

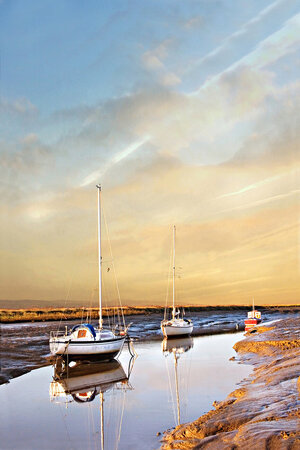
Then there are the small inlets, popular for sailing with their small boat yards

031.jpg

033.jpg

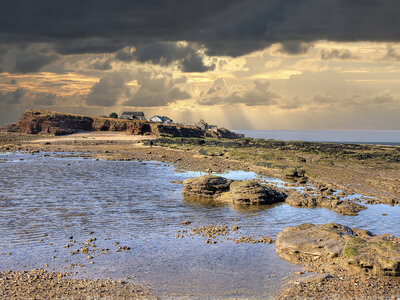
This is the beach and the old fort

030.jpg
 

Attachments

  • hilbre 02.jpg
    hilbre 02.jpg
    585.4 KB · Views: 4
  • Dee Estuary.jpg
    Dee Estuary.jpg
    285.9 KB · Views: 9
Last edited:
Back
Top