Thanks Zoly. I am really enjoying it. I can already tell that wooden models are much more komplex, but on the other hand you are more free in building them, because you can form everything if you know how.You are doing a good job!


 |
The beloved Ships in Scale Magazine is back and charting a new course for 2026! Discover new skills, new techniques, and new inspirations in every issue. NOTE THAT OUR NEXT ISSUE WILL BE July/August 2026 |
|
 |
As a way to introduce our brass coins to the community, we will raffle off a free coin during the month of August. Follow link ABOVE for instructions for entering. |
|
Thanks Zoly. I am really enjoying it. I can already tell that wooden models are much more komplex, but on the other hand you are more free in building them, because you can form everything if you know how.You are doing a good job!
Thank you Uwek. I would start earlier, but I honestly did not know that there is anything like wooden modeling before. In the hobby shop in my town there are only plastic models and very few basic wooden kits. I thought that they did not exist at all, and that the kits are only plastic.Very good progress - I am getting the feeling, that there is more and more a new fan of wooden ship-modelling grown up....


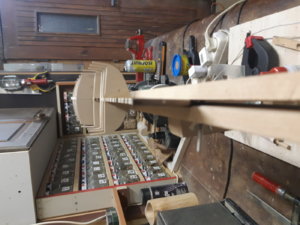
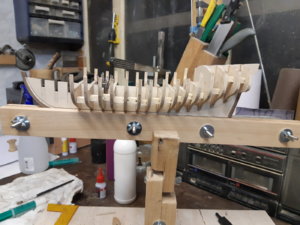
I checked in the manual of this model - it is double planked model, so you have to use therefore the complete thickness of the first plus the second walnut planking as a measure for the rabbet-line !! Or did you already added both in your trial?Dear fellow modelers. Last evening I fitted all the bulkheads and I have new issue. It seems that the rabbet line is drawn well because I measured it couple of times and also most of the bulkheads are following this line, but it is looking like there is lot more space then necessary for the rabbet. I tried to fit there final width planking. See in the pictures.View attachment 128855
I know I need to trim the rabbet line little bit more, but you can see here that if I push the planks against bulkheads there is visable space.View attachment 128856
View attachment 128858
View attachment 128857
I tought about this and there is couple of solutions. First is try to fit plannking as good as possible from bottom of ship. Or try to do it naturally and if there will be visible space use walnut straps to fit in the hollow space.
Any suggestions?
I checked in the manual of this model - it is double planked model, so you have to use therefore the complete thickness of the first plus the second walnut planking as a measure for the rabbet-line !! Or did you already added both in your trial?


![IMG_3032[1].JPG](https://shipsofscale.com/sosforums/data/attachments/114/114293-6b4abcf64af32e88cddc7bd1c37a69c0.jpg?hash=a0q89krzLo "IMG_3032[1].JPG")
Thanks for your advice. I will do it. I will be very carefull with that. I know it will be again reinforced when the planking will be done. But until then, will take every precotions.That is correct. This was my first model also and I struggled with this as I could not understand it or the concept. I have added a drawing, although, not very good!
Looking at your drawing you have the exact idea, and it is scary how thin the keel will become!!


 .
.


 ..
..


 . It is to low in red circle. No worries it could be sanded easily.


Is that counting the time spent logging everything in SOS?Total time spent on project is 46 hours.
Is that counting the time spent logging everything in SOS?
Your log is very detailed and helpful to follow the discussion of your questions.
Good work!