Thanks, Marco. Luckily I can visit the real thing and made a lot of pictures. And: ‘Size does Matter’It is magical how you transpose real life to the model. And the small bits really matter!
Regards, Peter
 |
As a way to introduce our brass coins to the community, we will raffle off a free coin during the month of August. Follow link ABOVE for instructions for entering. |
 |
 |
The beloved Ships in Scale Magazine is back and charting a new course for 2026! Discover new skills, new techniques, and new inspirations in every issue. NOTE THAT OUR FIRST ISSUE WILL BE JAN/FEB 2026 |
 |
Thanks, Marco. Luckily I can visit the real thing and made a lot of pictures. And: ‘Size does Matter’It is magical how you transpose real life to the model. And the small bits really matter!
 . But the results are really outstanding. Looking forward to see the model in person and be amazed by the small scale she actually is.
Thanks, Maarten. The after-party is still going on ……Hi Peter, as I am late congratulations with your birthday for next year.
See you already spent more time making your pictures then I have to build my ship. But the results are really outstanding. Looking forward to see the model in person and be amazed by the small scale she actually is.


Good morning Peter. Planning and testing is one of the reasons why you are a master at this craft, always carefully set out. I prefer the grey only because at this scale I think the black is too prominent.....maybe get a light blackIt's time to start working with wood on the deck. I had already done some tests with the planks and black calking. Although these are black on the Balder, they still showed quite dominant. That's why I did a test with grey.
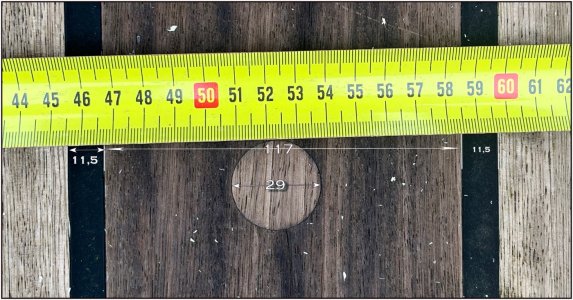
I also took the original dimensions into account:
View attachment 512106
The planks are 117 mm wide, the joints 11.5 mm and the plugs 29 mm.
In scale 1:50 these are respectively 2.35 / 0.23 / 0.58 mm
I'm going to use beech wood that I had already bought from Hans @Kolderstok during the build of my Bluenose. He had sawn slats of 250 x 1.2 mm for me. Given the thickness of the grey paper, I'm going to saw slats of 2.7 mm from it.
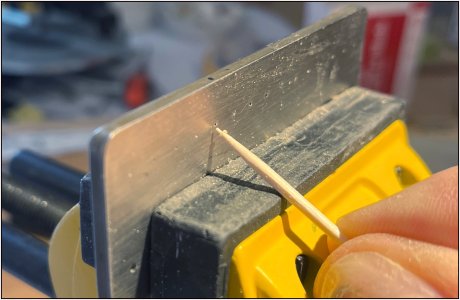
For the grey strips between the planks I made a template in which I can cut the strips:
View attachment 512107
I glued 2 planks to a piece of aluminium according to their thickness. Then I always have the same correct thickness. I made the scalpel extra sharp by stropping it on a leather strop.
I glued the strip on the long and the end side of some slats:
View attachment 512112
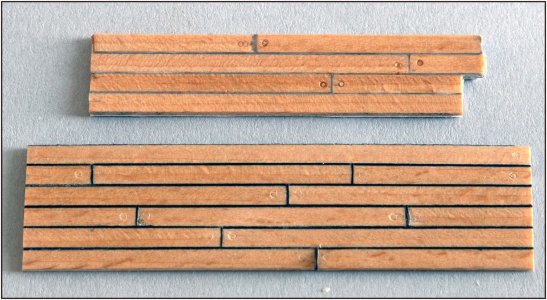
With this as a result:
View attachment 512109
Under the 1st test with black. Above with grey. The treatment with linseed oil makes the grey slightly darker in colour. The base under both tests is the grey paper used. I have to press the 'impressions' to imitate the plugs less deeply.
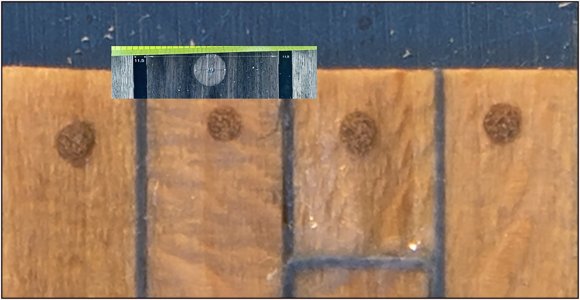
Then a comparison of the dimensions between the original and the test, with a less deep plug:
View attachment 512110
I had to reduce the upper original considerably, the test inflated.
The plug was made with a 0.5 mm hollow punch.
Regards, Peter

 . Your scale measurements are prefect however I wonder if there is another way of doing the plugs......I'm just not a fan of impressions for plug and treenails (just personal thing). Cheers Grant
Superb duplication of the decking in every respect! The inclusion of the plugs at this scale is great attention to detail!
Thanks for sharing.
I prefer the grey, somehow it is looking more to scale.
Good morning Peter. Planning and testing is one of the reasons why you are a master at this craft, always carefully set out. I prefer the grey only because at this scale I think the black is too prominent.....maybe get a light black
. Your scale measurements are prefect however I wonder if there is another way of doing the plugs......I'm just not a fan of impressions for plug and treenails (just personal thing). Cheers Grant
Thanks for your reactions, Brad, Maarten, Grant and Paul.Hi Peter, I wasn't going to say anything, but Grant has now said what I was thinking so I'll pop in. A real plug fits in perfectly and smoothly with no 'impression' in the wood surface. Your current approach misses, somewhat, what exists in real life and appears to my eye to be out of scale for that reason. In other words, I suspect you are doing it this way to make the plug blend in - and the result is the opposite for me.
OK, I now crawl back under my rock and watch your masterful work.
Thanks for you input, Jim. Much appreciated and hold you sharp!Greetings, mon ami! If I am allowed to say, I join the choir of the above members and think that plugs, the way they presented, will be too prominent for the scale. The topmost left is the only one that looks to scale, IMHO, but then it is possible to make all of the 'plugs' the same. I assume you are using the blunt needle, correct?
Also, the grey caulking looks better, did you try some light brown? BTW, I really like your approach to building the models.
All in all, it's just another brick in the wall

For this reason, I now regret having simulated the plugs on my Flying Cloud deck. It ended up looking like the plugs were wearing the deck and not the other way 'round. Once I started there was no going back. Peter's habit of making test samples is the way to go. And to take the extra time to see if you really are pleased with the result or not, and get some opinions on SoS.Hi Peter, I wasn't going to say anything, but Grant has now said what I was thinking so I'll pop in. A real plug fits in perfectly and smoothly with no 'impression' in the wood surface. Your current approach misses, somewhat, what exists in real life and appears to my eye to be out of scale for that reason. In other words, I suspect you are doing it this way to make the plug blend in - and the result is the opposite for me.
OK, I'll now crawl back under my rock and watch your masterful work.

Thanks for your comment and compliments, Pete. The advantages of scratch or building ‘out of the box’ is that you have to overthink almost everything. And don’t hurry and listen to your fellow modelers.For this reason, I now regret having simulated the plugs on my Flying Cloud deck. It ended up looking like the plugs were wearing the deck and not the other way 'round. Once I started there was no going back. Peter's habit of making test samples is the way to go. And to take the extra time to see if you really are pleased with the result or not. and get some opinions on SoS.


True storyYup. That's much better.
Dito!True story


Agreed. (Been there, seen that, done that...)I'm just not a fan of impressions for plug and treenails (just personal thing).
