clean and accurate - looking very good my friend
-

Win a Free Custom Engraved Brass Coin!!!
As a way to introduce our brass coins to the community, we will raffle off a free coin during the month of August. Follow link ABOVE for instructions for entering.
-

PRE-ORDER SHIPS IN SCALE TODAY!
The beloved Ships in Scale Magazine is back and charting a new course for 2026!
Discover new skills, new techniques, and new inspirations in every issue.
NOTE THAT OUR FIRST ISSUE WILL BE JAN/FEB 2026
You are using an out of date browser. It may not display this or other websites correctly.
You should upgrade or use an alternative browser.
You should upgrade or use an alternative browser.
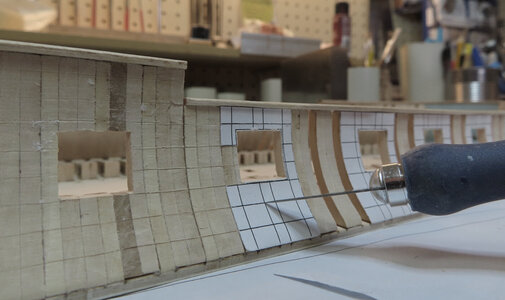
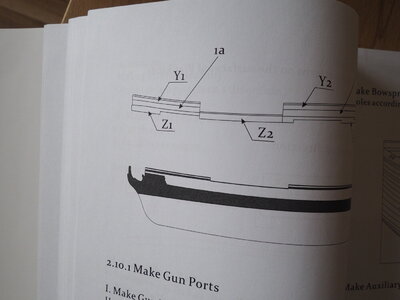
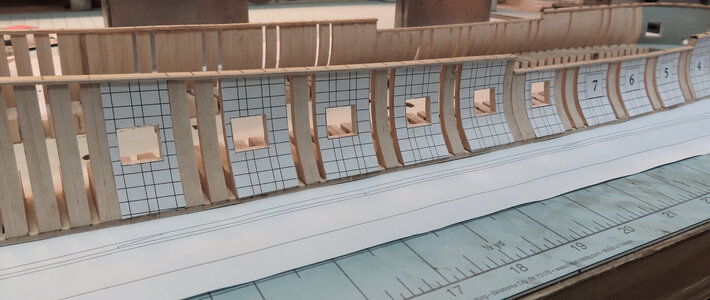
The major POF section is complete and now I am adding the templates. BTW, this kit is more of a hybrid combining POF and POB design. A basic glue stick used to attach the templates. The Rails are holding up nicely - no clamps were used in the process of installing the intermediate frames that go in between the major frames.
EDIT:
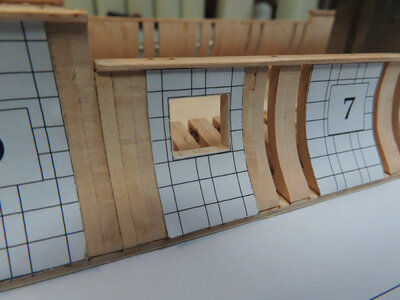
After all the Gun Port Frames have been installed, I do notice one thing. I do think (now) that these openings represent the FINAL opening - but the Gun Port Frames will NOT FIT INSIDE - the ports will have to be widened to accept the Gun Frames. I am not sure why the openings HERE are not the CUT-OUTS that would "INCLUDE" the full dimension to INCLUDE the Gun window Frames too.
When I was installing the Gun Window frames, I noticed that I had to WIDEN these ports, THEN, as I started to construct the window frame, I had to CUT OUT 1mm from the top of the Gun Port openings so that the Gun window frames would fit as they come from the kit. Otherwise, you would have to sand down ALL the windows to fit and I did not think that was the case. So, now going forward, my windows or Gun ports are taller by 1mm.
Please take time to investigate when you build your model.


Last edited:
Thank you all for the likes - it is appreciated !!!
Now - on to cutting out the cannon ports. Drilling holes and filing them down. The material is good and NOT that hard and as Zoltan said, it is not bad to file down to shape. I used a small drill on my Dremel and actually, I was able to use the Drillbit like a router to route out the frame.
The instructions also call for those planking lines to be transferred to the POF upper section. I am thinking of using an Exacto knife to "score" those lines so that when I remove the templates, those scores (cuts) will be slightly visible. Of course, a pencil will do fine as well.
EDIT:
After all the Gun Port Frames have been installed, I do notice one thing. I do think (now) that these openings represent the FINAL opening - but the Gun Port Frames will NOT FIT INSIDE - the ports will have to be widened to accept the Gun Frames. I am not sure why the openings HERE are not the CUT-OUTS that would "INCLUDE" the full dimension to INCLUDE the Gun window Frames too.
When I was installing the Gun Window frames, I noticed that I had to WIDEN these ports, THEN, as I started to construct the window frame, I had to CUT OUT 1mm from the top of the Gun Port openings so that the Gun window frames would fit as they come from the kit. Otherwise, you would have to sand down ALL the windows to fit and I did not think that was the case. So, now going forward, my windows or Gun ports are taller by 1mm.
Please take time to investigate when you build your model.

Last edited:
- Joined
- Oct 11, 2021
- Messages
- 740
- Points
- 403

Hi Donnie,
Great project you're hauling here. What kind of wood are the frames made off? Looks like pearwood or cherry? If so, this is great wood to work with for ship modeling! How about the "plastic" stern and bow? Not too worried this will give you problems in the future when the model is finished and the wood starts to shrink and expand due to humidity / climate conditions during winter and summer? I'm just curious...
Keep following your progress!
Clean and nice work Donnie
Hello Petr
the frames are made of Pear wood.
the frames are made of Pear wood.
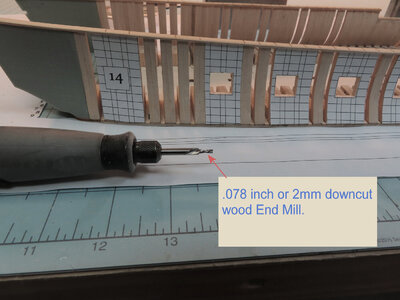
More Port holes opening up. I started using a .078 inch or 2mm Down Cut End Mill chucked up in a Dremel Tool to bore out the openings. You really have to be careful with this approach and have a very steady hand as the End Mill can grab. The good part is that it hogs out the opening fast with minimum filing. The bad part, is you MUST be careful and hold your tool very steady and somewhat strong. But, with a little practice, you can hog out the opening with one pass !!!
The bit was purchased from https://www.2linc.com and the part # PWD2-078-2 this fits a 1/8 inch collet. This End Mill is intended for a Mill naturally, but I thought I would try manual hand-holding. A little tricky, but works well.
EDIT:
After all the Gun Port Frames have been installed, I do notice one thing. I do think (now) that these openings represent the FINAL opening - but the Gun Port Frames will NOT FIT INSIDE - the ports will have to be widened to accept the Gun Frames. I am not sure why the openings HERE are not the CUT-OUTS that would "INCLUDE" the full dimension to INCLUDE the Gun window Frames too.
When I was installing the Gun Window frames, I noticed that I had to WIDEN these ports, THEN, as I started to construct the window frame, I had to CUT OUT 1mm from the top of the Gun Port openings so that the Gun window frames would fit as they come from the kit. Otherwise, you would have to sand down ALL the windows to fit and I did not think that was the case. So, now going forward, my windows or Gun ports are taller by 1mm.
Please take time to investigate when you build your model.
This is a link to the 2L Inc Catalog
or I included the pdf for convenience.
The bit was purchased from https://www.2linc.com and the part # PWD2-078-2 this fits a 1/8 inch collet. This End Mill is intended for a Mill naturally, but I thought I would try manual hand-holding. A little tricky, but works well.
EDIT:
After all the Gun Port Frames have been installed, I do notice one thing. I do think (now) that these openings represent the FINAL opening - but the Gun Port Frames will NOT FIT INSIDE - the ports will have to be widened to accept the Gun Frames. I am not sure why the openings HERE are not the CUT-OUTS that would "INCLUDE" the full dimension to INCLUDE the Gun window Frames too.
When I was installing the Gun Window frames, I noticed that I had to WIDEN these ports, THEN, as I started to construct the window frame, I had to CUT OUT 1mm from the top of the Gun Port openings so that the Gun window frames would fit as they come from the kit. Otherwise, you would have to sand down ALL the windows to fit and I did not think that was the case. So, now going forward, my windows or Gun ports are taller by 1mm.
Please take time to investigate when you build your model.


This is a link to the 2L Inc Catalog
or I included the pdf for convenience.
Attachments
Last edited:
Thank you all for the likes and compliments. I have cut out the templates for the other side now. However, it is important to take a break and to pay attention to the planking number sequences.
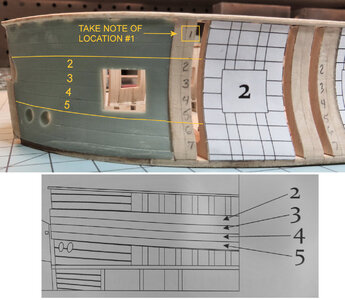
According to instructions, it seems that the #1 position is "offset" by a number. (as seen via the templates). Checking the manual, I see that this is correct. In the image below, you will see that I "pencil in" the locations of planks 1 - 8. To make sure I have them labeled correct, as you can see in the image below, you will see that plank #5 is located right above the Hawse Holes. This labeling is important to establish correctly now, as it will be many procedures and steps before you attempt the establishment of the planking.
I think and hope that I am correct in my assessment. I am not sure why there is a planking gap between #1 and #2. But, we will see at some point. If I am wrong then someone can correct me.

Hi Donnie!
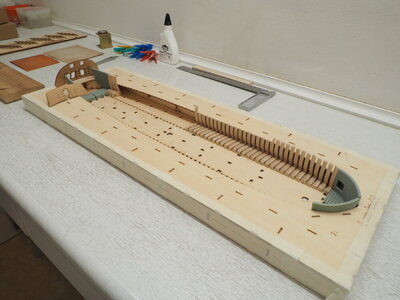
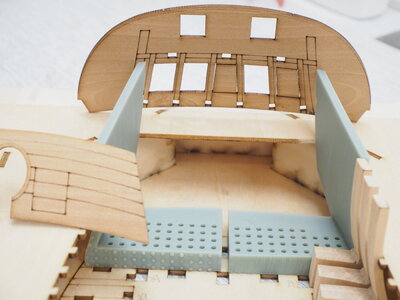
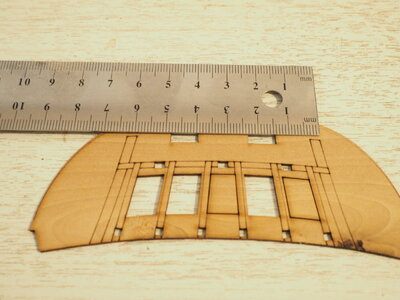
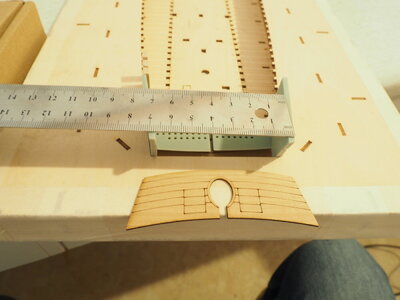
I don't want to disturb your construction report. But after you have already taken the upper part of the hull out of shape, you can please check whether the wooden parts fit on the stern.
If everything is right, I will start my own construction report. If not, it will require some changes in the construction, which I will then document.
Continue to have fun modeling.
Best regards
Thomas
Hello Thomas
thank you for your report. I will investigate upon my arrival at my shop this evening. As you know, the Plastic Stern pieces might need to be shaped to "match" the same shape as the last stern frame pieces. Do you have your Plastic Stern pieces glued to the template base? If not, you should soak or run warm water which makes the Plastic Soft and manageable, and use your hands or fingers to shape the plastic pieces to match the shape of the wooden frame pieces at the stern. If the Plastic Stern pieces are already glued and installed, you might use a very warm hairdryer of sorts to help make the plastic soft.
However, I will at your request inspect the wooden part to see if there is a discrepancy.
This is my summary. The Stern fits well and only needs a small amount of bending at the top rail sections. This can be accomplished perhaps with a heated hair dryer or some other similar method. The upper portion of the plastic stern pieces only need to be re-formed (inward) more on the top of each side.
Since the plastic is somewhat pliable, The parts might fit well only with glue and no re-forming needed.
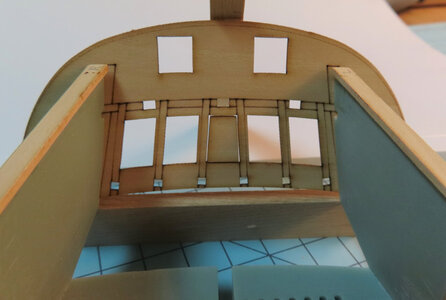
Since the plastic is somewhat pliable, The parts might fit well only with glue and no re-forming needed.

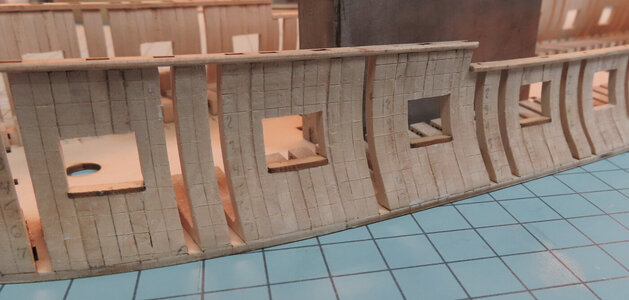
So, now I am starting on the Gunport Liners. Filling in the bottoms first.
EDIT:
After all the Gun Port Frames have been installed, I do notice one thing. I do think (now) that these openings represent the FINAL opening - but the Gun Port Frames will NOT FIT INSIDE - the ports will have to be widened to accept the Gun Frames. I am not sure why the openings HERE are not the CUT-OUTS that would "INCLUDE" the full dimension to INCLUDE the Gun window Frames too.
When I was installing the Gun Window frames, I noticed that I had to WIDEN these ports, THEN, as I started to construct the window frame, I had to CUT OUT 1mm from the top of the Gun Port openings so that the Gun window frames would fit as they come from the kit. Otherwise, you would have to sand down ALL the windows to fit and I did not think that was the case. So, now going forward, my windows or Gun ports are taller by 1mm.
Please take time to investigate when you build your model.

Last edited:
Cleanest cannon damage I've ever seen.....Not even any splinters. I don't know what those old sailors were complaining about.
Seriously, you have a remarkably steady hand Donnie.


