
Great work, it's not a race enjoy your time with the Pearl. I thought I would have mine finished in 6 months it's looking more like a year at least I'll get my money's worth.

-

SUBSCRIBE TO SHIPS IN SCALE TODAY!
The beloved Ships in Scale Magazine is back and charting a new course for 2026!
Discover new skills, new techniques, and new inspirations in every issue.
NOTE THAT OUR NEXT ISSUE WILL BE MARCH/APRIL 2026 -

Win a Free Custom Engraved Brass Coin!!!
As a way to introduce our brass coins to the community, we will raffle off a free coin during the month of August. Follow link ABOVE for instructions for entering.
You are using an out of date browser. It may not display this or other websites correctly.
You should upgrade or use an alternative browser.
You should upgrade or use an alternative browser.
Black Pearl 1:50 ZHL All-Scenario version
- Thread starter Ahoy All
- Start date
- Watchers 25
-
- Tags
- black pearl zhl
- Joined
- Mar 1, 2021
- Messages
- 315
- Points
- 168

I agree Tony….I’m pretty happy at 5 months in!Great work, it's not a race enjoy your time with the Pearl. I thought I would have mine finished in 6 months it's looking more like a year at least I'll get my money's worth.
- Joined
- Mar 1, 2021
- Messages
- 315
- Points
- 168
Very much appreciate, Vic!Just trying to be an encouragement, brother!
- Joined
- Mar 1, 2021
- Messages
- 315
- Points
- 168
Thank you for your kind words and support!Dear Rick
you are doing wonderful work and the result is beautiful, well done
")
Ahoy Ahoy,Captain's Log ~~~ May 1, 2021
Build time today: 2 hours
Total build time: 95 hours
Construction for the Black Pearl (All-Scenario version)
Build guidelines:
Steps 105-134
Secure the following parts:
Parts: 13C, 14C & 15C, H1-H3, J11-J20, L1-17, LC1-17, P2, P4, Q2, R2 & R3, #29
Note: I was hoping to document this build in parallel with the written manual and up to this point, our plan was pretty much on target. However, all Captain’s don’t sail alike and I can see its better to follow their chosen paths through experience, rather than to follow a Chinese map that has me talking to myself! The Pole #1 manual at this stage leaves a lot to the imagination! So, I’ll do my best to navigate the turbulent waters ahead and give you the paths I chose to follow!
Step 105 shows the placement of Parts 13C-15C and P2, P4, & Q2. I decided to go with 15C but did not glue in 13 & 14C because it would make it a bit harder to panel the inside deck walls. Since 15C was the highest bulkhead, it serves as a stabilizer when flipping the ship upside down.
I was a bit nervous with attaching Part P2 because of the empty space in the bow and wondering if the side plywood panel would locate properly in relation to the bow deck. I recall Jodie's thread (@MystRacing) showed that he deferred to his own way of closing in the front of the bow when he was not happy with how the panel laid up. I really didn't have any styrofoam laying around to fill in the dead space in the bow like Jodie used so I cut a few small pieces from a 2"x3" that was laying around the garage. Shaped it some and glued it in.
View attachment 230782
Now mates, this is where I really started treading water because I have never done this before. I just wasn't confident in what I was doing as far as sanding the bulkheads and shaping the curve of the bow. I really was winging it. So, I dry fit the P2 panel and was pleasantly surprised that it fit pretty good.
View attachment 230783
I was lucky that it fell in right under the bow deck and I assumed this was the proper location...although I did bend the third strip a bit too much and too fast and broke it. I used a heat gun and it worked pretty good in shaping the panel.....I soaked the front part for a few minutes and then used the heat gun as it dried out into shape. The second time around was a bit easier, as you can see below.
View attachment 230784
I trimmed them up and glued in the panel. Panels P4 & Q4 fit in fine and I glued them next.
Now, onto the L (4mm) and (3mm) LC parts to add support to the panel plywood sidewall. The pieces fit together almost perfectly, with a bit of light sanding just to clean up the laser marks. Yet, despite the nice fit, things didn't look to well once placed into their respective places.
View attachment 230785
Every piece required a good deal of sanding.....and I really didn't know why they were off so much...was it the Captain's faulty build or was it a poor laser cut? Luckily, I bought a new 1" belt sander that has a 5" disc sander on the side too.
View attachment 230786
Almost every cannon port had this amount of off-center, requiring a lot of sanding. So, I marked them up and started squaring things up, one-by-one.
View attachment 230787
So, I worked several hours getting these pieces glued in and found myself digging through the kit trying to figure out if I identified Part 29 correctly. Even though this deck will be sealed up and not quite visible, I decided to not panel over the cannon ports and trim later. Instead, I cut strips to 2.5" length, and planned to panel and cut as I laid the strips from bottom to top. Since my gun deck is a lighter deck, I wanted to create some contrast so I laid the first two layers of panel (stained Ebony) the next 7 rows were stained Golden Oak. Finally, I laid a piece of what we now call Crown molding on the top layer and matched it in Ebony stain to the lower two layers. I finished the paneling of the gun deck and feel it contrasts OK with the lighter deck. I just have to do some light sanding to clean up a few gun ports. Here's how it looks:
View attachment 230788
View attachment 230789
The Starboard side is plywood pieces R2 & R3. They were glued in and paneled and stained the same as the port side. In regard to Step 120, I have played around with a prototype of a cannon design which I shared earlier. While I have made some hammocks and have some pieces to place on the gun deck, I think this is where I have to take a breather and study my next steps.
Again, I have to agree with Jodie @MystRacing, it doesn't seem that it makes sense to glue in cannons and ornaments now.....Steps 121-126 detail the LED soldering. Those steps are not necessary in my plan because I am using my own lighting design and pre-wired LED's. Steps 128-134 can be completed now too. (Parts H1-H3, J11-J20). Steps 133 & 134 (ladder assembly can be completed now or later).
So, looking ahead my next steps would be to secure some of the stern, run my wire out the stern for the stern lamps, Captain's Quarters and masts. Do a bit more study on planking......it's likely that's going to happen before laying the main deck. Steps 135-185 will not follow the kit plan, as I do not feel comfortable going that route. So, this part of the build becomes the uncharted waters we will pursue.....
Hopefully, my greatest fear of planking will be conquered within the next few weeks....
134 0f 268 Steps completed in the 1st Pole. (50% completion.)
Ahoy all.
I am at the point of installing the inner side wall beams on the cannon deck.
I am having some confusion on what size those planks should be.
I am leaning towards the 2mmX4.5MMX450mm, these are thicker than the .5mm planks.
Is that the planking you went with ?
Thanks,
Rowboat.
- Joined
- Mar 1, 2021
- Messages
- 315
- Points
- 168
Yes, you are correct….Part #29 is what I used….Barely had enough for the gun deck and the main deck!Ahoy Ahoy,
I am at the point of installing the inner side wall beams on the cannon deck.
I am having some confusion on what size those planks should be.
I am leaning towards the 2mmX4.5MMX450mm, these are thicker than the .5mm planks.
Is that the planking you went with ?
Thanks,
Rowboat.
- Joined
- Mar 1, 2021
- Messages
- 315
- Points
- 168
Captain’s Log…….September 24, 2021
Build time today: 2 hour(s)
Total build time: 284 hours
Construction for the Black Pearl (All-Scenario version)
Personal note: Howdy mates! It’s been almost a month since my last Captain’s Log. No, I haven’t deserted the Black Pearl. I have experienced a real sad life event over the past few months. Watching a dear best friend, a retired RCMP, die from Stage 4 lung cancer! A detected nagging cough in a otherwise healthy 54-year old, led to his diagnosis in January….trust me, in my mind the real pandemic in the World is cancer, not Covid. This horrible disease took his life within 8 months. I just couldn’t motivate myself to build a model ship, while wrestling the grief I had for my dear friend. However, Wally was enjoying my build while he was fighting this horrible disease. I finally got moving again, as he would have wanted. This part of the build is for you Wally, and the Angel on my ship‘s bow is now laughing with you in Heaven.
Build guidelines:

The above parts were used to assemble the bowspirit, the bow railings, lashing & figurehead. Parts B27 & B28 (2 ea.), B31, C13 (2), C12 (2), G9 (10) for Starboard and Port rails, J13 (2 ea.), J14 (2 ea.), Q3 (10mm), U3 black rope. Part Z1 is a carved metal piece (Angel) not shown, which is the figurehead attached to the bowspirit!
Again, the kit‘s Pole 2 manual was a bit confusing. ZHL threw a curve with their pics of Parts B27 & B28. Step 35 and Step 40 are the only reference to the placement of these parts….which I screwed up. I glued two parts B27 & B28 together and attached them under the hole in the keel as pictured….figuring the lashing would have to be above these two pieces. I did notice all the way up in Step 80, here was instructions for boring out two holes and I knew I screwed up….I referred back to Jodie and Vic’s build and it confirmed my mistake….well, since I already glued in the two pieces, I had to make two of my own pieces from the scrap wood that would later be attached above these first installed pieces…the ones that were shown to be notched in Step 80.

I made two pieces from scrap wood and pre-notched the place where the U3 cord would pass when lashing up the bowspirit.

Here you can see I decided to position the bowspirit now rather than later. Also, it was easier to start the lashing this way without the railings completed, which would have hindered by access through those holes. The two rails G12 were installed as well as the two parts G13 at this point.


The lashing is tied off to the bowspirit and a base coat of brown acrylic was applied to the rails. There was no reference for the proper dowel to use for the bowspirit in the Pole 2 manual. I went to the Plan 2 1:1 scale fold-out and see that it was labeled Q3. The foremast was Q2 and both are 10mm wide. I did have to taper the bowspirit to fit into the hull of the ship as the hole was oblong and the dowel is round. I carefully tapered the bowspirit following the width according to the Plan 2 sketch. After proper fit, I glued it in and completed the lashing above.


The J3 & J4 rails attached from Starboard and Port sides.

Jodie was right, these rails are as brittle as uncooked spaghetti. After a few breaks, I got out the heat gun and positioned the rails very easily.

Now, I started to place the G9 pieces. While the plan shows 5 on each side of the ship, I chose to go with four.


The vertical posts are completed here with four posts on each side of the ship. I used some wood dough to smooth things out if there were some slight gaps. Applied a bit more base paint and started to work on the Angel figurehead.


i finished up the figurehead and added a darker finish coat to the rails along with some weathering…..


As I finished this log, big thunderstorms hit San Diego….a rare event….thunder, lightning, hail, and heavy rain…..

The bridge in the distance is the Coronado Bridge leading from the mainland to Coronado.
Ahoy mates….time for shore leave. Have a great weekend.
Rick
Build time today: 2 hour(s)
Total build time: 284 hours
Construction for the Black Pearl (All-Scenario version)
Personal note: Howdy mates! It’s been almost a month since my last Captain’s Log. No, I haven’t deserted the Black Pearl. I have experienced a real sad life event over the past few months. Watching a dear best friend, a retired RCMP, die from Stage 4 lung cancer! A detected nagging cough in a otherwise healthy 54-year old, led to his diagnosis in January….trust me, in my mind the real pandemic in the World is cancer, not Covid. This horrible disease took his life within 8 months. I just couldn’t motivate myself to build a model ship, while wrestling the grief I had for my dear friend. However, Wally was enjoying my build while he was fighting this horrible disease. I finally got moving again, as he would have wanted. This part of the build is for you Wally, and the Angel on my ship‘s bow is now laughing with you in Heaven.
Build guidelines:
The above parts were used to assemble the bowspirit, the bow railings, lashing & figurehead. Parts B27 & B28 (2 ea.), B31, C13 (2), C12 (2), G9 (10) for Starboard and Port rails, J13 (2 ea.), J14 (2 ea.), Q3 (10mm), U3 black rope. Part Z1 is a carved metal piece (Angel) not shown, which is the figurehead attached to the bowspirit!
Again, the kit‘s Pole 2 manual was a bit confusing. ZHL threw a curve with their pics of Parts B27 & B28. Step 35 and Step 40 are the only reference to the placement of these parts….which I screwed up. I glued two parts B27 & B28 together and attached them under the hole in the keel as pictured….figuring the lashing would have to be above these two pieces. I did notice all the way up in Step 80, here was instructions for boring out two holes and I knew I screwed up….I referred back to Jodie and Vic’s build and it confirmed my mistake….well, since I already glued in the two pieces, I had to make two of my own pieces from the scrap wood that would later be attached above these first installed pieces…the ones that were shown to be notched in Step 80.
I made two pieces from scrap wood and pre-notched the place where the U3 cord would pass when lashing up the bowspirit.
Here you can see I decided to position the bowspirit now rather than later. Also, it was easier to start the lashing this way without the railings completed, which would have hindered by access through those holes. The two rails G12 were installed as well as the two parts G13 at this point.
The lashing is tied off to the bowspirit and a base coat of brown acrylic was applied to the rails. There was no reference for the proper dowel to use for the bowspirit in the Pole 2 manual. I went to the Plan 2 1:1 scale fold-out and see that it was labeled Q3. The foremast was Q2 and both are 10mm wide. I did have to taper the bowspirit to fit into the hull of the ship as the hole was oblong and the dowel is round. I carefully tapered the bowspirit following the width according to the Plan 2 sketch. After proper fit, I glued it in and completed the lashing above.
The J3 & J4 rails attached from Starboard and Port sides.
Jodie was right, these rails are as brittle as uncooked spaghetti. After a few breaks, I got out the heat gun and positioned the rails very easily.
Now, I started to place the G9 pieces. While the plan shows 5 on each side of the ship, I chose to go with four.
The vertical posts are completed here with four posts on each side of the ship. I used some wood dough to smooth things out if there were some slight gaps. Applied a bit more base paint and started to work on the Angel figurehead.
i finished up the figurehead and added a darker finish coat to the rails along with some weathering…..
As I finished this log, big thunderstorms hit San Diego….a rare event….thunder, lightning, hail, and heavy rain…..
The bridge in the distance is the Coronado Bridge leading from the mainland to Coronado.
Ahoy mates….time for shore leave. Have a great weekend.
Rick
Last edited:

Can you see the Hotel from there? I hated those stupid posts on the rails. I broke them and did it over. Not very well, I might add.
- Joined
- Mar 1, 2021
- Messages
- 315
- Points
- 168
The Hotel Del would be to the left and out of this pic.Can you see the Hotel from there? I hated those stupid posts on the rails. I broke them and did it over. Not very well, I might add.
Hi Rick good to see you back on your Pearl The rails turned out well, I know how difficult they are to do. Your figure head looks pretty special good choice of colours it's good to see how all the Black Pearls have a personality of there own.
My bp wound up with a bowsprit 2cm short. I like the way Jodie did his.
- Joined
- Mar 1, 2021
- Messages
- 315
- Points
- 168
Vic, I thought Jodie’s was a great job too. I decided that would be best to climb that hill the next time.My bp wound up with a bowsprit 2cm short. I like the way Jodie did his.
- Joined
- Mar 1, 2021
- Messages
- 315
- Points
- 168
Thanks Tony….it’s like the old expression…”fall off the horse, get back on it”. Just slowing it down some and not worrying about it taking up hours of every day! Your sails are looking great….such fine work with all the knots, etc.Hi Rick good to see you back on your Pearl The rails turned out well, I know how difficult they are to do. Your figure head looks pretty special good choice of colours it's good to see how all the Black Pearls have a personality of there own.
Last edited:
- Joined
- Mar 1, 2021
- Messages
- 315
- Points
- 168
Captain’s Log…….October 12, 2021
Build time today: 1 hour(s)
Total build time: 298 hours
Construction for the Black Pearl (All-Scenario version)
Build guidelines: Well mates, I think this Captain has reached the point where following the Chinese instructions in proper sequence has long exhausted it’s useful purpose for me. I refer you to a different time and place and a character that we all might remember:

Yes, that would be Odd Job. I have recruited his help as I find myself skipping all over the Second Pole manual. I have endeavored to do a little bit of this and that, to break up the monotony of following a game plan and using my 298 hours of experience on this build so far to light up the ship….so in no special order and without further ado, here‘s what Odd Job and I have been working on.
 s Away:
Steps 62-65 in the Second Pole are directed toward the anchor assemblies.

Not much to note but you have to notch out Part G16 & G17 for the metal anchor to fit. Meticulous work bending the K6 & K7 bands and drilling for Y5 pins….the rest is just paint and detail.


Finished anchors.
Catheads:
I was fortunate to be able to follow the leads of Jodie and Vic. Jodie pointed out that the parts that go under Part I5 are two different sets at different angles:

All I could figure out is that you use the set which best works with the angle that applies to the Catheads on your ship. I followed Jodie’s lead and cut the relief down to deck level and drilled 4 holes instead of rectangular slots. Here’s a look from three different angles!


Well, I’ll take a few more pics and my next Log will show some work on the stern ornaments.
Ahoy all,
Rick
Build time today: 1 hour(s)
Total build time: 298 hours
Construction for the Black Pearl (All-Scenario version)
Build guidelines: Well mates, I think this Captain has reached the point where following the Chinese instructions in proper sequence has long exhausted it’s useful purpose for me. I refer you to a different time and place and a character that we all might remember:
Yes, that would be Odd Job. I have recruited his help as I find myself skipping all over the Second Pole manual. I have endeavored to do a little bit of this and that, to break up the monotony of following a game plan and using my 298 hours of experience on this build so far to light up the ship….so in no special order and without further ado, here‘s what Odd Job and I have been working on.
s Away: Steps 62-65 in the Second Pole are directed toward the anchor assemblies.
Not much to note but you have to notch out Part G16 & G17 for the metal anchor to fit. Meticulous work bending the K6 & K7 bands and drilling for Y5 pins….the rest is just paint and detail.
Finished anchors.
Catheads:
I was fortunate to be able to follow the leads of Jodie and Vic. Jodie pointed out that the parts that go under Part I5 are two different sets at different angles:
All I could figure out is that you use the set which best works with the angle that applies to the Catheads on your ship. I followed Jodie’s lead and cut the relief down to deck level and drilled 4 holes instead of rectangular slots. Here’s a look from three different angles!
Well, I’ll take a few more pics and my next Log will show some work on the stern ornaments.
Ahoy all,
Rick
- Joined
- Mar 1, 2021
- Messages
- 315
- Points
- 168
Captain’s Log (2)…….October 12, 2021
Build time today: 1 hour(s)
Total build time: 298 hours
Construction for the Black Pearl (All-Scenario version)
Build guidelines: I kept looking at all those metal ornaments and decorations in the ship’s kit and decided to paint some of them up and work on the stern some. I started with a base coat of white acrylic…and then toned it down some with a wash of brown acrylic…then accented with a touch of gold. Matched up to the figurehead on the bowspirit! Here are some pics:


I added a touch of color (red) to the deck by painting the statues leading into the Captain’s Cabin. I made a mistake by not setting the gas lamps further away from the doors so I found a couple of wooden beads and used them for the bases. Added a bit of gold accent. Also, added the accent rope to the main and fore masts, and lightly stained the masts….which are not permanently set at this stage.

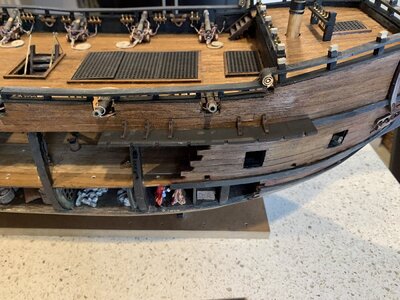
For those of you mates that have followed my build from the beginning, you know that I want my finished model to be a conversation piece and not a static hunk of wood on a base. So, rather than plank the port side closed, I decided to keep the side of the hull open/closed by making the panel removable.


On the Starboard side of the ship, I decided to not run the Whales plank over the open hull where it wasn’t necessary, only up to where the hull ends. For my two cents, this allows a better view into the Captain’s Quarters and the gun deck.


In my next log, I’ll detail the fun I had trying to build the three rowboats…peek below to see the one I finished on the left. I’ll do my best to walk you through this cursed event I. The next Log.

Ahoy all,
Rick
Build time today: 1 hour(s)
Total build time: 298 hours
Construction for the Black Pearl (All-Scenario version)
Build guidelines: I kept looking at all those metal ornaments and decorations in the ship’s kit and decided to paint some of them up and work on the stern some. I started with a base coat of white acrylic…and then toned it down some with a wash of brown acrylic…then accented with a touch of gold. Matched up to the figurehead on the bowspirit! Here are some pics:
I added a touch of color (red) to the deck by painting the statues leading into the Captain’s Cabin. I made a mistake by not setting the gas lamps further away from the doors so I found a couple of wooden beads and used them for the bases. Added a bit of gold accent. Also, added the accent rope to the main and fore masts, and lightly stained the masts….which are not permanently set at this stage.
For those of you mates that have followed my build from the beginning, you know that I want my finished model to be a conversation piece and not a static hunk of wood on a base. So, rather than plank the port side closed, I decided to keep the side of the hull open/closed by making the panel removable.
On the Starboard side of the ship, I decided to not run the Whales plank over the open hull where it wasn’t necessary, only up to where the hull ends. For my two cents, this allows a better view into the Captain’s Quarters and the gun deck.
In my next log, I’ll detail the fun I had trying to build the three rowboats…peek below to see the one I finished on the left. I’ll do my best to walk you through this cursed event I. The next Log.
Ahoy all,
Rick
Attachments
Last edited:
I’m sorry, but those boats were not fun! I’m liking the looks so far. I think the anchor rings have twine wrapped around them.Captain’s Log (2)…….October 12, 2021
Build time today: 1 hour(s)
Total build time: 298 hours
Construction for the Black Pearl (All-Scenario version)
Build guidelines: I kept looking at all those metal ornaments and decorations in the ship’s kit and decided to paint some of them up and work on the stern some. I started with a base coat of white acrylic…and then toned it down some with a wash of brown acrylic…then accented with a touch of gold. Matched up to the figurehead on the bowspirit! Here are some pics:
View attachment 261930View attachment 261931View attachment 261932
I added a touch of color (red) to the deck by painting the statues leading into the Captain’s Cabin. I made a mistake by not setting the gas lamps further away from the doors so I found a couple of wooden beads and used them for the bases. Added a bit of gold accent. Also, added the accent rope to the main and fore masts, and lightly stained the masts….which are not permanently set at this stage.
View attachment 261933
For those of you mates that have followed my build from the beginning, you know that I want my finished model to be a conversation piece and not a static hunk of wood on a base. So, rather than plank the port side closed, I decided to keep the side of the hull open/closed by making the panel removable.
View attachment 261934View attachment 261935
In my next log, I’ll detail the fun I had trying to build the three rowboats…peek below to see the one I finished on the left. I’ll do my best to walk you through this cursed event I. The next Log.
View attachment 261936
Ahoy all,
Rick
- Joined
- Mar 1, 2021
- Messages
- 315
- Points
- 168
Vic, I’ll refer back to your build. Thanks! Tell the Admiral we said hi!I’m sorry, but those boats were not fun! I’m liking the looks so far. I think the anchor rings have twine wrapped around them.
She's in Omaha visiting the kids at the moment. I'll probably have more build time on my Soleil Royal now.Vic, I’ll refer back to your build. Thanks! Tell the Admiral we said hi!
Vic, I’ll refer back to your build. Thanks! Tell the Admiral we said hi!
- Joined
- Mar 1, 2021
- Messages
- 315
- Points
- 168
Travel has been crazy with all these airlines. My mother-in-law has a Southwest flight back to San Diego on Saturday….hopefully, it won’t be cancelled!She's in Omaha visiting the kids at the moment. I'll probably have more build time on my Soleil Royal now.
Last edited: