Hey Rick, I love how you have had a fun time with this build. I'll take a lesson!
-

Win a Free Custom Engraved Brass Coin!!!
As a way to introduce our brass coins to the community, we will raffle off a free coin during the month of August. Follow link ABOVE for instructions for entering.
-

PRE-ORDER SHIPS IN SCALE TODAY!
The beloved Ships in Scale Magazine is back and charting a new course for 2026!
Discover new skills, new techniques, and new inspirations in every issue.
NOTE THAT OUR FIRST ISSUE WILL BE JAN/FEB 2026
You are using an out of date browser. It may not display this or other websites correctly.
You should upgrade or use an alternative browser.
You should upgrade or use an alternative browser.
Black Pearl 1:50 ZHL All-Scenario version
- Thread starter Ahoy All
- Start date
- Watchers 25
-
- Tags
- black pearl zhl
You’re having a lot of fun there, Rick!
- Joined
- Mar 1, 2021
- Messages
- 315
- Points
- 168

Hi Paul....from the beginning I wanted to make my build a bit educational for a novice and also a bit entertaining. The Black Pearl is a fictional ship and beauty lies in the eye of the beholder. Yes, it has been quite fun. Never thought I would get this far.Hey Rick, I love how you have had a fun time with this build. I'll take a lesson!
- Joined
- Mar 1, 2021
- Messages
- 315
- Points
- 168

Yo Vic....it's been 4 months in and 250+ hours....never thought I would make it this far....will work on the railings and perhaps the stairs this month....on a bit of a lighter schedule coming up....family coming in at the end of August for a couple weeks so that will be down time....once I get to the rigging, I'll take a bit of time off to study up on all the great advice here and read a bit more. Not sure how well I'll do from that point forward....but perhaps I can at least make it look somewhat authentic.You’re having a lot of fun there, Rick!
There is so much to learn about rigging. I just went with what the kit said. During the later stages of the Connie, I experimented a tried to add some realism. I learned a lot in that process and read up on more. I had to learn the terminology before I could gain more understanding. Donnie has some good stuff online. I also subscribed to Model Ship Building for Dummies. There are a lot of videos I’ve watched.
- Joined
- Apr 20, 2020
- Messages
- 6,242
- Points
- 738

great progress, it's looks beautifulCaptain's Log ~~~ July 31, 2021 (Part 2)
Build time today: 1.5 hour(s)
Total build time: 256 hours
Construction for the Black Pearl (All-Scenario version)
Build guidelines: Mates the varnish is dry and I'll try to show you around the ship. The guns and the puppets are not in place or finished. I just placed them around so you could get an idea of how the colors mix with the browns and blacks of the ship. NOTE: I am an awful photographer. All these pics are from my iPhone and the lighting above my pool table casts an orange hue...the actual colors in normal lighting are more rich and toward brown rather than orange. Also, there are 4 switches in this ship setup so far:
Switch 1: (lower deck on top of barrel) Controls lights on lower deck.
Switch 2: (gun deck attached to a bulwark) Controls lights on gun deck.
Switch 3: (inside entrance of Captain's Quarters-right) Controls outside
entrance lanterns and the lantern on the round table.
Switch 4: (Inside entrance of Captain's Quarters-left) Controls inside
lanterns of the Captain's Quarters.
Two sets of leads still remain....one outside the rear Stern Cabin and the other coming up from the mizzenmast hole. The one set will control the following switch:
Switch 5: Will control the three large exterior Stern lamps.
The remaining lead is an auxiliary for now.....may or may not use it.
I plan to do a video of the lighting portion of my ship because I can get many different visual effects. Since these lamp (LED's) work off of a remote control and with AC Power, I don't have to worry about batteries draining or moving anything around once the ship is on the base and the coffin is mounted to make contacts with the two leads within the keel. The remote allows me to dim the decks separately from the Captain's Cabin and there is 4 levels of bright to dim. So, as you can see there are many combinations with the switches and the dimmer from the remote to give you the lighting effect you like the most.
Onward to some of the pics and again, my apologies for such weak photos of the work.
Captain Quarters skylight in place:
View attachment 247184
Two coats of satin polyurethane drying out. Bottom in Ebony, the rest in Golden Oak.
View attachment 247185View attachment 247186
View attachment 247187View attachment 247188View attachment 247189
View attachment 247190View attachment 247191
View attachment 247193
Here's a look on how the dimmer gives a different effect. Brightest on left, dimmest on right. Two in-between.
View attachment 247194View attachment 247195
Mates in the 5 hammocks.....Captured captain and his lady on the right
View attachment 247196View attachment 247197
Peeking into the Captain's Quarter and spying the treasure map.
View attachment 247198View attachment 247200
Ghost of Jack Sparrow much clearer than pic depicts.
View attachment 247201View attachment 247202View attachment 247203
View attachment 247204View attachment 247205
View attachment 247206View attachment 247207
View attachment 247208
Next week we'll start putting in railings and the stairs from the gun deck to the main deck..
- Joined
- Mar 1, 2021
- Messages
- 315
- Points
- 168

Hello mate….thanks for the kind words and welcome aboard my thread! Can always use new deck mates who can offer advice and friendly banter! Be well and enjoy the adventure here!great progress, it's looks beautiful
Lighting looks great Rick, and nice work on the roof of the stern gallerey. Nice to be able to move to a different part of the build.
- Joined
- Mar 1, 2021
- Messages
- 315
- Points
- 168

Thanks Jodie…..keep the input on the rigging coming! I am a student of your work! Be well and have a great week! And thanks again for helping me with the lighting by providing me the extra lamps!Lighting looks great Rick, and nice work on the roof of the stern gallerey. Nice to be able to move to a different part of the build.
- Joined
- Mar 1, 2021
- Messages
- 315
- Points
- 168

Captain's Log ~~~ August 6, 2021
Build time today: 1 hour(s)
Total build time: 267 hours
Construction for the Black Pearl (All-Scenario version)
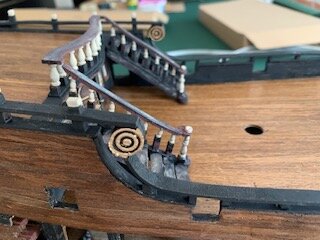
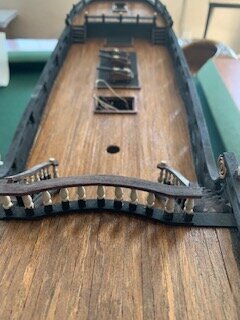
Build guidelines: The past week I have labored for 11 hours on the primary rails around the ship, the deck bannisters, and the staircases. Parts A11 & A12 are the curved pieces below and are fitted together. I aligned the bottom piece with the deck formation above the staircase and the top A11 piece has a slight setback. Parts H2 & X1 are the pieces that make up the balusters and Part B8 makes up the top rail. The railing around the deck is pretty self-explanatory so I won’t detail much here other than the fact to make sure you are using the correct size rail posts in the right places.
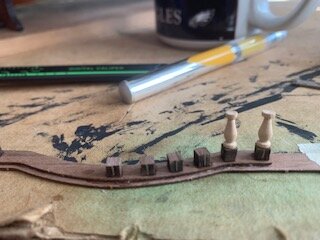
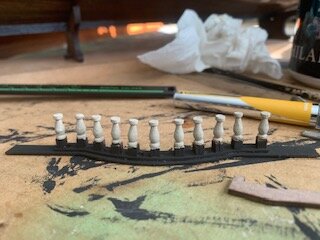
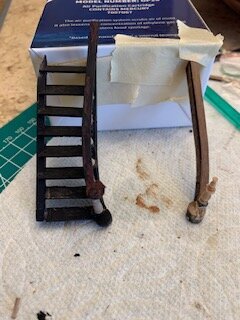
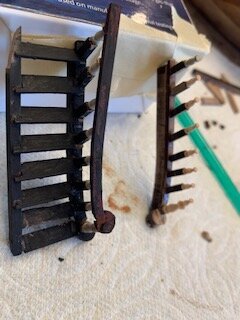
Now if you seek great guidance for building the two staircases I would advise you to check out @MystRacing and read Jodie’s write up and design instructions. For my part, I did a lot of guessing and simple scratch building. Below is how I build my right staircase. I figured I would use 7 balusters and 1 larger baluster mounted on top of two round bases. A small cutout of 1/4 of each round allowed for a post to mount in position to which I glued the large baluster to. Also, I glued the thinner curved piece to the top of the thicker curved base piece with a slight setback for the top piece that would meet the top rail of the staircase that was built above.
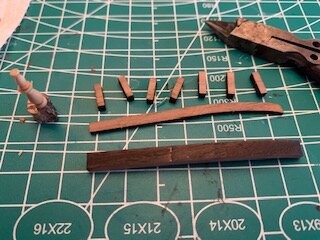
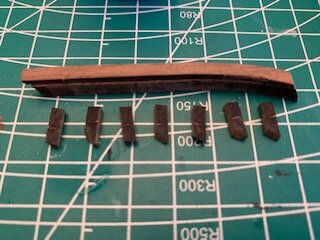
I roughly approximated the position of each stairwell and built them to match. I did not make my staircase wider with each step. I used some scrap wood and made the two bottom steps to each stairwell to accommodate the slight curve. Also, the small ornate pieces were glued to the top of the square balusters which I lightly sanded to align with a proper angle to the stairs
I painted the stairs ebony and then smeared brown and ash acrylic paint over them to give a weathered look. Below is the finished look and also you can see the stairs from the gun deck to the main deck and the two smaller stairs to the bow.
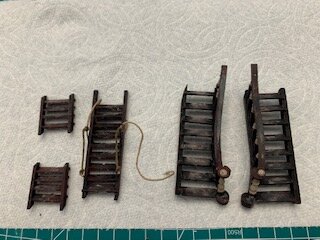
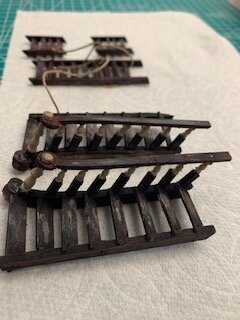
The staircases are not glued in here but give you a look at their appearance in relation to their alignment to the top rail and the supporting Part A12. I was actually surprised that the upper rails align perfectly and so does the top of the step sides. The remaining pics are a look at some of the side rails. I still have some weathering of the black rails to do to soften their appearance but they are finally in place and all done.
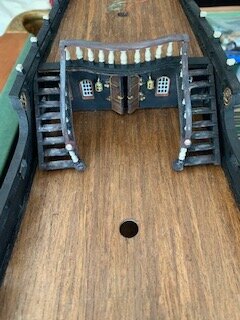
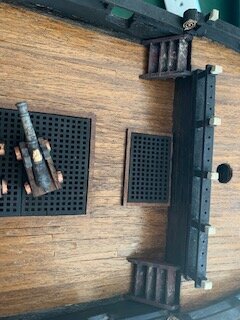
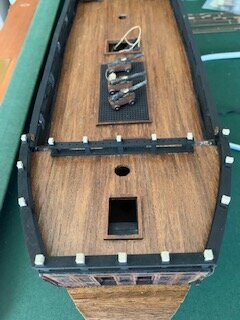
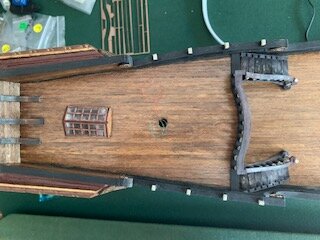
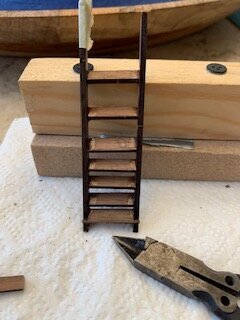
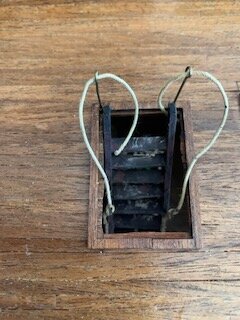
I had to completely scratch build the ladder from the gun deck to the main deck because I didn’t have enough step pieces….all that’s left to do is tie off the rope to the two pins.
Well mates another week has passed….enjoy shore leave this weekend and enjoy some rum. Sail straight and be well.
Ahoy all,
Rick
Build time today: 1 hour(s)
Total build time: 267 hours
Construction for the Black Pearl (All-Scenario version)
Build guidelines: The past week I have labored for 11 hours on the primary rails around the ship, the deck bannisters, and the staircases. Parts A11 & A12 are the curved pieces below and are fitted together. I aligned the bottom piece with the deck formation above the staircase and the top A11 piece has a slight setback. Parts H2 & X1 are the pieces that make up the balusters and Part B8 makes up the top rail. The railing around the deck is pretty self-explanatory so I won’t detail much here other than the fact to make sure you are using the correct size rail posts in the right places.


Now if you seek great guidance for building the two staircases I would advise you to check out @MystRacing and read Jodie’s write up and design instructions. For my part, I did a lot of guessing and simple scratch building. Below is how I build my right staircase. I figured I would use 7 balusters and 1 larger baluster mounted on top of two round bases. A small cutout of 1/4 of each round allowed for a post to mount in position to which I glued the large baluster to. Also, I glued the thinner curved piece to the top of the thicker curved base piece with a slight setback for the top piece that would meet the top rail of the staircase that was built above.


I roughly approximated the position of each stairwell and built them to match. I did not make my staircase wider with each step. I used some scrap wood and made the two bottom steps to each stairwell to accommodate the slight curve. Also, the small ornate pieces were glued to the top of the square balusters which I lightly sanded to align with a proper angle to the stairs


I painted the stairs ebony and then smeared brown and ash acrylic paint over them to give a weathered look. Below is the finished look and also you can see the stairs from the gun deck to the main deck and the two smaller stairs to the bow.


The staircases are not glued in here but give you a look at their appearance in relation to their alignment to the top rail and the supporting Part A12. I was actually surprised that the upper rails align perfectly and so does the top of the step sides. The remaining pics are a look at some of the side rails. I still have some weathering of the black rails to do to soften their appearance but they are finally in place and all done.


I had to completely scratch build the ladder from the gun deck to the main deck because I didn’t have enough step pieces….all that’s left to do is tie off the rope to the two pins.


Well mates another week has passed….enjoy shore leave this weekend and enjoy some rum. Sail straight and be well.
Ahoy all,
Rick
- Joined
- Apr 20, 2020
- Messages
- 6,242
- Points
- 738

Dear RickCaptain's Log ~~~ August 6, 2021
Build time today: 1 hour(s)
Total build time: 267 hours
Construction for the Black Pearl (All-Scenario version)
Build guidelines: The past week I have labored for 11 hours on the primary rails around the ship, the deck bannisters, and the staircases. Parts A11 & A12 are the curved pieces below and are fitted together. I aligned the bottom piece with the deck formation above the staircase and the top A11 piece has a slight setback. Parts H2 & X1 are the pieces that make up the balusters and Part B8 makes up the top rail. The railing around the deck is pretty self-explanatory so I won’t detail much here other than the fact to make sure you are using the correct size rail posts in the right places.
View attachment 248445View attachment 248446
Now if you seek great guidance for building the two staircases I would advise you to check out @MystRacing and read Jodie’s write up and design instructions. For my part, I did a lot of guessing and simple scratch building. Below is how I build my right staircase. I figured I would use 7 balusters and 1 larger baluster mounted on top of two round bases. A small cutout of 1/4 of each round allowed for a post to mount in position to which I glued the large baluster to. Also, I glued the thinner curved piece to the top of the thicker curved base piece with a slight setback for the top piece that would meet the top rail of the staircase that was built above.
View attachment 248447View attachment 248448
I roughly approximated the position of each stairwell and built them to match. I did not make my staircase wider with each step. I used some scrap wood and made the two bottom steps to each stairwell to accommodate the slight curve. Also, the small ornate pieces were glued to the top of the square balusters which I lightly sanded to align with a proper angle to the stairs
View attachment 248449View attachment 248450
I painted the stairs ebony and then smeared brown and ash acrylic paint over them to give a weathered look. Below is the finished look and also you can see the stairs from the gun deck to the main deck and the two smaller stairs to the bow.
View attachment 248451View attachment 248452
The staircases are not glued in here but give you a look at their appearance in relation to their alignment to the top rail and the supporting Part A12. I was actually surprised that the upper rails align perfectly and so does the top of the step sides. The remaining pics are a look at some of the side rails. I still have some weathering of the black rails to do to soften their appearance but they are finally in place and all done.
View attachment 248453View attachment 248454
View attachment 248455View attachment 248456
View attachment 248457View attachment 248458
I had to completely scratch build the ladder from the gun deck to the main deck because I didn’t have enough step pieces….all that’s left to do is tie off the rope to the two pins.
View attachment 248460View attachment 248461
Well mates another week has passed….enjoy shore leave this weekend and enjoy some rum. Sail straight and be well.
Ahoy all,
Rick
wonderful work, the results are so beautiful

Enjoying your build, Rick!Captain's Log ~~~ August 6, 2021
Build time today: 1 hour(s)
Total build time: 267 hours
Construction for the Black Pearl (All-Scenario version)
Build guidelines: The past week I have labored for 11 hours on the primary rails around the ship, the deck bannisters, and the staircases. Parts A11 & A12 are the curved pieces below and are fitted together. I aligned the bottom piece with the deck formation above the staircase and the top A11 piece has a slight setback. Parts H2 & X1 are the pieces that make up the balusters and Part B8 makes up the top rail. The railing around the deck is pretty self-explanatory so I won’t detail much here other than the fact to make sure you are using the correct size rail posts in the right places.
View attachment 248445View attachment 248446
Now if you seek great guidance for building the two staircases I would advise you to check out @MystRacing and read Jodie’s write up and design instructions. For my part, I did a lot of guessing and simple scratch building. Below is how I build my right staircase. I figured I would use 7 balusters and 1 larger baluster mounted on top of two round bases. A small cutout of 1/4 of each round allowed for a post to mount in position to which I glued the large baluster to. Also, I glued the thinner curved piece to the top of the thicker curved base piece with a slight setback for the top piece that would meet the top rail of the staircase that was built above.
View attachment 248447View attachment 248448
I roughly approximated the position of each stairwell and built them to match. I did not make my staircase wider with each step. I used some scrap wood and made the two bottom steps to each stairwell to accommodate the slight curve. Also, the small ornate pieces were glued to the top of the square balusters which I lightly sanded to align with a proper angle to the stairs
View attachment 248449View attachment 248450
I painted the stairs ebony and then smeared brown and ash acrylic paint over them to give a weathered look. Below is the finished look and also you can see the stairs from the gun deck to the main deck and the two smaller stairs to the bow.
View attachment 248451View attachment 248452
The staircases are not glued in here but give you a look at their appearance in relation to their alignment to the top rail and the supporting Part A12. I was actually surprised that the upper rails align perfectly and so does the top of the step sides. The remaining pics are a look at some of the side rails. I still have some weathering of the black rails to do to soften their appearance but they are finally in place and all done.
View attachment 248453View attachment 248454
View attachment 248455View attachment 248456
View attachment 248457View attachment 248458
I had to completely scratch build the ladder from the gun deck to the main deck because I didn’t have enough step pieces….all that’s left to do is tie off the rope to the two pins.
View attachment 248460View attachment 248461
Well mates another week has passed….enjoy shore leave this weekend and enjoy some rum. Sail straight and be well.
Ahoy all,
Rick
Thank you for sharing your work with us Rick. You're doing a fine job!
Great work on the stairs I found the centre ones very tricky, just in case you are unaware fix the two cannons under the stairs before gluing the stairs in place.Captain's Log ~~~ August 6, 2021
Build time today: 1 hour(s)
Total build time: 267 hours
Construction for the Black Pearl (All-Scenario version)
Build guidelines: The past week I have labored for 11 hours on the primary rails around the ship, the deck bannisters, and the staircases. Parts A11 & A12 are the curved pieces below and are fitted together. I aligned the bottom piece with the deck formation above the staircase and the top A11 piece has a slight setback. Parts H2 & X1 are the pieces that make up the balusters and Part B8 makes up the top rail. The railing around the deck is pretty self-explanatory so I won’t detail much here other than the fact to make sure you are using the correct size rail posts in the right places.
View attachment 248445View attachment 248446
Now if you seek great guidance for building the two staircases I would advise you to check out @MystRacing and read Jodie’s write up and design instructions. For my part, I did a lot of guessing and simple scratch building. Below is how I build my right staircase. I figured I would use 7 balusters and 1 larger baluster mounted on top of two round bases. A small cutout of 1/4 of each round allowed for a post to mount in position to which I glued the large baluster to. Also, I glued the thinner curved piece to the top of the thicker curved base piece with a slight setback for the top piece that would meet the top rail of the staircase that was built above.
View attachment 248447View attachment 248448
I roughly approximated the position of each stairwell and built them to match. I did not make my staircase wider with each step. I used some scrap wood and made the two bottom steps to each stairwell to accommodate the slight curve. Also, the small ornate pieces were glued to the top of the square balusters which I lightly sanded to align with a proper angle to the stairs
View attachment 248449View attachment 248450
I painted the stairs ebony and then smeared brown and ash acrylic paint over them to give a weathered look. Below is the finished look and also you can see the stairs from the gun deck to the main deck and the two smaller stairs to the bow.
View attachment 248451View attachment 248452
The staircases are not glued in here but give you a look at their appearance in relation to their alignment to the top rail and the supporting Part A12. I was actually surprised that the upper rails align perfectly and so does the top of the step sides. The remaining pics are a look at some of the side rails. I still have some weathering of the black rails to do to soften their appearance but they are finally in place and all done.
View attachment 248453View attachment 248454
View attachment 248455View attachment 248456
View attachment 248457View attachment 248458
I had to completely scratch build the ladder from the gun deck to the main deck because I didn’t have enough step pieces….all that’s left to do is tie off the rope to the two pins.
View attachment 248460View attachment 248461
Well mates another week has passed….enjoy shore leave this weekend and enjoy some rum. Sail straight and be well.
Ahoy all,
Rick
- Joined
- Mar 1, 2021
- Messages
- 315
- Points
- 168

Yep Tony, I'll be working on the main deck guns this week and will follow your input. Thanks!Great work on the stairs I found the centre ones very tricky, just in case you are unaware fix the two cannons under the stairs before gluing the stairs in place.
Last edited:
- Joined
- Mar 1, 2021
- Messages
- 315
- Points
- 168

Captain's Log ~~~ August 27, 2021
Build time today: 0 hour(s)
Total build time: 278 hours
Construction for the Black Pearl (All-Scenario version)
Build guidelines: Well, ahoy mates. The Captain is still alive. I see its been three weeks since the last log. As I started the 2nd pole of the Black Pearl back then, I only sailed around eleven hours on this ship in the past 21 days. The Admiral has been very demanding. So much to do in the summer....ship building is better suited for the fall and winter. But I happened to have a pile of pics to share with you on how things are looking up.
At the very least, I would say my progress is complete through Steps 1-34 of the 2nd pole. (with a few more for good measure) I finished up making 12 more guns for the main deck. I still have to do some minor detail work on them but they are glued into position and other than completing the cannon balls and some rods and bars....that is part is complete. With the guns in place, I have also placed the main stairs and completed the bow steps and main deck stairs.
There isn't much to discuss as most of the above steps were pretty self explanatory. However, I did have a bit of time with making the Capstan for the main mast. Of course the Steps to make the Capstan are in both Pole books...so you have to do some digging and even though I followed the plans, I believe the manuals have the parts labeled wrong and I had to do some jury rigging. Part H17 serves as the base of the Capstan and of course it wouldn't fit down the main mast....so some filing is called for...
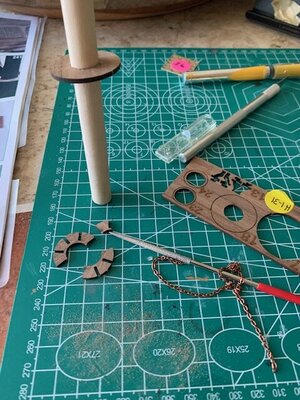
So, looking at Part H20 above, which I broke....herein begins the Chinese puzzle to where Parts, pics and Steps don't make sense...while 1st Pole book shows Part H20 as the piece that is to go on top of Part H17, the Part above looks like it should be Part H21, not Part H20....so when I realized it didn't look right when compared to the pic on Step 244 of the 1st pole...I knew I was in trouble because I already started working from the base up and glued it in place with super glue.
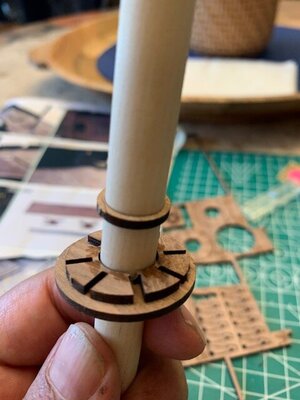
When I referenced the Parts diagrams identifying the parts....for some odd reason the Capstan pieces showed numbers but no sketch of the parts....odd right? So, it seemed logical to me that Part 20 in my kit should have been at the top of the Capstan for the bars to slot into. Not at the bottom as I placed it.
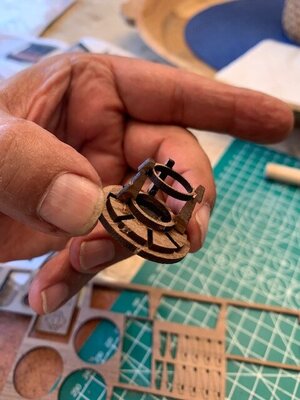
Its almost impossible to build the Capstan without it being mounted onto the mast. So, I marked the mast figuring the glue would make it almost permanent and impossible to remove.
Hint: Always cut out the parts from their frames.....its so easy to break them.
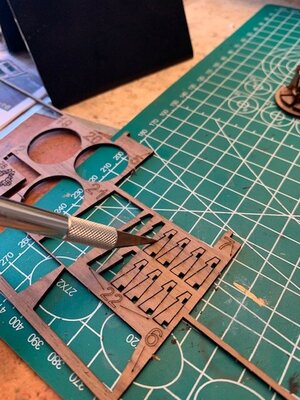
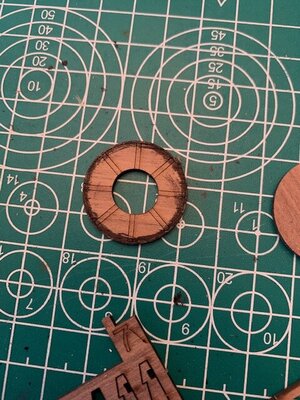
The above part which I believe should have been Part 20 but was labeled Part 21 had to be sanded down in size. I marked it and used my belt sander to make it smaller than the two discs it was sandwiched between at the top of the Capstan.
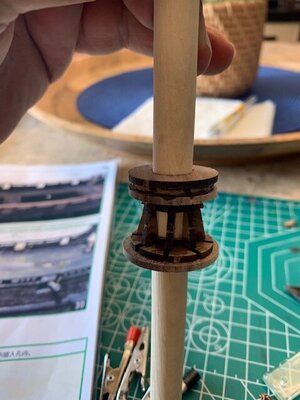
Here is the Capstan mounted onto the Main Mast.
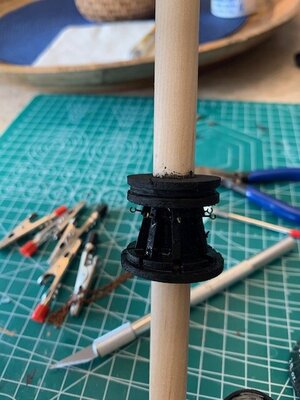
A coat of black acrylic and the hooks for the chain were set into place after drilling small holes for them. The bars that go around the Capstan are square and are recommended to be sanded round. Why do that? I drilled holes and used toothpicks that are already round, right?
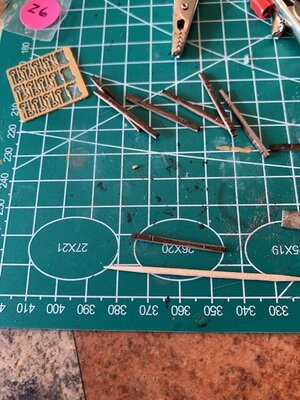
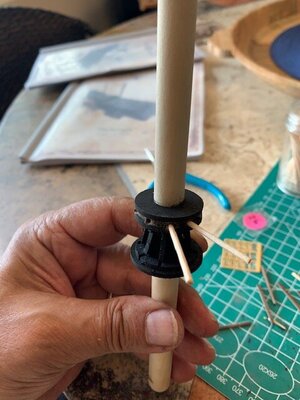
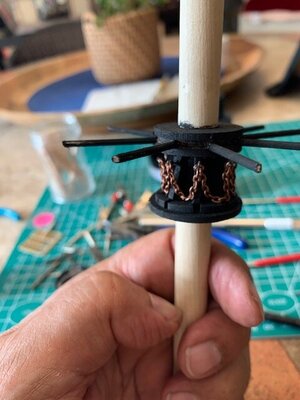
The Captan in place on the main mast from the deck. I did not glue them in because I figured they would get in the way when I did the rigging. So, for now they are temporary.
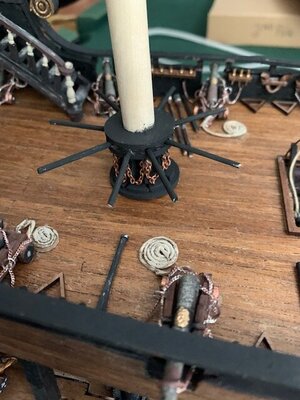
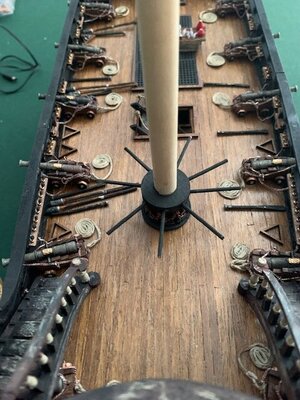
Mates, I have a lot of detail work to complete....I want to weather the rails and have to finish some embellishments on the guns and finish their accessories. However, I'll share some pics for you to get a better look at things. Truthfully, the pics don't do the ship justice. I'm a horrible photographer and much of what you will see is not where things will be when this ship is completed. One, I don't know if I like all the colors of the food stuffs on the tables. Reminds me of a B&W cartoon that has gone through some colorization. None of the puppets are glued in, just on the deck. The ships bell is not in yet here either. The eight gun deck cannons are not glued in and will be removable so I can flip up the deck to better show the lower deck puppets. These cannot will become part of a base that I will further design, to be moved interchangeable to the base and ship as desired. I have two sets of wires leading up to the rear lights and the mizzen mast for further enhancements. Now, here are some pics.

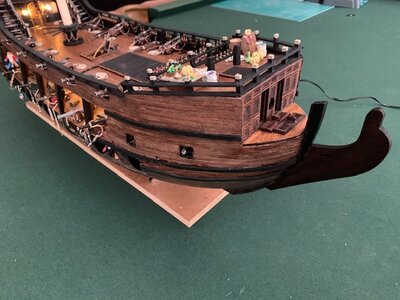
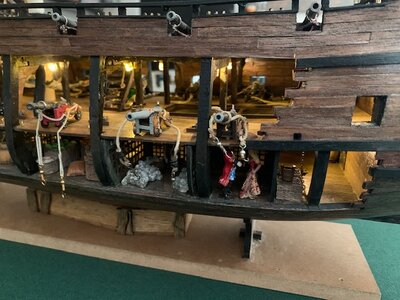

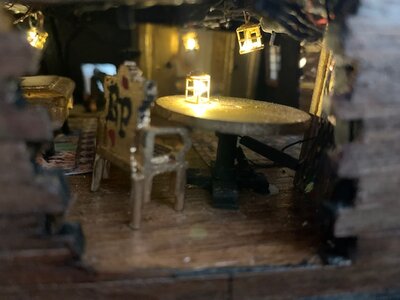
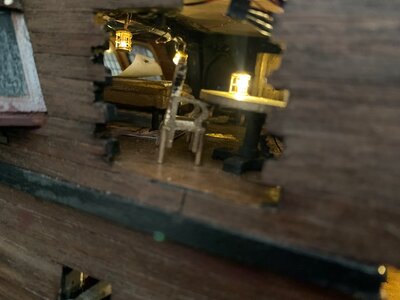
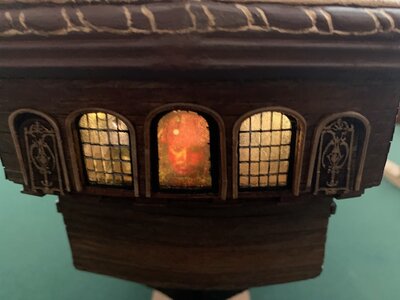
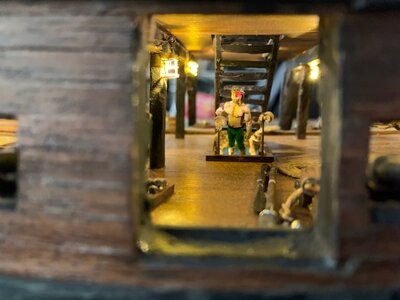
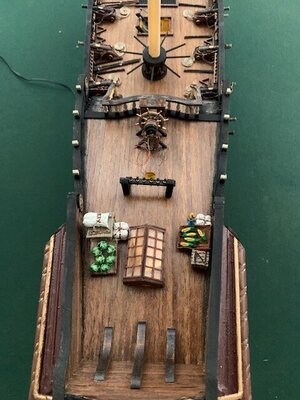
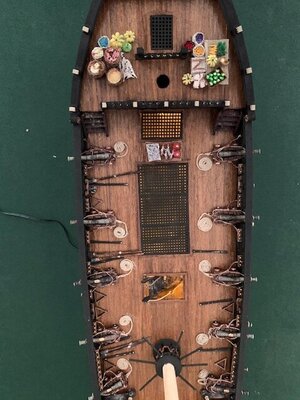
The next part of the build moves forward to the bow. Steps 35-51 will be next on the schedule. Family and friends are a big part of our plans leading up to Labor Day so the Captain's Log will be a bit slow through mid-September. With almost 280 hours in, I would have never thought to have made it this far.
Stick with me mates....I need you to help me make it through.
Happy Labor Day and Ahoy all!
Rick
Build time today: 0 hour(s)
Total build time: 278 hours
Construction for the Black Pearl (All-Scenario version)
Build guidelines: Well, ahoy mates. The Captain is still alive. I see its been three weeks since the last log. As I started the 2nd pole of the Black Pearl back then, I only sailed around eleven hours on this ship in the past 21 days. The Admiral has been very demanding. So much to do in the summer....ship building is better suited for the fall and winter. But I happened to have a pile of pics to share with you on how things are looking up.
At the very least, I would say my progress is complete through Steps 1-34 of the 2nd pole. (with a few more for good measure) I finished up making 12 more guns for the main deck. I still have to do some minor detail work on them but they are glued into position and other than completing the cannon balls and some rods and bars....that is part is complete. With the guns in place, I have also placed the main stairs and completed the bow steps and main deck stairs.
There isn't much to discuss as most of the above steps were pretty self explanatory. However, I did have a bit of time with making the Capstan for the main mast. Of course the Steps to make the Capstan are in both Pole books...so you have to do some digging and even though I followed the plans, I believe the manuals have the parts labeled wrong and I had to do some jury rigging. Part H17 serves as the base of the Capstan and of course it wouldn't fit down the main mast....so some filing is called for...

So, looking at Part H20 above, which I broke....herein begins the Chinese puzzle to where Parts, pics and Steps don't make sense...while 1st Pole book shows Part H20 as the piece that is to go on top of Part H17, the Part above looks like it should be Part H21, not Part H20....so when I realized it didn't look right when compared to the pic on Step 244 of the 1st pole...I knew I was in trouble because I already started working from the base up and glued it in place with super glue.

When I referenced the Parts diagrams identifying the parts....for some odd reason the Capstan pieces showed numbers but no sketch of the parts....odd right? So, it seemed logical to me that Part 20 in my kit should have been at the top of the Capstan for the bars to slot into. Not at the bottom as I placed it.

Its almost impossible to build the Capstan without it being mounted onto the mast. So, I marked the mast figuring the glue would make it almost permanent and impossible to remove.
Hint: Always cut out the parts from their frames.....its so easy to break them.


The above part which I believe should have been Part 20 but was labeled Part 21 had to be sanded down in size. I marked it and used my belt sander to make it smaller than the two discs it was sandwiched between at the top of the Capstan.

Here is the Capstan mounted onto the Main Mast.

A coat of black acrylic and the hooks for the chain were set into place after drilling small holes for them. The bars that go around the Capstan are square and are recommended to be sanded round. Why do that? I drilled holes and used toothpicks that are already round, right?


The Captan in place on the main mast from the deck. I did not glue them in because I figured they would get in the way when I did the rigging. So, for now they are temporary.


Mates, I have a lot of detail work to complete....I want to weather the rails and have to finish some embellishments on the guns and finish their accessories. However, I'll share some pics for you to get a better look at things. Truthfully, the pics don't do the ship justice. I'm a horrible photographer and much of what you will see is not where things will be when this ship is completed. One, I don't know if I like all the colors of the food stuffs on the tables. Reminds me of a B&W cartoon that has gone through some colorization. None of the puppets are glued in, just on the deck. The ships bell is not in yet here either. The eight gun deck cannons are not glued in and will be removable so I can flip up the deck to better show the lower deck puppets. These cannot will become part of a base that I will further design, to be moved interchangeable to the base and ship as desired. I have two sets of wires leading up to the rear lights and the mizzen mast for further enhancements. Now, here are some pics.


The next part of the build moves forward to the bow. Steps 35-51 will be next on the schedule. Family and friends are a big part of our plans leading up to Labor Day so the Captain's Log will be a bit slow through mid-September. With almost 280 hours in, I would have never thought to have made it this far.
Stick with me mates....I need you to help me make it through.
Happy Labor Day and Ahoy all!
Rick
- Joined
- Apr 20, 2020
- Messages
- 6,242
- Points
- 738

Dear RickCaptain's Log ~~~ August 27, 2021
Build time today: 0 hour(s)
Total build time: 278 hours
Construction for the Black Pearl (All-Scenario version)
Build guidelines: Well, ahoy mates. The Captain is still alive. I see its been three weeks since the last log. As I started the 2nd pole of the Black Pearl back then, I only sailed around eleven hours on this ship in the past 21 days. The Admiral has been very demanding. So much to do in the summer....ship building is better suited for the fall and winter. But I happened to have a pile of pics to share with you on how things are looking up.
At the very least, I would say my progress is complete through Steps 1-34 of the 2nd pole. (with a few more for good measure) I finished up making 12 more guns for the main deck. I still have to do some minor detail work on them but they are glued into position and other than completing the cannon balls and some rods and bars....that is part is complete. With the guns in place, I have also placed the main stairs and completed the bow steps and main deck stairs.
There isn't much to discuss as most of the above steps were pretty self explanatory. However, I did have a bit of time with making the Capstan for the main mast. Of course the Steps to make the Capstan are in both Pole books...so you have to do some digging and even though I followed the plans, I believe the manuals have the parts labeled wrong and I had to do some jury rigging. Part H17 serves as the base of the Capstan and of course it wouldn't fit down the main mast....so some filing is called for...
View attachment 252778
So, looking at Part H20 above, which I broke....herein begins the Chinese puzzle to where Parts, pics and Steps don't make sense...while 1st Pole book shows Part H20 as the piece that is to go on top of Part H17, the Part above looks like it should be Part H21, not Part H20....so when I realized it didn't look right when compared to the pic on Step 244 of the 1st pole...I knew I was in trouble because I already started working from the base up and glued it in place with super glue.
View attachment 252779
When I referenced the Parts diagrams identifying the parts....for some odd reason the Capstan pieces showed numbers but no sketch of the parts....odd right? So, it seemed logical to me that Part 20 in my kit should have been at the top of the Capstan for the bars to slot into. Not at the bottom as I placed it.
View attachment 252793
Its almost impossible to build the Capstan without it being mounted onto the mast. So, I marked the mast figuring the glue would make it almost permanent and impossible to remove.
Hint: Always cut out the parts from their frames.....its so easy to break them.
View attachment 252794
View attachment 252797
The above part which I believe should have been Part 20 but was labeled Part 21 had to be sanded down in size. I marked it and used my belt sander to make it smaller than the two discs it was sandwiched between at the top of the Capstan.
View attachment 252808
Here is the Capstan mounted onto the Main Mast.
View attachment 252809
A coat of black acrylic and the hooks for the chain were set into place after drilling small holes for them. The bars that go around the Capstan are square and are recommended to be sanded round. Why do that? I drilled holes and used toothpicks that are already round, right?
View attachment 252810
View attachment 252811
View attachment 252812
The Captan in place on the main mast from the deck. I did not glue them in because I figured they would get in the way when I did the rigging. So, for now they are temporary.
View attachment 252813
View attachment 252814
Mates, I have a lot of detail work to complete....I want to weather the rails and have to finish some embellishments on the guns and finish their accessories. However, I'll share some pics for you to get a better look at things. Truthfully, the pics don't do the ship justice. I'm a horrible photographer and much of what you will see is not where things will be when this ship is completed. One, I don't know if I like all the colors of the food stuffs on the tables. Reminds me of a B&W cartoon that has gone through some colorization. None of the puppets are glued in, just on the deck. The ships bell is not in yet here either. The eight gun deck cannons are not glued in and will be removable so I can flip up the deck to better show the lower deck puppets. These cannot will become part of a base that I will further design, to be moved interchangeable to the base and ship as desired. I have two sets of wires leading up to the rear lights and the mizzen mast for further enhancements. Now, here are some pics.
View attachment 252815
View attachment 252816
View attachment 252817View attachment 252818
View attachment 252819
View attachment 252820
View attachment 252821
View attachment 252822
View attachment 252823
View attachment 252824
The next part of the build moves forward to the bow. Steps 35-51 will be next on the schedule. Family and friends are a big part of our plans leading up to Labor Day so the Captain's Log will be a bit slow through mid-September. With almost 280 hours in, I would have never thought to have made it this far.
Stick with me mates....I need you to help me make it through.
Happy Labor Day and Ahoy all!
Rick
you are doing wonderful work and the result is beautiful, well done

Keep it up, Rick!Captain's Log ~~~ August 27, 2021
Build time today: 0 hour(s)
Total build time: 278 hours
Construction for the Black Pearl (All-Scenario version)
Build guidelines: Well, ahoy mates. The Captain is still alive. I see its been three weeks since the last log. As I started the 2nd pole of the Black Pearl back then, I only sailed around eleven hours on this ship in the past 21 days. The Admiral has been very demanding. So much to do in the summer....ship building is better suited for the fall and winter. But I happened to have a pile of pics to share with you on how things are looking up.
At the very least, I would say my progress is complete through Steps 1-34 of the 2nd pole. (with a few more for good measure) I finished up making 12 more guns for the main deck. I still have to do some minor detail work on them but they are glued into position and other than completing the cannon balls and some rods and bars....that is part is complete. With the guns in place, I have also placed the main stairs and completed the bow steps and main deck stairs.
There isn't much to discuss as most of the above steps were pretty self explanatory. However, I did have a bit of time with making the Capstan for the main mast. Of course the Steps to make the Capstan are in both Pole books...so you have to do some digging and even though I followed the plans, I believe the manuals have the parts labeled wrong and I had to do some jury rigging. Part H17 serves as the base of the Capstan and of course it wouldn't fit down the main mast....so some filing is called for...
View attachment 252778
So, looking at Part H20 above, which I broke....herein begins the Chinese puzzle to where Parts, pics and Steps don't make sense...while 1st Pole book shows Part H20 as the piece that is to go on top of Part H17, the Part above looks like it should be Part H21, not Part H20....so when I realized it didn't look right when compared to the pic on Step 244 of the 1st pole...I knew I was in trouble because I already started working from the base up and glued it in place with super glue.
View attachment 252779
When I referenced the Parts diagrams identifying the parts....for some odd reason the Capstan pieces showed numbers but no sketch of the parts....odd right? So, it seemed logical to me that Part 20 in my kit should have been at the top of the Capstan for the bars to slot into. Not at the bottom as I placed it.
View attachment 252793
Its almost impossible to build the Capstan without it being mounted onto the mast. So, I marked the mast figuring the glue would make it almost permanent and impossible to remove.
Hint: Always cut out the parts from their frames.....its so easy to break them.
View attachment 252794
View attachment 252797
The above part which I believe should have been Part 20 but was labeled Part 21 had to be sanded down in size. I marked it and used my belt sander to make it smaller than the two discs it was sandwiched between at the top of the Capstan.
View attachment 252808
Here is the Capstan mounted onto the Main Mast.
View attachment 252809
A coat of black acrylic and the hooks for the chain were set into place after drilling small holes for them. The bars that go around the Capstan are square and are recommended to be sanded round. Why do that? I drilled holes and used toothpicks that are already round, right?
View attachment 252810
View attachment 252811
View attachment 252812
The Captan in place on the main mast from the deck. I did not glue them in because I figured they would get in the way when I did the rigging. So, for now they are temporary.
View attachment 252813
View attachment 252814
Mates, I have a lot of detail work to complete....I want to weather the rails and have to finish some embellishments on the guns and finish their accessories. However, I'll share some pics for you to get a better look at things. Truthfully, the pics don't do the ship justice. I'm a horrible photographer and much of what you will see is not where things will be when this ship is completed. One, I don't know if I like all the colors of the food stuffs on the tables. Reminds me of a B&W cartoon that has gone through some colorization. None of the puppets are glued in, just on the deck. The ships bell is not in yet here either. The eight gun deck cannons are not glued in and will be removable so I can flip up the deck to better show the lower deck puppets. These cannot will become part of a base that I will further design, to be moved interchangeable to the base and ship as desired. I have two sets of wires leading up to the rear lights and the mizzen mast for further enhancements. Now, here are some pics.
View attachment 252815
View attachment 252816
View attachment 252817View attachment 252818
View attachment 252819
View attachment 252820
View attachment 252821
View attachment 252822
View attachment 252823
View attachment 252824
The next part of the build moves forward to the bow. Steps 35-51 will be next on the schedule. Family and friends are a big part of our plans leading up to Labor Day so the Captain's Log will be a bit slow through mid-September. With almost 280 hours in, I would have never thought to have made it this far.
Stick with me mates....I need you to help me make it through.
Happy Labor Day and Ahoy all!
Rick
- Joined
- Mar 1, 2021
- Messages
- 315
- Points
- 168

Never thought I would get this far! Too many other things to do outside as the summer wanes! I’ll push harder in the Fall!Keep it up, Rick!
Just trying to be an encouragement, brother!


