
Happy birthday Rick hope you are enjoying yourself have a cold one for me.

-

SUBSCRIBE TO SHIPS IN SCALE TODAY!
The beloved Ships in Scale Magazine is back and charting a new course for 2026!
Discover new skills, new techniques, and new inspirations in every issue.
NOTE THAT OUR NEXT ISSUE WILL BE MARCH/APRIL 2026 -

Win a Free Custom Engraved Brass Coin!!!
As a way to introduce our brass coins to the community, we will raffle off a free coin during the month of August. Follow link ABOVE for instructions for entering.
You are using an out of date browser. It may not display this or other websites correctly.
You should upgrade or use an alternative browser.
You should upgrade or use an alternative browser.
Black Pearl 1:50 ZHL All-Scenario version
- Thread starter Ahoy All
- Start date
- Watchers 25
-
- Tags
- black pearl zhl

Happy birthday Rick!
- Joined
- Mar 1, 2021
- Messages
- 315
- Points
- 168

Thanks Tony. Will do!Happy birthday Rick hope you are enjoying yourself have a cold one for me.
- Joined
- Mar 1, 2021
- Messages
- 315
- Points
- 168
Thanks Paul. The Admiral has a lot planned for my 67th!Happy birthday Rick!
- Joined
- Mar 1, 2021
- Messages
- 315
- Points
- 168
Thanks Vic….no ship building today….ha! 67 years young! Likely be 77 God willing before I ever start that San Felipe! Ha!Happy birthday, Rick! Did you get any new tools for your birthday?
- Joined
- Mar 1, 2021
- Messages
- 315
- Points
- 168
Thanks to all the great folks at Ships of Scale!

Happy Birthday, Captain Rick a.c.a. Ahoy all! 
- Joined
- Mar 1, 2021
- Messages
- 315
- Points
- 168
Thanks Jimsky!Happy Birthday, Captain Rick a.c.a. Ahoy all!

- Joined
- Mar 1, 2021
- Messages
- 315
- Points
- 168
Well mates, as the sun sets today, on my 67th birthday I was motivated to share with you scoundrels a part of the booty my Admiral surprised me with! Alas, good food and spirits may satisfy a grumbling belly, of which this Pirate has devoured much today. But it is that small element of surprise served with the cake and candles that tends to scorch new memories into an aged brain.
So, while calling out the Admiral “to scupper your hide out of here” and “get me some more cake and ice cream”, I cast my eyes upon these three items. “Part educational and part joke I think I see. Let me share a pic with thee”


The Pirate Primer…..the perfect compliment to any Captain building the Black Pearl. Almost 500 pages of everything Pirate. A nice addition to any library….what’s a few fake Gold Doubloons! (“Walk the Plank”, “Dead Men Tell No Tales”, and “Shiver Me Timber’s”), really worth? Probably about as much as our fiat currency? Ha! Finally, the Admiral gifted me an over-sized plastic tweezer….Not sure she’s saying my eyes are failing me or to serve as an answer to never being able to find the real tool.
So, thank you mates for sharing my special day with me and for all the kind words. You are a great crew and when my sea-going days of model ship building comes to an end, the memories of this site and those that sailed along here will always be a small part of my life’s voyage!
Be well,
Rick
So, while calling out the Admiral “to scupper your hide out of here” and “get me some more cake and ice cream”, I cast my eyes upon these three items. “Part educational and part joke I think I see. Let me share a pic with thee”
The Pirate Primer…..the perfect compliment to any Captain building the Black Pearl. Almost 500 pages of everything Pirate. A nice addition to any library….what’s a few fake Gold Doubloons! (“Walk the Plank”, “Dead Men Tell No Tales”, and “Shiver Me Timber’s”), really worth? Probably about as much as our fiat currency? Ha! Finally, the Admiral gifted me an over-sized plastic tweezer….Not sure she’s saying my eyes are failing me or to serve as an answer to never being able to find the real tool.
So, thank you mates for sharing my special day with me and for all the kind words. You are a great crew and when my sea-going days of model ship building comes to an end, the memories of this site and those that sailed along here will always be a small part of my life’s voyage!
Be well,
Rick
Attachments

Last edited:
I celebrated your birthday by completing my Constitution. I started it March of last year. It was interrupted by a fast build of the Black Pearl. I’m glad you had an awesome day!Thanks Vic….no ship building today….ha! 67 years young! Likely be 77 God willing before I ever start that San Felipe! Ha!
- Joined
- Mar 1, 2021
- Messages
- 315
- Points
- 168
Send me a few pics of the Constitution Vic. I’d love to see them!I celebrated your birthday by completing my Constitution. I started it March of last year. It was interrupted by a fast build of the Black Pearl. I’m glad you had an awesome day!
Please feel free to check my build log. You can click on it on my signature block below.Send me a few pics of the Constitution Vic. I’d love to see them!
- Joined
- Mar 1, 2021
- Messages
- 315
- Points
- 168
Shame on me Vic….I didn’t know this build thread existed! I’ll enjoy reading it over the weekend!Please feel free to check my build log. You can click on it on my signature block below.
Did you click on follow on my picture? This was my first ship.
- Joined
- Mar 1, 2021
- Messages
- 315
- Points
- 168
Well I did mark you as a follow when I first saw your Black Pearl log.....I'll recheck it...but I do know where it is now Vic....so it will be OK I think. Have a great weekend....I'll be finishing up the upper planking on my Pearl and will likely be applying final stain and varnish next week....almost finished with the !st Pole...Did you click on follow on my picture? This was my first ship.
Woot, woot!Well I did mark you as a follow when I first saw your Black Pearl log.....I'll recheck it...but I do know where it is now Vic....so it will be OK I think. Have a great weekend....I'll be finishing up the upper planking on my Pearl and will likely be applying final stain and varnish next week....almost finished with the !st Pole...
- Joined
- Mar 1, 2021
- Messages
- 315
- Points
- 168
Captain's Log ~~~ July 31, 2021 (Part 1)
Build time today: 1.5 hour(s)
Total build time: 256 hours
Construction for the Black Pearl (All-Scenario version)
Build guidelines: Hey mates, "here's luck and a fair wind to you"....It's time for me to "make smart with it" and to inform you excluding Steps #260-268, (which is dry dock scaffolding) we are finished with the 1st Pole of the Black Pearl. "I have pleasure in saying" that we have sailed 256 hours on this voyage so far. "I dare say" you have been a good crew and "you don't make no doubt of that".
As you can see from my words above, I have noticed since the start of this voyage my speech is turning more into Pirate jargon daily. So, since my Admiral gifted me this book on my birthday last week, I cannot stop the transformation....so not to place "a plague on your scurvy heads", rest assured these phrases are authentic and can be found in this cursed book:

Well mates I must start with "here's a friend(s) for you", fellow pirates Vic & Jodie who helped me through a parts conundrum! Where the hell do these go?


I never did see where Parts M13 & M14 above werein the plans...Jodie told me they were supposed to go in the Captain's Quarters as some type of beam ornament....the K4 part on the right figured to be for the rear of the stern but I didn't allow for a curved rear stern and mistakenly placed it in position as a straight wall. (which you will see in the pics below) First, while investigating where the above parts go, I realized from reading Jodie's build that I never placed this part below. Luckily, it was a piece that I could place below the stern cabin....however, as delicate as it is I managed to cut it out without breaking it....of course when I picked it up, I did break it....figures, right? Well, it glued in fine anyway!


As I started to work on the back wall of the Stern Cabin, I neglected t make it curved. As you can see in the pic below, I ran the part straight across.

Now back to the parts above, since my eyes couldn't see the yellow ink on the plans (who uses yellow ink on white stock? Answer: Chinese ship kits) A shout out to Vic who told me he recalled using them on the rear Stern Cabin wall....not going to work for me as you will see below:


You'll also note that I had to trim the top plate to fit on the inside of the side panels. Also, had to wood dough the top portion of the outside rear panel to even up the two surfaces. This is where I abandoned these curved K4 parts and used the M13 & M14 straight pieces to panel the rear wall instead. I didn't take a pic of this but you'll see the turnout of the straight wall in the final pics of Part 2.
As Jodie @MystRacing pointed out in his build of the Pearl, the roof of the Stern Cabin really is a scratch build. I liked his idea so I went over to Home Depot and bought a piece of decorative corner round to use instead of the square stick ZHL provided which had to be sanded into a quarter round. Hey ZHL, here's a thought, machine the pieces to fit. In the pic below, I did use the square piece to measure the top of the cabin roof and I marked it. You can also see where I filled in the 1st coat of wood putty to make both surfaces smooth so the metal ornaments can lie flat.


I made the first and second cuts of the quarter round and tried to get a visual on how straight pieces on a curved stern would work. My only solution was to angle out and fill in with scrap triangular pieces which you can see in pics below.


After I cut some fill in pieces from the scrap wood, I used some wood putty (not yet done below) to fill in the seam gaps. However, at this point I realized I cut the side quarter rounds too long and had already glued them in....now what? This wasn't the look that was in the plans, nor what I liked. You can see I extended over the cabin and angled the piece forward rather than backward....then I painted the roof copper and accented in black....now, I really hated the look....which I thought would be OK....but I had to finish it to see if I liked it and the Admiral said....can it.


I had to cut out and sand back the side panels to a more acceptable angle and length. And while at that, I decided to go with a brown roof and gold accents. I was not happy with the look so I decided to use two of the panels which I didn't use on the inside stern cabin windows....figured I'll tie it off later to the top rail and it sort of works as window panel cover....


The next step moving toward completion of the planking was to add the Wales to the hull. I removed myself from all the conjecture here and applied the first wale on the 5th plank position. On the open Starboard side this would be one plank under the opening. I looked at the plans and it finished up with two more Wales below the gun ports and the waterline. I didn't concern myself with accuracy here and perhaps I didn't need to put two there on each side but the plans showed two wider planks and I thought that what was to be dome.
The one tool that I found a Godsend was my hot gun/solder combo station. I found this the best way to bend planks with ease. With a little patience and practice, it made life a lot easier than soaking planks and using bands and things of such to wrap around curved objects. If and/or when I do my San Felipe, this baby will be at my side. Other than the 1" belt sander and considering all my lighting which needed soldering, and all the planks that needed bending, this tool was well worth the money.


I decided to take my Ebony stain and lightly wipe the hull below the bottom wale. I just wanted to create a darker effect where the ship would be in water. Here above, I started the wipe on the left front quarter of the bow.

The final pic of this Part 1 comes from the assembly of the Captain Quarter's skylight.
Today, I'm finishing up with a couple coats of satin varnish and I'll send a batch of pics over later today or tomorrow of the ship from all angles and with lighting arrangements so you can get a better look at the whole ship.
Ahoy for now mates,
Have a great weekend.
Rick
Build time today: 1.5 hour(s)
Total build time: 256 hours
Construction for the Black Pearl (All-Scenario version)
Build guidelines: Hey mates, "here's luck and a fair wind to you"....It's time for me to "make smart with it" and to inform you excluding Steps #260-268, (which is dry dock scaffolding) we are finished with the 1st Pole of the Black Pearl. "I have pleasure in saying" that we have sailed 256 hours on this voyage so far. "I dare say" you have been a good crew and "you don't make no doubt of that".
As you can see from my words above, I have noticed since the start of this voyage my speech is turning more into Pirate jargon daily. So, since my Admiral gifted me this book on my birthday last week, I cannot stop the transformation....so not to place "a plague on your scurvy heads", rest assured these phrases are authentic and can be found in this cursed book:
Well mates I must start with "here's a friend(s) for you", fellow pirates Vic & Jodie who helped me through a parts conundrum! Where the hell do these go?
I never did see where Parts M13 & M14 above werein the plans...Jodie told me they were supposed to go in the Captain's Quarters as some type of beam ornament....the K4 part on the right figured to be for the rear of the stern but I didn't allow for a curved rear stern and mistakenly placed it in position as a straight wall. (which you will see in the pics below) First, while investigating where the above parts go, I realized from reading Jodie's build that I never placed this part below. Luckily, it was a piece that I could place below the stern cabin....however, as delicate as it is I managed to cut it out without breaking it....of course when I picked it up, I did break it....figures, right? Well, it glued in fine anyway!
As I started to work on the back wall of the Stern Cabin, I neglected t make it curved. As you can see in the pic below, I ran the part straight across.
Now back to the parts above, since my eyes couldn't see the yellow ink on the plans (who uses yellow ink on white stock? Answer: Chinese ship kits) A shout out to Vic who told me he recalled using them on the rear Stern Cabin wall....not going to work for me as you will see below:
You'll also note that I had to trim the top plate to fit on the inside of the side panels. Also, had to wood dough the top portion of the outside rear panel to even up the two surfaces. This is where I abandoned these curved K4 parts and used the M13 & M14 straight pieces to panel the rear wall instead. I didn't take a pic of this but you'll see the turnout of the straight wall in the final pics of Part 2.
As Jodie @MystRacing pointed out in his build of the Pearl, the roof of the Stern Cabin really is a scratch build. I liked his idea so I went over to Home Depot and bought a piece of decorative corner round to use instead of the square stick ZHL provided which had to be sanded into a quarter round. Hey ZHL, here's a thought, machine the pieces to fit. In the pic below, I did use the square piece to measure the top of the cabin roof and I marked it. You can also see where I filled in the 1st coat of wood putty to make both surfaces smooth so the metal ornaments can lie flat.
I made the first and second cuts of the quarter round and tried to get a visual on how straight pieces on a curved stern would work. My only solution was to angle out and fill in with scrap triangular pieces which you can see in pics below.
After I cut some fill in pieces from the scrap wood, I used some wood putty (not yet done below) to fill in the seam gaps. However, at this point I realized I cut the side quarter rounds too long and had already glued them in....now what? This wasn't the look that was in the plans, nor what I liked. You can see I extended over the cabin and angled the piece forward rather than backward....then I painted the roof copper and accented in black....now, I really hated the look....which I thought would be OK....but I had to finish it to see if I liked it and the Admiral said....can it.
I had to cut out and sand back the side panels to a more acceptable angle and length. And while at that, I decided to go with a brown roof and gold accents. I was not happy with the look so I decided to use two of the panels which I didn't use on the inside stern cabin windows....figured I'll tie it off later to the top rail and it sort of works as window panel cover....
The next step moving toward completion of the planking was to add the Wales to the hull. I removed myself from all the conjecture here and applied the first wale on the 5th plank position. On the open Starboard side this would be one plank under the opening. I looked at the plans and it finished up with two more Wales below the gun ports and the waterline. I didn't concern myself with accuracy here and perhaps I didn't need to put two there on each side but the plans showed two wider planks and I thought that what was to be dome.
The one tool that I found a Godsend was my hot gun/solder combo station. I found this the best way to bend planks with ease. With a little patience and practice, it made life a lot easier than soaking planks and using bands and things of such to wrap around curved objects. If and/or when I do my San Felipe, this baby will be at my side. Other than the 1" belt sander and considering all my lighting which needed soldering, and all the planks that needed bending, this tool was well worth the money.
I decided to take my Ebony stain and lightly wipe the hull below the bottom wale. I just wanted to create a darker effect where the ship would be in water. Here above, I started the wipe on the left front quarter of the bow.
The final pic of this Part 1 comes from the assembly of the Captain Quarter's skylight.
Today, I'm finishing up with a couple coats of satin varnish and I'll send a batch of pics over later today or tomorrow of the ship from all angles and with lighting arrangements so you can get a better look at the whole ship.
Ahoy for now mates,
Have a great weekend.
Rick
Attachments
Last edited:
I’m liking it, Rick!Captain's Log ~~~ July 31, 2021 (Part 1)
Build time today: 1.5 hour(s)
Total build time: 256 hours
Construction for the Black Pearl (All-Scenario version)
Build guidelines: Hey mates, "here's luck and a fair wind to you"....It's time for me to "make smart with it" and to inform you excluding Steps #260-268, (which is dry dock scaffolding) we are finished with the 1st Pole of the Black Pearl. "I have pleasure in saying" that we have sailed 256 hours on this voyage so far. "I dare say" you have been a good crew and "you don't make no doubt of that".
As you can see from my words above, I have noticed since the start of this voyage my speech is turning more into Pirate jargon daily. So, since my Admiral gifted me this book on my birthday last week, I cannot stop the transformation....so not to place "a plague on your scurvy heads", rest assured these phrases are authentic and can be found in this cursed book:
View attachment 247015
Well mates I must start with "here's a friend(s) for you", fellow pirates Vic & Jodie who helped me through a parts conundrum! Where the hell do these go?
View attachment 247065View attachment 247066
I never did see where Parts M13 & M14 above werein the plans...Jodie told me they were supposed to go in the Captain's Quarters as some type of beam ornament....the K4 part on the right figured to be for the rear of the stern but I didn't allow for a curved rear stern and mistakenly placed it in position as a straight wall. (which you will see in the pics below) First, while investigating where the above parts go, I realized from reading Jodie's build that I never placed this part below. Luckily, it was a piece that I could place below the stern cabin....however, as delicate as it is I managed to cut it out without breaking it....of course when I picked it up, I did break it....figures, right? Well, it glued in fine anyway!
View attachment 247072View attachment 247073View attachment 247074
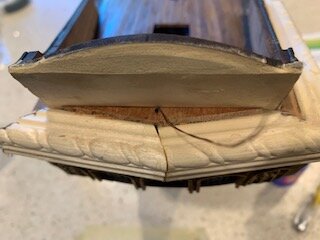
As I started to work on the back wall of the Stern Cabin, I neglected t make it curved. As you can see in the pic below, I ran the part straight across.
View attachment 247077
So now back to the parts above, since my eyes couldn't see the yellow ink on the plans (who uses yellow ink on white stock? Answer: Chinese ship kits) A shout out to Vic who told me he recalled using them on the rear Stern Cabin wall....not going to work for me as. you will see below.
View attachment 247078View attachment 247079
You'll also note that I had to trim the top plate to fit on the inside of the side panels. Also, had to wood dough the top portion of the outside rear panel to even up the two surfaces. This is where I abandoned these curved K4 parts and used the M13 & M14 straight pieces to panel the rear wall instead. I didn't take a pic of this but you'll see the turnout of the straight wall in the final pics of Part 2.
So as Jodie @MystRacing pointed out in his build of the Pearl, the roof of the Stern Cabin really is a scratch build. I liked his idea so I went over to Home Depot and bought a piece of decorative corner round to use instead of the square stick ZHL provided which had to be sanded into a quarter round. Hey ZHL, here's a thought, machine the pieces to fit. In the pic below, I did use the square piece to measure the top of the cabin roof and I marked it. You can also see where I filled in the 1st coat of wood putty to make both surfaces smooth so the metal ornaments can lie flat.
View attachment 247080View attachment 247090
So I made the first and second cuts of the quarter round and tried to get a visual on how straight pieces on a curved stern would work. My only solution was to angle out and fill in with scrap triangular pieces which you can see in pics below.
View attachment 247091View attachment 247092
After I cut some fill in pieces from the scrap wood, I used some wood putty (not yet done below) to fill in the seam gaps. However, at this point I realized I cut the side quarter rounds too long and had already glued them in....now what? This wasn't the look that was in the plans, nor what I liked. You can see I extended over the cabin and angled the piece forward rather than backward....then I painted the roof copper and accented in black....now, I really hated the look....which I thought would be OK....but I had to finish it to see if I liked it and the Admiral said....can it.
View attachment 247094
View attachment 247106View attachment 247104View attachment 247105
So, now I had to cut out and sand back the side panels to a more acceptable angle and length. And while at that, I decided to go with a brown roof and gold accents. I was not happy with the look so I decided to use two of the panels which I didn't use on the inside stern cabin windows....figured I'll tie it off later to the top rail and it sort of works as window panel cover....
View attachment 247109View attachment 247110
The next step moving toward completion of the planking was to add the Wales to the hull. I removed myself from all the conjecture here and applied the first wale on the 5th plank position. On the open Starboard side this would be one plank under the opening. I looked at the plans and it finished up with two more Wales below the gun ports and the waterline. I didn't concern myself with accuracy here and perhaps I didn't need to put two there on each side but the plans showed two wider planks and I thought that what was to be down.
The one tool that I found a Godsend was my hot gun/solder combo station. I found this the best way to bend planks with ease. With a little patience and practice, it made life a lot easier than soaking planks and using bands and things of such to wrap around curved objects. If and/or when I do my San Felipe, this baby will be at my side. Other than the 1" belt sander and considering all my lighting which needed soldering, and all the planks that needed bending, this tool was well worth the money.
View attachment 247174View attachment 247175View attachment 247176
View attachment 247177
I decided to take my Ebony stain and lightly wipe the hull below the bottom wale. I just wanted to create a darker effect where the ship would be in water. Here above, I started the wipe on the left front quarter of the bow.
View attachment 247179
The final pic of this Part 1 comes from the assembly of the Captain Quarter's skylight.
Today, I'm finishing up with a couple coats of satin varnish and I'll send a batch of pics over later today or tomorrow of the ship from all angles and with lighting arrangements so you can get a better look at the whole ship.
Ahoy for now mates,
Have a great weekend.
Rick
A special day is coming up for you next month September 19 is international speak like a Pirate day. Good progress on the Pearl.
- Joined
- Mar 1, 2021
- Messages
- 315
- Points
- 168
Captain's Log ~~~ July 31, 2021 (Part 2)
Build time today: 1.5 hour(s)
Total build time: 256 hours
Construction for the Black Pearl (All-Scenario version)
Build guidelines: Mates the varnish is dry and I'll try to show you around the ship. The guns and the puppets are not in place or finished. I just placed them around so you could get an idea of how the colors mix with the browns and blacks of the ship. NOTE: I am an awful photographer. All these pics are from my iPhone and the lighting above my pool table casts an orange hue...the actual colors in normal lighting are more rich and toward brown rather than orange. Also, there are 4 switches in this ship setup so far:
Switch 1: (lower deck on top of barrel) Controls lights on lower deck.
Switch 2: (gun deck attached to a bulwark) Controls lights on gun deck.
Switch 3: (inside entrance of Captain's Quarters-right) Controls outside
entrance lanterns and the lantern on the round table.
Switch 4: (Inside entrance of Captain's Quarters-left) Controls inside
lanterns of the Captain's Quarters.
Two sets of leads still remain....one outside the rear Stern Cabin and the other coming up from the mizzenmast hole. The one set will control the following switch:
Switch 5: Will control the three large exterior Stern lamps.
The remaining lead is an auxiliary for now.....may or may not use it.
I plan to do a video of the lighting portion of my ship because I can get many different visual effects. Since these lamp (LED's) work off of a remote control and with AC Power, I don't have to worry about batteries draining or moving anything around once the ship is on the base and the coffin is mounted to make contacts with the two leads within the keel. The remote allows me to dim the decks separately from the Captain's Cabin and there is 4 levels of bright to dim. So, as you can see there are many combinations with the switches and the dimmer from the remote to give you the lighting effect you like the most.
Onward to some of the pics and again, my apologies for such weak photos of the work.
Captain Quarters skylight in place:

Two coats of satin polyurethane drying out. Bottom in Ebony, the rest in Golden Oak.


Here's a look on how the dimmer gives a different effect. Brightest on left, dimmest on right. Two in-between.


Mates in the 5 hammocks.....Captured captain and his lady on the right


Peeking into the Captain's Quarter and spying the treasure map.


Ghost of Jack Sparrow much clearer than pic depicts.


Next week we'll start putting in railings and the stairs from the gun deck to the main deck..
Build time today: 1.5 hour(s)
Total build time: 256 hours
Construction for the Black Pearl (All-Scenario version)
Build guidelines: Mates the varnish is dry and I'll try to show you around the ship. The guns and the puppets are not in place or finished. I just placed them around so you could get an idea of how the colors mix with the browns and blacks of the ship. NOTE: I am an awful photographer. All these pics are from my iPhone and the lighting above my pool table casts an orange hue...the actual colors in normal lighting are more rich and toward brown rather than orange. Also, there are 4 switches in this ship setup so far:
Switch 1: (lower deck on top of barrel) Controls lights on lower deck.
Switch 2: (gun deck attached to a bulwark) Controls lights on gun deck.
Switch 3: (inside entrance of Captain's Quarters-right) Controls outside
entrance lanterns and the lantern on the round table.
Switch 4: (Inside entrance of Captain's Quarters-left) Controls inside
lanterns of the Captain's Quarters.
Two sets of leads still remain....one outside the rear Stern Cabin and the other coming up from the mizzenmast hole. The one set will control the following switch:
Switch 5: Will control the three large exterior Stern lamps.
The remaining lead is an auxiliary for now.....may or may not use it.
I plan to do a video of the lighting portion of my ship because I can get many different visual effects. Since these lamp (LED's) work off of a remote control and with AC Power, I don't have to worry about batteries draining or moving anything around once the ship is on the base and the coffin is mounted to make contacts with the two leads within the keel. The remote allows me to dim the decks separately from the Captain's Cabin and there is 4 levels of bright to dim. So, as you can see there are many combinations with the switches and the dimmer from the remote to give you the lighting effect you like the most.
Onward to some of the pics and again, my apologies for such weak photos of the work.
Captain Quarters skylight in place:
Two coats of satin polyurethane drying out. Bottom in Ebony, the rest in Golden Oak.
Here's a look on how the dimmer gives a different effect. Brightest on left, dimmest on right. Two in-between.
Mates in the 5 hammocks.....Captured captain and his lady on the right
Peeking into the Captain's Quarter and spying the treasure map.
Ghost of Jack Sparrow much clearer than pic depicts.
Next week we'll start putting in railings and the stairs from the gun deck to the main deck..
Last edited: