Looking really good.Hmmm, good weather and summer chores decrease the amount of time spent in the boatyard.
Todays time was spent on repairing some of the mistakes I made on the Tug’s hull. In my enthusiastic sanding, filling voids and more sanding of the hull I managed to break off every one of the bulkhead extension. Those have all been replaced by 3/32“ square Maple pieces.
The scribed deck was temporarily held in place with glue from an Elmers glue stick while I fitted the pieces of the waterway between the new bulkhead extensions . When I was satisfied that the waterway and the deck were a good fit, the waterway pieces were soaked and then glued and pinned to the false deck.
View attachment 154409
The waterway is used to eliminate the gap between the scribed deck and the edge of the first plank.
View attachment 154410
The rubber bands work great holding everything together for a test fit.
Jan
-

Win a Free Custom Engraved Brass Coin!!!
As a way to introduce our brass coins to the community, we will raffle off a free coin during the month of August. Follow link ABOVE for instructions for entering.
-

PRE-ORDER SHIPS IN SCALE TODAY!
The beloved Ships in Scale Magazine is back and charting a new course for 2026!
Discover new skills, new techniques, and new inspirations in every issue.
NOTE THAT OUR FIRST ISSUE WILL BE JAN/FEB 2026
You are using an out of date browser. It may not display this or other websites correctly.
You should upgrade or use an alternative browser.
You should upgrade or use an alternative browser.
Bluejacket Tug Sequin 1/4” scale
- Thread starter Pathfinder65
- Start date
- Watchers 24
-
- Tags
- bluejacket tug sequin
It is really looking good, Jan! I love the green colour.
Heirich,
I plan on using clear satin finish on the pilot house and deckhouse sides. I'm thinking the green will be a good contrast.
The build instructions have various color schemes depending on the year in service. I'm mixing up the colors from 1884-1900 and around 1910. Both eras have the hull with copper red below the waterline and white above. the deck structures were varnish with green or gray roofs and/or varnish / white sides.
Jan
That sounds good, Jan. I have always liked a green/white colour combination. It always makes me think of the old Rhodesian (now Zimbabwe) rugby team's colours.
View attachment 154561
Very nice, my favorite football team also sports a lot of green in their uniforms.
Jan
Shipyard or Play?
Hard choice today, nice sunny day to be outside and enjoy this.
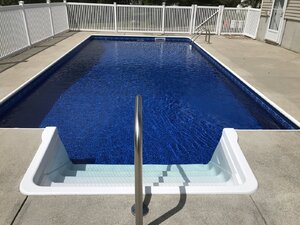
or do a liite shipyard work.
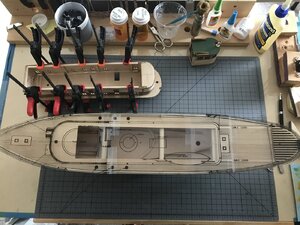
Actually a little of both was on the agenda.
The deckhouse and roof were lined up and glued, a ladder was attached to the Pilot house and an overlay was created see how everything will fit on the deck.
Jan
Hard choice today, nice sunny day to be outside and enjoy this.

or do a liite shipyard work.

Actually a little of both was on the agenda.
The deckhouse and roof were lined up and glued, a ladder was attached to the Pilot house and an overlay was created see how everything will fit on the deck.
Jan
- Joined
- Jan 9, 2020
- Messages
- 10,566
- Points
- 938

Man oh man - I am jealous of your pool! There are obviously public swimming pools (which are meticulously maintained) in Nantong, but due to apartment living, private pools are a foreign concept. The overlay shows great potential for finishing the deck really nicely.
Unfortunately our pool season is short, usually from the end of May to the end of September. But it's a great escape early in the morning, during the the day and some evenings.Man oh man - I am jealous of your pool! There are obviously public swimming pools (which are meticulously maintained) in Nantong, but due to apartment living, private pools are a foreign concept. The overlay shows great potential for finishing the deck really nicely.
I've found the overlays a great help, especially spotting and placing deck components, it also quickly shows if there are "do overs" required.
I'm slowly learning"scratch" building, the ladder. on the Pilot house took three tries before I was satisfied with the final product.
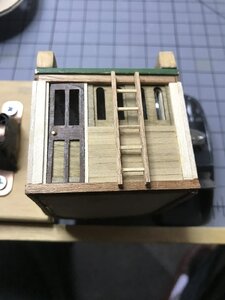
Your work is coming along nicely.
I say take the ship to the pool .
.
The overlay looks very helpful. Something for me to think about on my next build.
Don't have a pool but do have a hot tub which we use throughout the year. Friends have a pool if we feel the need to stretch out.
How did you connect the rungs to the rails,, butt joint glue them?
Building some ladders is coming up soon on my build.
I say take the ship to the pool
The overlay looks very helpful. Something for me to think about on my next build.
Don't have a pool but do have a hot tub which we use throughout the year. Friends have a pool if we feel the need to stretch out.
How did you connect the rungs to the rails,, butt joint glue them?
Building some ladders is coming up soon on my build.
I’ve read a lot of articles, have several books and videos on planking. I’m still at the novice stage as far as those parts of the builds go. The planking on my first build was nothing short of disaster, my second build was a slight improvement, the Tug’s planking was better still. I’m about to start the planking of my fourth build and have settled on “the Jan no hurry, measure, cut, fit, glue and let it sit one plank at a time “ method.You are getting VERY good at scratch building!
My ladders took considerably more attemptsand right now I am struggling my a*** o** with planking!
Jan
Your work is coming along nicely.
How did you connect the rungs to the rails,, butt joint glue them?
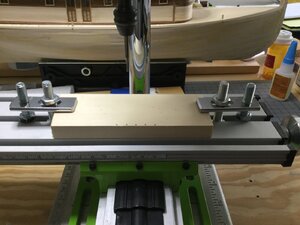
I set up my Dremel drill press with my ”X Y table”. I cut the rails to fit, taped the rails together, center punched the start holes for the rungs, drilled out the rung holes using the X Y table to move the rails and get the proper spacing.
The next step was to insert the rungs into the rails and let rungs extend beyond the rails. I placed a dab of glue around the ends of the rungs and used tweezers to push the rails out flush with the rung ends.
Jan
Hello, Jan.
I'm just getting caught up reading your current build. It is very impressive, excellent work. I'll be trying some of your ideas on my lobster boat when I get back to it.
Happy modelling.
Steven


I'm just getting caught up reading your current build. It is very impressive, excellent work. I'll be trying some of your ideas on my lobster boat when I get back to it.
Happy modelling.
Steven

Steven,Hello, Jan.
I'm just getting caught up reading your current build. It is very impressive, excellent work. I'll be trying some of your ideas on my lobster boat when I get back to it.
Happy modelling.
Steven

I’m glad your following along. This build is a much bigger head scratcher than my Lobster boat build
Jan
Companionway:
I have the deckhouse almost complete and had decided that I didn't want to cut out a doorway opening for the stairwell. I made a quick sketch of the stairwell and assembled some bits and pieces to build it.
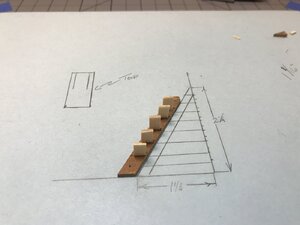
The risers needed to be cut out to give the steps a good fit. I tried doing the cuts by hand but after a couple of missteps decided there had to be a better way,
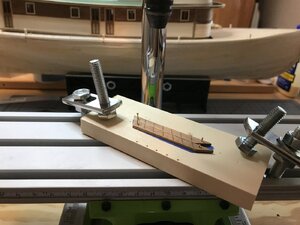
The first step was to figure out how to use the X Y table and set up the Dremel tool.
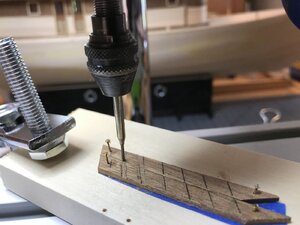
Then came the "whoops" moment. While making the second cut I noticed both risers were facing the same direction, which meant that the step cut outs on one would be OK but on the second riser the cut outs would be on the wrong side. Not a big mistake but an error on my part.
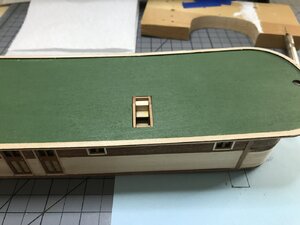
The final product after my fix. A wee bit of sanding is required to get everything fit flush with the roof. I worked on this step since the roof needs an additional coat of paint and is now glued to the deckhouse frame. The next step in the deckhouse build is to mark out all the holes for the guard rail stantions, the location of the skylight and stack, the life boat davits and and the eye bolts for the mast guy wires.
Jan
I have the deckhouse almost complete and had decided that I didn't want to cut out a doorway opening for the stairwell. I made a quick sketch of the stairwell and assembled some bits and pieces to build it.

The risers needed to be cut out to give the steps a good fit. I tried doing the cuts by hand but after a couple of missteps decided there had to be a better way,

The first step was to figure out how to use the X Y table and set up the Dremel tool.

Then came the "whoops" moment. While making the second cut I noticed both risers were facing the same direction, which meant that the step cut outs on one would be OK but on the second riser the cut outs would be on the wrong side.

The final product after my fix. A wee bit of sanding is required to get everything fit flush with the roof. I worked on this step since the roof needs an additional coat of paint and is now glued to the deckhouse frame. The next step in the deckhouse build is to mark out all the holes for the guard rail stantions, the location of the skylight and stack, the life boat davits and and the eye bolts for the mast guy wires.
Jan
Hello Jan, Very nice you are using mill for this exercise, this is one the ways I use myself. What actually brought my attention, if you don't mind, that you use incorrectly holding\step clumps (specifically the one on the right side). It is really dangerous, and if loose can hurt yourself.
You don't need the top bolt at all, and the holding plate should be the same level as the wooden block. A much better set of holding step clamps sell by proxxon, but I am not sure if they fit your XYZ table.
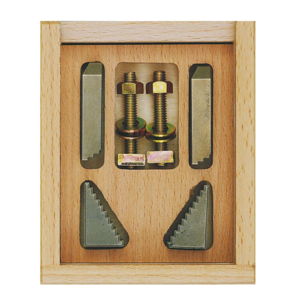
You don't need the top bolt at all, and the holding plate should be the same level as the wooden block. A much better set of holding step clamps sell by proxxon, but I am not sure if they fit your XYZ table.

Hello Jan, Very nice you are using mill for this exercise, this is one the ways I use myself. What actually brought my attention, if you don't mind, that you don't use incorrectly holding clumps (specifically the one on the right side). It is really dangerous, and if loose can hurt yourself.
You don't need the top bolt at all, and holding plate should be the same level as the wooden block. A much better set of holding step clamps sell by proxxon, but i am not sure if they fit your XYZ table.
View attachment 155310
Hmm, that clamp business is part of my inexperience using the XY table. I’ve not found a good tutorial on how to use that tool.
Jan
- Joined
- Jan 9, 2020
- Messages
- 10,566
- Points
- 938

The ladder really looks authentic in the deck and adds great detail. As far as the powertools go and "X, Y and Z-axis" - absolute Greek to me! 
 I suppose at some stage I will have to move away from the 17th Century!
 I suppose at some stage I will have to move away from the 17th Century!
The ladder really looks authentic in the deck and adds great detail. As far as the powertools go and "X, Y and Z-axis" - absolute Greek to me!
I suppose at some stage I will have to move away from the 17th Century!

Jan


