Bluenose 1/64 MS2130 by TechTrek (Chris) [COMPLETED BUILD]

Joined
Nov 15, 2020
Messages
742
Points
343

Location
Hillsburgh, ON, CAN
Hello everyone. I've been in this forum now for long enough that I feel comfortable sharing my 1st build, the Bluenose. This Model Shipways kit came with everything I needed to complete the build except for enough of the bras strips (1/64 x 1/8). The parts themselves were reasonably good quality, though I have to say I really don't have a lot of experience here. I will not be as detailed in this build as I've seen others do, since there is nothing magical about my work :). I will point out what I have learned along the way and add any pointers or things I feel are relevant to someone starting this kit. Hopefully you're not like me and just jumped in before doing any kind of research on how to actually build model ships. I'm one of those jumps in and refers to instructions when I'm stuck. Not the best advice for model ship building and I quickly learned to see what other are doing. Lots of online build logs for this ship. I found this one before I stumbled upon SOS. Blue Ensign Bluenose Build
I selected the Bluenose for my 1st build because of the great history of this Canadian icon. I was born on the East Coast of Canada so this ship has some Historical meaning for me. I also think she looks fantastic.
IMG_0249.jpg
 
Since I started this build last summer I will be relying on memory for some of the trials and tribulations. I had no issues with keel assembly other than trying to figure out what a rabbet is and how to do this. I managed to get the groove cut in reasonably well and I think in the right position. My bulkheads were not perfectly aligned but close enough for Government work :eek: 
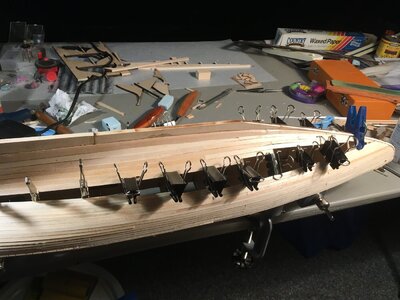
I started with the waterways to stabilize everything. This is my original workshop, a table setup in the basement, sitting on a carpet. DON'T do this!!! I spent more time on my hands and knees looking for small parts than building the boat. If you have no other choice put down a sheet of think plastic or something so the bits don't disappear. I found at this point that I was purchasing almost weekly another tool. I think I've spent as much on tools now as I did on this kit. o_O:rolleyes:
Bulkheads.jpg
 
Here is the planking adventure. I found in a post somewhere the suggestion to use binder clips with the handle from one removed and inserted into another to make a plank holder. Worked AMAZINGLY well to hold the planks in place nice and tight without having to nail them in place or use CA glue. Since the hull is not overly severe in it's curves I did not need to soak and heat the planks to get them into place. They just fell naturally. I started from the top down and from the bottom up, meeting in the middle. I did not at this point know about SOS or the build log I followed above but was watching some youtube videos about planking this ship. I made one small error that I ended up ripping a piece out later. I get to that in a sec. Here are some pics of the initial planking adventures, as well as the crazy setup for my work area.
IMG_2250.JPGIMG_2251.JPGIMG_2253.JPG

Below is the scuppers plank. I made this by marking off the separation and bulkhead locations on the plank edge then using a small flat file on the edge before installing.

IMG_2252.JPG

In the pic below you can see where I've been following the keel curve up into the bow with my planking. This is the mistake I made instead of trimming them and narrowing to fit a straighter line. Ended up having to rip some back to get the upper hull planking to finish in the rabbet.

IMG_2258.JPG

As you can see I didn't follow any particular pattern for my planking just made sure I didn't terminate the butt joints on the same bulkhead but tried to go across 3 different positions. I also used a fairly long plank. I started the plank at the stern, terminated it about 2/3 to the bow then finished to the bow. I then came back in the opposite direction, again going about 2/3 to the stern. All my stern planks were cut about 5 mm too long so I could later cut them all together when I worked on the transom.
 
Here I'm finishing the planking and getting ready to do the deck planking. I did make a custom jig to hold down the stern planks nice and tight. That along with some painters tape helped me do the stern.IMG_2258.JPG
IMG_0134.jpg

IMG_2261.JPGIMG_2264.JPG
As you can see in the next 2 pics I planked the keel way too high up the bow.
IMG_2262.JPGIMG_2263.JPG
Here you can see the sanded hull. My thumb is where I had to pull out about 3-4 CM of planking in order to bring the bow in nicely.IMG_2267.JPGIMG_2268.JPG
 

Attachments

  • IMG_2268.JPG
    IMG_2268.JPG
    138.6 KB · Views: 8
  • IMG_2267.JPG
    IMG_2267.JPG
    133.5 KB · Views: 11
  • IMG_2266.JPG
    IMG_2266.JPG
    202.2 KB · Views: 10
  • IMG_2264.JPG
    IMG_2264.JPG
    175.5 KB · Views: 16
  • IMG_2263.JPG
    IMG_2263.JPG
    175.7 KB · Views: 8
  • IMG_2262.JPG
    IMG_2262.JPG
    221 KB · Views: 8
  • IMG_2261.JPG
    IMG_2261.JPG
    248.9 KB · Views: 9
I realize I'm just blasting out my build but I might as well get it done and catch up to my current status. This next set of pics are for the deck planking. I left a big opening under the main cabin in order to hold the battery case for my lights I will be installing. Stupid me did not run the wiring from the stern to the bow before the deck planking, which caused me some grief later. :eek: I also made sure to add extra support for the masts and supports for the deck around the cabin and hatch openings. I've noticed some plank the entire deck and just put the hatch covers and things on top. This just didn't seem right to me as I wanted all my hatches and things to be able to be opened. I even made some stairs going down from the fore deck companionway.
IMG_2270.JPG
As you can see I did not follow the traditional straight planks with the jagged edge board (I forget what it's called) by the waterway. I just planked from the water way into the centre. I kind of like this look. My next build I'll go the other way ;)
IMG_2269.JPG
Here are the deck pieces I made. Including the stairs I mentioned above. I used mahogany for all the tops, I liked the darker wood colour.
IMG_2272.JPG
Here is the final deck after light staining and a satin finish.
Deck.JPG
 
I wanted to get all the planking posted before talking about painting. I went through a bit of an adventure with painting. Bought an air brush, built a spray booth and got some fine line masking tapes of various widths. 1st the spray booth, a bunch of cardboard duck taped together with some plastic I could pull down if things got really messy. The air is pulled out using a wet/dry vacuum I already had. Just used a section of dry vent hose and made a custom connection for it to the vacuum. I also bought some furnace filter material to make the air filter so I didn't suck a bunch of paint particles into the vacuum.
IMG_0139.jpgIMG_0140.jpg
Here are some pics after I masked the deck in order to spray paint the waterways and rail. I painted them both white even though the waterways are supposed to be grey. The deck pieces I made have been laid out just so I could get an idea as to what they would look like. You can also see in this pics the wires hanging off the port and starboard sides. Those are holding the micro LED lights so they don't fall back into the hull.DeckPieces2.jpg
Here's another shot from the stern. LOL the gun in the pic has no bearing on anything, just happened to be talking about one of my long guns with someone AlienDeckPieces1.jpg
 
Hi Chris,
Nice you make a build-log of your Bluenose from Model Shipways next to the upcoming builds of the Bluenose Build Group. Can we compare one and each other. I have my chair set to follow your build.
Regards, Peter
Sure Peter happy to do a compare, just not on quality of the builder. o_O I already noticed that the new build does not have the same rigging detail that I have. I did steal the stern lettering for my build. Thanks to @Heinrich for researching and showing the results. I have a little HP sprocket printer that lets me print peel and stick colour prints up to 5" long. I used it for all my lettering bits.
 
OK, next step was getting my LED lights running and tested. These are pico LED lights I found on Amazon. They come with the resistors already presoldered so no need to worry about that. For those that are not familiar LED lights have a positive and negative side. They won't work if installed the wrong way. I have a 2 x AA battery pack with built in on/off switch. Also from Amazon. The wire I use is just the inside wires from an Ethernet (network) cable. 22G solid core copper wire. The three lights in the bow have all the positive (+) leads joined together with the (+) wire coming from the stern. There are 3 lights, one green (port), one red (starboard) and one under the deck between the forward companionway and the air port hatch.
IMG_0154.jpgIMG_2280.JPG
As you can see they're nice and bright. They're small enough (1 mm) to insert into the aluminium lantern pieces. I'll post a pic later after they are installed into the shrouds. LEDs are not at all difficult to use. Just remember to bring all the (+) sides together and all the (-) sides together into a wire that will then bring the circuit to your battery pack. My batteries should last for hours before I need to replace them. You could also use a 9V battery with a battery clip instead of a battery pack. If I were to do this again I would run the wires out the bottom and have the battery pack more accessible then under the main cabin.
Here are links to the LEDs and Battery pack I used. Amazon AA battery pack and Amazon pico LED lights
 
On to the bowsprit and making some of those fiddly bits...Here I've been following the methods of Blue Ensign from the log I referred to at the beginning of this thread. He steps through the method I used for making the chain plates and pieces for the various masts and booms. I also found a file that I could 3D print for the filigree on the bow, worked out great.
IMG_0148.jpgIMG_0149.jpgIMG_0150.jpgIMG_0152.jpg
In this last pic I have removed the catheads. Wish I had done it sooner as they get mangled every time you get anywhere near them. I've got them set aside with the anchors to go on after I've finished everything else.
IMG_0153.jpg
 
Masts and standing rigging next. I did not follow the advice of doing the rigging with the masts off. I had already glued them in place before I saw this suggestion. Hence as I've seen in many build logs... read ahead. Especially since most of the oops I screwed up comes after a post where you've already done or installed the thing that you later say "I should have done that differently." :rolleyes:IMG_0161.jpgIMG_2318.JPGIMG_2319.JPG
And now the standing rigging...here's my version of the rat lines jig with a guide paper behind it. I have seen other logs where the width of the jig is exactly the size of the ratline spacing and moved up after each line is tied. Will try that next time.
IMG_0162.jpgIMG_0168.jpgIMG_2321.JPGIMG_2335.JPG
 
At this point I took a break from rigging and started on the dories. The ones that came with the kits I thought were very flimsy and didn't like them. There are some posts about Bluenose dories in SOS. I also posted a Dory build thread which is here. Bluenose Dories Build
Here are the dories in case you just want a quick view of the highlights...
IMG_0171.jpgIMG_0172.jpgIMG_0175.jpgIMG_0178.jpgIMG_2360.JPG
Obviously there needs to be more sanding and cleanup... Here are the buckets and fish gaffs and the final dories with oars and sails as well.
IMG_2350.JPGIMG_2358.JPG
I went full Newfie on the dory paint job...ROTF
IMG_0243.jpg
 
During the last month I moved my shipyard. Here's the new and improved shipyard.
IMG_0179.jpgIMG_0250.jpg

Little side trip to making rope coils. Saw a few threads about this and after some thought came up with this idea.
IMG_0244.jpg
And here I am now just finished attaching the jumbo jib boom and the main gaff.
IMG_0245.jpgIMG_0246.jpg
Ok, so we're all caught up now. I've managed to squeeze the entire last 4 months of build into this mornings mega postings. I will now post as I go... Happy building everyone.
 
Hi Chris,
Wow you really have it going there! Very nice looking ship. Looks to me like you have your rigging down pat. I will study some of your techniques ,would it be possible for you to take some close ups of your blocks where they attach to the mast? Not so much the metallic hardware but the line to block attachment. I know exactly what you mean by getting too far ahead. I'm paying for it now trying to hang single and double blocks to the underside of the fore top especially after I set the shroud lines. I feel like I'm standing on my head trying to do it!
Ok @Daniel20 , here are some closer shots of the rigging and some blocks not yet installed. Including 1 ring ready for a block. I hope this is what you're looking for. If you want shots of anything else just ask. Thumbsup :D
IMG_0251.jpgIMG_0252.jpgIMG_0253.jpgIMG_0254.jpgIMG_0255.jpg
 
For all you Bluenose I builders I have created a set of flags based on my research. I've included two different versions of signal flags. These are all ready to send to 8.5 x 11 transfer paper. Here is the image. The pdf file attached below is the one you want for printing. They should all be the right size for a 1/64 scale build. These are all early 1900's signal flags. The British flag for Canada is the largest and the Nova Scotia flag is slightly smaller. Thumbsup :D
Screen Shot 2020-12-23 at 10.14.21 AM.png
 

Attachments

  • Bluenose.pdf
    115.8 KB · Views: 21
Last edited:
For all you Bluenose I builders I have created a set of flags based on my research. I've included two different versions of signal flags. These are all ready to send to 8.5 x 11 transfer paper. Here is the image. The pdf file attached below is the one you want for printing. They should all be the right size for a 1/64 scale build. These are all early 1900's signal flags. The British flag for Canada is the largest and the Nova Scotia flag is slightly smaller.
View attachment 200233
Do you have any bluenose scroll work or name suitable to put on transfer paper?
 
Do you have any bluenose scroll work or name suitable to put on transfer?
Here is the file I used for the filigree on the bow. I 3D printed it, painted it yellow then glued it on.
FilligreeVector.jpg
Here is the stern lettering, from Heinrich and his Bluenose build forum.
Bluenose Stern Lettering.png
Here is the file I used for the side lettering. Ignore the yellow and my name plate. :)
Bluenose Lettering.png
 
Back
Top