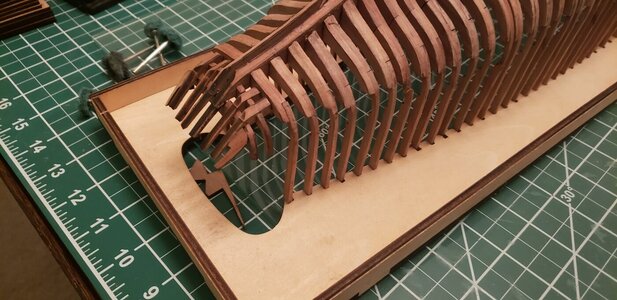
I seen that too Heinrich, I thought it was just my lack of coffee. Yet the other side looks like it is correct!!!
-

Win a Free Custom Engraved Brass Coin!!!
As a way to introduce our brass coins to the community, we will raffle off a free coin during the month of August. Follow link ABOVE for instructions for entering.
-

PRE-ORDER SHIPS IN SCALE TODAY!
The beloved Ships in Scale Magazine is back and charting a new course for 2026!
Discover new skills, new techniques, and new inspirations in every issue.
NOTE THAT OUR FIRST ISSUE WILL BE JAN/FEB 2026
- Home
- Forums
- Ships of Scale Group Builds and Projects
- Bluenose PoF Group Build
- Bluenose Group Build Logs
You are using an out of date browser. It may not display this or other websites correctly.
You should upgrade or use an alternative browser.
You should upgrade or use an alternative browser.
Bluenose, 1921, Nova Scotia - 1:72 Scale - YuanQing
- Thread starter Brewbrarian
- Start date
- Watchers 21
- Joined
- Jul 9, 2019
- Messages
- 497
- Points
- 323

It is an illusion of the angle in the photo. I dont yet have the MC Escher skills to create Möbius jigs.I seen that too Heinrich, I thought it was just my lack of coffee. Yet the other side looks like it is correct!!!
- Joined
- Jul 9, 2019
- Messages
- 497
- Points
- 323

- Joined
- Jul 9, 2019
- Messages
- 497
- Points
- 323

Hi Don,Looks great Eric, happy to see the damage was repairable. Any problems getting the frames into the jig and keel?
I would recommend widening the notch in the frames with a file, and filing the fore and aft verticals of the notches in the keel. They should slide on smoothly and firmly, but you'll need to adjust them a fair bit to keep from forcing too much and causing breakage.
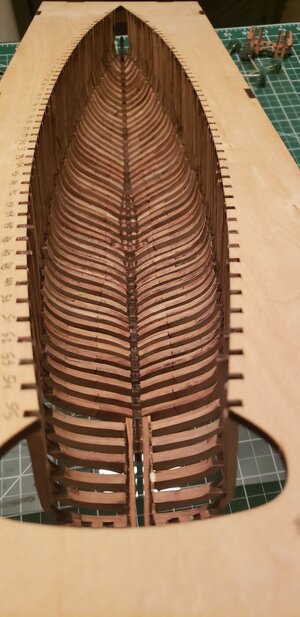
Optical illusion...it’s not.Eric - I'm confused. On the last picture with the holes drilled in Frame #31, the jig seems to be upside down?
- Joined
- May 26, 2020
- Messages
- 205
- Points
- 143

Are you gluing each frame as you fit them to the keel and jig at the same time?
I am ready to start glueing, and am confused on how to do it.
I think I need a play by play
I am ready to start glueing, and am confused on how to do it.
I think I need a play by play
- Joined
- Jul 9, 2019
- Messages
- 497
- Points
- 323

Hi @marter1229 ,
For attaching frames to the keel, this is how I proceeded. I don't read Chinese, so I'm proceeding dangerously on instinct here, so be warned. However, the instructional images seem to indicate that this much is safe.
For attaching frames to the keel, this is how I proceeded. I don't read Chinese, so I'm proceeding dangerously on instinct here, so be warned. However, the instructional images seem to indicate that this much is safe.
- Attach the fore- and aftmost frames #1 and #49--Aftmost I think I only went to about 40 here since I was worried about the more delicate aft frames.
- I also put one frame in the waist here for support, but when there is a frame both in front of and behind the one you are inserting, it does make it more difficult and may necessitate inserting from underneath the jig to get it into place.
- These frames hold up the keen as you insert additional frames; it is quite delicate at first, and at this point the whole assembly is resting on four/six spindly little legs, so be very careful
- Begin filing and fitting the frames one by one, moving from bow to stern
- I would do a rough filing of the frame notch inside port and starboard, and then a light filing of the vertical edges of the keel notch to widen it slightly
- Dry fit the frame to the keel and adjust with more filing if necessary
- Then remove the frame, apply glue in the notch and attach
- This is a bit tricky, but I found if you come in from behind the last installed frame and below the upside-down keel, fit the notches and then gently rotate the frame into position. As the top timbers (arms of the frame) move forward, you can gently pinch them together and move them forward, notch by notch, until they are in their proper numbered position.
- Here I give a firm upward (toward the keel) press at the inside center of the frame to push it into its final position
- The bottom edge of the frame should just about meet the rabbet (the notch in the keel) at the fore, since the planks will lay across this point of the frame and sit snug at that angle in the rabbet. At the aft, they should closely follow the "bearding line" (the beveled wood at the rear keel) for a similar reason.
- I was not gluing the tips to the jig here, but Heinrich has said that we should. Mine still fit fairly snug in the jig--enough that I can pick the whole assembly up by the keel--so I'm not worrying about that at this point, but I could also do this after the fact if necessary. Your process may vary
- Proceed in this way for all frames moving from bow to stern
- Once I did a few frames, I got a pretty good sense of how much wood needed to be removed. I could then do this without the dry fit without problems, but don't go down that road unless you are sure.
- Images are coming.
Last edited:
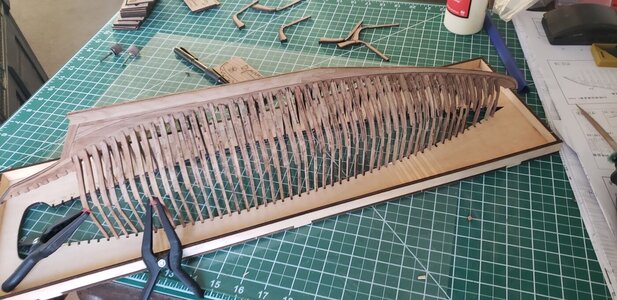
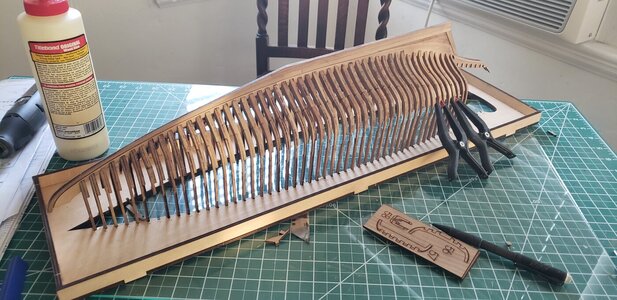
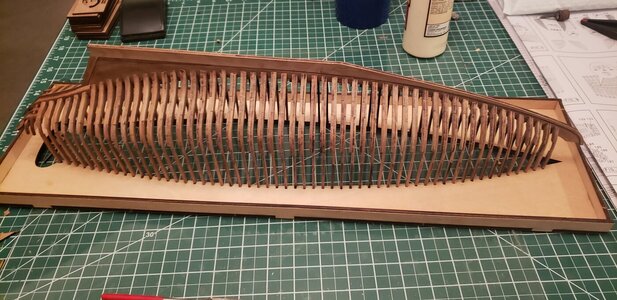
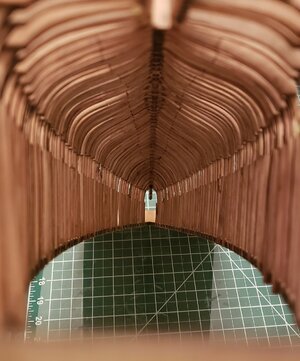
I love the cathedral shot!!!A bit more progress tonight on frames...Ive snapped more than a couple, but they seem to have patched up well for the most part... keel is just balanced on there for a peek, not set in the notches just yet.
Lots of pictures of frames in this log!!
View attachment 203326View attachment 203327
Kurt Konrath
Kurt Konrath
That is caused by depth of focus on frame 31 with hole, also focus on top of jig frame, but blurs the horizontal base in background to give image of plywood layers being part of base, not the top of sides. So "the jig is up", upright and correct in photo, just a bit weary on the eyes.Eric - I'm confused. On the last picture with the holes drilled in Frame #31, the jig seems to be upside down?
- Joined
- May 26, 2020
- Messages
- 205
- Points
- 143

Thanks for a great explanation. I will proceed slowly.Hi @marter1229 ,
For attaching frames to the keel, this is how I proceeded. I don't read Chinese, so I'm proceeding dangerously on instinct here, so be warned. However, the instructional images seem to indicate that this much is safe.
- I also put one frame in the waist here for support, but when there is a frame both in front of and behind the one you are inserting, it does make it more difficult and may necessitate inserting from underneath the jig to get it into place.
- These frames hold up the keen as you insert additional frames; it is quite delicate at first, and at this point the whole assembly is resting on four/six spindly little legs, so be very careful
- This is a bit tricky, but I found if you come in from behind the last installed frame and below the upside-down keel, fit the notches and then gently rotate the frame into position. As the top timbers (arms of the frame) move forward, you can gently pinch them together and move them forward, notch by notch, until they are in their proper numbered position.
- Here I give a firm upward (toward the keel) press at the inside center of the frame to push it into its final position
- The bottom edge of the frame should just about meet the rabbet (the notch in the keel) at the fore, since the planks will lay across this point of the frame and sit snug at that angle in the rabbet. At the aft, they should closely follow the "bearding line" (the beveled wood at the rear keel) for a similar reason.
- I was not gluing the tips to the jig here, but Heinrich has said that we should. Mine still fit fairly snug in the jig--enough that I can pick the whole assembly up by the keel--so I'm not worrying about that at this point, but I could also do this after the fact if necessary. Your process may vary
- Proceed in this way for all frames moving from bow to stern
- Once I did a few frames, I got a pretty good sense of how much wood needed to be removed. I could then do this without the dry fit without problems, but don't go down that road unless you are sure.
- Joined
- Jul 9, 2019
- Messages
- 497
- Points
- 323

- Joined
- Jul 9, 2019
- Messages
- 497
- Points
- 323

Fantastic Eric, it is looking awesome!
Can you perhaps add a bit of stained glass?
- Joined
- Jul 9, 2019
- Messages
- 497
- Points
- 323

Thanks for the complimentary words. Overall, I'm pleased with the frames. I sanded most of the laser char from the frames using a Dremel, as they were being made. I wanted to leave some meat for final sanding, and expect to clean up the last vestiges of black with a clean, fine sanding once some internal strakes have been attached to stabilize the framework.
The half frames at the transom are kind of giving me problems as they want to come loose with any movement at all. I may decide to use a wire post to help secure their attachment to the keel. Curious to see how other folks mange these.
Now on to the keelson... another satisfying step.
The half frames at the transom are kind of giving me problems as they want to come loose with any movement at all. I may decide to use a wire post to help secure their attachment to the keel. Curious to see how other folks mange these.
Now on to the keelson... another satisfying step.
- Joined
- Jul 9, 2019
- Messages
- 497
- Points
- 323

Thanks for the complimentary words. Overall, I'm pleased with the Bluenose frames--and she does have some gorgeous curves. I sanded most of the laser char from the frames using a Dremel, as they were being made. I wanted to leave some meat for final sanding, and expect to clean up the last vestiges of black with a clean, fine sanding once some internal strakes have been attached to stabilize the framework.
The half frames at the transom are kind of giving me problems as they want to come loose with any movement at all. I may decide to use a wire post to help secure their attachment to the keel. Curious to see how other folks mange these.
Now on to the keelson... another satisfying step.
It is great to see such progress and commentary for those in your wake. . . nothing deceased or desiccating in your work. You are forging ahead while I only put up words and items not related to the challenges of the build. Great work. Rich
Eric, I hadn’t seen your build log recently, great work!
i’m blown away by your progress.
my work pace looks to be an order of magnitude slower than yours.
keep up the great work. I sure makes it easier on those who will follow.
Regards,
Dave
i’m blown away by your progress.
my work pace looks to be an order of magnitude slower than yours.
keep up the great work. I sure makes it easier on those who will follow.
Regards,
Dave


