Bluenose by Liebre

Hello Henk. That is an exceptionally clean-looking frame. In retrospect, your policy of one frame a day may actually be a very good one. That way you get to focus entirely on one thing and do that perfectly. So as far as the time goes - no worries there!~
 
Spent a lot of time lately to complete the keel and a lot of time sanding #18
IMG_5043.JPG

#18 , not glued with Bison wood glue, or other wood glue, but with Zap Z-Poxt 2 component glue Did
some tests with wood glue, to nothing wrong with it, but dries very quickly leaving little time to correct
Z-Poxy behaves like soap on a wet floor for the first 5 minutes, then a very good adhesion Sliding
 
Last edited:
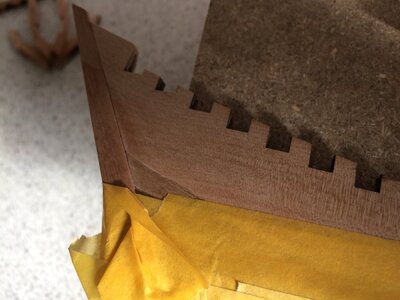
#20 and #21 , chamfered, so that there is room to apply the first planking later.
Have a good look at the posts of Peter #47 , this method has been adopted.

The rebate is determined with the help of one of a custom-made slats, this is now narrower than a plank thickness, so that the first batten of the planking will be skimmed off and then slid in between
 
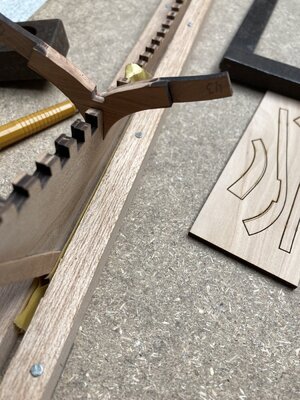
I first made a simple construction board where the keel is clamped
The space of the trusses which is made to measure to the keel (about 15 to 20 minutes per truss, files fit, measure files, etc.)
 

Attachments

  • IMG_5036.JPG
    IMG_5036.JPG
    206.7 KB · Views: 17
Then a slats which 10 trusses overlap, which is chamfered, to check whether the batten fits with the truss, with the keelson there to check everything.
A bit more work, but I think it will translate into the progress of the hull
Later I will put the supplied Jig and see how this will turn out
IMG_5042.JPG
 
Last edited:
A small update to help another builder get started.

The slots in the frames and the keel.

Sometimes it is difficult to see whether these connect well and do not come out too high.

The solution is very simple:

Determine the distance with, for example, a piece of paper the size of the slot of the keel and mark this with a thin pencil line which you can easily remove later when the rafter is glued.
If you have marked correctly, see the line sticking out above the keel and know that you are in the right position.

As an example frame 43
back.JPG
 
Last edited:
I'm still working on the frames and have arrived at frame 50 to 54
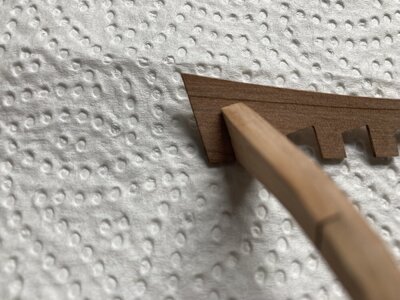
Before gluing the parts (19 and 65) together I lightly filed the openings where we enter the frames so that they fit neatly
I'm starting to have doubts here, I check regularly to the photos that Peter has posted because it
extracts a lot of information When I look at his photo of his post #266 (photo Kiel95) I see that the connection of the frame on the photo looks a bit different than my photo
My frame is a bit more skewed
More filing of the frame is always possible ..
Please advice for help
vraag.jpg
 
Hi Henk,
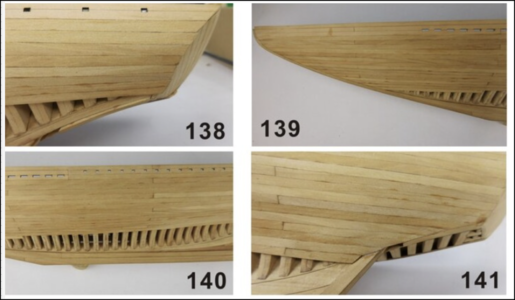
Please keep this pictures from the manual pag. 23 in mind:
1630490281744.png
Special picture 141. And the end:
-when you made the bevels on those frame parts;
-when you dry fitted those half frames of the stern (plus all the others);
-with the tops in the jig and the bottom on the keel;
the hull planks must flow over the frames to the middle part between that sticks out a little bit.
Regards, Peter
 
Ok
Thanks Peter
I am not yet ready to have the frames in the mold

few steps too early…
The inexperience (uncertainty) plays a part.

I have a lot to look at your photos and check back regularly, for construction.
Regards,
Henk
 
Ok
Thanks Peter
I am not yet ready to have the frames in the mold

few steps too early…
The inexperience (uncertainty) plays a part.

I have a lot to look at your photos and check back regularly, for construction.
Regards,
Henk
Ok, Henk.
But please, look also in the other build-log's. They have also managed this 'problem'. Mine is not the 'holy grail'.
Regards, Peter
 
Back
Top