-

Win a Free Custom Engraved Brass Coin!!!
As a way to introduce our brass coins to the community, we will raffle off a free coin during the month of August. Follow link ABOVE for instructions for entering.
-

PRE-ORDER SHIPS IN SCALE TODAY!
The beloved Ships in Scale Magazine is back and charting a new course for 2026!
Discover new skills, new techniques, and new inspirations in every issue.
NOTE THAT OUR FIRST ISSUE WILL BE JAN/FEB 2026
You are using an out of date browser. It may not display this or other websites correctly.
You should upgrade or use an alternative browser.
You should upgrade or use an alternative browser.
Bomb vessel cross section - scale 3/8 or 1:32
- Thread starter Dave Stevens (Lumberyard)
- Start date
- Watchers 16
Hello Daniel,you need to write a Pm to @Winston about the plans he is a member here on the forum .He owns the copyright and may get you a set.Hi Dave, I'm trying to get hold of the plans for this bomb vessel section ,however the MSB site indicates that they are only available in US Canada. Can you direct me to somewhere else ?Thanks for any help you may be able to offer.. Dan w
- Joined
- Dec 1, 2016
- Messages
- 6,378
- Points
- 728

the plans are owned and copyrighted by Model Ship Builder at one time they were available on the site but have been removed when Winston decided to produce a kit.
So at this time I would say they are not available
So at this time I would say they are not available
Quick update. Because of Dave's build here I have decided to post the plans to the NBM site (http://navyboardmodels.com/plans_modern). They are available in two scales. 1/4" and 1/2". You will have to re-scale them if you wish to build at the scale Dave is building (3/8" scale). We'll have to sort out where the timbering kit will be posted and what it will cost. There was some discussion between Dave and I on this in the past but I don't recall what we decided would be best to do.
OK THANKS TO BOTH DAVE AND WINSTON, JUST UPDATE US AS TO WHAT IS HAPENING FOR THE ISSUING OF THE KIT. Don
- Joined
- Dec 1, 2016
- Messages
- 6,378
- Points
- 728

my idea was to build the deck outside the hull then drop it in and mark the locations of the beams. I thought of this because all the knees are pre cut and they will determine the distance between the beams. so if the deck is built i will know exactly where the beams fall.
Well the idea does not work because the hull tumbles inward so the top is smaller than the deck location. you can not install the deck in one piece.
a new plan is needed.
Well the idea does not work because the hull tumbles inward so the top is smaller than the deck location. you can not install the deck in one piece.
a new plan is needed.
Last edited:
...two pieces cut\joined at the centerline, perhaps? The mid plank overlapped the second half of the deck. I saw Andrey @KUDIN made gun deck in his model LeFleuronWell the idea does not work because the hull tumbles inward so the top is smaller than the deck location. you can not install the deck in one piece.
a new plan is needed.
- Joined
- Dec 1, 2016
- Messages
- 6,378
- Points
- 728

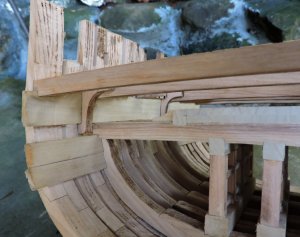
getting back to the deck, I can not build it outside the hull and drop in in place like I thought so I will construct it in the hull piece by piece. First piece is the clamps and they have notches in them for the beams. Normally when building a deck you would set all the beams in place then cut and fit the lodging knees to fit between the beams. In this case the knees are pre cut so they will determine the spacing of the beams. Cutting the notches in the clamps while the clamps are not in the hull would be easier. I could put the clamps in a vice, use a razor saw and cut the sides of the notches and just chip out the notch. The question is if i glue the clamps in the hull without the notches how easy will it be to cut the notches as i build the deck?
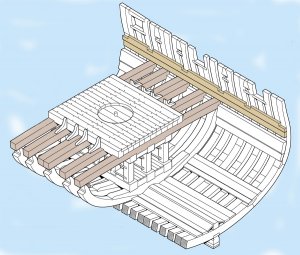
cutting the notches depends on the wood you use, because the clamps are against the inside of the frames you can not use a razor saw to cut the sides of the notch. The notches have to be done with just a knife. If you are using a hard wood cutting the notches will be difficult, but if you use a softer wood then cutting the notches is much easier.
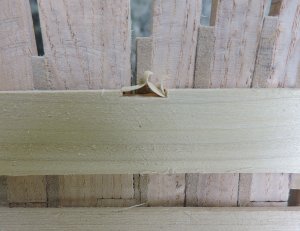
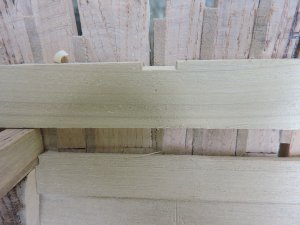

cutting the notches depends on the wood you use, because the clamps are against the inside of the frames you can not use a razor saw to cut the sides of the notch. The notches have to be done with just a knife. If you are using a hard wood cutting the notches will be difficult, but if you use a softer wood then cutting the notches is much easier.


- Joined
- Dec 1, 2016
- Messages
- 6,378
- Points
- 728

There will be a lot of notches to cut and all these notches will line up with each other. so giving a little thought to the wood you use will make a big difference. One thing about this project is learning and developing your knife skills. This is something you can apply to future model building.
If you have the tools you can cut these notches with a mill but in this build it is more about using basic tools.
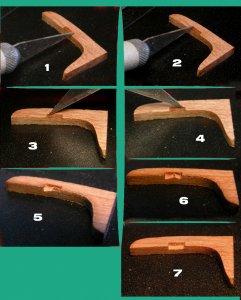
Cutting a notch 1 cut a stop cut on the side of the notch 2 do the same to the other side 3 in the corner stab downward and toward the center 4 repeat the last step 5 start your cut in the center of the notch and cut toward the side 6 do this to both sides of the notch 7 slice across the bottom.
If you have the tools you can cut these notches with a mill but in this build it is more about using basic tools.

Cutting a notch 1 cut a stop cut on the side of the notch 2 do the same to the other side 3 in the corner stab downward and toward the center 4 repeat the last step 5 start your cut in the center of the notch and cut toward the side 6 do this to both sides of the notch 7 slice across the bottom.

- Joined
- Dec 1, 2016
- Messages
- 6,378
- Points
- 728

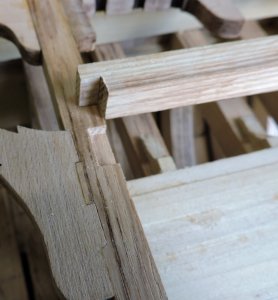
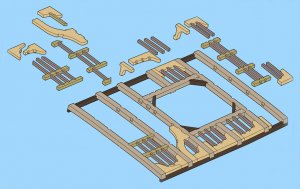
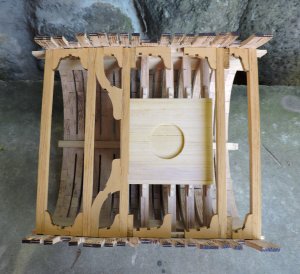
if you purchase a set of laser cut parts this is what you get for the deck. what i did was to set the end beam on the right in place then the lodging and hanging knee followed by the next bean and so on until i had all the beams and ledges in place.
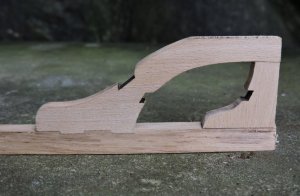
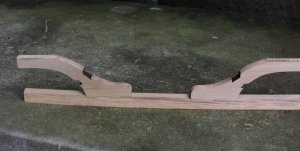
when I got to the two long arm knees I had to cut notches in the side of the beam.
first set the location of the notches and make a cut.
clamping the beam in a vice I set the depth of the notch using the knee
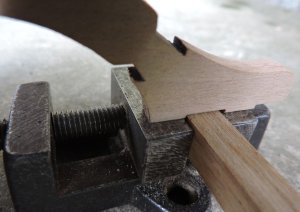
from here on it is just a matter of cutting the notch until you are level with the surface of the vice.
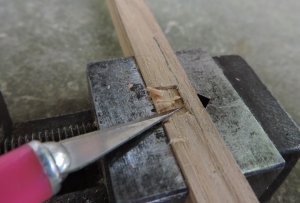
and done
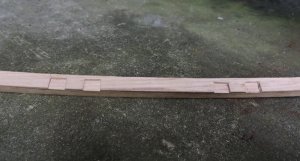
then check your fit
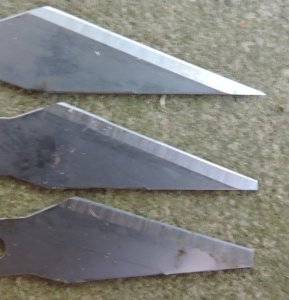
Exacto blades tend to break off the tips, that is a good thing and I save the broken blades because they work great for cutting notches, the sharp tip will dig into the wall of the notch as where a flat tip will scrape along the edge. sometimes I run the end on a stone and sharpen it like a chisel.

when I got to the two long arm knees I had to cut notches in the side of the beam.

first set the location of the notches and make a cut.

clamping the beam in a vice I set the depth of the notch using the knee

from here on it is just a matter of cutting the notch until you are level with the surface of the vice.

and done

then check your fit

Exacto blades tend to break off the tips, that is a good thing and I save the broken blades because they work great for cutting notches, the sharp tip will dig into the wall of the notch as where a flat tip will scrape along the edge. sometimes I run the end on a stone and sharpen it like a chisel.

Last edited:
- Joined
- Dec 1, 2016
- Messages
- 6,378
- Points
- 728

- Joined
- Dec 1, 2016
- Messages
- 6,378
- Points
- 728

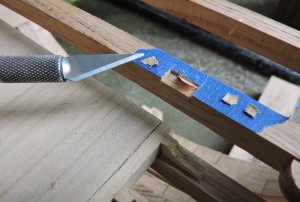
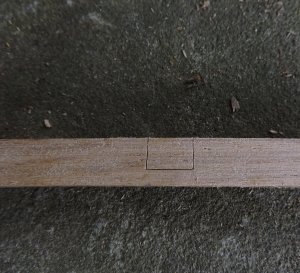
moving on to framing in the mortar pit I need to add the short side beams and notch them into the main beams. First cut a section of beam so its length comes to the center or close to it of the two main beams. a little trick i do is use masking tape then position the beam and cut around the ends with a new sharp blade.
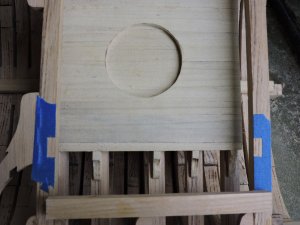
by using tape it gives me a sharp clean edge to go by. The trick is not to use a lot of pressure just enough to cut the tape.
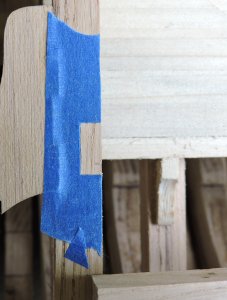
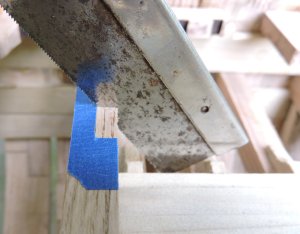
one way to go about cutting the notch is to use a razor saw and cut along the inside of the tape until to get to the back edge. Watch the angle of your cut or you might end up with cutting the face of the beam. Another way i have cut these notches is to just cut along the tape edge with a knife.

by using tape it gives me a sharp clean edge to go by. The trick is not to use a lot of pressure just enough to cut the tape.

one way to go about cutting the notch is to use a razor saw and cut along the inside of the tape until to get to the back edge. Watch the angle of your cut or you might end up with cutting the face of the beam. Another way i have cut these notches is to just cut along the tape edge with a knife.

- Joined
- Dec 1, 2016
- Messages
- 6,378
- Points
- 728

cutting notches in steps makes the notches easier and once you have the method down you can cut notch after notch with great accuracy.
what you are looking at in the next two images is a cut starting at the edge of the beam and cutting at an angle toward the back of the notch and downward along the saw cut. By doing this it leaves a wedge shaped piece of wood in the notch.
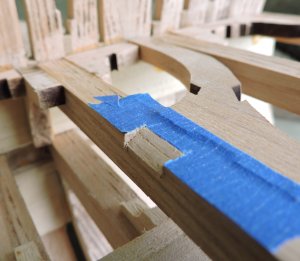
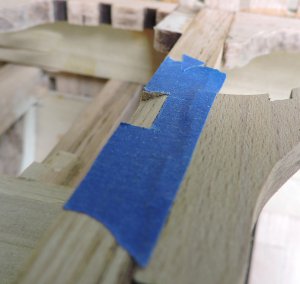
what you are looking at in the next two images is a cut starting at the edge of the beam and cutting at an angle toward the back of the notch and downward along the saw cut. By doing this it leaves a wedge shaped piece of wood in the notch.


- Joined
- Dec 1, 2016
- Messages
- 6,378
- Points
- 728

my next cuts are to remove the wedge of wood still in the notch, looking straight on you can see the upper edge of the wedge is level with the surface of the beam
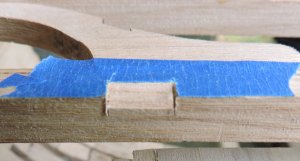
with a new sharp blade make a cut along the back edge. Do not use a lot of pressure when cutting along the tape because the cut will tend to follow the grain rather than the straight edge of the tape. so first a light scoring cut and then use a little more pressure to make more cuts. Once you have gone deep enough slicing off the top of the wedge is quick and easy.
I keep doing this first cut a little deeper on the back edge and remove more of the wedge.
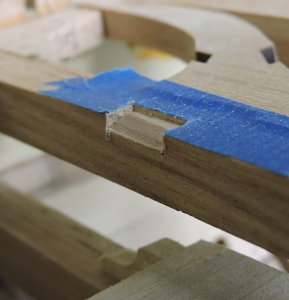

Last edited:
- Joined
- Dec 1, 2016
- Messages
- 6,378
- Points
- 728

- Joined
- Dec 1, 2016
- Messages
- 6,378
- Points
- 728

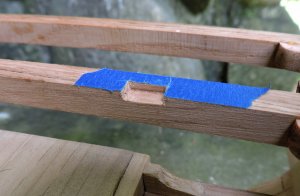
why the tape?
when you first cut around the end of the beam use a new and sharp blade and with little pressure cut the tape. your edge will be exact.
While you are cutting the notch stay true to the tape edge and cut the sides of the notch on a slight inward angle undercutting the tape edge so when you place the end of the beam in the notch it will rest against the top of the notch along the tape edge.
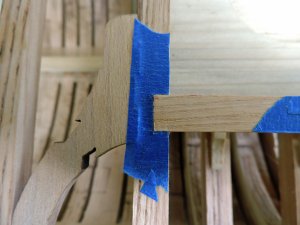
as long as you stay true to the tape edge once you pull the tape off you will get a nice clean tight fit. Keep in mind you are looking really close at the joinery,
and that's the trick to tight clean joinery plus a little practice doesn't hurt
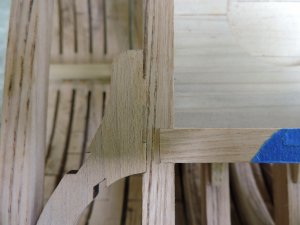
when you first cut around the end of the beam use a new and sharp blade and with little pressure cut the tape. your edge will be exact.
While you are cutting the notch stay true to the tape edge and cut the sides of the notch on a slight inward angle undercutting the tape edge so when you place the end of the beam in the notch it will rest against the top of the notch along the tape edge.

as long as you stay true to the tape edge once you pull the tape off you will get a nice clean tight fit. Keep in mind you are looking really close at the joinery,
and that's the trick to tight clean joinery plus a little practice doesn't hurt

- Joined
- Dec 1, 2016
- Messages
- 6,378
- Points
- 728

- Joined
- Dec 1, 2016
- Messages
- 6,378
- Points
- 728

ok
we started with this
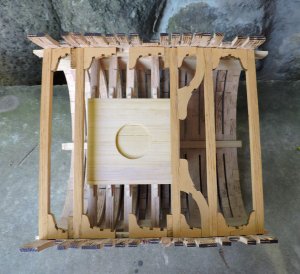
and finished up with framing in the mortar pit
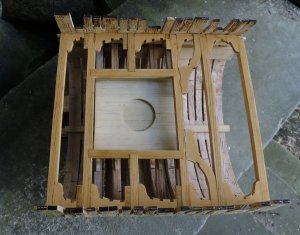
there are still a lot of notches to cut for the carlings and ledges which brings up a good question.
Why bother taking all the time to cut these notches when they are going to be covered and no one will see all you fine woodworking skills? In other words if you don't see it in the finished model don't bother doing it.
As i work on this project, it does come to mind this is really not about building a fine scale model it is more of a how to improve you woodworking skills and learning different methods. so you can say seeing you handy work or not in the final model is not the point. The point is a learning woodworking.
You can have the best of both worlds of showing off knife skills and a finished model. You can leave parts of the planking off to highlight the joinery, skip planking all together and show the model as a timbering model, use a tinted plastic for planking so you can see through it to the finer joinery work below.
I found it relaxing sitting out in the yard whittling out notches and notch by notch the job is getting done so this aspect of the build is something to consider a Zen thing. If you look at all the notches to be cut with a sense of dread AND they all get covered up in the final model than you need a quick and easy way to get the job done or short cuts (which i will cover later).
You need to plan out the model from the start and what you want to end up with. There are expensive rare woods you can use such as Boxwood or Pearwood even rosewoods. These woods are very hard and do not lend themselves well to knife carving. you will find cutting the notches by hand will take a lot longer because you can only chip out small pieces at a time. BUT these woods will polish up and give a rich appearance to the final model.
If you are of the mind set of building and using a knife to improve your modeling skills i suggest softer woods like Poplar, Basswood or soft Maple. Don't get me wrong these softer woods also make a fine looking model.
for me it is neither reason stated above I view the model as a prop to be used to create this how to do it topic.
we started with this

and finished up with framing in the mortar pit

there are still a lot of notches to cut for the carlings and ledges which brings up a good question.
Why bother taking all the time to cut these notches when they are going to be covered and no one will see all you fine woodworking skills? In other words if you don't see it in the finished model don't bother doing it.
As i work on this project, it does come to mind this is really not about building a fine scale model it is more of a how to improve you woodworking skills and learning different methods. so you can say seeing you handy work or not in the final model is not the point. The point is a learning woodworking.
You can have the best of both worlds of showing off knife skills and a finished model. You can leave parts of the planking off to highlight the joinery, skip planking all together and show the model as a timbering model, use a tinted plastic for planking so you can see through it to the finer joinery work below.
I found it relaxing sitting out in the yard whittling out notches and notch by notch the job is getting done so this aspect of the build is something to consider a Zen thing. If you look at all the notches to be cut with a sense of dread AND they all get covered up in the final model than you need a quick and easy way to get the job done or short cuts (which i will cover later).
You need to plan out the model from the start and what you want to end up with. There are expensive rare woods you can use such as Boxwood or Pearwood even rosewoods. These woods are very hard and do not lend themselves well to knife carving. you will find cutting the notches by hand will take a lot longer because you can only chip out small pieces at a time. BUT these woods will polish up and give a rich appearance to the final model.
If you are of the mind set of building and using a knife to improve your modeling skills i suggest softer woods like Poplar, Basswood or soft Maple. Don't get me wrong these softer woods also make a fine looking model.
for me it is neither reason stated above I view the model as a prop to be used to create this how to do it topic.
Last edited:
Excellent tutorial on cutting those mortises. Thanks, Dave!


