One thing I don’t like about planking the decks prior to installing them, is that some of the notches usually have to be adjusted. In addition, most decks have a curve downwards towards the outside edges or bulwarks. This was for water to drain out of the scuppers, at the waterway boards where the deck meets the bulwarks. If you plank the deck first and then try to bend it, then you will have gaps between boards and potential cracking. My preferred method is to install the decks first, and if they are curved I soak them in water first to help them bend without breaking. But before installing, I check all the notches to ensure they line up properly, and if not, I adjust them when dry fitting. Then I put glue on the frames where the deck sits, and I use tiny nails and a push nailer to nail the deck in place. Then I use a punch to sink the nail head below the deck. Then when they dry I start planking the decks, and if they are any gaps from adjusting the notches, the planks cover them! 
-

Win a Free Custom Engraved Brass Coin!!!
As a way to introduce our brass coins to the community, we will raffle off a free coin during the month of August. Follow link ABOVE for instructions for entering.
-

PRE-ORDER SHIPS IN SCALE TODAY!
The beloved Ships in Scale Magazine is back and charting a new course for 2026!
Discover new skills, new techniques, and new inspirations in every issue.
NOTE THAT OUR FIRST ISSUE WILL BE JAN/FEB 2026
You are using an out of date browser. It may not display this or other websites correctly.
You should upgrade or use an alternative browser.
You should upgrade or use an alternative browser.
Buccaneer 1:100 by Occre - Build log
Couple of questions…One thing I don’t like about planking the decks prior to installing them, is that some of the notches usually have to be adjusted. In addition, most decks have a curve downwards towards the outside edges or bulwarks. This was for water to drain out of the scuppers, at the waterway boards where the deck meets the bulwarks. If you plank the deck first and then try to bend it, then you will have gaps between boards and potential cracking. My preferred method is to install the decks first, and if they are curved I soak them in water first to help them bend without breaking. But before installing, I check all the notches to ensure they line up properly, and if not, I adjust them when dry fitting. Then I put glue on the frames where the deck sits, and I use tiny nails and a push nailer to nail the deck in place. Then I use a punch to sink the nail head below the deck. Then when they dry I start planking the decks, and if they are any gaps from adjusting the notches, the planks cover them!
1 - What punch do you use? Can you share purchase info? I was looking for one before heading to Mexico and couldn’t find one I wanted to purchase.
2 - This is my first plank on board deck (2nd ship overall), how should I have modified the build to bend the decks? In retrospect I saw someone install a small board on the tops of the keel. Had no idea what the purpose was, but it now after your comment makes me think that it was to create the bend in the deck.
3 - The ship doesn’t have any scuppers. Since the Buccaneer is not based on as real ship what’s your (and the group as a whole) in adding them?
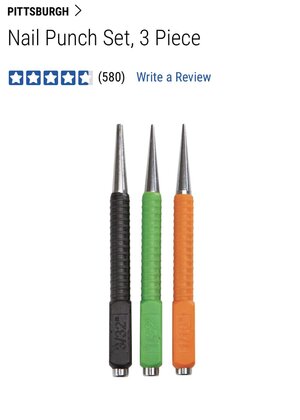
1. I don’t remember the exact brand, but something very small like this…I use a 1/16” punch…Couple of questions…
1 - What punch do you use? Can you share purchase info? I was looking for one before heading to Mexico and couldn’t find one I wanted to purchase.
2 - This is my first plank on board deck (2nd ship overall), how should I have modified the build to bend the decks? In retrospect I saw someone install a small board on the tops of the keel. Had no idea what the purpose was, but it now after your comment makes me think that it was to create the bend in the deck.
3 - The ship doesn’t have any scuppers. Since the Buccaneer is not based on as real ship what’s your (and the group as a whole) in adding them?
2. You shouldn’t have to make a camber in your decks, the model kit frame should have one. Here is a picture of a frame with a camber, it is very slight and almost unnoticeable.
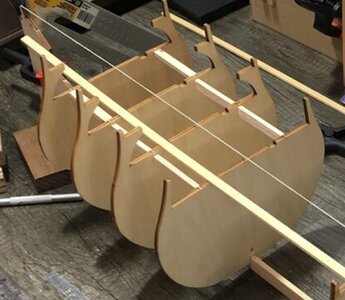
So if your kit frames have no camber, I would not add one.
3. I would not worry about adding scuppers, unless it’s a detail you feel strongly about adding. Some people do, and some don’t.
Here is my deck on my recent build …
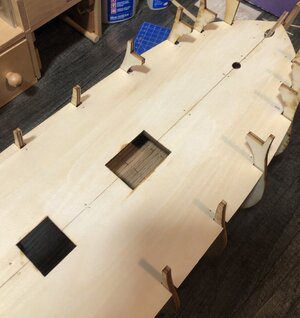
As you can see, after adjusting the notches to fit the frames properly, there are gaps. Also you can see the nails.
After planking, the gaps are covered…
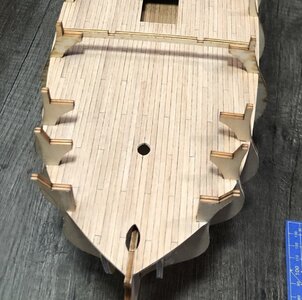
I prefer nails because they eliminate the need for clamps, and if you use a punch to drive them below the surface of the deck, you can just plank over them. And you have that extra bond of glue and nails.
Beautiful decking. Thanks for the info and pics. Are the deck planks long strips with the “lengths” drawn in with a pencil or are they shorter boards each individually glued down (I assume they are glued down).1. I don’t remember the exact brand, but something very small like this…I use a 1/16” punch…
View attachment 373977
2. You shouldn’t have to make a camber in your decks, the model kit frame should have one. Here is a picture of a frame with a camber, it is very slight and almost unnoticeable.
View attachment 373974
So if your kit frames have no camber, I would not add one.
3. I would not worry about adding scuppers, unless it’s a detail you feel strongly about adding. Some people do, and some don’t.
Here is my deck on my recent build …
View attachment 373975
As you can see, after adjusting the notches to fit the frames properly, there are gaps. Also you can see the nails.
After planking, the gaps are covered…
View attachment 373976
I prefer nails because they eliminate the need for clamps, and if you use a punch to drive them below the surface of the deck, you can just plank over them. And you have that extra bond of glue and nails.
Kurt Konrath
Kurt Konrath
If you decide to add basic scuppers along the top deck, you can just drill a hole between a few frames and file long and flat or square, just enough to let water out. Doesn't have to be pretty or very noticeable at all.
I have seen a few small boats with scuppers full width between alternating sets of frames, and about half a plank width high. Just two scuppers on back end of deck as water normally flows backwards as ship travels forward.
I have seen a few small boats with scuppers full width between alternating sets of frames, and about half a plank width high. Just two scuppers on back end of deck as water normally flows backwards as ship travels forward.
The deck was planked on this ship with 120mm long boards. I glue them down one at a time with wood glue that I spread on with a toothpick on the back. Then I press them in place. It’s tedious work, like putting down a wood floor in a home.Beautiful decking. Thanks for the info and pics. Are the deck planks long strips with the “lengths” drawn in with a pencil or are they shorter boards each individually glued down (I assume they are glued down).
In progress pic…
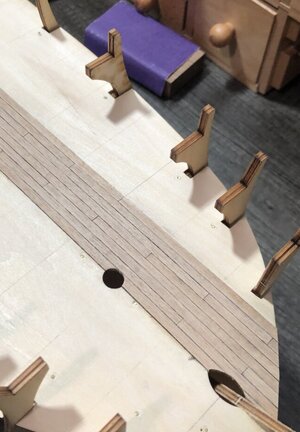
I edged the boards with a charcoal pencil, a little messy, but I like the look.
Last edited:
I agree - I like the look tooThe deck was planked on this ship with 120mm long boards. I glue them down one at a time with wood glue that I spread on with a toothpick on the back. Then I press them in place. It’s tedious work, like putting down a wood floor in a home.
In progress pic…
View attachment 374265
I edged the boards with a charcoal pencil, a little messy, but I like the look.
5/12
Very pleased with the repairs and now on to planking the walls between the various decks of the ship. This is done in the same manner as the deck; glueing thin boards onto a board. In this case, the “wall” boards.
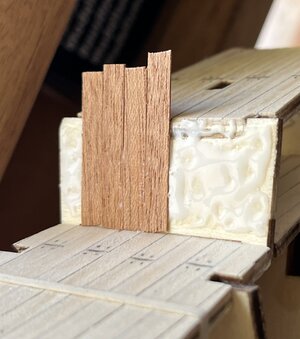
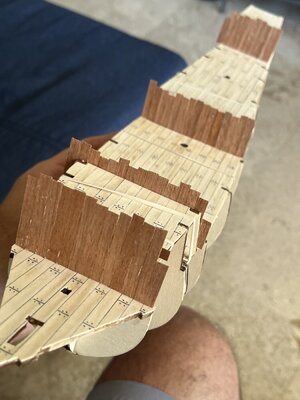
I am skipping a step due to availability of supplies. The deck is supposed to be varnished (satin) but I did not bring any down. I’ve done some searching around town and given how little I need, it just does make sense to buy a quart, even if I could find it.
After the planked deck walls dried, I trimmed the excess off. Gotta say I’m glad I learned about using a set of toenail clippers. Made this step really easy.
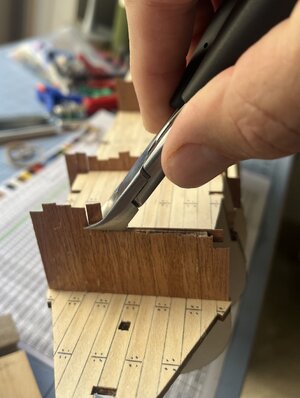
After clipping as much of the excess planks as possible off, I held a piece of scrap wood against the wall and then simply used a knife. The board held the planks in place while letting me cut the boards flush with the top of the wall.
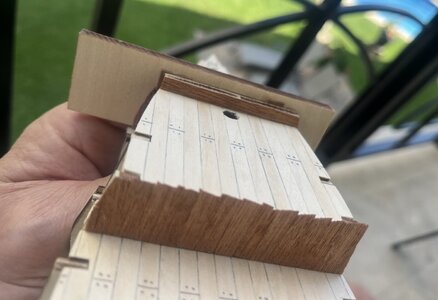
Some light sanding along the tops of each wall and this step is done.
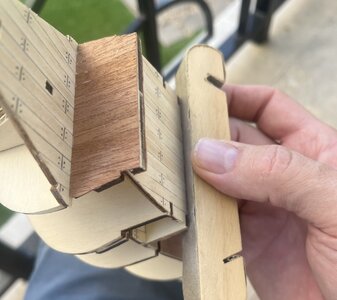
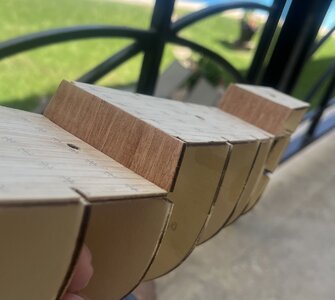
I’m supposed to stain the inner sides of the bulkwards, but just like not having varnish, I don’t have any stain. I did find both stain and varnish on Amazon - Mexico, but it’s very unlikely for them to arrive before we leave so I may “have” to wait until my next trip after buying it in the states.
To get as much done as possible, I might plank these inner walls instead of staining them. I’m sure I saw/read it in a Buccaneer build log somewhere, but I can’t find it. I believe I should have enough of the planks, so it’s really up to me to decide if I want to plank the walls now or wait until my next trip to stain them. I’ll sleep on it and make my decision in the morning.
So I’ll throw it out for comments… Do I wait and stain it (November-ish) or plank them now? I’m leaning towards planking them, but would be interested in anyone’s thoughts, especially if in do some would cause issues later in the build that my newbie-ism doesn’t realize.
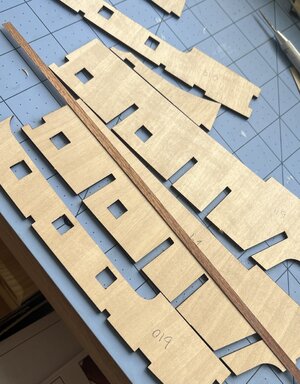
Time for this portion: 2 hours
Total time to date: 18.5 hours
Very pleased with the repairs and now on to planking the walls between the various decks of the ship. This is done in the same manner as the deck; glueing thin boards onto a board. In this case, the “wall” boards.


I am skipping a step due to availability of supplies. The deck is supposed to be varnished (satin) but I did not bring any down. I’ve done some searching around town and given how little I need, it just does make sense to buy a quart, even if I could find it.
After the planked deck walls dried, I trimmed the excess off. Gotta say I’m glad I learned about using a set of toenail clippers. Made this step really easy.

After clipping as much of the excess planks as possible off, I held a piece of scrap wood against the wall and then simply used a knife. The board held the planks in place while letting me cut the boards flush with the top of the wall.

Some light sanding along the tops of each wall and this step is done.


I’m supposed to stain the inner sides of the bulkwards, but just like not having varnish, I don’t have any stain. I did find both stain and varnish on Amazon - Mexico, but it’s very unlikely for them to arrive before we leave so I may “have” to wait until my next trip after buying it in the states.
To get as much done as possible, I might plank these inner walls instead of staining them. I’m sure I saw/read it in a Buccaneer build log somewhere, but I can’t find it. I believe I should have enough of the planks, so it’s really up to me to decide if I want to plank the walls now or wait until my next trip to stain them. I’ll sleep on it and make my decision in the morning.
So I’ll throw it out for comments… Do I wait and stain it (November-ish) or plank them now? I’m leaning towards planking them, but would be interested in anyone’s thoughts, especially if in do some would cause issues later in the build that my newbie-ism doesn’t realize.

Time for this portion: 2 hours
Total time to date: 18.5 hours
Plank them vertically, it will look better than stain on plywood. 
5/13 to 5/16
Small disclaimer… I’m still leaning the parts of a ship so PLEASE let me know if I’m referring to something incorrectly.
I’ve decided to plank the inner walls of the sides of the ship instead of staining them. The boards will be horizontal with vertical supports as I saw in a build log for the Golden Hind. And since the Buccaneer is a fictional ship, I’m not doing the actual ship any dis-service. I’m also renaming her “Molino” or Mill. Not the most glamorous name, but it’s the name of our condominium complex in Vallarta. I’ll research how and where to post it on the ship.
The vertical supports won’t go in until later for a variety of reasons, one of them being I want to varnish them to match the deck and I don’t have the varnish here in Mexico. I glued the planking on the bulkwards in much the same fashion as the deck was made.
In all there are 7 pieces that make up the bulkward walls, 3 along each side plus the piece on the stern. To make sure I don’t cut too much of the planks off (like I did on the decks), I’ll be taking extra time to dry fit each planked bulkward.
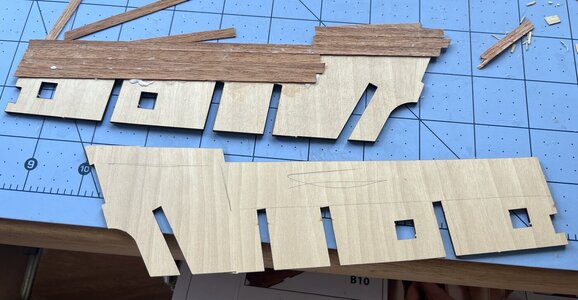
I then trimmed off the excess and sanded the edges smooth.
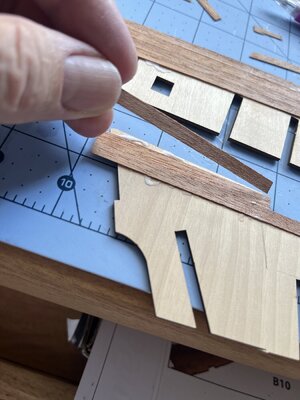
All the time dry fitting the pieces not just against the top of the hull/bulkheads, but also against any adjoining pieces. This step took a lot more time than I expected as each piece has small slots and tabs to align the bulkwards and tops of the bulkheads on the ship - and while they were fairly close to matches, they weren’t exact. Without being “exact”, the tops of the 7 bulkward walls would not match.
The 2 on the bow and thr 2 at midship needed just a little tweaking to get them where I wanted them. The ones on the stern were a different story. Each needed multiple slots opened up and even “deepened” a little bit for them to sit correctly.
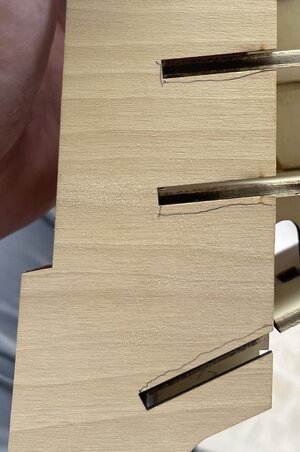
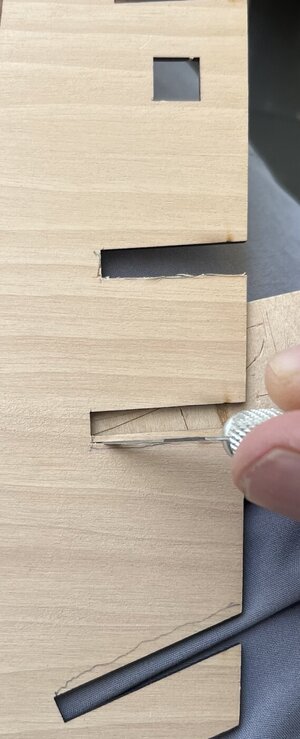
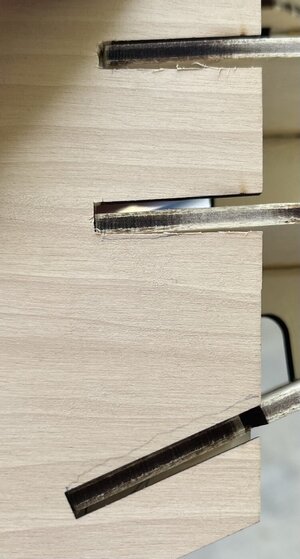
That left the last piece at the bow across the transom/poop deck. First I had to make the slots a little deeper since I added to the thickness of the tabs by planking the bulkwards. That was the east part.
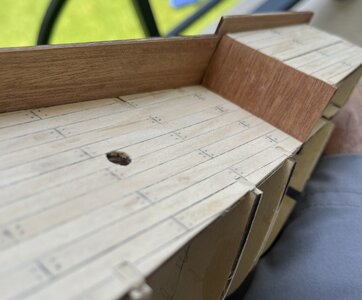
The next part was the transom/poop deck itself. Once I dry fitted these bulkwards, it became apparent that the poop deck was:
The wideness issue required some trimming and sanding to allow the bulkwards to lay down flat against the poop deck.
With all of them ready, I dry fitted all of them again and began glueing, starting with the 3 sections at the stern. In addition to glue, I used rubber bands (I don’t have any clamps big enough here in Mexico) and pins to hold the bulkwards to the bulkheads and frame while the glue set. I haven’t used CA glue on either ship yet, so I was a bit hesitant to start now. I’ll practice at some point in the near future.
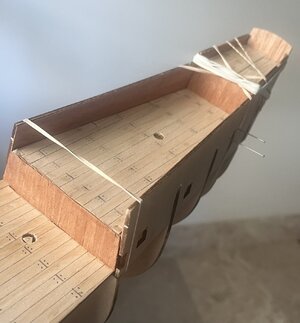
Even with all of the cutting and sanding, there is a small gap between the deck and the bulkward at the stern of the poop deck that I will need to add some boards to fill as well as one side will need a shim added to get it to align with the starboard side.
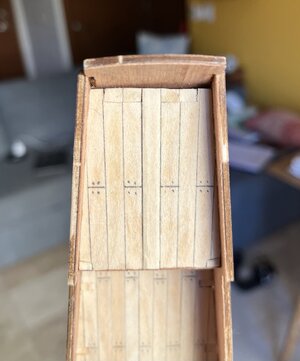
I wanted to add some scuppers to the main deck so I marked where I wanted them and drilled them. Not many (4 on each side) and not too big.
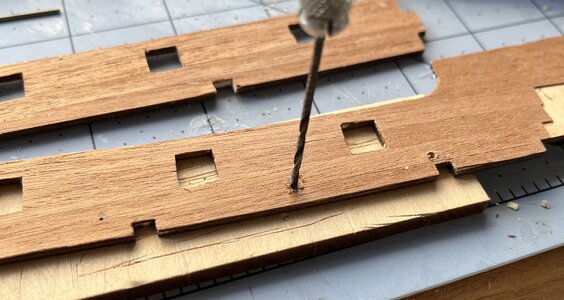
So the 3 sections towards the stern are complete with the 4 from bow to the midship still to be completed. My time in Mexico is waning so I need to use it efficiently to get to a point that I feel comfortable leaving the Molino alone in a closet for around 6 months.
Time for this portion: 7.5 hours
Total time to date: 26 hours
Small disclaimer… I’m still leaning the parts of a ship so PLEASE let me know if I’m referring to something incorrectly.
I’ve decided to plank the inner walls of the sides of the ship instead of staining them. The boards will be horizontal with vertical supports as I saw in a build log for the Golden Hind. And since the Buccaneer is a fictional ship, I’m not doing the actual ship any dis-service. I’m also renaming her “Molino” or Mill. Not the most glamorous name, but it’s the name of our condominium complex in Vallarta. I’ll research how and where to post it on the ship.
The vertical supports won’t go in until later for a variety of reasons, one of them being I want to varnish them to match the deck and I don’t have the varnish here in Mexico. I glued the planking on the bulkwards in much the same fashion as the deck was made.
In all there are 7 pieces that make up the bulkward walls, 3 along each side plus the piece on the stern. To make sure I don’t cut too much of the planks off (like I did on the decks), I’ll be taking extra time to dry fit each planked bulkward.

I then trimmed off the excess and sanded the edges smooth.

All the time dry fitting the pieces not just against the top of the hull/bulkheads, but also against any adjoining pieces. This step took a lot more time than I expected as each piece has small slots and tabs to align the bulkwards and tops of the bulkheads on the ship - and while they were fairly close to matches, they weren’t exact. Without being “exact”, the tops of the 7 bulkward walls would not match.
The 2 on the bow and thr 2 at midship needed just a little tweaking to get them where I wanted them. The ones on the stern were a different story. Each needed multiple slots opened up and even “deepened” a little bit for them to sit correctly.


That left the last piece at the bow across the transom/poop deck. First I had to make the slots a little deeper since I added to the thickness of the tabs by planking the bulkwards. That was the east part.

The next part was the transom/poop deck itself. Once I dry fitted these bulkwards, it became apparent that the poop deck was:
- Not level in relation to the quarter deck
- The upper front corners were too wide
The wideness issue required some trimming and sanding to allow the bulkwards to lay down flat against the poop deck.
With all of them ready, I dry fitted all of them again and began glueing, starting with the 3 sections at the stern. In addition to glue, I used rubber bands (I don’t have any clamps big enough here in Mexico) and pins to hold the bulkwards to the bulkheads and frame while the glue set. I haven’t used CA glue on either ship yet, so I was a bit hesitant to start now. I’ll practice at some point in the near future.

Even with all of the cutting and sanding, there is a small gap between the deck and the bulkward at the stern of the poop deck that I will need to add some boards to fill as well as one side will need a shim added to get it to align with the starboard side.

I wanted to add some scuppers to the main deck so I marked where I wanted them and drilled them. Not many (4 on each side) and not too big.

So the 3 sections towards the stern are complete with the 4 from bow to the midship still to be completed. My time in Mexico is waning so I need to use it efficiently to get to a point that I feel comfortable leaving the Molino alone in a closet for around 6 months.
Time for this portion: 7.5 hours
Total time to date: 26 hours
Kurt Konrath
Kurt Konrath
Looking good so far
5/17 to 5/19
Small disclaimer… I’m still leaning the parts of a ship so PLEASE let me know if I’m referring to something incorrectly.
The final push before the Molino hits the dry dock until my next time down here…
The front 4 bulkwards all went in fairly easy with only a bit of glue, a few rubber bands, and a few pins.
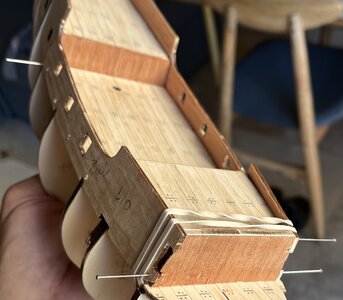
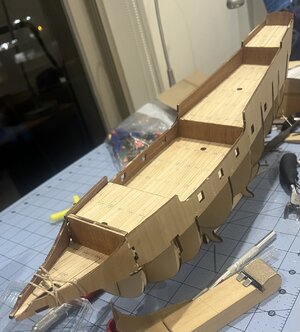
The last remaining things to clean up appear to be pretty straightforward and easy:
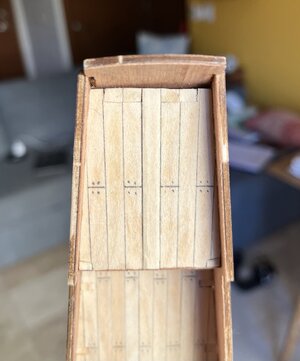
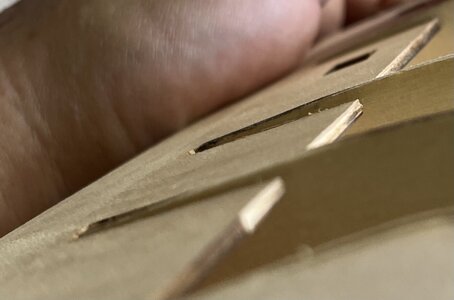
The items above were straight forward with the only item #3 being troubling, and it was only because where I needed to insert the small braces was too small for my fat fingers. Got all of them done, but ended up covering my fingers in glue too.
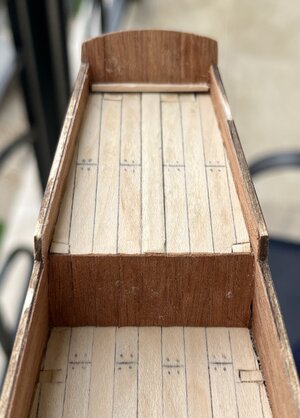
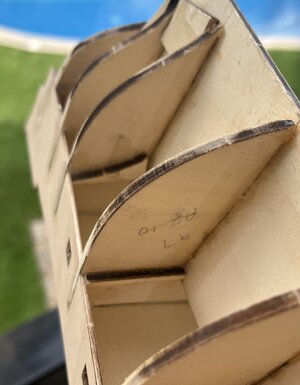
Sanding, followed by sanding, followed by even more sanding. The nice part is I’m at a good spot to call it quits for any more building for this trip, so I can sand for as little or as much as I want. The pictures showing the sanded bulkheads and bulkwards are a bit deceiving as they are flat/smooth. The different colors of the layers of the plywood, the burnt edges of the laser cut wood, and the glue filler all give it the look of uneven wood, but it’s not.
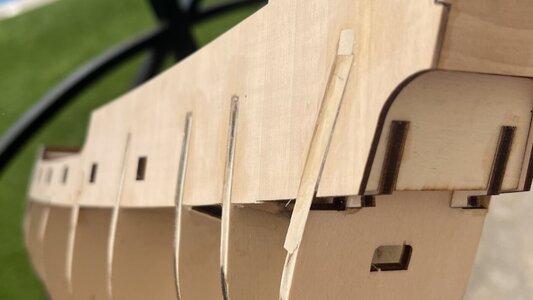
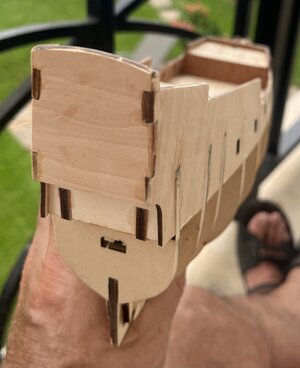
I know all of this will be covered in planking, but I gave it a bit extra attention since I didn’t want to start planking and then stop a day later. I’m hoping the smoothness of the transitions will make the planking both easier and better looking.
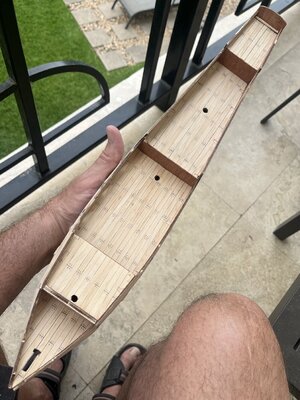
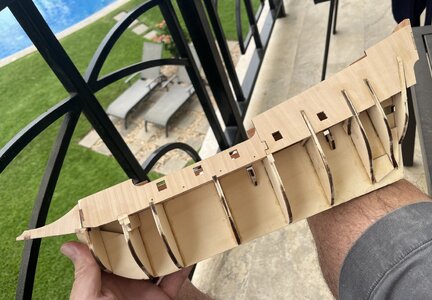
Time for this portion: 6.5 hours
Total time to date: 32.5 hours
Small disclaimer… I’m still leaning the parts of a ship so PLEASE let me know if I’m referring to something incorrectly.
The final push before the Molino hits the dry dock until my next time down here…
The front 4 bulkwards all went in fairly easy with only a bit of glue, a few rubber bands, and a few pins.


The last remaining things to clean up appear to be pretty straightforward and easy:
- All the bulkward joints need sanding
- The very rear of the poop deck needs some fillers
- The rear 3 or 4 bulkwards need to be pushed out slightly to align with the bulkheads
- Add a little filler to where 2 of the forward bulkheads meet the bulkwards


The items above were straight forward with the only item #3 being troubling, and it was only because where I needed to insert the small braces was too small for my fat fingers. Got all of them done, but ended up covering my fingers in glue too.


Sanding, followed by sanding, followed by even more sanding. The nice part is I’m at a good spot to call it quits for any more building for this trip, so I can sand for as little or as much as I want. The pictures showing the sanded bulkheads and bulkwards are a bit deceiving as they are flat/smooth. The different colors of the layers of the plywood, the burnt edges of the laser cut wood, and the glue filler all give it the look of uneven wood, but it’s not.


I know all of this will be covered in planking, but I gave it a bit extra attention since I didn’t want to start planking and then stop a day later. I’m hoping the smoothness of the transitions will make the planking both easier and better looking.


Time for this portion: 6.5 hours
Total time to date: 32.5 hours
That’s a good start! 
As far gluing tiny pieces, use tweezers and apply glue to the part with a toothpick.
Ps - bulwarks are the inner walls
As far gluing tiny pieces, use tweezers and apply glue to the part with a toothpick.
Ps - bulwarks are the inner walls
Good morning. After some adjustments, repairs and many hours she is coming together really well. Cheers Grant5/17 to 5/19
Small disclaimer… I’m still leaning the parts of a ship so PLEASE let me know if I’m referring to something incorrectly.
The final push before the Molino hits the dry dock until my next time down here…
The front 4 bulkwards all went in fairly easy with only a bit of glue, a few rubber bands, and a few pins.
View attachment 375156
View attachment 375157
The last remaining things to clean up appear to be pretty straightforward and easy:
View attachment 375158
- All the bulkward joints need sanding
- The very rear of the poop deck needs some fillers
- The rear 3 or 4 bulkwards need to be pushed out slightly to align with the bulkheads
- Add a little filler to where 2 of the forward bulkheads meet the bulkwards
View attachment 375159
The items above were straight forward with the only item #3 being troubling, and it was only because where I needed to insert the small braces was too small for my fat fingers. Got all of them done, but ended up covering my fingers in glue too.
View attachment 375161
View attachment 375163
Sanding, followed by sanding, followed by even more sanding. The nice part is I’m at a good spot to call it quits for any more building for this trip, so I can sand for as little or as much as I want. The pictures showing the sanded bulkheads and bulkwards are a bit deceiving as they are flat/smooth. The different colors of the layers of the plywood, the burnt edges of the laser cut wood, and the glue filler all give it the look of uneven wood, but it’s not.
View attachment 375164
View attachment 375165
I know all of this will be covered in planking, but I gave it a bit extra attention since I didn’t want to start planking and then stop a day later. I’m hoping the smoothness of the transitions will make the planking both easier and better looking.
View attachment 375166
View attachment 375167
Time for this portion: 6.5 hours
Total time to date: 32.5 hours
5/20
Here’s the last picture of the Molino for this trip. Yes, someone put Baby in the corner. I know I’ll miss working on her while back in Denver, but I have the Bluenose just waiting to be pulled out. Feel free to watch that build log.
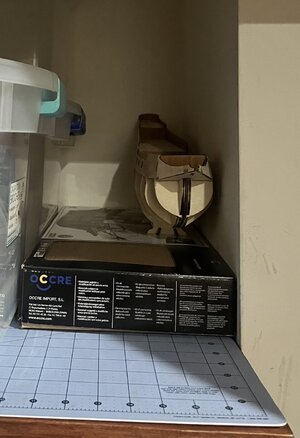
I’ll be taking the instructions and plans home with me to help me plan and prepare for my next time down here. I’ll make sure to have any and all paint, stain, and varnish that I need. This ship has a more radical hull than the Bluenose sitting at home, so hopefully I’ll be able to improve upon my first planking. The Molino is also a double planking, so I get to have double the fun/practice.
While getting ready for the trip home, my wife asked what I would work on next. I told her I’ve started down that mental path a couple of times and each time I tell myself to relax and focus on the reality that I have 2 unfinished ships that each still have a long way to go.
The Bluenose at home needs the decking while the Molino needs the hull double planked. Both still everything on their decks along with their masts and rigging. So I have s bunch of new adventures ahead.
I have not yet done any rigging. Well that’s not 100% true. Back in the late 80s I made a 36” plastic model of the Cutty Sark.
 I followed every tip they offered or could find (gotta remember the internet was a baby back in those days - no online build logs). I was very proud of her and carried her around for probably 20 years. I know she made the trip from Denver to Philly and pretty sure she made the trip a year later back to Denver, but that’s where my memory gets cloudy. I wish I could remember what happened to her, but it’s gone - both the ship and my memory of its demise.
Time for this portion: 0 hours
Total time to date: 32.5 hours
Here’s the last picture of the Molino for this trip. Yes, someone put Baby in the corner. I know I’ll miss working on her while back in Denver, but I have the Bluenose just waiting to be pulled out. Feel free to watch that build log.

I’ll be taking the instructions and plans home with me to help me plan and prepare for my next time down here. I’ll make sure to have any and all paint, stain, and varnish that I need. This ship has a more radical hull than the Bluenose sitting at home, so hopefully I’ll be able to improve upon my first planking. The Molino is also a double planking, so I get to have double the fun/practice.
While getting ready for the trip home, my wife asked what I would work on next. I told her I’ve started down that mental path a couple of times and each time I tell myself to relax and focus on the reality that I have 2 unfinished ships that each still have a long way to go.
The Bluenose at home needs the decking while the Molino needs the hull double planked. Both still everything on their decks along with their masts and rigging. So I have s bunch of new adventures ahead.
I have not yet done any rigging. Well that’s not 100% true. Back in the late 80s I made a 36” plastic model of the Cutty Sark.
 I followed every tip they offered or could find (gotta remember the internet was a baby back in those days - no online build logs). I was very proud of her and carried her around for probably 20 years. I know she made the trip from Denver to Philly and pretty sure she made the trip a year later back to Denver, but that’s where my memory gets cloudy. I wish I could remember what happened to her, but it’s gone - both the ship and my memory of its demise.
Time for this portion: 0 hours
Total time to date: 32.5 hours
Last edited:
Duplicate - removed
Can’t wait to pull this out of dry dock (we might go down for week but if not we’ll be down in December), but until then I get to work on my Bluenose.


