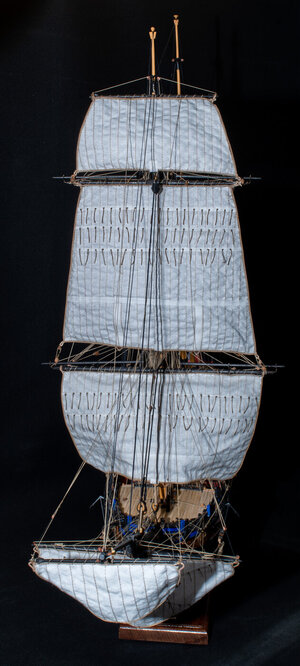
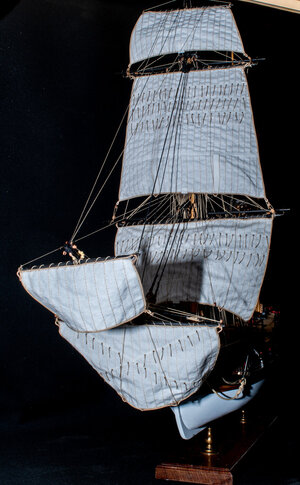
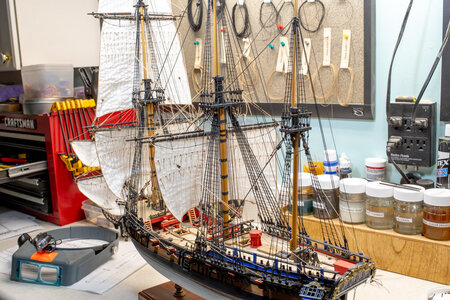
Build log: HMS Fly [COMPLETED BUILD]

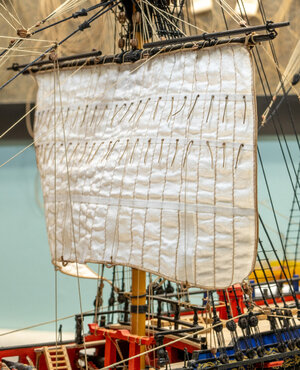
What king of sail cloth did you start with? We here can I get sail plans
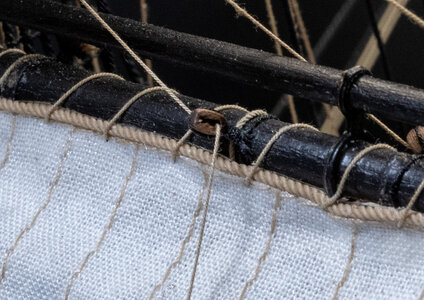
I bought the cloth from my local fabric store. I got the thinnest cotton they had, then ran it through the washing machine but didn't put it on a dry cycle. I wanted the wrinkles in it. The sail plans are from the book The fully framed model vol 4. The full book title is at the top of the second photo. The plans are to scale so all you have to do is scale it to your needs. I made a pattern on poster board then transferred it to the cloth. After the sewing was complete I covered the outside edge with fabric glue then trimmed around the outside. The bolt rope was also glued on with fabric glue. You will have to add a lot of extra blocks for the sail rigging, i.e. bolt ropes, buntlines, etc. Also I had to move the location of some block attachment points to accommodate the sails.

View attachment 376089View attachment 376090
Thanks a lot this is what I’m going to. I’m going to start the running rigging this week and I wonder at what stage I have start installing the sails.

IMG_0810.jpeg
 
The foremast has been completed. Things are getting a little tight. The main course is next and it should very interesting. Think I'll cover the project in a little more detail. There are several blocks and running rigging that needs to be added to handle the sails.
HMS Fly 76.jpgHMS Fly 77.jpgHMS Fly 78.jpg
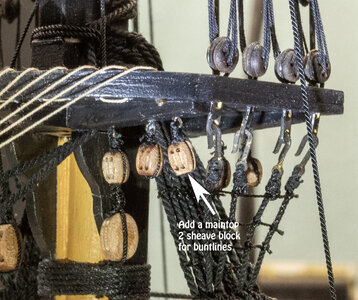
You will need to add blocks on the spar and on the mast for the buntlines.
HMS Fly 79.jpg

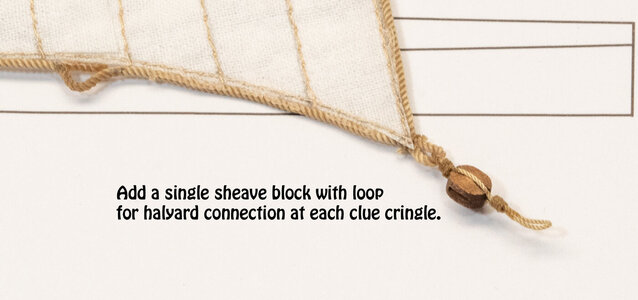
Also several blocks were added for the clue cringles and on the mast. Trying to figure out where rigging ties off has been a problem. Iv'e added a couple of pin rails that helped but the swan class books are a little vague in this department.
HMS Fly 80.jpg
 
The foremast has been completed. Things are getting a little tight. The main course is next and it should very interesting. Think I'll cover the project in a little more detail. There are several blocks and running rigging that needs to be added to handle the sails.
View attachment 377273View attachment 377274View attachment 377275
You will need to add blocks on the spar and on the mast for the buntlines.
View attachment 377276

Also several blocks were added for the clue cringles and on the mast. Trying to figure out where rigging ties off has been a problem. Iv'e added a couple of pin rails that helped but the swan class books are a little vague in this department.
View attachment 377277
Good evening Charlie. Wow - impressive. Stunning photos as well. Cheers Grant
 
WOW Charlie, I just reviewed your log, and you have a real beauty there! I like seeing how the sails integrate in amongst all the rigging. I see you had to get your own sewing machine, HA! I had to sew my own sails on my Vasa, my wife would not do it, but she let me learn on her machine. Glad I finally caught up you.
 
WOW Charlie, I just reviewed your log, and you have a real beauty there! I like seeing how the sails integrate in amongst all the rigging. I see you had to get your own sewing machine, HA! I had to sew my own sails on my Vasa, my wife would not do it, but she let me learn on her machine. Glad I finally caught up you.
Hey Daniel: It's been one of those "Wished I'd known about that yesterday" moments. It's too late to start over but by the time I finish I should be pretty good at sail making/installation. Think my next post will point out a couple of pitfalls I had and how to avoid them.
 
Hey Daniel: It's been one of those "Wished I'd known about that yesterday" moments. It's too late to start over but by the time I finish I should be pretty good at sail making/installation. Think my next post will point out a couple of pitfalls I had and how to avoid them.
I’m sure some of would love to read that document when you create it.
 
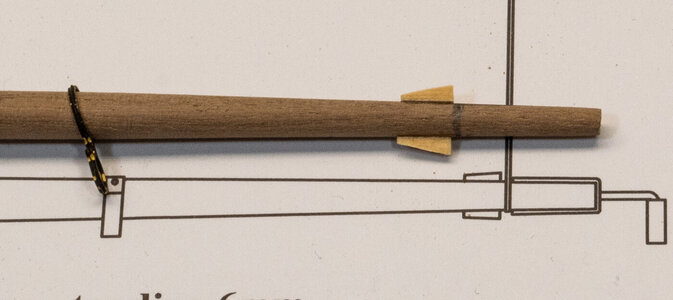
I'm starting on the main course and think I may be getting a little more proficient at sail installation. Here are a couple of hints for the beginner like me. First I drill the holes for the ends of the spar for stunsail boom hardware and also the foot ropes. Easier to drill when the dowel is not tapered. Next drill a hole through the center of the spar, fore and aft, and mast to anchor the spar exactly where I want it when I do the install. I use head pins from the jewelry department at the local HobbyLobby. They are cheap and work well for all sorts of stuff. After tapering the spar as per the plans, put the inboard hardware on the spar for the stunsail boom. I didn't do that when I started and had to sand all the spars end stops off and start over because the hardware didn't fit over the stops, at least I think they are called stops. Next I installed the stops 5mm more inboard on the spar to make room for the extra lines rigging the sails require. Time for some paint.

HMS Fly 81.jpg
You can see the 5mm extra space for the stops and the stunsail hardware inboard of them. Can't believe I did that twice.

HMS Fly 82.jpg
What happens when you don't have the extra space. A rats nest.

HMS Fly 83.jpg
Much neater when you have the space to attach the extra rigging for the sails.
 
I'm starting on the main course and think I may be getting a little more proficient at sail installation. Here are a couple of hints for the beginner like me. First I drill the holes for the ends of the spar for stunsail boom hardware and also the foot ropes. Easier to drill when the dowel is not tapered. Next drill a hole through the center of the spar, fore and aft, and mast to anchor the spar exactly where I want it when I do the install. I use head pins from the jewelry department at the local HobbyLobby. They are cheap and work well for all sorts of stuff. After tapering the spar as per the plans, put the inboard hardware on the spar for the stunsail boom. I didn't do that when I started and had to sand all the spars end stops off and start over because the hardware didn't fit over the stops, at least I think they are called stops. Next I installed the stops 5mm more inboard on the spar to make room for the extra lines rigging the sails require. Time for some paint.

View attachment 378109
You can see the 5mm extra space for the stops and the stunsail hardware inboard of them. Can't believe I did that twice.

View attachment 378110
What happens when you don't have the extra space. A rats nest.

View attachment 378111
Much neater when you have the space to attach the extra rigging for the sails.
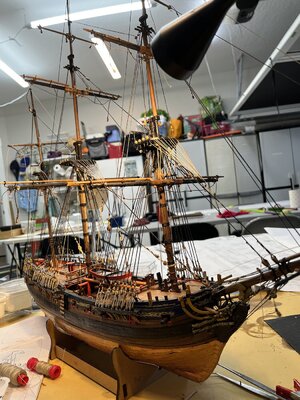
Charlie that is wonderful.
 
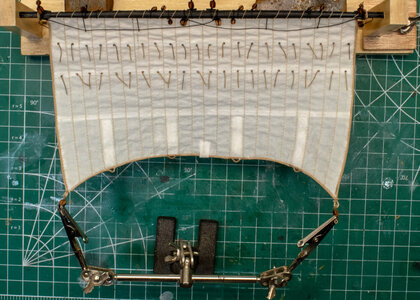
This is for those that want to add sails to their model. It may not be 100% accurate but I like the look so far. I do small changes to the process on every sail and by the time I'm done I should have it pretty close to correct. I watched "Master and Commander" many times to try and see how things were rigged. It was a big help. One shot of interest was when they raised the stunsails. I add the stunsail booms after I sew the sail to the yard, the next step.

I didn't add the bowlines. Things were getting a little cramped. If you were having the sail partially raised then the bowlines would look great. Next up is attach the sail and paint it with diluted glue so it holds its shape. Pix to follow. Sorry if I get the names of some parts incorrect. Still working on that.

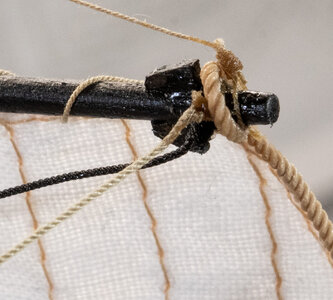
Here is what I did to make the yard and sail ready for rigging.

Buntline blocks.jpgClue block.jpg
 
Also add a 2 sheave block to each side of the main top to accommodate the buntlines. I also changed the single block called for on the instruction sheet to a 2 sheave.

View attachment 380631
Hi Charlie. This is “first class” rigging and detail. Those buntline blocks, deadeyes and futtock hooks are so cool. Enjoy threading those buntlines- tricky little things they are. Cheers Grant
 
Hi Charlie. This is “first class” rigging and detail. Those buntline blocks, deadeyes and futtock hooks are so cool. Enjoy threading those buntlines- tricky little things they are. Cheers Grant
Hey Grant. been an interesting build. A great learning experience. considering adding the jibs also if i’m not burned out after completing the masts.
 
Back
Top