Hi Roger. That sounds good. I have some of the thin plywood that I can use that for backing.

-

SUBSCRIBE TO SHIPS IN SCALE TODAY!
The beloved Ships in Scale Magazine is back and charting a new course for 2026!
Discover new skills, new techniques, and new inspirations in every issue.
NOTE THAT OUR NEXT ISSUE WILL BE July/August 2026 -

Win a Free Custom Engraved Brass Coin!!!
As a way to introduce our brass coins to the community, we will raffle off a free coin during the month of August. Follow link ABOVE for instructions for entering.
You are using an out of date browser. It may not display this or other websites correctly.
You should upgrade or use an alternative browser.
You should upgrade or use an alternative browser.
Build Log: RCMP St. Roch [COMPLETED BUILD]
- Thread starter Carleroo
- Start date
- Watchers 11
-
- Tags
- completed build
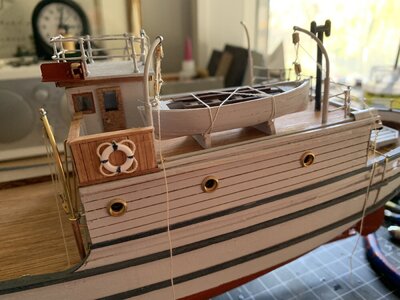
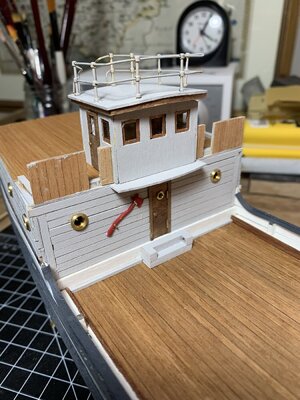
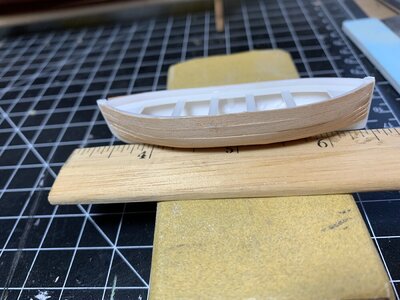
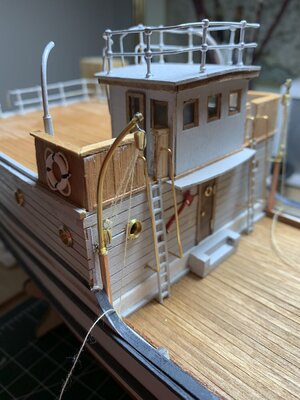
I made some more progress over the last several days. I added the roof, laid down the roof planks and completed the wheelhouse, also adding some of the railings. I'm seriously thinking of not painting the cabin roof. I know it departs from the authentic St. Roch, but I do like the look of the exposed wood. I am also not that keen on the plastic lifeboats, so I am experimenting with adding wooden cladding, using some very thin wood strips. It still needs some smoothing and refinement, but I'm pleased overall. I will likely do something similar to the insides of the boats, unless I decide to cover them.
Attachments
I'm sorry that you were close to an accident in measuring the ropes. I I will order some thinner thread, since all of what I have seems to have a lot of chuff. If I did want to use some of it, does beeswax smooth it out?I no longer have my scribbled notes on the actual sizes I used. So I tried to use my micrometer on the actual model today but after snagging the first rope that I measured I stopped. The small parts and lines are too delicate to withstand an accident, yikes!
Without actual ship measurements I originally estimated rope and wire sizes from museum photos. Lifeboat falls would have been a minimum 20mm manila (diameter). Topping lifts and guy tackle probably the same size or larger for this ship. Forestay halyard, as an example, probably 12mm. Based on those estimates if you look at a museum photo of the St. Roch you can see the aft wire on the foremast is slightly larger than the two shrouds with the rat boards. I think I used 0.3mm (actual 22mm) for the larger diameter and then a little smaller diameter for the other two. They might have been a little larger but at this scale there is not a lot of visual difference. Remember, the scaled lines you decide on must pass through the holes in blocks where relevant.
One of the enjoyable aspects of ship modelling, I find, is to research different sources for both some realism and for historical reasons. If you search for “St. Roch Vancouver images” or something similar you will find close-up photos of various parts of the ship, which will help you enormously. Don’t forget the museum staff may also be able to provide you with accurate sizes for all of the rigging presently installed, if that is important to you.

Hello Carl. This is my first venture into building a ship model - and my first look at the SOS forums. I have found the pictures in this building log astoundingly useful! Thank you.
Hi Bruelves, Many thanks. Are you building the St. Roch? Maybe with my photos you can avoid some of my mistakes!!Hello Carl. This is my first venture into building a ship model - and my first look at the SOS forums. I have found the pictures in this building log astoundingly useful! Thank you.
")
Hi Carl. I have started a build log for my attempt at St. Roch and will log my progress there. Your photos have already helped me enormously. I just need you to stay ahead of me so I can follow along!
Great...Maybe if you get ahead of me, I can rely on you.. I am making steady progress. I'm now retired and have lots of time to work on the kit. I found that the instructions on this model are very skimpy. There's no step by step manual with detailed diagrams of photos. I myself have relied heavily on other builders' experiences. You can find them on my previous posts in this log. I'll be excited to see your own progress.Hi Carl. I have started a build log for my attempt at St. Roch and will log my progress there. Your photos have already helped me enormously. I just need you to stay ahead of me so I can follow along!
I am also retired but I can only work on the kit in small bits - grandchildren to take care of. Only the diagrams in the instructions are of any use and they are skimpy too.

No issue at all Carl, my near clumsiness and focal distance issues at the momentI'm sorry that you were close to an accident in measuring the ropes. I I will order some thinner thread, since all of what I have seems to have a lot of chuff. If I did want to use some of it, does beeswax smooth it out?

No issue at all Carl, my near clumsiness and focal distance issues at the moment
I know what focal distances and clumsiness are all about.No issue at all Carl, my near clumsiness and focal distance issues at the moment
By the way, will beeswax smooth put some of the chuff on rigging thread?More work on the ship. I finished most of the wheelhouse stuff, put up some of the railings and ladders. If I can keep my hands steady enough, I will next install the handrails for the ladders.


You are now way ahead of me.
I know modellers have used beeswax on their rope over the years to remove/lessen fuzz. I understood the disadvantage is dust accumulates more easily on the lines. I used the rope I purchased without the application of any other treatment. There are many modellers who use it in combination with other methods to achive a certain look. Probably the best solution is to search on this and other sites for "beeswax", you'll get many hits.I know what focal distances and clumsiness are all about.
Thanks Roger. My education on boat modelling continuesI know modellers have used beeswax on their rope over the years to remove/lessen fuzz. I understood the disadvantage is dust accumulates more easily on the lines. I used the rope I purchased without the application of any other treatment. There are many modellers who use it in combination with other methods to achive a certain look. Probably the best solution is to search on this and other sites for "beeswax", you'll get many hits.

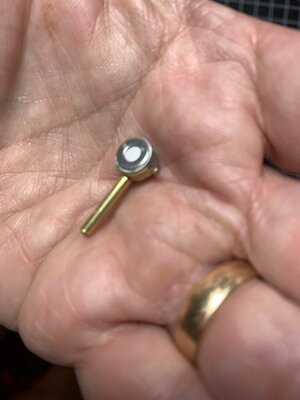
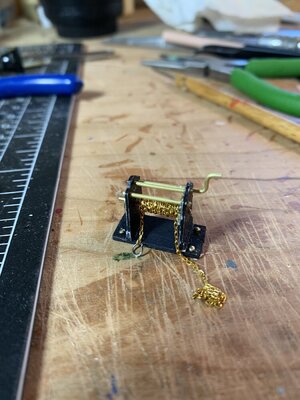
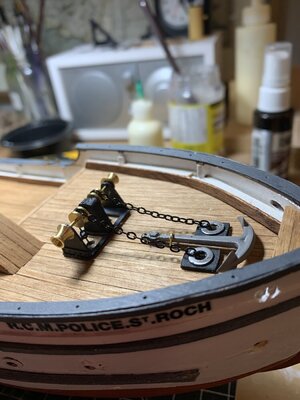
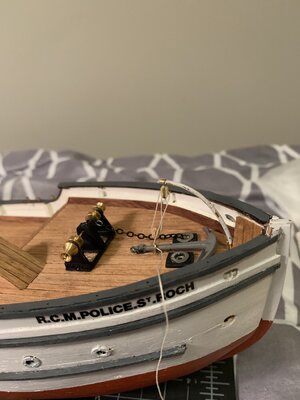
I spent a few days working on various bits and pieces. The ports on the deck that accept my anchor chain were too small for the anchor chain that I will be using, so I made my own from thin pieces of wood and small metal washers. I also made a major change to the winch. I used a short copper tube, added a handle and chain and laid it on a base. The base wasn't really necessary, but having a small platform to be assemble the small pieces on my workbench made it easier, and I decided to keep it, adding a few "bolts" as well. I also put together a searchlight using a small copper tube, a washer and a nail (for the handle).
Attachments
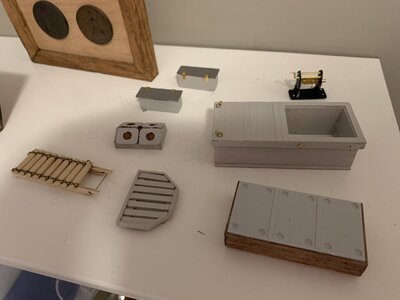
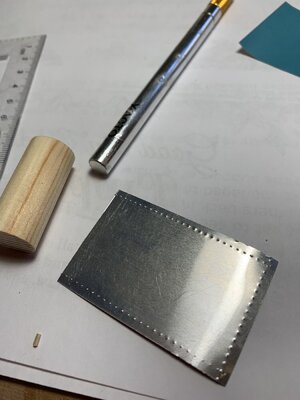
More assembly going on in the "shipyard". I built the smokestack, but decided to use some aluminum strip left over from an Occre locomotive project. I thought it would look more realistic having a metal covering with simulated bolts made with one of those pie-cutter thingees (I'm not sure of the correct terminology). I also made a few more items out of scrap because I couldn't find the specific part in the kit - a constant problem trying to identify a part...have to sometimes look all over the scale drawing to find it..
Attachments


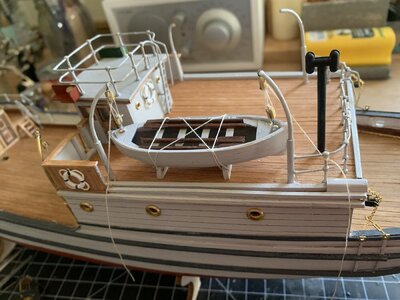
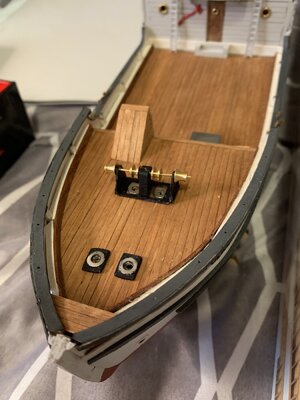
The last 2 days have seen the railings put up at the assembled two other davits at the rear of the cabin as well as shaping and installing the lifeboat davits. I ended up inserting the brass davits into some copper tubing that I found. It was a perfect fit (thanks Roger for the inspiration). I also assembled two davits on the main deck. This was my first time dealing with this type of job - tiny deadeyes, attaching very narrow wire to hold the deadeyes to the davits, etc. I had some .2 mm wire left over from a house project. It was much better than the copper wire provided in the kit. It was much finer and easier to manipulate. Still, my hands are not that steady, so I found this a challenging task. There will likely be a bit more cursing as I head into the rigging for the 2 lifeboats! I also attached the anchor. I found a plastic anchor from ages ago and used that one. The one in the kit had to be assembled (the two bits at the end- incredibly tiny and difficult to attach.
Attachments

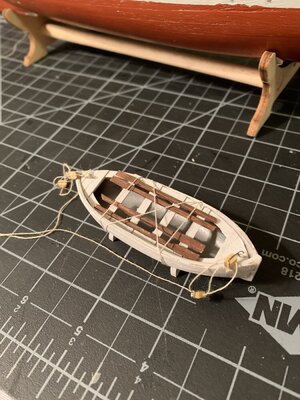
I've been working on the lifeboats. I clad the plastic lifeboats with thin leftover deck planking. I also made some miniature oars and added them to the boats. Assembling the blocks and tackle was a bit fo a challenge for me. I have a slight tremor in my hands and while it is not a serious condition, it does affect how steadily I can hold things. For the most part I can manage and for very fine work, I am able to brace my hands. I did find dealing with the thread and small holes a bit frustrating, but thanks to needle threaders I was able to claim victory. I have decided to install the boats after I add more things to the deck, so that I have a clear space to allow me to add these without having to avoid the boats, davits, tackle, etc.. I also added a davit at the bow for the anchor.
Attachments
Enjoy the time...grandkids and the model-building!! Cheers.I am also retired but I can only work on the kit in small bits - grandchildren to take care of. Only the diagrams in the instructions are of any use and they are skimpy too.
I continue work on the kit. I have completed and painted the railings, and started work on the masts and booms. I also installed one of the lifeboats. I am leaving the second lifeboat for later, since there are some items - funnel, skylight, storage boxes - that need to fit between them. If I add the 2nd lifeboat now, it might be a bit tricky to place these items later, since the lifeboats and rigging, etc. might get in the way. I would have preferred to install these items but I still have to finish the skylights (waiting for replacement parts from Billings).