• Beginning at 5:00AM PST (13:00 UTC) on Friday February 14th, all services in the Los Angeles, California, USA Data Center will be offline to perform a Data Center Migration. Due to the nature of this migration, we anticipate up to 24 hours of downtime to safely complete this work. Please be patient during this time and thank you for being a valuable member of our community.

Cazador Xebec 1750 - OcCre - scale 1:60 [COMPLETED BUILD]

Thanks Grant, not as great as your Victory! ;)
Good morning Pter- Thanks for this. However there is no way I could get close to your woodwork, details, decorations etc. your work is first class for sure....maybe one day when
I’m big I will be able to get close ;) . I am debating between the Cazador and Endurance for my next build. At least if I choose Cazador I have a lovely example to follow. Cheers Grant
Thanks man, to much compliments. I think OcCre did a great job on the research of the Endurance. Not to many people has build it and you'll make a fine model out of her I am sure. If you choose Cazador....well....it's a fine kit with lot's of possibilities to upgrade if you want.
 
Thanks Uwek, it's a real pleasure working on this nice kit. OcCre made some errors with the "design" of this kit, but if you can spot these it's easily solved. On the other hand, if you leave them in, nobody will notice only an experts eye will see them. :)
Thanks for stopping by and say hi!
 
Hi guys,

Some progress on the yard I made some improvements at the focsle construction that holds the fore-mast. To do so, I had to put my saw into the current construction. A bit nerve breaking kind of work.....The part I inserted is a slightly different color. Both walnut, so in time the color difference will be less visible.

[IMG]


[IMG]


The mast is on a certain angle and the fit is just what I was looking for.

[IMG]


From fore to aft. Some scratch build parts made and placed on deck. And yes, it's not being placed in the center of the quarterdeck due to the place of the mizzenmast.

[IMG]


[IMG]


The supportive "arch" I made out of a single piece of solid walnut was a difficult job. The amount of angles this thing has is ridiculous.
It's an add on I see on other Xebecs and I kind of liked it. It supports the spanker boom.

[IMG]


[IMG]


Regards,
Pete
Awesome!
 
Hello guys,
A sunny summer update from the wharf. Where should I begin, I did so many "small" things this time. So I placed a column, some cleats were placed, barrels placed, did a lot of ironwork (nails, bolts, rings etc), redesigned the position of the stairs to the quarterdeck (one is made, the other not finished yet)
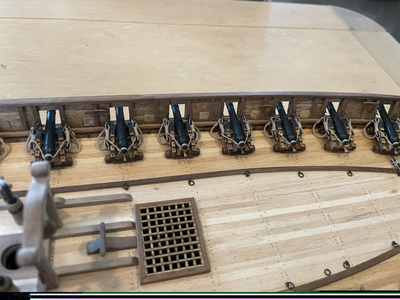
For one, I did some major work on the rigging of the cannons. I use the rope and cable BenD from Ropes of Scale made for me and it's a pleasure working with high quality rope. The breach rope is actually 1.1mm cable and not rope. I used 3mm blocks to rig the first cannon. I did it 5 times over, because I wasn't satisfied with the result. Also I did not go for the rope coils on the deck. The breachrope goes through the carriage and the ends of the tackle rigging are just wrapped around the knob of the gun. 1 down, 19 to go...

photo 561038


photo 561036


photo 561037


photo 561039


photo 561041


photo 561040


photo 561042


photo 561043


photo 561518


photo 561517


De positie van de trap en het plateau naar het halfdek heb ik volledig anders vorm gegeven en geplaatst. Dit is meer in lijn met de Franse Xebec's.

photo 561516


photo 561519


photo 561521


photo 561520


photo 561522


that's it for this update,
Pete
 
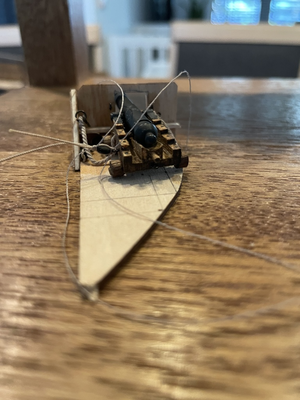
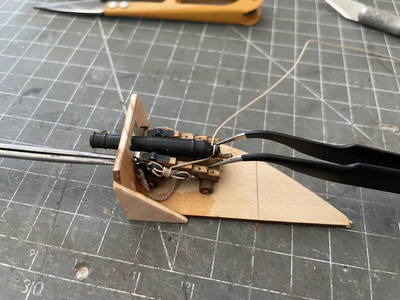
For the rigging of the cannons, I use a simple but effective jig so I can rig the cannons off the ship. This makes life much easier because I can turn the jig with the cannon in all directions. Also it prevents damage on the ship doing it this way.
So to me the jig has a simple but effective purpose. I can clamp the carriage to the jig so the cannon stays on it's place. I can use both hands, And to be sure, I sometimes during the rigging progress I wish I had 3 or 4. :oops:

Now, this jig is simple like I said, It's functional and pretty easy to make. I used some scrap plywood that came with the kit and made a single gunport situation. It's not important how the jig looks, how fancy it is but only that the distance between the carriage and the hooks and bolts on the jig are the same as on the ship. I made the jig a bit smarter by drawing some lines on the bottom. The first line is the line were the back wheels needs to stop so I can cut the length of the breach rope. The second line is the place where the rear tackle positions. I used my drill to make a small hole for the bolt and ring.

There are many ways to make a jig and I'm sure there are much better ones than I made for my cannons, but in the end it's the result or outcome that matters.... ;)
After finishing rigging a cannon on the jig, I simply remove the jig and place the cannon already fully rigged on the ship. I can do 1 sometimes 2 per evening depends on the cooperativity of all the materials.... :rolleyes:Speechless

1658421953767.png

1658422503371.png

1658422453054.png
 
Hello everyone,

In between the rigging of the cannons, I did some "ironwork" needed for a few things on my to-do-list.
I began with the anchors. The once provided within the kit didn't look to bad and they were already blackened. After inspection I decided to change them a little bit and blued them with Super Gun blue.

photo 561636


photo 561634


photo 561635


I also made an anchor for the "little boat"....

photo 561637


i made a few eyebolds and rings which I used for the oar port lids..

photo 561638


All the gunport lids are placed included with the ironwork....

photo 561639


photo 561640


I made two of four knees which I placed to reinforce the catheads . Two down, two to go....I'll remove the cleats above the knees and give these another place.

photo 561641


photo 561642


As last I worked on the swivel guns. They are made out of zamac and are cast. I bored out the barrels, cleaned them up and blued them with Super Gun Blue.
I dry-fitted these on the quarterdeck, so they are not glued down yet.

photo 561643


photo 561644


photo 561645


photo 561647


That's it for now,

Until the next one, happy modeling.
Pete
 
Back
Top