
thats coming along nicely Paul. This ships rigging looks easy, but I'm finding it much harder than it looks.

-

SUBSCRIBE TO SHIPS IN SCALE TODAY!
The beloved Ships in Scale Magazine is back and charting a new course for 2026!
Discover new skills, new techniques, and new inspirations in every issue.
NOTE THAT OUR NEXT ISSUE WILL BE MARCH/APRIL 2026 -

Win a Free Custom Engraved Brass Coin!!!
As a way to introduce our brass coins to the community, we will raffle off a free coin during the month of August. Follow link ABOVE for instructions for entering.
You are using an out of date browser. It may not display this or other websites correctly.
You should upgrade or use an alternative browser.
You should upgrade or use an alternative browser.
Cazador-Xebec Occre 1:60 by Paul V
- Thread starter paulv1958
- Start date
- Watchers 6
-
- Tags
- cazador-xebec occre

Yep
I slowed down becase of all the inteconnecting blocks and all the small bits of riging needed to make up one complete.
At the smaller scale Its a pain to get them all the same distance. Oh and Occre's just ;look at the photos approach, doe not help.
I just did what looked right as the belaying diagram omits half the tie points. Did my head in one some it.
Square rig might be comlex but it all makes sense.
Al lease the sails were easy.
Onto the multi hole blocks. Obviously they needed a lot of counter puliies to lift the masts.

This is excellent rigging. Very clean and precise. Looks great. I can tell you took great care in doing this.
I will look on more later.
Donnie
I will look on more later.
Donnie

Hi Paul,
Nice build log and build of the Xebec kit by Ocre. I see the close similarities of it to the ZHL plank on frame kit of Le Requin that I am building. I think your masting and rigging portion will help me a lot in my build because the Chinese kit has only some drawings of the rigging and no instructions on it whatsoever.
I have completed making the masts but not the yardarms on mine. Been busy with other things.
Anyway, I'm glad I found your build log and will be following it to completion. Thanks for sharing it with everyone, you're doing a great job in the build.
Take care,
Bob Hunt
Thanks Bob,Donnie from both you that's a great compliment.
Nicely put. Needs no other words.... Seems the Guilds of olden times still try to rule... ( oops thats the gamer in me or is it.)
cheers...
Nicely put. Needs no other words.... Seems the Guilds of olden times still try to rule... ( oops thats the gamer in me or is it.)
cheers...
Hi all
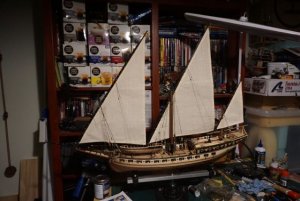
Wee the sails & masts are attached. Final rigging & rope still to be completed. Note sure whats going on with past posts but images are are corrupted ?
Anyway here is next set.
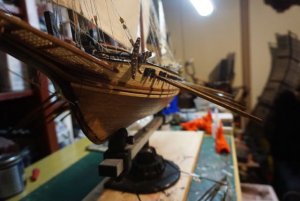
The rigging although simple is very fiddly and tight to work around. The difficulty is getting it to go through the wood batterns on the hull sides. The Occre plan is some what open to interpretation. However I thing I have it close.
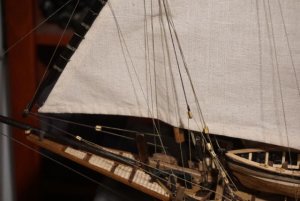
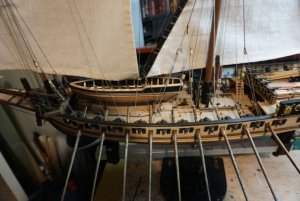
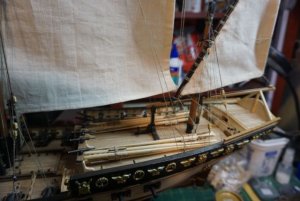
Sail loose & yards (?) added & initially rigged. They are pinned to the mast with brass wire.
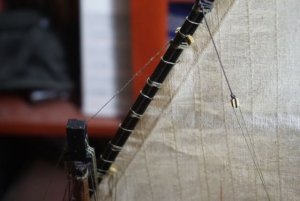
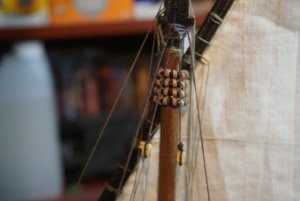
Close up of fore yard lower rigging.
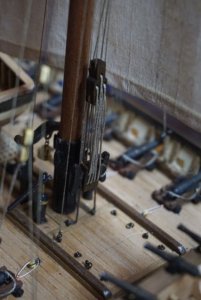
Main mast rigging block. The rope is not that supplied with the kit, but leftover from other models. I thought that the thicker rope looked better
Main yard top tie off & rigging
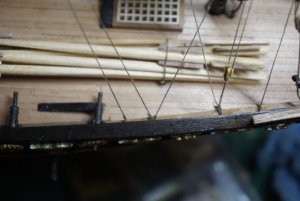
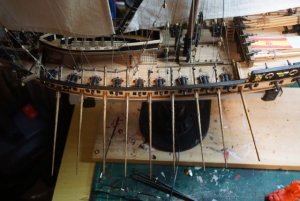
Lower deck ties
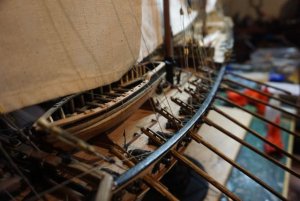
Ships boat tied & secured, Main lower yard tied.
The sails were sewn to the yards at each rope point individually. This allowed the sail to sit nicely.
If I can keep up the enthusiasm for final rigging, I expect to finish within the week. The its all the pretty rope loops and side ores to be added.
See you shortly,
Wee the sails & masts are attached. Final rigging & rope still to be completed. Note sure whats going on with past posts but images are are corrupted ?
Anyway here is next set.
The rigging although simple is very fiddly and tight to work around. The difficulty is getting it to go through the wood batterns on the hull sides. The Occre plan is some what open to interpretation. However I thing I have it close.
Sail loose & yards (?) added & initially rigged. They are pinned to the mast with brass wire.
Close up of fore yard lower rigging.
Main mast rigging block. The rope is not that supplied with the kit, but leftover from other models. I thought that the thicker rope looked better
Main yard top tie off & rigging
Lower deck ties
Ships boat tied & secured, Main lower yard tied.
The sails were sewn to the yards at each rope point individually. This allowed the sail to sit nicely.
If I can keep up the enthusiasm for final rigging, I expect to finish within the week. The its all the pretty rope loops and side ores to be added.
See you shortly,
Attachments


Hello
Very very nice build. Is there a reason why almost all of your posted jpg's are no longer available(threaded or pixelated? I am currently starting a log for same ship on MSW and your log was a great help. Sad to see it go :sad:
sideliner
Very very nice build. Is there a reason why almost all of your posted jpg's are no longer available(threaded or pixelated? I am currently starting a log for same ship on MSW and your log was a great help. Sad to see it go :sad:
sideliner
Hi sideliner,
Will be fixed shortly.
Will be fixed shortly.
Thank you Paul!
My A.L. build lacks information on the rigging as well, must be a Spanish Model ship company thing. Excellent work on the sails and rigging,
Cheers Andy
Cheers Andy
Paul
Thanks for jpg fix. I saw the issue was a software glitz. Also appreciate other comments")
sideliner
Thanks for jpg fix. I saw the issue was a software glitz. Also appreciate other comments
sideliner
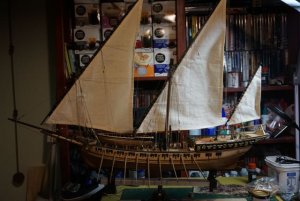
She is done.
Well apart from the stand.....
This has been a great kit and a real fun build. Given I got it for $299 it was a bargain.
The wood quality was excellent and plentiful.
The thread is typical Occre / AL thread. Not bad but not great. ( still love the stuff that comes with caldercraft)
The metal bits were nice and only needed a little cleaning.
Anyway here are the final images:
The external oars I decided to add ( not in kit, but 3mm dowel & leftover grating work well)
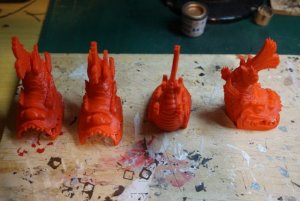
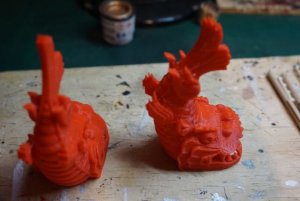
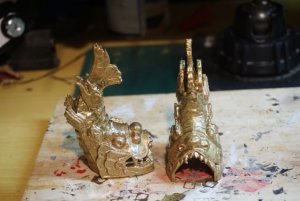
Some dragonfish ( 3d printed from thingverse) to use as supports for the hull on mounting board
Painted gold they come up okay
Parrels added
Views of the final ship
Next up the AL Navio Santa Ana 1784
Well apart from the stand.....
This has been a great kit and a real fun build. Given I got it for $299 it was a bargain.
The wood quality was excellent and plentiful.
The thread is typical Occre / AL thread. Not bad but not great. ( still love the stuff that comes with caldercraft)
The metal bits were nice and only needed a little cleaning.
Anyway here are the final images:
The external oars I decided to add ( not in kit, but 3mm dowel & leftover grating work well)
Some dragonfish ( 3d printed from thingverse) to use as supports for the hull on mounting board
Painted gold they come up okay
Parrels added
Views of the final ship
Next up the AL Navio Santa Ana 1784
Attachments
-
 DSC03296.jpg39 KB · Views: 292
 -
 DSC03297.jpg43.3 KB · Views: 298
 -
 DSC03298.jpg33.1 KB · Views: 309
 -
 DSC03300.jpg45.7 KB · Views: 318
 -
 DSC03301.jpg27.4 KB · Views: 316
 -
 DSC03302.jpg49.8 KB · Views: 327
 -
 DSC03305.jpg49.3 KB · Views: 324
 -
 DSC03307.jpg44.1 KB · Views: 328
 -
 DSC03308.jpg37.9 KB · Views: 317
 -
 DSC03309.jpg42.9 KB · Views: 307
 -
 DSC03311.jpg46.2 KB · Views: 305
 -
 DSC03313.jpg40.7 KB · Views: 302

A fine looking ship, excellent work. Congratulations :handgestures-salute:

I've always like Xebecs. Yours is an exceptional job. I just bought the old Aeropiccola Indiscret on eBay, and I hope that I can emulate your build!
Bill
Bill
Hello Paul
As you know I am building the CAZADOR and posting to this site. I am questioning the way my first plank below the bulwark fits at the stern. There appears to be an overhang of the deck in this area. Looking at your build and pictorial instructions, I don't see this overhang. I don't really have an issue with the overhang. I'm just concerned that I am missing something. I have posted two JPEGs on my log for clarification.
sideliner