The beloved Ships in Scale Magazine is back and charting a new course for 2026!
Discover new skills, new techniques, and new inspirations in every issue.
NOTE THAT OUR NEXT ISSUE WILL BE July/August 2026
Win a Free Custom Engraved Brass Coin!!!
As a way to introduce our brass coins to the community, we will raffle off a free coin during the month
of August. Follow link ABOVE for instructions for entering.
Tnx . Have to keep it open for the next 3 days. Swollen again but doesnt keep me away from shipyard. Dont know what it is with this hobby. Sometimes so frusterating and when i am done with some parts in want to redo things but it keeps pulling me even if i feel bad.
Jim, What a brilliant scraper tutorial! Thank you for posting all of the explanatory pictures as well. Another milestone for me to strive towards. This site and it's members sure keep my brain cells firing Now I am off to look up a 'dressing stone'
Greetings fellow shipmates! Before I will continue, I would like to thanks everyone who stopped by this log. Today we are making our own mouldings. (YAY)
Whether you are a kit builder or make you models from scratch, consider the idea of personalizing your work by adding wooden mouldings. So, what is the moulding (spelled molding in the US), also known as coving (the UK and Australia)? Here is the definition by Wikipedia. Moulding is a strip of material with various profiles used to cover transitions between surfaces or for decoration. It is traditionally made from solid milled wood or plaster but may be of plastic or reformed wood.
The idea is using old\broken hacksaw blades and various abrasive wheels to make our own scrapers, so we can fabricate mouldings of our choice and desire.
A word of cautions: Since we will be cutting metal in high speed with abrasive disks. Please be careful, always use protective goggles and wear face protective mask, to avoid abrasive dust inhale.
Tools will be used:
Any variable speed grinder that you can comfortably hold in your hand. Flexible shaft with a handpiece attached and foot-pedal control is desirable but not necessary. I will be using one of the cordless grinders from Dremel
Cut out wheels, grinder stones (different grit, diameter and thickness) and mandrels to hold wheels
Dressing stone (to shape wheels\stones)
An old, dull or broken hacksaw blade
Using the plans or kit building manual find out the moulding pattern you will need, and sketch it out on a paper. Make it large enough so you can visually understand how many groves, how wide\deep and geometry of those grooves should be. Transfer all measurements from a plan into your sketch. The next step is to find cutting wheels suitable for this tool. Assemble wheels on the mandrel using your sketch as the guide. I use paper washers as spacers between the wheels to play with the desired size\shape. To finish assembly, tighten the thread firmly (don’t overtighten). The tool should be ready.
Look at the first picture below. This tool has 3 disks (A.B.C). Disk A and C the same thickness, and the same diameter. Disk B is thicker and larger diameter. Let’s say we need to make a scraper with profile we made in this tool.
Insert the tool in the collet, tighten and get the rotary tool ready. Take in the left hand your hacksaw workpiece. Move the cutting tool to the workpiece edge at a 90-degree angle until a spark appears. Do it again, plunge the tool slowly until you see the grooves left on the workpiece edge. Repeat the process by constantly venturing on a little bit until the desired size and shape archived. It will be tough and impossible for me to explain (with my broken English) al the gotchas, and I am afraid my friend - Google translator will add to this mess. Observe my pictures, if you need more explanations please ask. I will be more than glad to help.
Once happy with scraper size\shape it is time to make mouldings. Now we will need to cut the wood strips. I use boxwood, Pearwood and Ebony for my mouldings. The size of the strips is determined by the width and height of the working surface of the tool we made. It is imperative to cut wood strips precisely with the exact size of your scraper
Before you begin, determine the direction of the wood fibres. To do this, put the tool at the beginning of the strip, press lightly against the strip and scrape wood towards the opposite end. If the tool moves freely and the chips curl, this means you move in the right direction. If not, start from the opposite end of the strip and repeat the same procedure. The cutter (scraper) should glide easily, and shaving wood should curl. Attach the strip with double-sticky tape to a board and start scraping.
Move scraper only one direction from start to the end of the strip
Apply equal amount of pressure while moving along the strip.
DO NOT remove a lot of material by one run, Slowly by surely!
The scraper should move freely, without excessive force
Check the shape\size after a couple of runs. Make sure the surface is smooth
If you are getting a ‘rip’ cut instead of smooth, most likely scraper is not sharp enough. Hacksaw blades are made of a carbon steel and should hold an edge. However, as with any cutting tool, it will require re-sharpening (occasionally).
Now, try to make your own first-class mouldings! Start with a simple shape moulding. A single, round grove scraper is a good example. I use such moulding for Charles Royal Yacht to decorate gun ports area.
Once master the single grove, try two groves, three groves of different size. You can use dressing stone to shape cutting wheels. The more you practice, the more pleasant the result will be. Good luck, and remember, if you have questions - please ask.
Howdy, Ron!
Thank you for kind of words. I am glad you like the tutorial and hoping that it doesn't somewhat cumbersome with an explanation. English is not my native language. I use 'google translate' service to simulate text output. I've noticed that international members in our forum, use Google translate as the method to communicate. Let's keep in touch should you have any questions.
Thanks all of you for the ‘likes’ and valuable comments. I hope that the little tutorial for making mouldings come in handy and you already try making one. Well…, with the favourable wind, we are following the course of Woody Joe and turn our attention to the various decks planking.
Step 16 (user’s manual) suggested installing doors for the crew, royal family entry cabins, and sculptured decorations around both doors. I thought this is a bit premature at this stage, as there will be more dust during decks construction. I decided to postpone until the final decorations assembly.
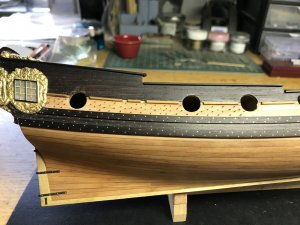
All false decks made out of solid wood 1.15mm. Quarterdeck has ‘wings’ to go in corresponding notches in the bulkhead. It was fitted nicely and glued. The main deck was assembled from three pieces (by design). On a side note, a word to compliment Woodie: top of the bulkheads (aka deck beams) where even, has a bevel to board and starboard and didn’t require prior sanding for alignment (except for char removing).
On the main deck, Woodie provides a laser marks for top timber location as well as a centerline from stern to the bow (very nice touch, Woodie).
Swiss Pear (from mine stash) used as the border to outline start and end of the planking. IMHO it should play on the contrast when completed.
Wood for deck planking where excellent and I decided to use it for all the decks in the ship. To imitate caulking seams, I grab multiple strips together and mark single side with the black graphite pencil. Planks where cut to 140mm to establish Three planks butts’ pattern. The waterways were glued both board and starboard. And the deck planking process begins…
Greetings fellow shipmates! Foremost, thanks for your visit and the kind comments! The Head
It would be nice moving to the fun part but… there some business we have to take care of first. Kit's manual suggested glueing the head at the frame assembly stage.
The head should be painted black. I hear you are saying: “Jim and Paint….” Yep, you are correct! In the beginning, I decided to make my own out of Ebony.
However, I was so fascinated by the planking process, that I completely forgot about what I need to establish the head. I have no choice as to become a surgeon. The challenge was that I had to cut through the precise strip (thickness of the head) without damaging the trim. My mini saw made the trick.
Then, the head was secured with round pins and glue.
Happy Friday fellow modellers! Kudos to each one of you who are following, or the first time visiting this build log! The shipyard received wood and the captain order... It is time to treenail… BTW, who is the captain??? Hmmm...
A treenail, also trenail, trennel, or trunnel (you name it!!!!), is a wooden peg, pin, or dowel used to fasten pieces of wood together, especially in timber frames, covered bridges, wooden shipbuilding and boat building. It is driven into a hole bored through two (or more) pieces of structural wood (mortise and tenon).
There are many ways to imitate treenails among modellers. I will not undertake to assert which one more authentic or better than others. Everyone chooses the method that is most suitable based on his\her ability, skills and capabilities. One of the most common way (IMHO) is to use toothpicks. I don’t know how this is justified, but many modellers (of those whom I know) use this method for a long time, still. Being this method already described by many shipmates on SOS, I will describe a few different ones. In Part 1, we will be drawing wood thru a drawplate.
Well known method, great results, but somewhat not easy and time-consuming. This method required a good quality wood and drawplate. There are many drawplates on the market. Most of them used by jewellery makers to reduce wire into a smaller gauge. While some of them are good brand names and quality, they are not suitable for our purpose. I found a drawplate from Byrnes Model Machines perfectly suited for our job. So let’s begin!
On the table saw, cut the square slats 0.8 x 0.8mm (for treenails 0.5mmø or smaller).
Starting from the largest whole, where the slat passes freely, pass through each successive drawplate hole by removing chips. The chips should curl, if this does not happen, you are pulling slat against the wood fibres, switch the ends.
With each draw, it will decrease in diameter. Don’t cheat and skip the holes!!!
In order for the slats to enter the hole easily, the end should be tapered.
Drawing the slat will require some effort. To make it easier to pull, wrap a sandpaper (250 grit) around the end of the slot.
Draw ONE WAY ONLY, and try to run the entire billet from start to end without stoppage.
The final size shaped with ‘steelwood’ (Super fine grit). Be very careful as the treenail slat at this diameter (0.49 -0.50mm) is super fragile. Shape ONE DIRECTION ONLY!
Drill the holes and sand them lightly.
To imitate hemp and tar the workpiece it is necessary to blacken. Here the choice is yours, who loves\prefers what. I prefer to blacken the holes themselves (if possible). Suppose the hole is 0.5omm. I take the mechanical pencil 0.5mm ø lead and very gently insert it in the hole by lightly twisting. You can use a VERY sharp pencil instead, then you must keep a sharp point and sharpen the pencil more often.
Dilute PVA glue with water, it should be a milk consistency. Dip the end of the treenail and insert it in the blackened hole. Don’t cut yet, wait until it dries, and go to the next hole until you run out of billets. Once it completely dried, you can cut and repeat the procedure.
Finally cut treenails with the very sharp surgical blade. If using a cutter, don't cut too close as if the cutter is not sharp enough, it may squash the wood. This is bad! Here are some results.
To be continued....in Part 2 Happy Weekend mates!!!
Greetings, Maarten,
Thanks for checking in! I still in doubt what method is most realistic. I like the method you are using on your models. The result speaks for itself!
Enjoy the weekend,
Outstanding wood the treenails look delicate I use tooth picks when I break off the tip I chuck it up in the drill and work the end to a point again. this is safe for me I would definitely break the ones like you make. these days my hands are a bit to shaky to delicate work.


") Now I am off to look up a 'dressing stone'
Now I am off to look up a 'dressing stone'
") Start with a simple shape moulding. A single, round grove scraper is a good example. I use such moulding for Charles Royal Yacht to decorate gun ports area.
Start with a simple shape moulding. A single, round grove scraper is a good example. I use such moulding for Charles Royal Yacht to decorate gun ports area.