It is a delight to follow your build!
-

Win a Free Custom Engraved Brass Coin!!!
As a way to introduce our brass coins to the community, we will raffle off a free coin during the month of August. Follow link ABOVE for instructions for entering.
-

PRE-ORDER SHIPS IN SCALE TODAY!
The beloved Ships in Scale Magazine is back and charting a new course for 2026!
Discover new skills, new techniques, and new inspirations in every issue.
NOTE THAT OUR FIRST ISSUE WILL BE JAN/FEB 2026
You are using an out of date browser. It may not display this or other websites correctly.
You should upgrade or use an alternative browser.
You should upgrade or use an alternative browser.
Charles Royal Yacht, 1674, Scale 1:64, by Woody Joe (Japan)
Hi Pat,You wrote that the pictures make it look good but on pictures you see every little mistake and bad spots so its your work that is good to the mm. How do you solder brass? High heat?
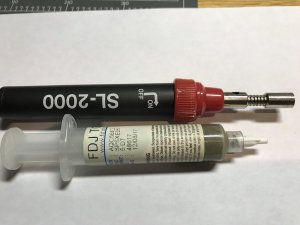
Soldering brass is as easy as soldering copper and in my experience doesn't need any more heat really. As long as both parts are clean, start by using a wee bit of flux on both parts, bring the pieces temperature up to the point that solder will melt and flow and you are done. I use a soldering iron similar to a Weller 'Pyropen' but much cheaper unfortunately and it works really well. As it is butane I can remove the soldering tip and use it as a micro torch.
Sorry to jump in on your thread Jim. Your explanations go light years beyond what I can do
Ron
pictures you see every little mistake and bad spots
We all doing mistakes and they show on our work earlier or later...they are (mistakes) can be minimized but not unavoidable (IMHO). I using magnifying glasses for most of my work because I simply, cannot see well without them on. While using magnifying glasses you can see all of the details LARGE enough to correct if you see something wrong.
I solder brass using a butane torch and one of the tube soldering paste. This paste, in my understanding, premixed with flux and silver solder makes use of it really cool. I clean surface with sandpaper\alcogol take a small nub of paste with the part I need to solder, and heat (constantly moving the torch sideways).
Please let me know if everything is understandable with my broken English
Happy Modelling!
Last edited:
I second Ron! @Pat71 It is not that difficult, it is all about how clean and tight the soldering joints.Soldering brass is as easy as soldering copper
Last edited:
Jim, Is it easy to judge the amount of paste to use? I like the idea of silver instead of tin and lead!
@Pat71 It all depends on the time and\or mood I have. usually a few hours during the weekdays and more time on the weekend. Also, it greatly depends on what part of the project you are working ON. Rigging - is not my best part, though.How long do you spend in the shipyard a day?
Yes, it is super easy! As long as you soldering parts are tight together, it just a matter to close the sim. But obviously, it depends on if the part needs to hold tension or it visible to your eyes (without magnifying glasses).Jim, Is it easy to judge the amount of paste to use? I like the idea of silver instead of tin and lead!
You will look for silver soldering paste (easy, or low temperature) something like this: https://www.riogrande.com/product/K...MIkrrTgriq3wIViovICh1MdQ5ZEAkYEiABEgIVb_D_BwETnx gonna look for that paste
- Joined
- Jul 29, 2017
- Messages
- 908
- Points
- 343

Found this one. (Dutch )https://www.xtrack.nl/nl/product/griffon-cfs/griffon-s39-soldeerpasta-rood-pot-200-gram.
I am not sure about this one. I have never used nor familiar with it. See in the jewelry stores. It is a common product for a jewelry storeFound this one
H Jim, I have a lot of questions on the typ of glues to use and where to get them,,, I have been using a TITBOND TRANLUCENT GLUE it drys clear and like rubber but if you get it on unstained wood you can not get it off period and really makes the stain very blochy even though I wipe the excess off wit a damp rag still will not come off, have been prestaining items before installation, but that presents some problems to,, as far as CA goes I try to use as little as possible as if any gets on the wood face it leaves a shiny spot on the wood, so I have to use SPRAY DULCOATE , AND ON PHTO ETCHED PARTS I HAVE BEEN USING ZAP-A-GAP but it does not give me enough time to adjust parts and reall leaves a ugly finish what do you rcomend to solve my problems, I also use a mixture of the TRANSLUCENT GLUE WITH WATER AND SAWDUST TO FILL IN SOME SMALL GAPS IN PLANKING also where can I order these types of glue, AND ALSO THE BARRETTE FILE. ANY HELP WILL BE GREATLY APPRECIATED. THANKS Don
Hi Jim,
just catching up on your superb build log. Excellent work buddy.
just catching up on your superb build log. Excellent work buddy.
H Jim, I have a lot of questions on the typ of glues to use and where to get them,,,
Hello, @donfarr I would be more than glad to help. Please refer to post #8: where I talk about the various glue types and their use.
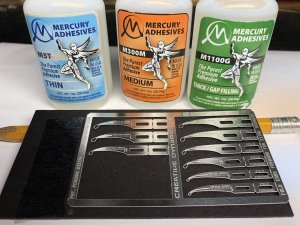
As you mentioned, CA penetrates in wood and leave a white (sometimes foggy) spot. For this particular reason, I use CA mostly to glue metal\photoetch parts to any surface who don't require blackened afterward. Here in the USA, I found an excellent blend (IMHO), it dries clear, and don't leave the foggy spot. It comes in three different viscosity types: super-thin (almost like water), medium and thick. (see below)

In the photo, you can find CA glue applicator "Glue Looper" made by a company Creative Dynamic. I like them very much, specifically when using super-thin glue. Each type of glue uses different # of glue applicator. Be careful when buying. Here is the website: http://www.creativedynamicllc.com/the-glue-looper.html The website has many tutorials for various glue applicators and glue types.
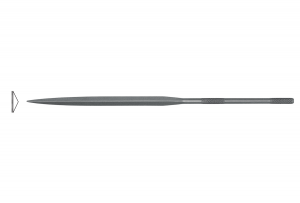
Barrette needle file is ideal for refining flat surfaces as well as narrow areas, straight edges and structures, and outside curves. It has a broad-based triangle shape that tapers in width and thickness, and has teeth only on the bottom surface; the file is double-cut. The safe back prevents removal of metal from adjacent surfaces.
As with swiss\gemarn brands, they come with different cuts: The higher the # the more smooth cut you will have. Swiss or German needle files are not cheap but will last you for a long time. The best place to find them is a jewelry store. Here is some information: http://www.grobetusa.com/barrette-files/

https://www.riogrande.com/Product/Friedrich-Dick-Barrette-Needle-Files/114756
http://www.ottofrei.com/Glardon-Vallorbe-Pillar-Needle-Files-LA2401_2
I am hoping this can help you! Happy modeling.
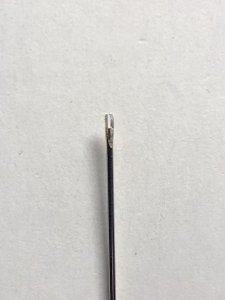
Here is a simple CA applicator made in 5 minutes from a sewing needle using a rotary tool and cut-off disk. First, cut the thread insert a quarter from the end, just enough to make an opener. Using the same disk smooth both sides about 45 degrees make it a knife like. That's it! Oh... made a nice handle for comfort! 

Happy Modelling!

Happy Modelling!


