
Fantastic work Jim, carvings look awesome

-

SUBSCRIBE TO SHIPS IN SCALE TODAY!
The beloved Ships in Scale Magazine is back and charting a new course for 2026!
Discover new skills, new techniques, and new inspirations in every issue.
NOTE THAT OUR NEXT ISSUE WILL BE July/August 2026 -

Win a Free Custom Engraved Brass Coin!!!
As a way to introduce our brass coins to the community, we will raffle off a free coin during the month of August. Follow link ABOVE for instructions for entering.
You are using an out of date browser. It may not display this or other websites correctly.
You should upgrade or use an alternative browser.
You should upgrade or use an alternative browser.
Charles Royal Yacht, 1674, Scale 1:64, by Woody Joe (Japan)
Very nice job on this model!

It is looking really good - I like your eye for the details - very accurate fine work 
Thank you for a compliment, but when you see your woodcarving @Maarten on Royal Caroline, you understand what to strive for! Amazing work, Maarten! OkBeautiful carving work Jim.

Hi Jim,Thank you for a compliment, but when you see your woodcarving @Maarten on Royal Caroline, you understand what to strive for! Amazing work, Maarten! Ok
These carvings are mainly cnc from the kit, I would wish to be able to do that. But I think human hanss cant beat the precision of cnc machining.
- Joined
- Dec 3, 2018
- Messages
- 2,450
- Points
- 538

Greetings fellow shipmates! Before I will continue, I would like to thanks everyone who stopped by this log. Today we are making our own mouldings. (YAY)
Whether you are a kit builder or make you models from scratch, consider the idea of personalizing your work by adding wooden mouldings. So, what is the moulding (spelled molding in the US), also known as coving (the UK and Australia)? Here is the definition by Wikipedia. Moulding is a strip of material with various profiles used to cover transitions between surfaces or for decoration. It is traditionally made from solid milled wood or plaster but may be of plastic or reformed wood.
The idea is using old\broken hacksaw blades and various abrasive wheels to make our own scrapers, so we can fabricate mouldings of our choice and desire.
A word of cautions: Since we will be cutting metal in high speed with abrasive disks. Please be careful, always use protective goggles and wear face protective mask, to avoid abrasive dust inhale.
Tools will be used:
Using the plans or kit building manual find out the moulding pattern you will need, and sketch it out on a paper. Make it large enough so you can visually understand how many groves, how wide\deep and geometry of those grooves should be. Transfer all measurements from a plan into your sketch. The next step is to find cutting wheels suitable for this tool. Assemble wheels on the mandrel using your sketch as the guide. I use paper washers as spacers between the wheels to play with the desired size\shape. To finish assembly, tighten the thread firmly (don’t overtighten). The tool should be ready.
- Any variable speed grinder that you can comfortably hold in your hand. Flexible shaft with a handpiece attached and foot-pedal control is desirable but not necessary. I will be using one of the cordless grinders from Dremel
- Cut out wheels, grinder stones (different grit, diameter and thickness) and mandrels to hold wheels
- Dressing stone (to shape wheels\stones)
- An old, dull or broken hacksaw blade
Look at the first picture below. This tool has 3 disks (A.B.C). Disk A and C the same thickness, and the same diameter. Disk B is thicker and larger diameter. Let’s say we need to make a scraper with profile we made in this tool.
Insert the tool in the collet, tighten and get the rotary tool ready. Take in the left hand your hacksaw workpiece. Move the cutting tool to the workpiece edge at a 90-degree angle until a spark appears. Do it again, plunge the tool slowly until you see the grooves left on the workpiece edge. Repeat the process by constantly venturing on a little bit until the desired size and shape archived. It will be tough and impossible for me to explain (with my broken English) al the gotchas, and I am afraid my friend - Google translator will add to this mess. Observe my pictures, if you need more explanations please ask. I will be more than glad to help.
Once happy with scraper size\shape it is time to make mouldings. Now we will need to cut the wood strips. I use boxwood, Pearwood and Ebony for my mouldings. The size of the strips is determined by the width and height of the working surface of the tool we made. It is imperative to cut wood strips precisely with the exact size of your scraper
Before you begin, determine the direction of the wood fibres. To do this, put the tool at the beginning of the strip, press lightly against the strip and scrape wood towards the opposite end. If the tool moves freely and the chips curl, this means you move in the right direction. If not, start from the opposite end of the strip and repeat the same procedure. The cutter (scraper) should glide easily, and shaving wood should curl. Attach the strip with double-sticky tape to a board and start scraping.
Nå, prøv å lage din egen førsteklasses lister!
- Move scraper only one direction from start to the end of the strip
- Apply equal amount of pressure while moving along the strip.
- DO NOT remove a lot of material by one run, Slowly but surely!
- The scraper should move freely, without excessive force
- Check the shape\size after a couple of runs. Make sure the surface is smooth
- If you are getting a ‘rip’ cut instead of smooth, most likely scraper is not sharp enough. Hacksaw blades are made of a carbon steel and should hold an edge. However, as with any cutting tool, it will require re-sharpening (occasionally).
Begynn med en enkel formstøping. En enkelt, rund lundskraper er et godt eksempel. Jeg bruker slike støping for Charles Royal Yacht å dekorere pistolportområder.
Når du er herre, skal du prøve to lunder, tre lunder av forskjellig størrelse. Du kan bruke dressingstein til å forme skjærehjul. Jo mer du trener, jo mer behagelig blir resultatet. Lykke til, og husk, hvis du har spørsmål - vennligst spør.
Glad Modellering! [/SITAT]
Nise trix thath i vil try later somtimeTommel opp
Hi Jim, following your build is a delight, GREAT CRAFTMANSHIP, on the stain problems and removing parts, which I have a great deal of experience with, as I need to remove mistakes quite frequntly, ,,, I have had the same experience using Min-Wax PENETRATING STAINS, with me they just do not work, I have used the conditioneer and have the same problems, now I use Min-Wax GEL STAIN, if stirred properly can give nice finish, on larger pieces I use Zinser non wax sanding sealer first,,,,now to removing parts what I use is NAIL POLISH REMOVER WITH 100% ASOTONE I use a swab and rub it on the joint, it may take a few applications and with an EXACTO BLADE start prying it loose, I keep putting it on until the bond is broken it works on both PVA and CA glues even if set for quite some time. Don
Thanks for sharing your experience, Don! Recover from mistakes - is actually learn methodology. However, I'd prefer to learn from someone's mistake I bought Minwax gel stain (as per your recommendation), however, didn't have a chance to use it. And thanks again for your tips and suggestion, they are well appreciated.
I bought Minwax gel stain (as per your recommendation), however, didn't have a chance to use it. And thanks again for your tips and suggestion, they are well appreciated. Armor and deck fittings
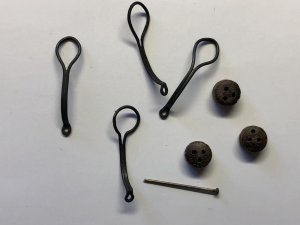
I am very honored to know that you follow and appreciate my build log! Thank you all (no exceptions)! Today we will discuss various deck fittings. I must say, Woody Joe, provide a sufficient quality for all fittings, and once assembled they will look great. However, as with other parts, I made a decision to fabricate my own. Below is the original parts from Woodie, some of them partially assembled.


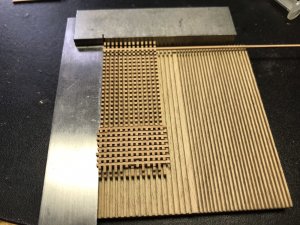
Here the one I build my own. Ladders and gratings cut out of Pear.


Five Rails and rudder made out of boxwood. Funnel made out of black hornbeam.


Here is the process I made my own grating.


to be continued...
I am very honored to know that you follow and appreciate my build log! Thank you all (no exceptions)!
Today we will discuss various deck fittings. I must say, Woody Joe, provide a sufficient quality for all fittings, and once assembled they will look great. However, as with other parts, I made a decision to fabricate my own. Below is the original parts from Woodie, some of them partially assembled.Here the one I build my own. Ladders and gratings cut out of Pear.
Five Rails and rudder made out of boxwood. Funnel made out of black hornbeam.
to be continued...
Attachments

Jim, it's astounding to me that no matter how close you get when you are taking pictures, your work doesn't diminish in quality. I know a few guys that try to pass off a sort of 'used and abused' realism to their models as deliberate. Your work is always clean and perfect and I never need to imagine what something 'should' look like. Ok... enough smoke being blown up there Did you make your own pintles and braces?
Ron
Did you make your own pintles and braces?Ron

...continue with the anchor and buoy. I use cast anchor provided in the kit however made my own stock out of black hornbeam. I thought anchor without a buoy would look lonely so I made my own. to complement anchor and buoy I made rope. Still learning to make a better one...


and buoy...


to be continued...
and buoy...
to be continued...
Hi Jim,
You do have a very good eye for detailing. These gratings are sublime, especially if you keep the relative small scale in mind. Thumbs up.
You do have a very good eye for detailing. These gratings are sublime, especially if you keep the relative small scale in mind. Thumbs up.
A fully agree with the word of the others - very good eye for the details and accurate work -> Keep on going and showing us much more of your work and methods
This is purely outstanding build. Not only a build log, but a tutorial showing each step. I must remember the copper. Fantastic. All of it.
Greetings fellow shipmates! Thanks all for your visit and the kind comments!! Ok Today, I will continue my last week post with a brief update on Channel, chain plates and deadeyes. All of the Woodies supplied parts for channels, chain plates and deadeyes I opted out. Channels where white wood and would require to paint (not an option for Jim), deadeyes where plastic and chain plates were much simplified.


I thought, if there is a place for modifications – this should be the one for sure. Channels made out of Ebony. Chain plates links made out of brass wire soldered in a loop. Then it was formed as a plate and soldered. Using the jewelry wise I bent 45 degrees bolt hole and blackened all.


.jpeg")
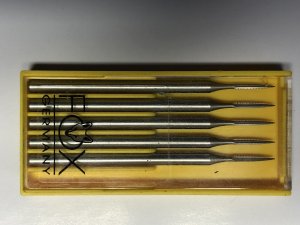
I saw in a number of models, were builders neglected to properly shape deadeyes and\or blocks holes. It is not that difficult, but makes rope flows naturally. I use one of these burs to shape the holes of deadeyes.


To be continued... Thank you!!
I thought, if there is a place for modifications – this should be the one for sure. Channels made out of Ebony. Chain plates links made out of brass wire soldered in a loop. Then it was formed as a plate and soldered. Using the jewelry wise I bent 45 degrees bolt hole and blackened all.
I saw in a number of models, were builders neglected to properly shape deadeyes and\or blocks holes. It is not that difficult, but makes rope flows naturally. I use one of these burs to shape the holes of deadeyes.
To be continued... Thank you!!
Attachments
Last edited:
Again Jim a great upgrade in small details.
Thank you, @janos These are Krause shape burs (made in Germany). Here is the e-bay link I bought.
Bur Shape: Krause - Pointed
- Shank - Shaft Size: 3/32" - 2.32mm
- Material: Tungsten Vanadium Steel
- Overall Length: 1-3/4" - 44mm
- Size ISO # and Diameter: 010- 1.0mm
- Packaged: 6 Pieces in Plastic Box
Bur Shape: Krause - Pointed
- Shank - Shaft Size: 3/32" - 2.32mm
- Material: Tungsten Vanadium Steel
- Overall Length: 1-3/4" - 44mm
- Size ISO # and Diameter: 010- 1.0mm
- Packaged: 6 Pieces in Plastic Box