
Good morning Rob. Coming along nicely. As always I enjoy all the detail you include. Enjoy your holiday. CHeers GrantThe other side of age ship is now done.
View attachment 553341
After that I seized the shrouds (each loop to itself) just below the fighting platform. That tightened things up a bit and straighten out the shrouds. It should make it easier to ratline.
View attachment 553343
I am happy how things are shaping up.
View attachment 553344
Before I ratline, I will be installing the Bentinck shrouds which go through the main shrouds. I am not going to do it using the method shown in the book. It looks way too clumsy. I will be doing it more like Tom Culb did it without many of the out of proportion thimbles the instructions would have you use.
I will be going on vacation for the next few weeks. I look forward to doing more work on this great cross section when I return!

-

SUBSCRIBE TO SHIPS IN SCALE TODAY!
The beloved Ships in Scale Magazine is back and charting a new course for 2026!
Discover new skills, new techniques, and new inspirations in every issue.
NOTE THAT OUR NEXT ISSUE WILL BE July/August 2026 -

Win a Free Custom Engraved Brass Coin!!!
As a way to introduce our brass coins to the community, we will raffle off a free coin during the month of August. Follow link ABOVE for instructions for entering.
You are using an out of date browser. It may not display this or other websites correctly.
You should upgrade or use an alternative browser.
You should upgrade or use an alternative browser.

Thank you!Wow! Thanks for sharing. Very nice work.
View attachment 556783
As always Grant thank you for your enthusiasm and helpful input!Good morning Rob. Coming along nicely. As always I enjoy all the detail you include. Enjoy your holiday. CHeers Grant
Rob
Back from 4 weeks in sunny Tucson. Great town with lots to do. A bit warm in the summer! I spent a bit of time there constructing a small workshop in my garage and started a model of the Bluenose there. But that will be for another build log.
Before I work on the Bentinck shrouds (also called the futtock shrouds) I did the final seizing of the main shroud and cut off the excess shroud line to straighten things up and make it a bit less confusing,
I am fairly new to all of this and I have to say the most frustrating part of the work so far is the rigging. Specifically seizing lines. It always seems that when I want to make a loop, the line will want to loop the opposite way, when I put a line through another line it will find a way to pop out, the line will always find a way to snag itself around a pin or clamp I don't want it to.
I think a PhD candidate in engineering or physics could get a decent dissertation out of examining how all this occurs. Sometimes it feels as if the line is actually alive and trying its best to defeat me!
But enough of that. Here are two pictures of the finished off sides. I am still unsure of what to do with the swifter lines coming out of the block and tackle.


Before I thread the Bentinck shrouds through the main shrouds I want to put the futtock staves in place. There are 1/32" brass rods that get seized to the main shrouds right above the Bentinck shrouds. To make sure I place them correctly I placed a piece of line from the middle eyebolt on the bottom of the fighting station to the eyebolt on the deck where the Bentinck shrouds will be secured. I then seized the futtock tape right above that line.

Before I work on the Bentinck shrouds (also called the futtock shrouds) I did the final seizing of the main shroud and cut off the excess shroud line to straighten things up and make it a bit less confusing,
I am fairly new to all of this and I have to say the most frustrating part of the work so far is the rigging. Specifically seizing lines. It always seems that when I want to make a loop, the line will want to loop the opposite way, when I put a line through another line it will find a way to pop out, the line will always find a way to snag itself around a pin or clamp I don't want it to.
I think a PhD candidate in engineering or physics could get a decent dissertation out of examining how all this occurs. Sometimes it feels as if the line is actually alive and trying its best to defeat me!
But enough of that. Here are two pictures of the finished off sides. I am still unsure of what to do with the swifter lines coming out of the block and tackle.
Before I thread the Bentinck shrouds through the main shrouds I want to put the futtock staves in place. There are 1/32" brass rods that get seized to the main shrouds right above the Bentinck shrouds. To make sure I place them correctly I placed a piece of line from the middle eyebolt on the bottom of the fighting station to the eyebolt on the deck where the Bentinck shrouds will be secured. I then seized the futtock tape right above that line.
Since the Bentinck shrouds will interfere with any placement of ratline above the futtock starves, I rat lined the main shrouds above the futtock starves.

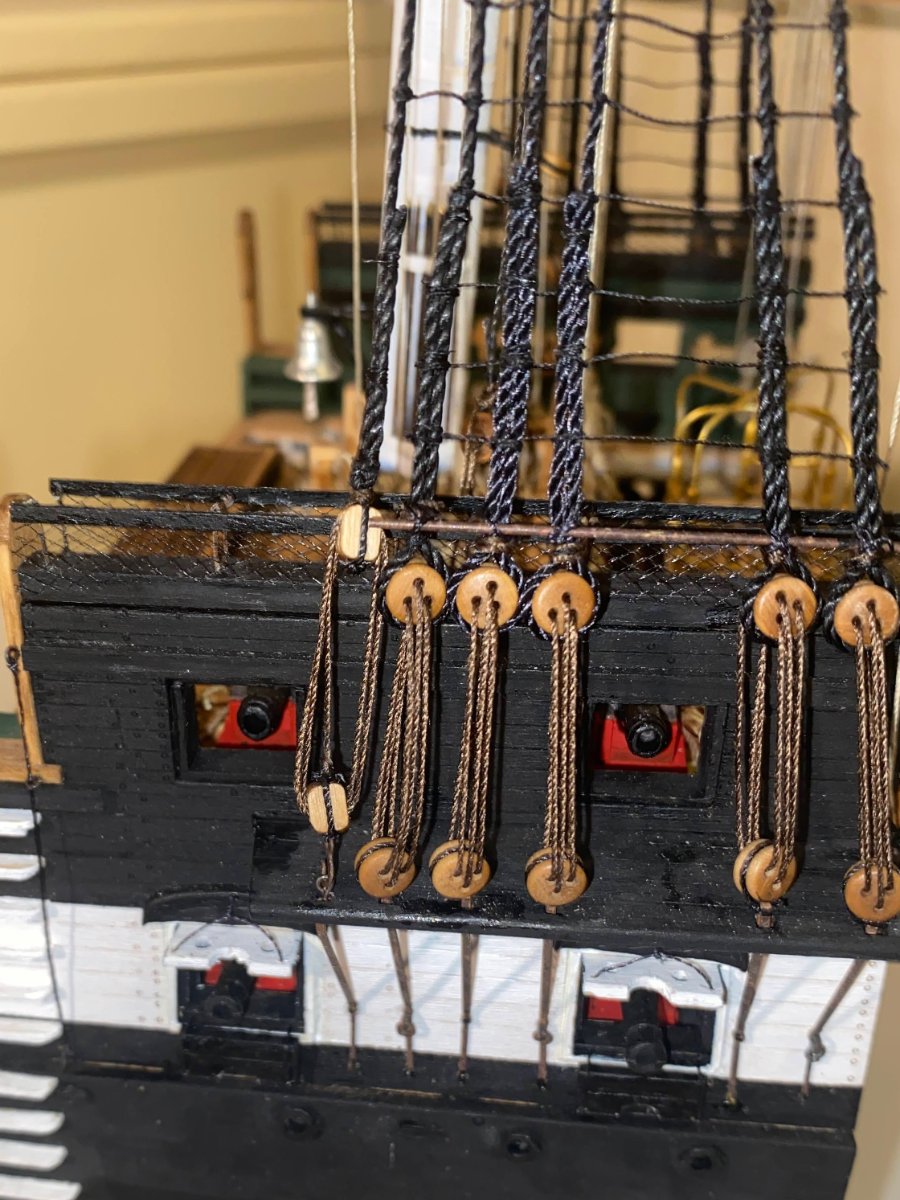
At the bottom of each Bentinck lines are a bullseyes that are lashed to another bullseye that is anchored to the waterway of the spar deck. Unfortunately, I can find only one bullseye of the proper size in my kit. Instead of waiting a couple of weeks to have Model expo ship me more bullseyes. I have decided to use some of the thimbles that are included. They are about the same size and should work well.
At the bottom of each Bentinck lines are a bullseyes that are lashed to another bullseye that is anchored to the waterway of the spar deck. Unfortunately, I can find only one bullseye of the proper size in my kit. Instead of waiting a couple of weeks to have Model expo ship me more bullseyes. I have decided to use some of the thimbles that are included. They are about the same size and should work well.
I assembled the lines for the Bentinck shrouds. I seized two hooks on each end of 4 lines about 4" long and a hook on each of a line about 1/2 that length. On the other end of the single hook line I seized a loop. I used this to loop around the thimble.


I then threaded the lines through the main shrouds and attached the hooks to the eyelets on the bottom of the fighting top. I tried various combinations of line placement since the length of each line is close but not exactly the same. I found a combination that resulted in suitable tight lines and used a drop of CA to secure the hooks into the eyelets.

This (so far) is actually working out better than I thought it would. Now to secure the other ends!
I then threaded the lines through the main shrouds and attached the hooks to the eyelets on the bottom of the fighting top. I tried various combinations of line placement since the length of each line is close but not exactly the same. I found a combination that resulted in suitable tight lines and used a drop of CA to secure the hooks into the eyelets.
This (so far) is actually working out better than I thought it would. Now to secure the other ends!

Rob, I for one am so grateful for your build log, so many helpful instructions and insights. I found this site and your build late in my build. I have uploaded some photos of the lower mast tacklefall (page 61). Right wrong black or white, I tucked the "lanyard" from the triple block under the double block and seized. I know you used two double blocks but maybe the concept could be the same?
Unfortunately the photos from dropbox rotated on my end.
Cheers Mike


Unfortunately the photos from dropbox rotated on my end.
Cheers Mike
Mike,Rob, I for one am so grateful for your build log, so many helpful instructions and insights. I found this site and your build late in my build. I have uploaded some photos of the lower mast tacklefall (page 61). Right wrong black or white, I tucked the "lanyard" from the triple block under the double block and seized. I know you used two double blocks but maybe the concept could be the same?
Unfortunately the photos from dropbox rotated on my end.
Cheers Mike
View attachment 561591
View attachment 561592
Thank you for your suggestion. I believe I may follow your example!. I did use 2 double blocks, but as I said in the log, I "cheated" and made a pseudo triple block by reaving the line through the 3rd hole in the lower double block. I am so glad you have found my build log of use. I have to say I really enjoy putting down what I have been doing, and I think most importantly, going over the errors I have made and how I have tried to correct them!
Rob
I used a heavy clamp to put tension onto the Bentinck shrouds. I then put in ratlines.

Then other end of the Bentinck shrouds consists of a hook that goes into an eyelet on the waterway of the spar deck, a short length of line and a bullseye. Since my bullseyes were lacking I used some left over thimbles.

I then seized some lines that will be used as a lashing between these thimbles and a thimble on the other end of the shroud.

These short pieces were hooked onto the eyelets and fixed with a small drop of CA while using some tension to hold the thimbles up until the glue set.
I then seized thimble on the ends of the Bentinck shrouds. You may note I used a sewing clip on one of the shrouds. I have just gotten these after seeing others use them. They are inexpensive (100 for $7 on Amazon) and hold items well. They are easier to use than the alligator clips and weigh less. I think they will be useful for holding things when rigging.

After seizing the thimbles I used the line I put on the lower thimble to lash the two together. I tried to keep tension on the lines as I did the lashing and fixed things in place with CA. Finally the Bentinck shrouds were completed!

Then other end of the Bentinck shrouds consists of a hook that goes into an eyelet on the waterway of the spar deck, a short length of line and a bullseye. Since my bullseyes were lacking I used some left over thimbles.
I then seized some lines that will be used as a lashing between these thimbles and a thimble on the other end of the shroud.
These short pieces were hooked onto the eyelets and fixed with a small drop of CA while using some tension to hold the thimbles up until the glue set.
I then seized thimble on the ends of the Bentinck shrouds. You may note I used a sewing clip on one of the shrouds. I have just gotten these after seeing others use them. They are inexpensive (100 for $7 on Amazon) and hold items well. They are easier to use than the alligator clips and weigh less. I think they will be useful for holding things when rigging.
After seizing the thimbles I used the line I put on the lower thimble to lash the two together. I tried to keep tension on the lines as I did the lashing and fixed things in place with CA. Finally the Bentinck shrouds were completed!
Nice detailing, Rob. This cross section is turning out great!
Thank you. This has been a lot of fun. I have learned a lot. I am so glad to have found this hobby and this wonderful site filled with great people.Nice detailing, Rob. This cross section is turning out great!
The next step is to ratline the shrouds. In order to break the monotony of the rat lining, I will work on the rigging of the masts as I ratline. First off I seized two lengths of the 1/32" brass rods that I blackened using brass black to the area right above the dead eyes to act as shear poles. Of note the shear poles do not extend to or attach to the lower mast fall tackle (the swifter).

I test fitted the royal yard to make sure it was parallel to the rest of the cross section. It is held in place by a short piece of brass pin which bent a bit to get the yard to the alignment I wanted.

Royal lift lines were then attached to the eyebolts at the ends of the royal lift, making sure there was more than enough to reeve through the single blocks to the fife rail. These were coiled up and secured with a bit of tape. The royal halliard line I had previously placed making sure it was installed below the wire that runs through the jackstays eyelets. The other end of the halliard will be stropped to a double block which will then be part of a block and tackle called the jig tackle which will eventually be attached to one of the eyebolts on the starboard deadeye channel. I will take pictures of this as I do it to help future builders. I have to say Tom Culb's building log shows this in wonderful detail which I have found to be a great help.
 modelshipworld.com
Here is the yard with the 3 lines attached.

I test fitted the royal yard to make sure it was parallel to the rest of the cross section. It is held in place by a short piece of brass pin which bent a bit to get the yard to the alignment I wanted.
Royal lift lines were then attached to the eyebolts at the ends of the royal lift, making sure there was more than enough to reeve through the single blocks to the fife rail. These were coiled up and secured with a bit of tape. The royal halliard line I had previously placed making sure it was installed below the wire that runs through the jackstays eyelets. The other end of the halliard will be stropped to a double block which will then be part of a block and tackle called the jig tackle which will eventually be attached to one of the eyebolts on the starboard deadeye channel. I will take pictures of this as I do it to help future builders. I have to say Tom Culb's building log shows this in wonderful detail which I have found to be a great help.
USS Constitution by TomCulb - FINISHED - Model Shipways - 1:76.8 - cross-section
As far as I know this is the first log on this site for Model Shipways’ cross section of the USS Constitution. I bought the kit last summer, when I think it was pretty newly released, and when I was about midway through my Spray build. I have never done a cross section, and I was attracted to the...
modelshipworld.com
Here is the yard with the 3 lines attached.
Last edited:
The ratlining is going slowly but steady. I am doing a few on each side, making sure they are even then applying some dilute PVA glue to the knots, allowing them to dry and cutting off the excess line. I am currently using a different thread I picked up at Michaels. It is mostly cotton and is much more forgiving in it does not spring back as much as the previous line I used which was, I believe 70% polyester. I run the line through a damp sponge first and it makes it easier to work with. I am tying the line to the shroud using cow hitches. They are not as secure as a clove hitch but for this application they are fine, and easy to do.

I tried using two pieces of wood with the proper spacing for the lines, but I have found it cumbersome and certainly not a time saver.

however my biggest concern is the tension between the shroud line not to make the rat lines too slack or to pull in the shrouds getting an hourglass look. I mat redo some of the ratline after I finish doing the whole thing.

So far using the ratline scale provided on the plans seems to work the best for me.
I tried using two pieces of wood with the proper spacing for the lines, but I have found it cumbersome and certainly not a time saver.
however my biggest concern is the tension between the shroud line not to make the rat lines too slack or to pull in the shrouds getting an hourglass look. I mat redo some of the ratline after I finish doing the whole thing.
So far using the ratline scale provided on the plans seems to work the best for me.
Finally after several days (doing a few at a time), the rat lining is finished. I am planning on painting on a dilute white glue solution to stiffen things, but I have to say the lines are fairly straight. I think using the cow hitches worked well at this scale and eased the work. It was also a good idea to do the rat lining on the top of the shrouds before the futtock shrouds were installed. it would have been next to impossible to do with the futtock shrouds in the way.


Following the suggestion of Jeff T in his build log, before I install the yards I will install the main sling and the upper triple blocks for the preventer slings of the main yard. I am using 1mm brown/black line from the Ropes of Scale company which are vastly superior to the line provided. I first used a drill bit to make a loop on one end of the line. I then set the line in place and measured where the thimble should go. The thimble was then seized to the line.

I set the line in place and secured the end temporarily with a piece of tape before I set the main yard in. This will allow me to adjust the length of the lanyard used to secure the two thimbles together. One on the sling and one of the main yard.

I set the line in place and secured the end temporarily with a piece of tape before I set the main yard in. This will allow me to adjust the length of the lanyard used to secure the two thimbles together. One on the sling and one of the main yard.
Well after taking a while to consider things, I believe it may be easier to secure the thimbles of the two slings with the yard off the ship and then thread the sling up and attach it to the mast when the yard is set into place.
I attached the preventer sling to the main yarn wrapping line through both thimbles. I also attached the 2 triple blocks along side the preventer sling. These all wrap inside the sling cleats on the front of the yarn and the lines are wrapped under the jackstay wire. Make sure the lines and blocks wind up behind the jackstay wire. In case you are interested these blocks are from Syren models and they are really well made and, as you can see, look great.
The instructions, I believe have incorrectly labeled these slings. The one labeled sling should be called the preventer sling. It was there, I gather, to hold the main yarn up in case the other 2 slings (properly called Jeers) were to fail. The other two slings that do the main lifting of the yard were called Jeers.

There will still be more lines wrapped in this tight space between the cleats for the truss tackle. These are lines used to hold the yard tight to the mast. This small area is full of blocks and lines going this way and that. It is a bit difficult to figure exactly where things go, but looking at other build logs is a big help.
The instructions, I believe have incorrectly labeled these slings. The one labeled sling should be called the preventer sling. It was there, I gather, to hold the main yarn up in case the other 2 slings (properly called Jeers) were to fail. The other two slings that do the main lifting of the yard were called Jeers.
There will still be more lines wrapped in this tight space between the cleats for the truss tackle. These are lines used to hold the yard tight to the mast. This small area is full of blocks and lines going this way and that. It is a bit difficult to figure exactly where things go, but looking at other build logs is a big help.
Last edited:
I stropped two double blocks to 2 small hooks and attached them to the mast in preparation for the truss take. I am a bit concerned if the double blocks can take large enough line to look realistic, but if necessary I can always use the larger double blocks supplied. They certainly do not look as good.

Kurt Konrath
Kurt Konrath
We are no longer shrouded in mystery on how you got all this done so nice and neat.
Great work, and I will for sure copy and print your build log for review before I begin my cross section.
Great work, and I will for sure copy and print your build log for review before I begin my cross section.