- Joined
- Nov 4, 2024
- Messages
- 30
- Points
- 48

A question for you Dom if you don't mind. I've seen pictures of many models with a fife rail both fore and aft of the fore mast.. Billings has both. Campbell only has the one in front. What does she have now.
 |
As a way to introduce our brass coins to the community, we will raffle off a free coin during the month of August. Follow link ABOVE for instructions for entering. |
 |
 |
The beloved Ships in Scale Magazine is back and charting a new course for 2026! Discover new skills, new techniques, and new inspirations in every issue. NOTE THAT OUR FIRST ISSUE WILL BE JAN/FEB 2026 |
 |


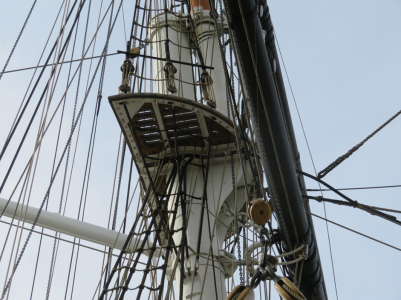
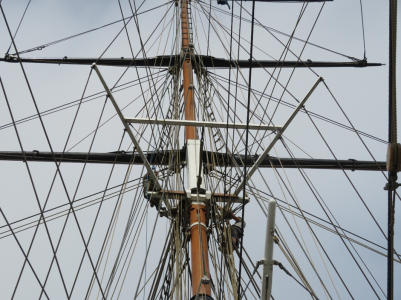
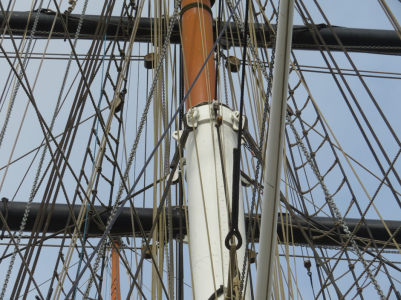

The 3 pictures showed a impressive amount of rigging, Dom. But the start is there with you nicely made mast parts.Part 33 Working on the Masts - Hit the Rocks - Again!
The ship has been temporarily “becalmed” for a few weeks while I was sorting out the garden ready for spring planting and doing some house projects (my new computer was also a complete PITA to set up after my old one died - it was 14years old so, I guess I was pushing my luck anyway!). Having made some progress on my other “projects” I tried to find a bit of time to work on model just to keep things ticking over. Things were going OK but then I struck a rock (well, a kidney stone) which left me low in the water!! I knew I had another one rattling around but it had not given me any trouble until now. It’s not as bad as the horrendous one that sent me to hospital at the end of 2023 so I am hoping it will pass without any surgical intervention! Hopefully, I will be back on course with a good wind behind me soon.
However, Clipper Captains were able to “ghost” their ships through the doldrums so to take my mind off things I have been working on the masts.
Lower Masts: with the dimensions decided as I discussed in Part 31 (b, c) the first thing was to prep. the lower masts dowels. The dowel sizes I decided on were 10mm for the Fore/Main (tapering to 7.5 mm) and 8.5mm (tapering to 7 mm) for the Mizzen. I had to buy some 10mm dowels for the Fore/Main which turned out to be not so easy because the usual suppliers did not have any long lengths in stock in a decent hardwood. I finally found some 1 m lengths on-line but when they arrived, they were all as straight as a dogs back leg! Not to be defeated, I put each dowel into a drill and ran it slowly so that I could find sections that were reasonably straight and then cut those out to use. I turned the ends down and fitted a brass sleeve which is a sliding fit for my socket size and then tapered the masts to the correct dimensions using my electric drill, a broad flat file and various grits of emery cloth.
Trestle Tops: I decided to make the tops from some solid wood. The actual tops are constructed from angle iron to form the frame with wooden slats on top (but wood will do!).
View attachment 514670
I cut the main shape from some 2 mm sapele and then milled some 1 mm slots to represent the slats. There are more slot/slats than I made but I could only go down to a 1mm diameter cutter and trying to put more slots into the wood would have made them very weak.
The Trestle Tree Tops: These consist of the tops, the cross trees and the spreaders for the upper backstays. There are also some fairleads on the after side of the rear cross tree.
View attachment 514671
Main Mast Upper Cross Tree and Spreaders
I made the tops by milling them from some solid basswood and used 3x1.5mm oak strip for the Cross Trees and Spreaders.
The Caps: on the ship the mast caps are constructed from iron bands. I did not have any suitable fittings, so I soldered different diameter brass tubes together to match the mast diameters and filed them to fit each mast section snugly.
View attachment 514672
Lower Main Top Cap
View attachment 514673
Fore, Main and Mizzen sections with cap bands and tops
Next Up: There are a lot of fittings that I need to add but at least I now have all the mast sections sized up correctly. I also need to make the cheeks and mast footings. One of the key things that I will need to treble check is the yard spacings so that they will match the sail set that I purchased from HisModel. I will index the sections and tops so that they will all align correctly when I make the final assembly. Once that is all done, I can paint and varnish all the parts and assemble.

I have this kit with fittings set and am due to go to Perth I June. Whereabouts are youHi Dom,
I too have this kit. Purchased it cheap on Facebook marketplace, but mine had the Fittings inside, all in the one box. What I am interested in is those sets of rigging you purchased and the photo etch decor. Did HiSmodel carry them as a standard pack/item? I will have to have a look at their site. I had a quick look and what a range they have! I will see if there is anything remotely like it here in Australia, but no doubt will have to reach out overseas.
Rob
That’s why she is somewhere on my list …… I love rigging.


| Yard Length | |||
| Tea rig | 1:75 | ||
| FORE | m | mm | |
| Fore course | 23.8 | 317.3 | Stunsail booms (2.75mm tapering to 2mm at the end) |
| Lower topsail | 20.7 | 276.0 | |
| Upper topsail | 19.5 | 260.0 | Stunsail booms (2.5mm tapering to 1.9mm at the end) |
| Topgallant | 14.6 | 194.7 | Stunsail booms (2.5mm tapering to 1.9mm at the end) |
| Royal | 11.6 | 154.7 | |
| MAIN | |||
| Main course | 23.8 | 317.3 | Stunsail booms (2.75mm tapering to 2mm at the end) |
| Lower topsail | 20.7 | 276.0 | |
| Upper topsail | 19.5 | 260.0 | Stunsail booms (2.5mm tapering to 1.9mm at the end) |
| Topgallant | 14.6 | 194.7 | Stunsail booms (2.5mm tapering to 1.9mm at the end) |
| Royal | 11.6 | 154.7 | Stunsail booms (2 mm tapering to 1.75mm at the end) |
| Skysail | 10.4 | 138.7 | |
| MIZZEN | |||
| Mizzen course | 18.3 | 244.0 | |
| Lower topsail | 16.5 | 220.0 | |
| Upper topsail | 14.6 | 194.7 | |
| Topgallant | 11.9 | 158.7 | |
| Royal | 10.1 | 134.7 | |
| Boom Lengths | |||
m | mm | ||
| Spanker | 15.8 | 211.0 | largest diameter 4mm (centre), tapering to 3mm at the fore and 2.8mm at the end |
| Spanker Gaff | 8.6 | 138 | largest diameter 3.7mm tapering to 2.4mm |
| Spencer Gaff | 5.8 | 93 | largest diameter 3mm tapering to 2mm |



Hi Kevin,Aahhh, the Lakes. I haven’t been there for quite a while but plan to revisit north yorks later this year.
I used 0.2mm brass rod for the jackstays, they looked great. I guess your challenge will be the eyelets. I’ll be following your rigging with great interest as one of the reasons I stalled was because it all started to look very complicated at this point, juxtaposing assembly with rope work.


| Yard Length | |||
| Tea rig | 1:75 | ||
| FORE | m | mm | |
| Fore course | 23.8 | 317.3 | Stunsail booms (2.75mm tapering to 2mm at the end). Swinging boom on forward bulkhead (approx. 12 m long – 160 mm at scale of fitted) |
| Lower topsail | 20.7 | 276.0 | |
| Upper topsail | 19.5 | 260.0 | Stunsail booms (2.5mm tapering to 1.9mm at the end) |
| Topgallant | 14.6 | 194.7 | |
| Royal | 11.6 | 154.7 | |
| MAIN | |||
| Main course | 23.8 | 317.3 | Stunsail booms (2.75mm tapering to 2mm at the end) |
| Lower topsail | 20.7 | 276.0 | |
| Upper topsail | 19.5 | 260.0 | Stunsail booms (2.5mm tapering to 1.9mm at the end) |
| Topgallant | 14.6 | 194.7 | Stunsail booms ((2.3mm tapering to 1.7mm at the end) |
| Royal | 11.6 | 154.7 | |
| Skysail | 10.4 | 138.7 | |

Every builder deserves a spacious workplace. Yours looks very good, Dom.Part 35: Progress on the Masts and Yards – Trying to Pick-up Where I Left Off!
It’s been a while since my last post. I had hoped to keep the build ticking over, but I just have had much too much “other stuff” to get done, so the ship sailed into the doldrums, and I just could not get back into the frame of mind to get underway again (I am sure other modellers have had the same problem!). However, things have now calmed down, and I am trying to get some wind back in the sails (also, the clocks have gone back, the weather has changed (for the worse!) and it’s Christmas Eve already!). Hopefully, I will steer this winter’s campaign back on course over the next few weeks but I was determined to get a post out before Christmas (just!).
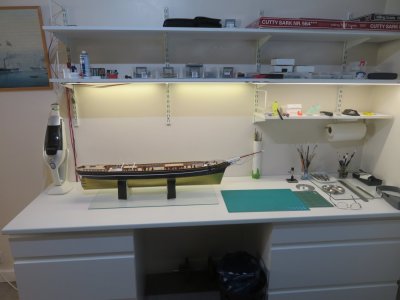
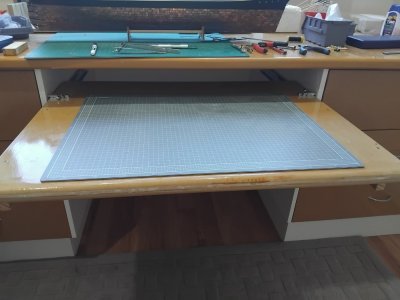
One of the first things I really had to do was to rearrange my hobby room so that I could extend my work top. The Cutty Sark took up nearly the full length of my old one and it was almost impossible to work on it without a lot of shuffling of bits and pieces and risking damage. I bought some inexpensive kitchen drawer cabinets and a work top which were OK for my needs. I also improved the lighting by adding some adjustable low profile LED lights under the shelf. The new lighting greatly improves things by providing a more natural light directly down onto the model which helps to remove shadows and isn’t harsh on my eyes (much better!).
View attachment 566008
It fits!
Back to the build!
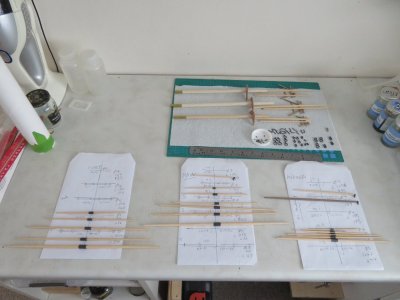
Foremast Yards: I made up some of the parts needed for the masts and yards some months ago, but I forgot where everything goes! To ease myself back into the build I am making up the yards and the stunsail booms. I mostly followed Longridge’s plans and cross-referenced to Cambell’s and Billing’s plans. I will included most of the bands, main blocks and tackles that I considered “necessary” for the rigging at this scale, but it is not comprehensive.
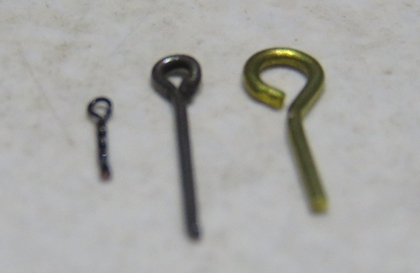
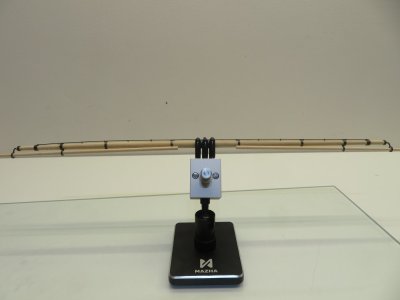
Jackstays: For the jackstays, I decided that 0.5mm blackened brass rod looked good enough without being too far over-scale (scale size would be 0.2mm) and they are stiff enough that I will be able to attach the sails to them. Longridge gives a description of the jackstay eyelets as being through-eye balls on a stem but at this scale small wire eyelets are quite sufficient! The number of eyelets used on the real ship was about 550 (rough count!) and I opted for 1/2, so I needed about 275 (plus the ones that vanished into the ninth dimension!) for all three masts. I tried a few methods to make the eyelets (waste of time!), but I ended up just twisting some 0.2mm blackened copper wire around a 0.5mm pin drill, dabbing the stem into some CA and cutting to length - you can see from the picture how small they are compared to standard 1 and 2mm eyelets - what a pain in the eyeballs!
View attachment 566011
I marked and drilled each yard so that the eyelets were evenly spaced just to the forward side and then slid the rod through them and fixed everything in place with some CA.
View attachment 566009
Jackstays
Stunsail Booms: Depending on which plans you are referring to, there are some differences. After checking all the plans (again), when she was tea-rigged (as far as I could find out), the sliding booms were fitted on the fore course, fore topgallant, main course, main upper topsail and main topgallant yards. To secure the tops of the fore course and main course, and the topgallant and main topgallant (to the royals), stunsail yards (short yards attached to the outer top of the stunsails) were used. There were no stunsails on the mizzen. Swinging booms were attached to the forward bulwarks by a gooseneck for rigging the bottom of the fore course stunsails which were swung out when the stunsails were in use and rested in a cradle on the bulwarks when not in use. Since I am not rigging the stunsails, I will not be fitting the swinging booms.
The revised table of yards and booms:
Yard Length Tea rig 1:75 FORE Fore course Stunsail booms (2.75mm tapering to 2mm at the end).
Swinging boom on forward bulkhead (approx. 12 m long – 160 mm at scale of fitted)Lower topsail Upper topsail Stunsail booms (2.5mm tapering to 1.9mm at the end) Topgallant Royal MAIN Main course Stunsail booms (2.75mm tapering to 2mm at the end) Lower topsail Upper topsail Stunsail booms (2.5mm tapering to 1.9mm at the end) Topgallant Stunsail booms ((2.3mm tapering to 1.7mm at the end) Royal Skysail
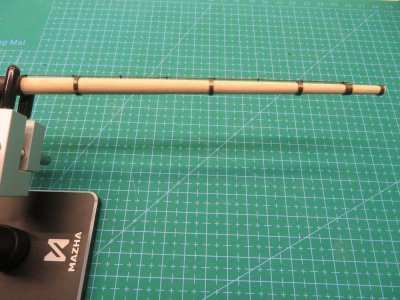
The stunsail booms are roughly half the length of the yard with a diameter proportionate to the yard they are rigged to. Boom-irons support each boom to the yards which are essentially eye rings with one extending from the end of the yard with an elbow and one on the yard approx. ¼ of the length of the yard from the end through which the boom can slip. When inboard the booms were lashed into place to prevent them moving out in bad weather. A boom-jigger was used to move the booms out which consisted of a pair of pullies, a single to an eyebolt on the inner end of the boom and a double attached to the outer yard arm iron. However, I will leave the boom-jigger rigging off the model to simplify things and I will lash the booms in place (good enough). The position of the booms on the yards is also somewhat ??? Cambell shows the booms below the fore and main course yards (as she is now) but Longridge shows the booms above the yards. Unfortunately, there are no definitive images of the ship in full tea-rig and in later service for the wool runs, the stunsails and booms were not used (when you look at images of the ship berthed in Sydney Harbour, the stunsail booms are not fitted to the yards because speed was not essential and they were too easily damaged). I decided to go with Campbell’s plans.
View attachment 566012
Main Course Yard with Jackstays and Booms (temp., needs adjusting when fitted to the mast before fixing)
Next up: with the jackstays done I will add all the necessary eyelets for the rigging blocks on the yards and then I will start dressing the masts with all the necessary iron work.
And of course:
Merry Christmas and a Happy New Year to Everyone!
View attachment 566014

Thanks Peter. Now that I have removed the barrier of work space I hope to make some good progress on the build.Every builder deserves a spacious workplace. Yours looks very good, Dom.
If this yard is the ‘first product’ on that place then it is the investment, then it is definitely worth the investment. Nicely detailed.
Regards, Peter

Hi Grant,Good afternoon Dom. Happy new year and best of luck for 2026. Cheers Grant


Hi Dom, Good to see you back and happy New Year. Been parked up myself. Went back working last May and when I got back home late Sept I had a list of projects to do around home. Now that summer is full on and we are hitting the high 30s regularly i am back to working on the beast in airconditioned comfort. Acquired 3D kit from Kevin, boats, fife rails etc, so I am pretty pleased with the improvement they make. Got block set and etchings from Hismodels so plenty to do. I will try and get a post up later in the month.
If I might make a suggestion regards your work space. put a shelf on drawer runners in where you sit. I find it a real advantage having a work area that is a bit lower. A couple of snib locks hold it in the open position.
View attachment 567921
