-

Win a Free Custom Engraved Brass Coin!!!
As a way to introduce our brass coins to the community, we will raffle off a free coin during the month of August. Follow link ABOVE for instructions for entering.
-

PRE-ORDER SHIPS IN SCALE TODAY!
The beloved Ships in Scale Magazine is back and charting a new course for 2026!
Discover new skills, new techniques, and new inspirations in every issue.
NOTE THAT OUR FIRST ISSUE WILL BE JAN/FEB 2026
You are using an out of date browser. It may not display this or other websites correctly.
You should upgrade or use an alternative browser.
You should upgrade or use an alternative browser.
Dansk Jagt/Sweden Yacht - (A.k.a Baltic “Hunt” Ship) - Yuanqing, 1:50. Project No. 4. [COMPLETED BUILD]
- Joined
- Sep 23, 2021
- Messages
- 262
- Points
- 168

Part 8 Fitting the Strakes and Decking
Leaving the false decks off made it very easy to clamp the rubbing strakes in the correct position on the hull without the need to pin them.
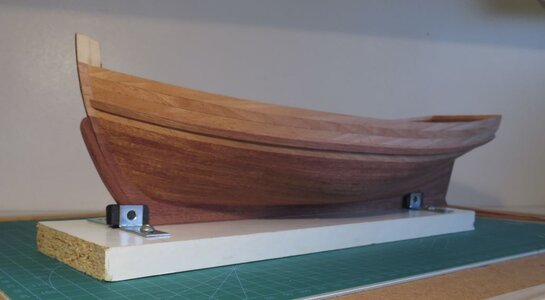
With the strakes attached I temporarily tacked the false decks into position so that I could cut off the stanchion extensions flush to the deck using a mini-razor saw blade.
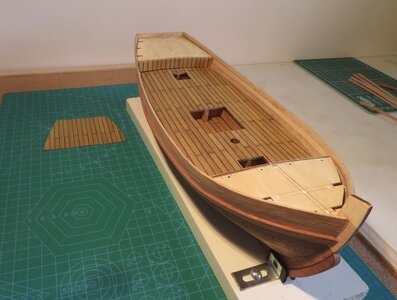
I removed the decks again so that I could clean up the inner bulwarks and then fixed them down in their final position and glued on the finished deck covering that I made in Part 3. With the decking all in place, I pasted some strips onto the inner bulwarks and finished off by bending some 3X2mm oak strips to form the edging pieces and glued them into position. Very pleased with how the decks look, the caulking thread does give a good effect but I don’t think I would use it on smaller scale models.
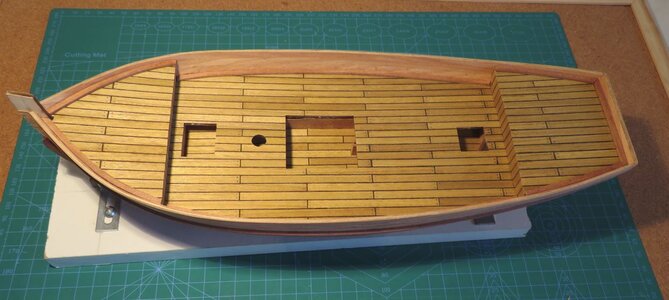
Pre-making the laminated covering saved a lot of effort, I think it would have been very messy and time consuming to have attempted to cut, trim and glue each strip individually and also add the caulking thread with the decks on the model.
The next steps will be to smooth down the hull planking ready for some coats of varnish, make up the hatch ways and fit the gunwales (but, it will be a little while until I can get around to working on the model again as I am heading off for a few days of hiking in the Cumbrian Fells ).
).
Leaving the false decks off made it very easy to clamp the rubbing strakes in the correct position on the hull without the need to pin them.

With the strakes attached I temporarily tacked the false decks into position so that I could cut off the stanchion extensions flush to the deck using a mini-razor saw blade.

I removed the decks again so that I could clean up the inner bulwarks and then fixed them down in their final position and glued on the finished deck covering that I made in Part 3. With the decking all in place, I pasted some strips onto the inner bulwarks and finished off by bending some 3X2mm oak strips to form the edging pieces and glued them into position. Very pleased with how the decks look, the caulking thread does give a good effect but I don’t think I would use it on smaller scale models.

Pre-making the laminated covering saved a lot of effort, I think it would have been very messy and time consuming to have attempted to cut, trim and glue each strip individually and also add the caulking thread with the decks on the model.
The next steps will be to smooth down the hull planking ready for some coats of varnish, make up the hatch ways and fit the gunwales (but, it will be a little while until I can get around to working on the model again as I am heading off for a few days of hiking in the Cumbrian Fells
- Joined
- Sep 23, 2021
- Messages
- 262
- Points
- 168

Part 9 Making the Hold/Cabin Hatchways and Hand Rails.
After a few days hiking in the English Lakeland Mountains the world seems a better place!

My wife with Bowfell in the distance.
I digress - back to the model: A little progress on fitting out the decks which was fairly straight forward work. I made the hold surrounds from offset pieces of 7x2mm strip which I bevelled and glued together to fit the deck openings. The covers were pre-cut and only needed the edges cleaning up. I started to assemble the cabin hatchways and found there was a slight problem with the laser cut parts being oversized because they had not allowed for the thickness of the wood on one side but it was an easy fix. The hatchway doors were a bit plain so I added some moulding details and also some door jams because the hatchways looked odd having just “doors”. I will make some handles and hinges later.
The model came with some laser-cut sapele handrails which were in two sections, but they didn’t look quite right. They also did not quite follow the curve of the hull and were a darker red in colour than the rest of the hull.
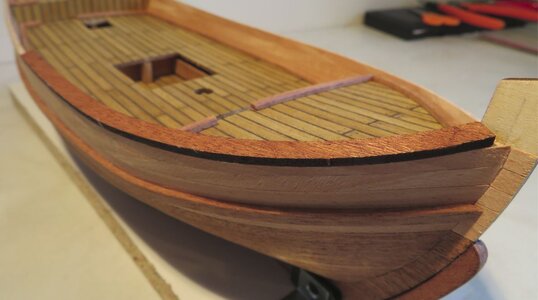
I could probably have steamed them to the correct shape and sanded them but I decided to use some lighter wood strips which were a little thinner and were a better colour match to the hull. To get the correct profile I used a flexicurve against the hull and transferred the curve to a piece of scrap wood and placed some short wooden dowels to bend the wood against.
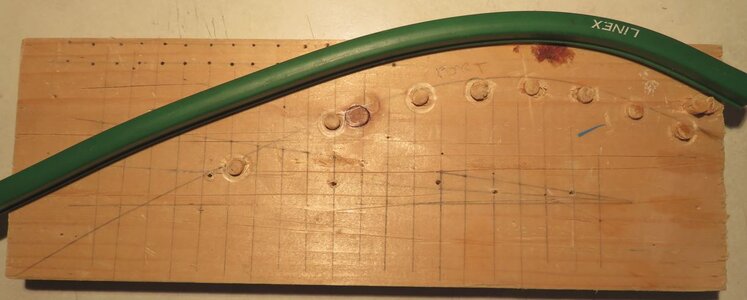
I ran a steam iron over the strips and gradually bent them to shape. It took a while to avoid splitting the wood but I was able to form each rail from one strip.
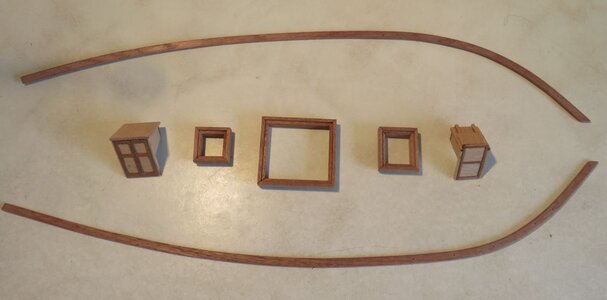
I always find fitting the rails to be troublesome. Keeping them in place exactly along the line of the bulwarks with the correct amount of overhang is a pain. I used some 0.5mm brass wire to pin through the rail along the centre-line of the bulwark so that I could slide the rail down the wire and into the correct position. I’ll trim the rails at the stern and complete the transom once everything is firmly in place.
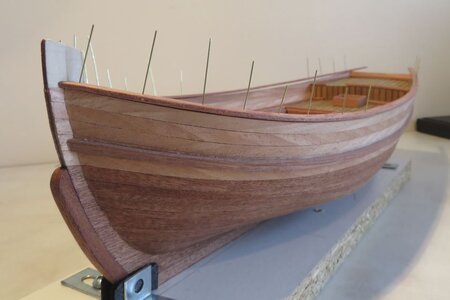
Final trial fitting out before I glue everything down.
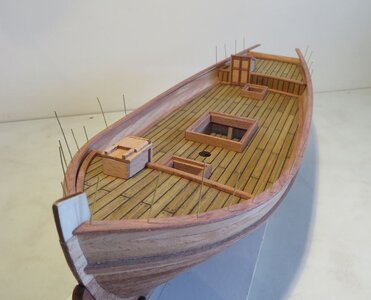
Once I have fixed the rails I will shape and fit the upper bow bulwarks and finish off the prow and then I can clean up the hull and seal it. I am not sure if I will tint the wood or just apply a clear sealant/varnish ( I'm not sure how the cherry wood strips will tint, any suggestions welcome).
All good, moving along (slowly).
After a few days hiking in the English Lakeland Mountains the world seems a better place!

My wife with Bowfell in the distance.
I digress - back to the model: A little progress on fitting out the decks which was fairly straight forward work. I made the hold surrounds from offset pieces of 7x2mm strip which I bevelled and glued together to fit the deck openings. The covers were pre-cut and only needed the edges cleaning up. I started to assemble the cabin hatchways and found there was a slight problem with the laser cut parts being oversized because they had not allowed for the thickness of the wood on one side but it was an easy fix. The hatchway doors were a bit plain so I added some moulding details and also some door jams because the hatchways looked odd having just “doors”. I will make some handles and hinges later.
The model came with some laser-cut sapele handrails which were in two sections, but they didn’t look quite right. They also did not quite follow the curve of the hull and were a darker red in colour than the rest of the hull.

I could probably have steamed them to the correct shape and sanded them but I decided to use some lighter wood strips which were a little thinner and were a better colour match to the hull. To get the correct profile I used a flexicurve against the hull and transferred the curve to a piece of scrap wood and placed some short wooden dowels to bend the wood against.

I ran a steam iron over the strips and gradually bent them to shape. It took a while to avoid splitting the wood but I was able to form each rail from one strip.

I always find fitting the rails to be troublesome. Keeping them in place exactly along the line of the bulwarks with the correct amount of overhang is a pain. I used some 0.5mm brass wire to pin through the rail along the centre-line of the bulwark so that I could slide the rail down the wire and into the correct position. I’ll trim the rails at the stern and complete the transom once everything is firmly in place.

Final trial fitting out before I glue everything down.

Once I have fixed the rails I will shape and fit the upper bow bulwarks and finish off the prow and then I can clean up the hull and seal it. I am not sure if I will tint the wood or just apply a clear sealant/varnish ( I'm not sure how the cherry wood strips will tint, any suggestions welcome).
All good, moving along (slowly).
- Joined
- Sep 23, 2021
- Messages
- 262
- Points
- 168

Part 10 Fitting out the Deck, a Useful Tool and a Visit to the Liverpool Maritime Museum
Still slow going - I’m not finding much spare time for the model (and now my garden is demanding much of that!) so, just a (little) progress update.
I made up the windlass and bowsprit supports so that I could fix the handrails and the upper bow bulwarks. The bowsprit is offset and rests in a cut-out on the port upper bulwark and is fixed to the prow by a bracket. The instructions were vague as to the dimensions and construction of the bowsprit supports but after a bit (a lot) of humming and harring I worked out how it should be done so that I could place them correctly and then make the cut-out in the bulwark in order to have the correct the angle on the bowsprit . Fortunately, the bowsprit is hinged at the support so I could take the pin out and put the bowsprit aside so that it was out of the way while I worked on the model (no risk of snapping it!).
The windlass assembly was straightforward but the plans did not show any information on the run for the anchor chain or if there should be some chain pots. The anchor chain exits the hull below the fore deck so I think there should be hawse pipes and chain pots to below the forward deck (I’m not sure). It may not be correct but I will add some small rings in front and behind the windlass for the chains to run though. After checking how windlasses should look I added some battens to the drum, some teeth for the clapper and a winding lever.
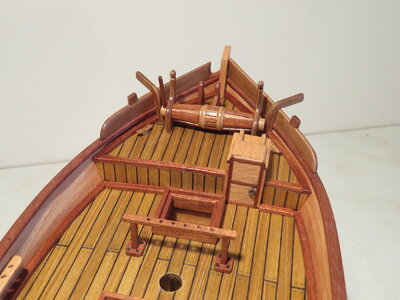
The laser cut wood for the small skylight on the rear deck was very brittle and broke easily. It was also quite thick and “clunky” so I made a new skylight from some thinner wood strips which looked much better. I also made a few other little additions to the model to add a bit of interest: some handle rings for the cabin hatchways which I blackened with brass black, a wooden fife rail to replace the suggested bent brass rod and a taffrail at the stern which I will use to attach the boom sheet.
I varnished the inner bulwarks while they were easy to access and then fixed the rails and upper bulwarks onto the hull. With that done I attached the rest of the deck fittings and cleaned up the hull with progressively 400, 600, and 800 fine grit paper. I sealed everything with clear semi-gloss acrylic without any tinting (3x coats on the outer hull sanded between coats with 1200 grit and 2x on the decks without sanding in order to give a slightly flatter finish.
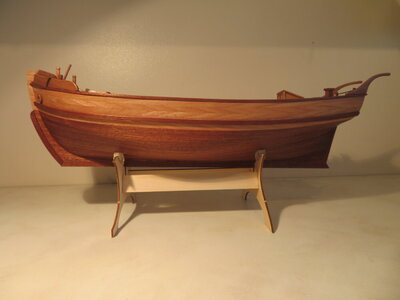
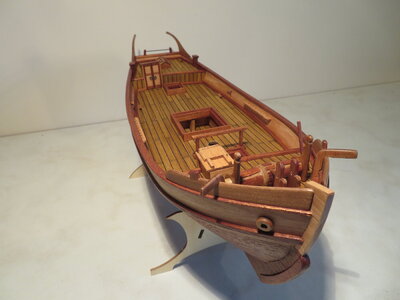
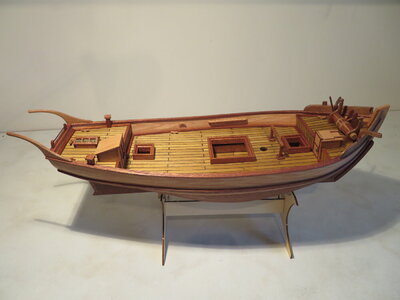
To finish off the hull I need to make a rudder, some rudder irons and also the chain plates and strops. The kit ones are OK, but I think I will use a slightly different design which I think will fit and look better. I will also make a nice stand as the kit supplied one is a bit “rubbish” but it is OK to use it as a build stand for now.
Coming along. Hopefully I will move onto the masts and rigging soon.
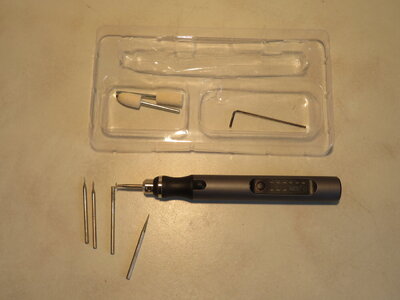
A really useful little tool
If anyone hasn’t come across these - I purchased a small USB grinding/cutting/polishing pen off ebay (£21) which I have found to be really useful and I can highly recommend buying one. It has three speed levels, is very light to use and it comes with seven bits. I have used it to make very fine cuts and alterations on fitted parts where it would be difficult to use normal cutting tools and blades and is far more easy and precise to handle than my Dremel. I think it would be really good for intricate carving use. The battery lasts about 10-20 mins depending on speed and load if used continuously, but you can power it from a USB C power supply if you don’t mind the cable (probably need to buy a longer, more flexible cable than the one supplied). Model is ANT-XIN D1, it takes 2.3mm shaft bits so it is easy to purchase a variety of cutting/drilling/grinding/polishing heads.
A visit to the Liverpool Maritime Museum
It has been a very long time since I last saw the Maritime Collections and back then the exhibits were displayed in the Main Liverpool Museum in the City Centre. In 1984 all of the Exhibits were moved to a refurbished warehouse on the riverside front as part of a dockside regeneration project. I have never visited the “new” museum so I made a quick visit to see what was on display. Liverpool has a rich maritime history stretching back over 800 years, it was home to the great transatlantic passenger liner companies Cunard and White Star and was one of the major shipping ports for the UK. The museum has been expanded to include a number of themed exhibitions (the latest being the Lusitania and Titanic Collections, The Battle of the Atlantic and the History of the Liverpool Docks spanning the past 300 years).
I had hoped to view the collection's models of which, there are over 750 examples spanning all ages and types. Most of the models were those of the builders and the ship owners but also sailor-made ones. The models were extremely fine and included full, half and water-line together with sections and engines. Sadly, I discovered that most of the models are not permanently exhibited now and only just a few selected models are displayed as part of the themed exhibitions. I have made a short slide show of those that were on display. For reference I purchased the catalogue of the models that are held in the collection (the models can be viewed on request) and I have included a few photographs from the pages of the catalogue for those interested.
View attachment Liverpool Maritime Museum.mp4
Still slow going - I’m not finding much spare time for the model (and now my garden is demanding much of that!) so, just a (little) progress update.
I made up the windlass and bowsprit supports so that I could fix the handrails and the upper bow bulwarks. The bowsprit is offset and rests in a cut-out on the port upper bulwark and is fixed to the prow by a bracket. The instructions were vague as to the dimensions and construction of the bowsprit supports but after a bit (a lot) of humming and harring I worked out how it should be done so that I could place them correctly and then make the cut-out in the bulwark in order to have the correct the angle on the bowsprit . Fortunately, the bowsprit is hinged at the support so I could take the pin out and put the bowsprit aside so that it was out of the way while I worked on the model (no risk of snapping it!).
The windlass assembly was straightforward but the plans did not show any information on the run for the anchor chain or if there should be some chain pots. The anchor chain exits the hull below the fore deck so I think there should be hawse pipes and chain pots to below the forward deck (I’m not sure). It may not be correct but I will add some small rings in front and behind the windlass for the chains to run though. After checking how windlasses should look I added some battens to the drum, some teeth for the clapper and a winding lever.

The laser cut wood for the small skylight on the rear deck was very brittle and broke easily. It was also quite thick and “clunky” so I made a new skylight from some thinner wood strips which looked much better. I also made a few other little additions to the model to add a bit of interest: some handle rings for the cabin hatchways which I blackened with brass black, a wooden fife rail to replace the suggested bent brass rod and a taffrail at the stern which I will use to attach the boom sheet.
I varnished the inner bulwarks while they were easy to access and then fixed the rails and upper bulwarks onto the hull. With that done I attached the rest of the deck fittings and cleaned up the hull with progressively 400, 600, and 800 fine grit paper. I sealed everything with clear semi-gloss acrylic without any tinting (3x coats on the outer hull sanded between coats with 1200 grit and 2x on the decks without sanding in order to give a slightly flatter finish.


To finish off the hull I need to make a rudder, some rudder irons and also the chain plates and strops. The kit ones are OK, but I think I will use a slightly different design which I think will fit and look better. I will also make a nice stand as the kit supplied one is a bit “rubbish” but it is OK to use it as a build stand for now.
Coming along. Hopefully I will move onto the masts and rigging soon.
A really useful little tool
If anyone hasn’t come across these - I purchased a small USB grinding/cutting/polishing pen off ebay (£21) which I have found to be really useful and I can highly recommend buying one. It has three speed levels, is very light to use and it comes with seven bits. I have used it to make very fine cuts and alterations on fitted parts where it would be difficult to use normal cutting tools and blades and is far more easy and precise to handle than my Dremel. I think it would be really good for intricate carving use. The battery lasts about 10-20 mins depending on speed and load if used continuously, but you can power it from a USB C power supply if you don’t mind the cable (probably need to buy a longer, more flexible cable than the one supplied). Model is ANT-XIN D1, it takes 2.3mm shaft bits so it is easy to purchase a variety of cutting/drilling/grinding/polishing heads.

A visit to the Liverpool Maritime Museum
It has been a very long time since I last saw the Maritime Collections and back then the exhibits were displayed in the Main Liverpool Museum in the City Centre. In 1984 all of the Exhibits were moved to a refurbished warehouse on the riverside front as part of a dockside regeneration project. I have never visited the “new” museum so I made a quick visit to see what was on display. Liverpool has a rich maritime history stretching back over 800 years, it was home to the great transatlantic passenger liner companies Cunard and White Star and was one of the major shipping ports for the UK. The museum has been expanded to include a number of themed exhibitions (the latest being the Lusitania and Titanic Collections, The Battle of the Atlantic and the History of the Liverpool Docks spanning the past 300 years).
I had hoped to view the collection's models of which, there are over 750 examples spanning all ages and types. Most of the models were those of the builders and the ship owners but also sailor-made ones. The models were extremely fine and included full, half and water-line together with sections and engines. Sadly, I discovered that most of the models are not permanently exhibited now and only just a few selected models are displayed as part of the themed exhibitions. I have made a short slide show of those that were on display. For reference I purchased the catalogue of the models that are held in the collection (the models can be viewed on request) and I have included a few photographs from the pages of the catalogue for those interested.
View attachment Liverpool Maritime Museum.mp4
- Joined
- Sep 23, 2021
- Messages
- 262
- Points
- 168

Part 11 Rudder and Rudder Irons
I ran into a problem while trying to fit the rudder. The gap between the rudder and the keel post was too large for the rudder and hinges to be positioned correctly. After taking some measurements and comparing them to the plan I found that there was an error in the keel size at the stern. The strips that form the transom are attached to the end of the false keel and the stringers but they obviously made a mistake and have not allowed for the thickness of the planks. As a result the transom sticks out further than it should by 2mm i.e. the thickness of the planking strips. This error would have only ever become apparent at this stage unless you were really experienced and on the ball! Had I realised there was a mistake I could have added 2mm to the stern post or, more correctly, reduced the length of the keel and stringers by the same amount but, that would need to be done before even making up the skeleton! Oh well - “fait accompli” - “c’est la vie!”. The only way to fix it was to make a new rudder with a small extension on the stern post side in order to close up the gap.
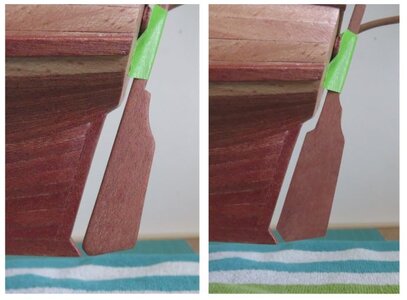
I also made a new tiller to fit the rudder. It was a straightforward fix but it was rather time consuming to get all the gaps correct and make sure that the tiller was positioned properly. With the gap corrected I made up a set of rudder irons from some 0.3 mm brass sheet and thin walled 1.7mm OD brass tube which I soldered together and then attached the rudder to the hull with some cut down 0.7mm blackened brass pins and varnished it up.
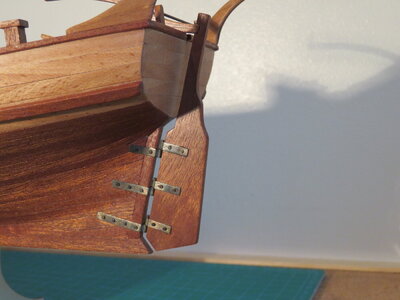
It was a little bit annoying to have found a major error in the construction at this point in the build but it was also a good exercise to find a work around and it all looks perfectly OK. The only job left for the hull is to make up some chainplate straps which I will do next and then I can move on to the mast and start the rigging.
I ran into a problem while trying to fit the rudder. The gap between the rudder and the keel post was too large for the rudder and hinges to be positioned correctly. After taking some measurements and comparing them to the plan I found that there was an error in the keel size at the stern. The strips that form the transom are attached to the end of the false keel and the stringers but they obviously made a mistake and have not allowed for the thickness of the planks. As a result the transom sticks out further than it should by 2mm i.e. the thickness of the planking strips. This error would have only ever become apparent at this stage unless you were really experienced and on the ball! Had I realised there was a mistake I could have added 2mm to the stern post or, more correctly, reduced the length of the keel and stringers by the same amount but, that would need to be done before even making up the skeleton! Oh well - “fait accompli” - “c’est la vie!”. The only way to fix it was to make a new rudder with a small extension on the stern post side in order to close up the gap.

I also made a new tiller to fit the rudder. It was a straightforward fix but it was rather time consuming to get all the gaps correct and make sure that the tiller was positioned properly. With the gap corrected I made up a set of rudder irons from some 0.3 mm brass sheet and thin walled 1.7mm OD brass tube which I soldered together and then attached the rudder to the hull with some cut down 0.7mm blackened brass pins and varnished it up.

It was a little bit annoying to have found a major error in the construction at this point in the build but it was also a good exercise to find a work around and it all looks perfectly OK. The only job left for the hull is to make up some chainplate straps which I will do next and then I can move on to the mast and start the rigging.
- Joined
- Sep 23, 2021
- Messages
- 262
- Points
- 168

Part 12 Chainstrap Plates
Just a bit of work needed to complete the hull. I cut some 2mm strips from 0.15mm brass shim to make the straps. With the brass being quite thin it was easy to position the straps at the correct angle on the hull and then fold the brass around the strakes with the end of a flat screwdriver so that they sat nicely in position. I drilled the straps carefully with my grinder pen (really liking this tool ) using a needle point in order to avoid dimpling the brass.
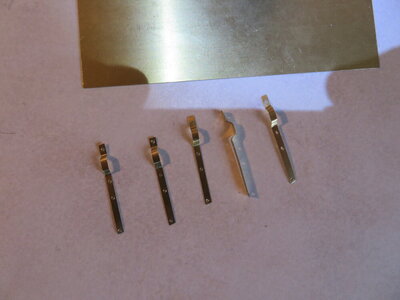
I blackened the straps with some brass black and then attached them to the hull with some blackened 0.7mm brass pins. I will strop the lower deadeyes to them with wire or some thread.
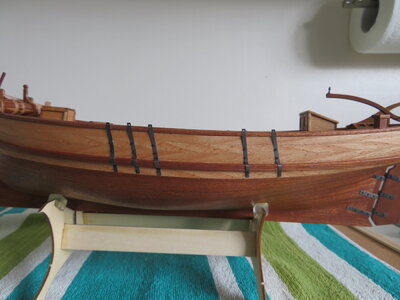
There are a couple of brackets that I need to make which will be attached to the hull for the bowsprit but I will do that once I have stepped the mast and started the rigging.
Next up: Assembling and stepping the mast and fitting the bowsprit.
Just a bit of work needed to complete the hull. I cut some 2mm strips from 0.15mm brass shim to make the straps. With the brass being quite thin it was easy to position the straps at the correct angle on the hull and then fold the brass around the strakes with the end of a flat screwdriver so that they sat nicely in position. I drilled the straps carefully with my grinder pen (really liking this tool

I blackened the straps with some brass black and then attached them to the hull with some blackened 0.7mm brass pins. I will strop the lower deadeyes to them with wire or some thread.

There are a couple of brackets that I need to make which will be attached to the hull for the bowsprit but I will do that once I have stepped the mast and started the rigging.
Next up: Assembling and stepping the mast and fitting the bowsprit.
- Joined
- Sep 23, 2021
- Messages
- 262
- Points
- 168

Part 13 The Spars
The spars were supplied pre-tapered and just needed trimming to the final size and fine sanding. I decided to replace most of the fittings with some home made ones as I thought they would look better. Fortunately this is such a simple ship that there were only a few bits to make. I replaced all of the wooden bands with blackened brass ones and I also changed the wooden striker for a brass rod to which I soldered a small spreader bar for the bowsprit shrouds to run. I made some new yokes for the boom and gaff to replace the kit ones (which were OK but I thought were a little small).
The instructions show a small hand-winch attached to the mast made from laser cut wood but I don’t know what it is for!
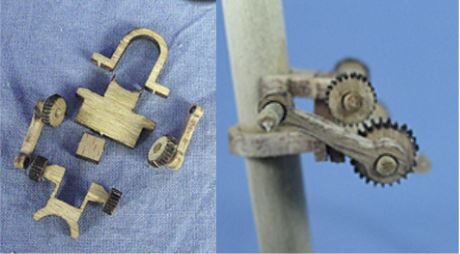
It doesn’t seem to be rigged to anything in the instructions or the plan so I don’t know if it is for raising the mainsail, the yard or for loading the cargo??? Any suggestions from the Forum welcome. I also don’t know how historically correct such a winch would be on a ship of this period/type? In any case, the laser parts broke easily and most of the gear teeth were so fine that they had burnt away. I was in two minds if I would bother to add the winch but because I want to use this model to practise making parts I thought I would make something. I rummaged through my bits and pieces and found some small brass gears salvaged from old toy motors. The gears looked about the right diameters and I cut them in half so that I had matching pairs for either side of the winch. I made up a wooden frame and a pair of handles with some brass rod for the spindles. I blackened the brass parts and assembled the winch and then made a hoop of brass bar to attach it to the mast (it even works).
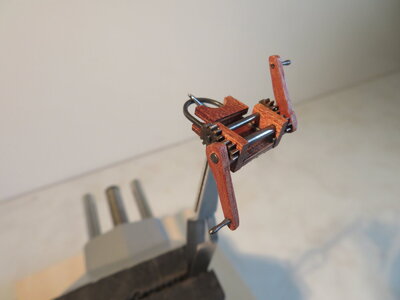
I think the spars are made of ramin wood (or similar) so I decided to tint them in order to match the hull. I used a cherry wood stain but it came out a little bit darker red than I wanted (never mind). I finished them with the semi-gloss varnish. There were no sail hoops in the kit but looking at pictures of the Olifant (as my reference), I can see that it has hoops for the mainsail. I liked the ones I bought for my Bluenose so I bought a set from Vanguard Models which look very nice. I fitted the bowsprit and made a small support bracket and also one for the bobstay at the prow. I added blackened eyelets for the rigging where needed.
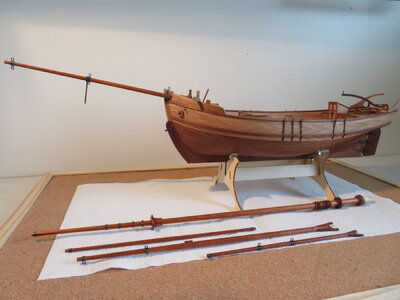
Next up: Stepping the mast and starting the rigging
The sails that came with the kit are reasonably well made and fit for purpose so I will go with them rather than make my own. I just need to add some rings for attaching them and some reefs on the mainsail and square sail. I will assemble the mast boom and gaff off the ship so that I can more easily attach the mainsail before stepping the mast. I will draw up a new rigging plan rather than follow the instructions in the kit. The plan shows a very basic rig with no pin numbering so I will look at my previous models and figure out something which would be more representative for a ship of this type.
All good, but summer is here and I have many other projects to do so I will only be dipping in and out of the shipyard for the odd hr or so over the next few weeks.
The spars were supplied pre-tapered and just needed trimming to the final size and fine sanding. I decided to replace most of the fittings with some home made ones as I thought they would look better. Fortunately this is such a simple ship that there were only a few bits to make. I replaced all of the wooden bands with blackened brass ones and I also changed the wooden striker for a brass rod to which I soldered a small spreader bar for the bowsprit shrouds to run. I made some new yokes for the boom and gaff to replace the kit ones (which were OK but I thought were a little small).
The instructions show a small hand-winch attached to the mast made from laser cut wood but I don’t know what it is for!

It doesn’t seem to be rigged to anything in the instructions or the plan so I don’t know if it is for raising the mainsail, the yard or for loading the cargo??? Any suggestions from the Forum welcome. I also don’t know how historically correct such a winch would be on a ship of this period/type? In any case, the laser parts broke easily and most of the gear teeth were so fine that they had burnt away. I was in two minds if I would bother to add the winch but because I want to use this model to practise making parts I thought I would make something. I rummaged through my bits and pieces and found some small brass gears salvaged from old toy motors. The gears looked about the right diameters and I cut them in half so that I had matching pairs for either side of the winch. I made up a wooden frame and a pair of handles with some brass rod for the spindles. I blackened the brass parts and assembled the winch and then made a hoop of brass bar to attach it to the mast (it even works).

I think the spars are made of ramin wood (or similar) so I decided to tint them in order to match the hull. I used a cherry wood stain but it came out a little bit darker red than I wanted (never mind). I finished them with the semi-gloss varnish. There were no sail hoops in the kit but looking at pictures of the Olifant (as my reference), I can see that it has hoops for the mainsail. I liked the ones I bought for my Bluenose so I bought a set from Vanguard Models which look very nice. I fitted the bowsprit and made a small support bracket and also one for the bobstay at the prow. I added blackened eyelets for the rigging where needed.

Next up: Stepping the mast and starting the rigging
The sails that came with the kit are reasonably well made and fit for purpose so I will go with them rather than make my own. I just need to add some rings for attaching them and some reefs on the mainsail and square sail. I will assemble the mast boom and gaff off the ship so that I can more easily attach the mainsail before stepping the mast. I will draw up a new rigging plan rather than follow the instructions in the kit. The plan shows a very basic rig with no pin numbering so I will look at my previous models and figure out something which would be more representative for a ship of this type.
All good, but summer is here and I have many other projects to do so I will only be dipping in and out of the shipyard for the odd hr or so over the next few weeks.
- Joined
- Sep 23, 2021
- Messages
- 262
- Points
- 168

Part 14 Stepping the Mast and Standing Rigging
Too many other things to do! I found a bit of time to work on the model between other jobs and first up was to sort out a (better) rigging plan. I looked at a number of reference sources and there are a number of rigs that can be used for a fore and aft gaff rigger with squaresail. My thoughts were that, as a working ship with minimum crew, they would have made the rigging as functional and as efficient as possible. On that basis I drew up a rigging plan that would be in keeping with this type of ship. I only needed a few extra rigging blocks and I bought some nice walnut belaying pins to replace the white metal ones in the kit but that was all.
The only work needed on the sails was to add some attachment rings and the reefs and they were good to go. I attached the main sail to the boom, gaff and the mast hoops and as much of the rigging as possible with the mast off the ship. I also rigged the squaresail and yard just for convenience and to reduce the chance of breaking something. I tinted the blocks and deadeyes and used some blackened 0.5mm wire to strop the deadeyes to the straps.
I rigged the bowsprit shrouds and added some blocks for the haul down lines before stepping the mast and attaching the fore stays and shrouds. Making progress, at least it now looks like a sailing ship! Still plenty to do but I am in the home straight.
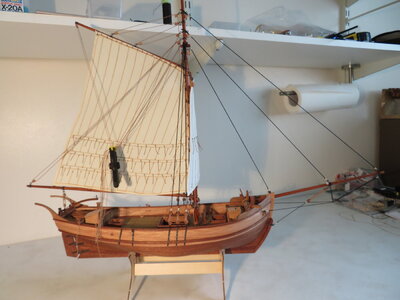
Next up: Fitting the jibs, running rigging and building the row boat
Too many other things to do! I found a bit of time to work on the model between other jobs and first up was to sort out a (better) rigging plan. I looked at a number of reference sources and there are a number of rigs that can be used for a fore and aft gaff rigger with squaresail. My thoughts were that, as a working ship with minimum crew, they would have made the rigging as functional and as efficient as possible. On that basis I drew up a rigging plan that would be in keeping with this type of ship. I only needed a few extra rigging blocks and I bought some nice walnut belaying pins to replace the white metal ones in the kit but that was all.
The only work needed on the sails was to add some attachment rings and the reefs and they were good to go. I attached the main sail to the boom, gaff and the mast hoops and as much of the rigging as possible with the mast off the ship. I also rigged the squaresail and yard just for convenience and to reduce the chance of breaking something. I tinted the blocks and deadeyes and used some blackened 0.5mm wire to strop the deadeyes to the straps.
I rigged the bowsprit shrouds and added some blocks for the haul down lines before stepping the mast and attaching the fore stays and shrouds. Making progress, at least it now looks like a sailing ship! Still plenty to do but I am in the home straight.

Next up: Fitting the jibs, running rigging and building the row boat
Dom, what is the wood on the upper five planks? Love the grain pattern.
Thanks, Ron
Thanks, Ron
- Joined
- Sep 23, 2021
- Messages
- 262
- Points
- 168

Hi Ron,Dom, what is the wood on the upper five planks? Love the grain pattern.
Thanks, Ron
They are cherry wood strips.
Dom
Hi Dom, I just caught up with your new Dansk Jagt build. I missed the start of it somehow, and by the time I reached the end of the second page I realised that you have all but finished it!Time for a new build (+ bonus video of a little holiday project at the end ).
Your work is very neat and precise and an inspiration for people like me to try and lift my game, and your rendition of the kinetic wave machine is remarkable! Looking forward to the remainder of this build

Last edited:
- Joined
- Sep 23, 2021
- Messages
- 262
- Points
- 168

Part 15 Jibs and Running Rigging
Fitting the jibs and the rest of the running rigging needed some thought (with a little bit of trial and error) as to which pins to belay the lines to. I adjusted or moved each line so that each run did not cross any other lines and looked “right” otherwise, it was a fairly straightforward process. The brass rings for the hanks supplied in the kit were made from 0.7mm wire and looked a little oversized and there were not enough for all three jibs at the correct spacing so I made a new set from 0.5mm brass wire which I blackened and used instead. I decided to set the jibs to port and used the pins on the bulwarks rather than tie them along the midline at the fife rail.
I was not sure about the braces for the yard as they did not have a good place to tie off. After looking at images of rigging on similar types of vessel, I decided that they should run as far back as possible. I added pendant blocks to the yard ends and an extra pair of cleats on the aft deck for the pulls. This used the pair of deck cleats intended for the row boat but I will use the bollards on the aft deck to tie up the row boat instead which will be OK and is probably a more sensible place anyway.
For the jib haul downs I will put a couple of coils on the ends of the ropes and hang them on the stanchions of the windlass and the bowsprit supports. So that they don’t get in the way I have just left them loose and will tidy them up after I fit the anchors and chains.
The other job left on the rigging was to tie the rat lines - always a pain in the eyeballs - I thought I was going to have it easy with only one set to do, but it was torture. Just as I started, the UK went into a heat wave hitting 40C ( normal for this time of year is 18-20C!). Hardly anyone in the UK has an aircon, so with the heat all I could do was a few minutes at a time.
I have left the ends of all the lines long for the moment and will tidy them up later because I want to make some hanks for the belays and some rope coils to put on the decks to add a bit of detail at the end.
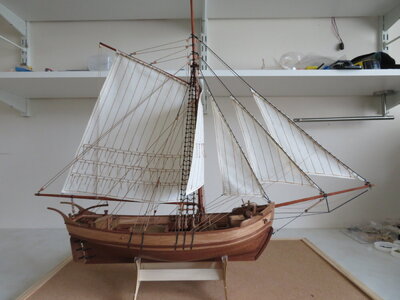
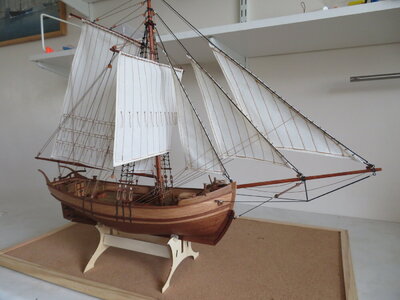
Next up: I have started the small row boat that hangs off the stern which I will finish off. I also decided that I will replace the ply hatch covers with solid wood to match the hull and hold surrounds. For the finishing touches I will make a nice stand, fit the anchors and add a few details on the deck and then I will be raising the flag. My next log entry will probably be the final part for this model.
Fitting the jibs and the rest of the running rigging needed some thought (with a little bit of trial and error) as to which pins to belay the lines to. I adjusted or moved each line so that each run did not cross any other lines and looked “right” otherwise, it was a fairly straightforward process. The brass rings for the hanks supplied in the kit were made from 0.7mm wire and looked a little oversized and there were not enough for all three jibs at the correct spacing so I made a new set from 0.5mm brass wire which I blackened and used instead. I decided to set the jibs to port and used the pins on the bulwarks rather than tie them along the midline at the fife rail.
I was not sure about the braces for the yard as they did not have a good place to tie off. After looking at images of rigging on similar types of vessel, I decided that they should run as far back as possible. I added pendant blocks to the yard ends and an extra pair of cleats on the aft deck for the pulls. This used the pair of deck cleats intended for the row boat but I will use the bollards on the aft deck to tie up the row boat instead which will be OK and is probably a more sensible place anyway.
For the jib haul downs I will put a couple of coils on the ends of the ropes and hang them on the stanchions of the windlass and the bowsprit supports. So that they don’t get in the way I have just left them loose and will tidy them up after I fit the anchors and chains.
The other job left on the rigging was to tie the rat lines - always a pain in the eyeballs - I thought I was going to have it easy with only one set to do, but it was torture. Just as I started, the UK went into a heat wave hitting 40C ( normal for this time of year is 18-20C!). Hardly anyone in the UK has an aircon, so with the heat all I could do was a few minutes at a time.
I have left the ends of all the lines long for the moment and will tidy them up later because I want to make some hanks for the belays and some rope coils to put on the decks to add a bit of detail at the end.


Next up: I have started the small row boat that hangs off the stern which I will finish off. I also decided that I will replace the ply hatch covers with solid wood to match the hull and hold surrounds. For the finishing touches I will make a nice stand, fit the anchors and add a few details on the deck and then I will be raising the flag. My next log entry will probably be the final part for this model.
- Joined
- Sep 23, 2021
- Messages
- 262
- Points
- 168

Part 16 “ Bits and Bobs”
Just a few things to finish off the model.
I am not sure what type of wood was used for the row boat but it was very porous, brittle and really difficult to glue (possibly coconut?). I eventually stuck everything together with copious amounts of CA but it was nasty! Because the glue soaked into the wood the tint would not take and it looked very blotchy. I eventually had to give the whole thing several coats of a dark varnish which was not ideal because it ended up looking “plasticky” but it was all I could do.
I was also not sure if brass black worked on white metal so I tried it and found that it only slightly darkened the metal. I thought it was probably because the tarnish layer was too thick so I used an acid wash solution to strip any surface oxides and then tried again leaving it in a stronger solution of the brass black for 10 minutes which worked very well. I blacked up the chains and made up some new stocks from solid wood rather than using the ply parts and made some bands from blackened brass strips.
I replaced the ply hold covers with solid wood ones. I liked the way that Olha did them on her < Carrack > so I made up some lifting rings and hinges from blackened brass wire.
There was a barrel included in the kit but I thought it would look better if I added a few different sized casks and barrels to go on the deck and in the holds so I purchased a few extras and tinted them in light oak stain and painted the bands. I also made up a new stand to replace the rather poor kit one and some access ladders.
For some finishing touches I will add a few hanks to the pins (I need to practice making a few). The only other thing left is the flag - spot the error with the one in the kit < Sweden? > but I may just recolour it with some thinned acrylic.
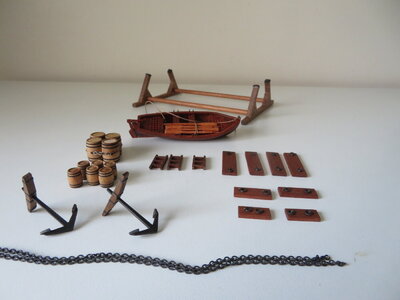
And that’s it for this one! I will sign off this build log here and will post a separate “completed build” once I have added the “Bits and Bobs” to the model.
Just a few things to finish off the model.
I am not sure what type of wood was used for the row boat but it was very porous, brittle and really difficult to glue (possibly coconut?). I eventually stuck everything together with copious amounts of CA but it was nasty! Because the glue soaked into the wood the tint would not take and it looked very blotchy. I eventually had to give the whole thing several coats of a dark varnish which was not ideal because it ended up looking “plasticky” but it was all I could do.
I was also not sure if brass black worked on white metal so I tried it and found that it only slightly darkened the metal. I thought it was probably because the tarnish layer was too thick so I used an acid wash solution to strip any surface oxides and then tried again leaving it in a stronger solution of the brass black for 10 minutes which worked very well. I blacked up the chains and made up some new stocks from solid wood rather than using the ply parts and made some bands from blackened brass strips.
I replaced the ply hold covers with solid wood ones. I liked the way that Olha did them on her < Carrack > so I made up some lifting rings and hinges from blackened brass wire.
There was a barrel included in the kit but I thought it would look better if I added a few different sized casks and barrels to go on the deck and in the holds so I purchased a few extras and tinted them in light oak stain and painted the bands. I also made up a new stand to replace the rather poor kit one and some access ladders.
For some finishing touches I will add a few hanks to the pins (I need to practice making a few). The only other thing left is the flag - spot the error with the one in the kit < Sweden? > but I may just recolour it with some thinned acrylic.

And that’s it for this one! I will sign off this build log here and will post a separate “completed build” once I have added the “Bits and Bobs” to the model.
- Joined
- Sep 23, 2021
- Messages
- 262
- Points
- 168

Hi Heinrich, Nomad,
thanks for the comments. I will post the completed build pictures in a couple of days. I just have to tie up the anchors and sort out the flag and I am done.
Hopefully I will have time to catch up on a few builds in the forum that I am following, so looking forward to seeing how HMS fly is doing!
My next build has now arrived in the Shipyard. I am not starting it for awhile but I will start a log with an "unboxing" soon (I think I might regret this one!!!)


